Transcription
Ambient Rigid Core Bamboo FlooringInstallation Instructions & GuidelinesImportant Pre-Installation NotesAll of our rigid core bamboo floors come with an attached acoustical pad (IXPE) on the underside of each plankand are meant to be installed via the floating method. *IXPE-backed flooring is not recommended for glue downinstallation and is not warranted if installed via this method; however, floors backed with cork underlayment arewarranted for glue down installation.*When your flooring is ordered, approximately 7% to 10% should be added to the actual square footage neededas allowance for cutting and waste.Natural/Visible Defects:Our flooring products are quality inspected before packaging and shipping. Nevertheless, the installer must usereasonable selectivity (common sense) to hold out, relocate in hidden places, or cut out pieces with glaringdefects, whatever the cause. Installation of any material serves as acceptance of that material and theManufacturer will not accept responsibility for flooring installed when it has visible defects. Should an individualflooring plank be doubtful as to grade, manufacture, milling, or factory finish, the installer should not use thatpiece. Ensure adequate lighting for proper inspection.Keep Packaging Intact:Do not discard carton packaging in the event that you need to return flooring. We only accept returns in originalpackaging.Using Tape on Bamboo Floors:The only tape approved for use on hardwood/bamboo floors and moldings is 3M/Scotchguard #2080 tape. Donot use any other tape (including blue painter’s tape), as it may cause finish to peel. Do not leave the tape onany finish surface for more than 6-10 hours or it will damage the finish.Warning About Mineral Spirits/Paint Thinner:The use of certain abrasive chemicals, including those in the list below, may irreparably damage your flooringfinish: paint thinner, mineral spirits, turpentine, acetone and Methyl Ethyl Ketone (MEK)ALWAYS test all cleaning agents on a sacrificial plank prior to use.Construction Paper:Do not cover the floors with construction paper or plastic for extended periods of time. Construction paper andother protective floor coverings have the potential to cause discoloration in wood and bamboo floors becausethey result in uneven light absorption. Plastic membranes may cause a build-up of humidity and can result incupping or other moisture imbalance problems.
The Cut Edges of Your Flooring:The cut ends of planks should only by placed at the edges of the installation and should be covered by perimetermoldings like baseboard or quarter round to prevent them being walked on. When a plank is cut on its sides orends, the exposed/cut edge is not warranted for foot traffic as it is not finished. Only full planks with microbeveled edges on all 4 sides should be laid in areas experiencing foot traffic.Run Limits:If your interior humidity settings will fluctuate more than 40% in a given year, your successive runs of rigid corebamboo (SPC core) flooring should not exceed 40 ft x 50 ft.Inspecting for Damage:Before installing or cutting a floor plank, inspect it carefully for damage BEFORE installation. If you see a defect,call Ambient for a possible refund or replacement. Our Claims/Returns department cannot accept any planksthat have been already installed and/or cut.Work Out of Multiple Boxes:Because there are variations in vinyl plank design, Ambient recommends blending floor planks from severaldifferent cartons during installation.Jobsite RequirementsOur rigid core bamboo flooring can be installed on, above, or below grade. Prior to installation of any flooring,the installer must ensure that the jobsite and subfloor meet the requirements of these instructions. Themanufacturer is not responsible for floor failure resulting from unsatisfactory jobsite and/or subfloor conditionsor failure to assess the situation properly. Room temperature and humidity of installation area should be consistent with normal, yearround living conditions for at least a week before installation.A room temperature of 60 degrees to 90 degrees Fahrenheit and humidity range of 40% to 70%are required.Flooring should be one of the last items installed on any new construction or remodel project. All work involvingwater or moisture should be completed before floor installation.Important Note About Crawlspaces:If you have a crawl space under your home or new flooring, we recommend sealing the space (prior to installingthe new floors) using the following guidelines: There must be a ground layer cover of 6 to 20 mil BLACK polyethylene film with joints overlapping atleast 6 inches, and sealed with moisture-resistant tape, or any recommended puncture-resistantmembrane, such as Class C, meeting ASTM D-1745.There must be a minimum of 18′′ from the ground to underside of joists and it should have perimeterventing equal to at least 1.5% of the crawl space total square footage. The vents should be properlyplaced for cross ventilation.Acceptable Subfloor Types & ConditionsIt is acceptable to install rigid core bamboo floors over most types of hard-surface flooring; as long as theexisting floor has a clean, dry, flat, surface that is in good structural shape. Use T-moldings at doorways and forany span greater than 40’ in any direction. If installing this flooring over a sheet vinyl floor surface, the existing
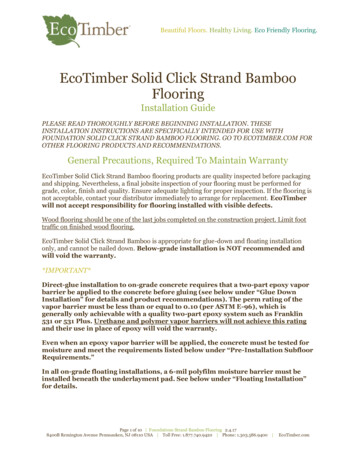
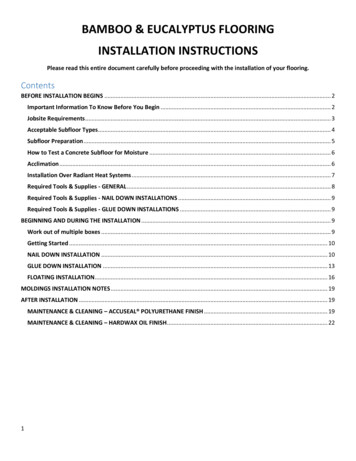
floor should have little cushion from soft underlay or substrates. Too much cushion can compromise thestrength of our product. NEVER install our rigid core bamboo flooring over ANY type of carpet.Subfloor PreparationTo ensure a successful installation of your rigid core bamboo flooring, properly prepare your subfloor byensuring it is clean, dry, flat, and in good structural shape. The required flatness of the subfloor is 3/16" per 10'radius Thoroughly sweep subfloor free of all debris, wax, oil, paint, curing agents and other contaminants thatwould interfere with adhesive bond. Ensure subfloor is level - flat to 3/16" per 10-foot radius or 1/8" per 6-foot radius and firm. If subfloor isnot level, sand down high spots and fill low spots with Portland-based compound and allow it tocompletely dry and cure before installationEnsure subfloor is dry and that it remains dry year-round. The moisture content of a wood subfloor mustnot exceed 12%.Ensure subfloor is structurally sound and well-secured.For all types of installation, joints should be staggered 10" to 20". Laying the flooring across the floor joists isrecommended.Concrete Slabs:If installing on concrete, ensure the concrete slab never exceeds 20 lbs. per 1000 sq. ft. of moisture. When moldis present in your home, it can become a health hazard, especially for someone with allergies, asthma, orbreathing problems. It can also lead to irritation of the eyes, skin, nose, throat, and lungs. Ambient cannot beheld for these moisture-related Issues. General guidelines suggest installing a 6 mil polyfilm over concretesubfloors to prevent moisture from contacting the floors.Asphaltic "cut-back" adhesive residues should be completely removed prior to the installation. It is the installer'sresponsibility to test concrete and subfloors for excessive wetness and plan their materials and installationaccordingly.AcclimationOur rigid core bamboo flooring (SPC core) floors only require an acclimation period of 24 hours prior toinstallation. If you are installing these floors in an excessively dry or excessively humid climate, we recommendacclimating for 3 full days (72 hours). Acclimation should be completed following the guidelines below:
***Note: Our Rigid Core flooring (boxes) CAN be acclimated over concretewithout the need for/use of a 6mm plastic membraneas long as the concrete doesn’t emit more than 15lbs moisture.
Installing Your Rigid Core Bamboo FloorsThe FLOATING method is used when installing rigid core bamboo (SPC core) flooring. Cabinets or fixed objectsshould not be installed on top of these floors. These bamboo floors require proper expansion space,undercutting of all door jams, and prohibits fastening wall moldings and transition strips to SPC core flooring.Required Tools and Materials:Before you begin installation of your flooring, be sure you have access to the following list of tools: Safety Glasses Utility Knife Tape Measure Tapping Block Jigsaw T-Square Miter/Table Saw Pull Bar Rubber Mallet ¼” Spacers Dust Mask Vacuum or BroomQuick Tips for Successful Installation:To avoid scratching your floor, be sure to use felt pads when moving furniture. Place large or heavy furnitureand appliances on non-staining floor protectors. Ball-type castors can damage your floor and are NOTrecommended.If your furniture has wheels or castors on them, make sure the wheels or castors are: Clean and free of debrisAble to roll and swivel easilyLarge surface wheels or castorsSuitable for resilient-type flooringNon-staining
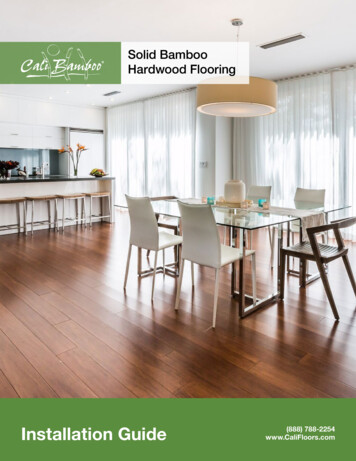
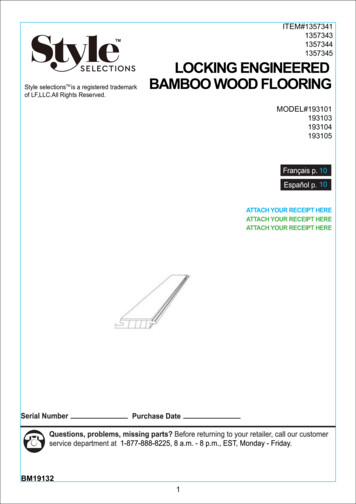
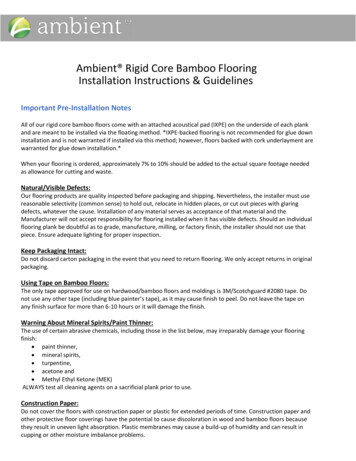
Step-By-Step InstallationStep 1: Begin installation of flooringfrom a corner of the room and workingfrom left to right. Install spacers betweenthe plank and the wall at the end andedges where the plank and wall cometogether.Step 3: Cut the last plank to fit the space. Usethe leftover plank from first row as starter forsecond row, and so on for each row. Theremust be at least 8” between plank end jointson adjacent rows.**For tile planks, the distance between end jointsshould be at least 12 inches.Step 2: Lock short end of plank by insertingtongue into groove at an angle. Then dropinto place. Continue this step to the end ofthe row.Step 4: Lock the long edge of plank byInserting tongue into groove at an angle anddrop in place. Next, slide the plank towardthe end of previously installed plank until thetongue just touches the groove.
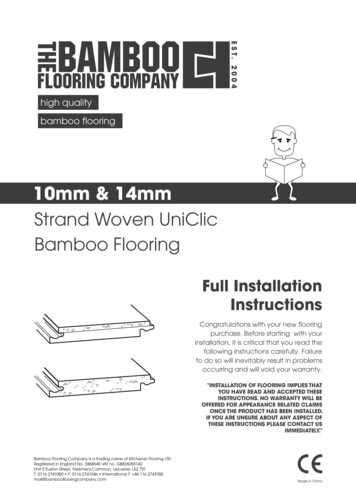
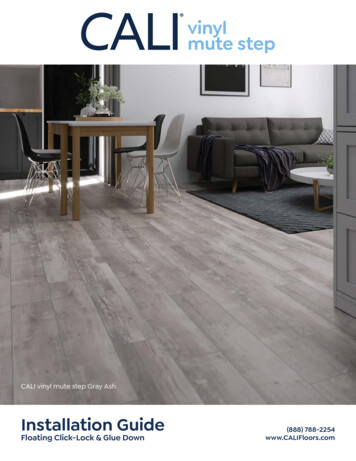
Step 5: THIS IS AN IMPORTANT STEP! Use arubber mallet or hammer and a wood block.Tap the block to tap long edge of the plank toensure a tight fit. MAKE SURE THERE IS NOGAPPING AS IT CAN COMPROMISE THELOCKING SYSTEM!Step 7: Place wood block at end of plank and tapwith hammer to lock ends of planks together.Remove bridge and continue toward the wall untilinstalling the final plank in the row. BE SURE TOTAP ON EDGE SO AS NOT TO DAMAGE LOCKINGMECHANISM OF PLANKS.Step 6: Using the tongue and groove, attacha scrap piece of floor plank to bridge gapbetween ends of planks and hold themsteady.Step 8: Use a hammer and pull bar to lockthe final piece in the row. Insert a spacer atend of the row. Continue installation on nextrow until final row.
Step 9: Use a hammer and pull bar to locklong edges of planks on the final row.Step 10: To install under door jambs, use ajamb saw to undercut space under doorjamb to allow the plank to slide freely. Tapthe long edge with hammer and tappingblock to lock in place. Use the hammer andpull bar to lock short end of plank.
Remove expansion spacers and install base and/or quarter round moldings to cover the expansion space. Vacuum yourfloor to remove any dirt or debris.Installation Over Radiant Heat SystemsPlease note that these are general guidelines. Please contact your radiant heat system manufacturer prior to installationto ensure that your specific system is compatible with rigid core (SPC core) bamboo flooring as well as if they have anyspecific requirements. We also recommend reading the NWFA Radiant Heat Protocol before beginning your installationplan.Notes About Installing Over Radiant Heat: New concrete needs to cure for at least 60 days before installing flooring materials. If considering Radiant heat, only Hydronic radiant heat can be used. The heating components must have a minimum of 3/8” separation from the product. System must be operational for a minimum of two weeks prior to installation.A transition strip must be used for any installation longer than 40 linear feet and/or wider than 30 linear feet.It is also suggested to use T-Molding in doorways.Pre-Installation:If the radiant heat system is embedded in concrete, turn the radiant heat system on with the temperature set on highfor 5-6 days. This should help burn off any moisture residing in the concrete prior to installation and this should bedone the week leading up to installation. Next, the temperature should be set to 65 F and held at that temperature 5days prior to acclimating the floors – during acclimation – during installation – and for 72 hours after installation.During Installation: Must leave at least a 1/2" expansion gap at all walls and doorways (the SPC flooring expands slightly whenheated)Must install break every 25 ft. (max run 25 ft in any direction)The temperature of the radiant heat system should always be maintained at a constant 65 F. A stove or any other item that can affect the temperature of the ground should not be used at the job site. The flooring must be acclimated over the radiant heat with the system turned on and set to 65 F. The sameacclimation preparation must be followed as always, including cutting the boxes open and stacking. If the radiant heat system is encased in concrete or another substrate that releases moisture, a 6mmpolyethylene barrier must be placed between the flooring boxes and the substrate so that the flooring does notabsorb moisture during acclimation.Post-Installation/Maintenance: During the first three days after installation, the radiant heat system temperature should be maintained at atemperature of 65 F (18⁰ C). After that, the temperature can be set warmer, by 5 F per hour to a maximumoperation temperature of 85 F (29⁰ C).The temperature of the sub-floor must never exceed 85 F (29⁰ C). When turning off the radiant heat system, it must cool by a temperature of 1.5 Fahrenheit per day. Never turnyour radiant system off suddenly. The radiant heat system cannot fluctuate in temperature rapidly. Room temperature should vary no morethan /-7 degrees Fahrenheit year around.
Moldings Installation NotesAlways ensure to use an adhesive that is not water or latex based when gluing moldings and stair pieces down. Using anadhesive that releases moisture will damage the moldings and cause splitting, cracking and possibly warping. Werecommend that you use Titebond Premium Wood Glue – or a similar adhesive – to glue down your moldings. Once atransition molding is glued down, place a heavy object on top of the molding for a period of at least 8 hours to ensure acohesive bond.The only tape approved for use on moldings is 3M/Scotchguard #2080 tape. Do not use any other tape. Other tapes(including blue painter’s tape) may cause finish to peel. Regardless of which tape you use, do not leave the tape on anyfinish surface for more than 12 hours or it will damage the finish.Installing strand trim pieces with a nail gun can be more difficult than trim pieces made of other materials and you willneed to either a) pre-drill these moldings and then nail them, b) glue them in using Titebond Premium Wood Glue orsimilar, or c) use a micro-pin nailer (we suggest the Bostitch Porter Cable 23 GA gun with a 1" long micro thin nail - thiscan be purchased directly from Bostitch or rented from a big box store).Maintenance & Cleaning – ACCUSEAL POLYURETHANE FINISHThe maintenance program for our rigid core bamboo flooring is designed to be user-friendly. The latest advances infinish technology are used in our manufacturing process to help aid product performance and maintenance. The use ofproducts like wax, water or oil soaps should be avoided.Important Notes: Avoid Harsh Cleaning Agents: Never use mineral spirits, paint thinner, turpentine or other harsh chemicals toclean your rigid core bamboo flooring, as they may damage your finish. Using Orange Glo or other oil-basedproducts on your bamboo flooring can also potentially damage the finish. Don’t Wet Mop Your Bamboo Floor: Be sure not to use a wet mop or leave any excess water on your floor. Don’t Steam Mop Your Bamboo Floor: Please note that using a steam mop on your floors will void your warrantyand may cause irreparable damage. For further reading please visit this /How-To-Steam-Clean-Hardwood-Flooring.htm Always Test Cleaners On A Sacrificial Plank: To be sure you will not damage your floor, always test anychemicals or cleaners on an extra/leftover flooring plank to see what the final effect will be. Use A Chair Mat Under Rolling Office Chairs: Always use a chair mat under a rolling office chair or your finish willwear away (this is true of all wood floors). Only use chair mats that are approved for use over wood flooring assome chair mats trap moisture or cause other problems that may compromise the finish.Protect Your Floors:After your floor has been installed, floor protectors should be placed under the legs of chairs and tables. Doors leadingoutside should have floor mats placed both inside and out. Your floor should be cleaned weekly with the use of asuction vacuum, not abrasive rotary brush vacuums, to remove grit and debris from the surface of the flooring. Highertraffic areas may require more frequent cleaning to keep the floor free of grit and abrasive debris that can damage thefloor and finish.Keep a Few Planks:After installing your bamboo & eucalyptus floors, keep at least a few extra planks to use as possible replacement boardsor to test with new cleaning solutions. (If damage occurs or the finish is dulled from using a cleaner, it is better to findout on an extra plank than on your new floor.)
UV / Sunlight Exposure:Do not cover the floors with construction paper or plastic for extended periods of time. Construction paper and otherprotective floor coverings have the potential to cause discoloration in all hardwood flooring because they result inuneven light absorption. Plastic membranes may cause a build-up of humidity and can result in cupping or othermoisture imbalance problems.There are few flooring types on earth that will not fade and change color over time from constant exposure to directsunlight (and even overhead artificial lighting) for extended periods of time. We recommend installing UV protectionfilm on all windows to help protect against fading, and frequently rotating rugs and furniture to avoid sun spots.Regular Cleaning:For routine cleaning of your bamboo floor, any approved hardwood floor cleaning system such as Swiffer Wet Jet (withhardwood insert) or Bona Hardwood Cleaning System will work. For small stains and grit marks, you can use a dampcloth to rub them off followed by a dry cloth. For removing tough stains such as paint, adhesive residue, and gum, youcan use more heavy-duty products. We strongly suggest testing your desired cleaning product on a leftover flooringplank prior to cleaning your actual floor, to ensure that product does not damage the factory finish.Otherwise, you can also use a soap-based concentrate solution that is approved for pre-finished wood floors. First, use agood broom or microfiber dry mop to remove excess dirt and debris from your floor. Second, pour 1/5th of an approvedhardwood floor cleaner concentrate in. Third, dip your mop into the bucket but then ensure to completely wring out allwater from it leaving it only lightly damp – then use this lightly damp mop to clean the floor.Surface/Finish Scratches:Minor scratches can occur on the surface of the floor's finish, which is designed to protect your bamboo flooring fromdamage. If scratches occur, first try to buff them out using a soft rag along with an acceptable hardwood floor cleaner.We have found that after a few cleanings and normal foot traffic, light scratches tend to wear away. If a scratch remains,or you have a deep scratch that looks white in color, a tested remedy is to use mineral oil or almond oil on a soft rag torub it out.Deeper Grooves & Gashes:Large grooves or gashes can be avoided via the use of furniture pads under the legs of all heavy furniture includingtables, chairs or couches. Take all the precautions you can when moving any type of furniture on your floor to avoiddamage.Flooring professionals can repair certain gashes and gouges. They will use floor putty to fill the existing gouge and finishthat small section with a new coating, but they may also be able to use urethane. Please check with your floor installerto see if this option is available to you.Replacing damaged floor planks can be an option when you have deeper grooves/gashes in your flooring. This can bethe ideal solution when you have leftover SPC/rigid core click-lock floor planks.Our rigid core bamboo flooring CANNOT be refinished.Additional Notes & ResourcesThe NWFA has put together a job site checklist for you or your installer to fill out before, during, and after theinstallation of your new flooring. It’s a great way to ensure the installation goes smoothly and can be filed away to use asa reference in the future. Download and print the checklist here: National Wood Flooring Association: Jobsite Checklist- The installer avoids using this checklist at their own risk.Ambient will not accept responsibility for flooring damaged on installation. All installation procedures should followWood Flooring Association (NWFA) recommendations. For further information, contact NWFA National at 800.422.455
NEVER install our rigid core bamboo flooring over ANY type of carpet. Subfloor Preparation To ensure a successful installation of your rigid core bamboo flooring, properly prepare your subfloor by ensuring it is clean, dry, flat, and in good structural shape. The required flatness of the subfloor is 3/16" per 10'