Transcription
CHORD MOJO 2PRODUCT GUIDEBY
Unboxing the Mojo 2In the box:– The Mojo 2– A MicroUSB to USB type A cableBefore Powering OnBefore using the Mojo 2, charge it fully via the MicroUSB port that has the battery icon over it.When the Mojo 2 is fully charged, the battery status light will be blue.There is also a desktop mode that bypasses the battery for those who wish to use the unit as just a desktop DAC/amplifier. The battery status light will be purple when you are in this mode.
Battery StatusCharging StatusBattery LifeWhen you are finished charging the device, the battery status light will remain blue when it’s powered on while unpluggedfrom the charger.
Digital InputsWhether you are using a computer, phone, tablet or any other device to play back your music, you will be using the digitalinputs of the Mojo 2.The Mojo 2 can also be used wirelessly with the Chord Poly. This will be covered in more detail in the Poly section of thisdocument.From right to left, you have:–––––Optical/Toslink input.MicroUSB used for power.MircoUSB used for data.USB C port used for data.3.5mm coaxial port.– The 3.5mm coaxial port can support both standard coaxial connections as well as dual data coax if you wish to use this devicewith the M Scaler.From Chord Electronics,“The Hugo M Scaler is a highly advanced standalone upscaler capable of redefining sound quality from digital audio. It uses RobWatts’ (our Digital Design Consultant’s) unique filter technology, the most advanced in the world, to upscale standard 44.1kHzdigital audio up to 705.6kHz (16x CD’s 44.1kHz native resolution), ready to be passed to a suitable DAC; Hugo M Scaler extends itsupscaling performance to 768kHz (from 96kHz input data).”The Mojo 2 will automatically switch to the source it detects a signal from. If multiple devices are connected and playingmusic simultaneously, the Mojo 2 will prioritize the Micro USB, USB C, then the coaxial port, and lastly the optical port.Connecting Your Headphones or IEMsPlug your headphones or IEMs into the Mojo 2 via the 2x 3.5mm headphone port.The Mojo 2 can power two headphones at the same time, but the volume cannot be controlled separately. For this reasonwe recommend using similar headphones when two people are listening to the Mojo 2 at the same time.
Powering On and Playback–––––––Press and hold the power button to turn the Mojo 2 on.Once connected to a music source via the digital inputs, press and hold the ‘-’ volume button until both the ‘ ’ and ‘-’ are unlit.Attach your headphones or IEMs and slowly keep pressing the ‘ ’ until it reaches an ideal volume for you.Pressing the ‘-’ again once at no volume will toggle the device to Low Gain mode. We recommend using Low Gainmode for most IEMs and sensitive headphones.Similarly, pressing ‘ ’ up to the maximum volume and then pressing “ ” will enable High Gain Mode. Use HighGain mode for headphones that need the extra power.After making your adjustments, make sure your volume is set to zero before plugging in your headphones.Plug in your headphones or IEMs and press ‘ ’ until you have reached your desired listening volume.It is best practice to set the volume down to zero when switching between headphones, as they can have very differentimpedances and sensitivities. This means that a volume setting that matches one headphone might be dangerously loudfor a different headphone.Safety and Maintenance–––Keep the Mojo 2 from direct contact with water or other liquids.Only clean the Mojo 2 with a microfiber cloth.Attempting to open, dismantle, or internally apply third-party devices to the Mojo 2 will invalidate your warranty.Register your Mojo 2 via the Chord Electronics website.
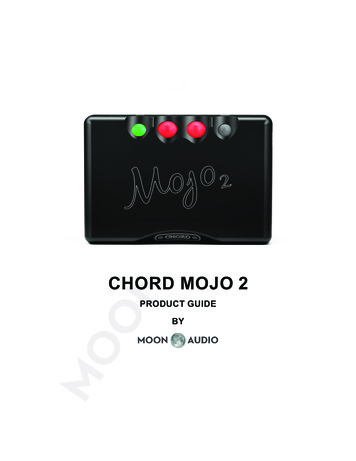
Front Panel ControlsThe Mojo 2 operates via a set of glass marble buttons that change color to display current setting status.From right to left, you have:The Power Button. Turns the device on and off.The ‘ ’ Button. Increases the volume when not in a menu. When the volume is set to the maximum, pressing this buttonagain will enable High Gain mode. Do not make this adjustment while headphones are attached. When in a menu, thisbutton along with ‘ ’ will cycle through the various options available.The ‘-’ Button. Decreases the volume when not in a menu. When the volume is at the minimum, press this button againto enable Low Gain Mode. When in a menu, this button along with ‘ ’ will cycle through the various options available.A quick shortcut to mute the device is to press both the ‘ ’ and the ‘-’ buttons at the same time until the menu button pulses. Press thesetwo buttons again to unmute.The Menu Button ‘M.’ Cycles through the menu options available for this device.The Menu ButtonAs you press the menu button, the colors will cycle with each press through the various menus. Each menu is indicated bythe menu button changing to one of the following colors:
Menu Button Cont.When the Menu button is off, the device is in Low Gain Mode with volume controls enabled.When the Menu button is glowing white the device is in High Gain Mode with the volume controls enabled.This is considered the main menu and the device will auto return to this menu after sitting for awhile in a different menuThis does not apply to Lockdown Mode, which locks the device.In the Dark Blue menu, the ‘-’ button will control the brightness of the buttons. Continued pressing of the “-” will cyclethrough all levels of brightness.The ‘ ’ button will cycle through the Crossfeed modes.Red Bass, Yellow MidBass, Green Mid Treble, Blue Upper TrebleRed, Yellow, Green and Light Blue are each EQ controls for the frequency ranges mentioned in the table (found on thenext page under “Equalization”).An example of how to use this: If you want to boost the bass of your music, you would select the Red option and press the‘ ’ button to increase bass presence. Similarly, to reduce bass, you would press the ‘-’ button.This will be covered in more detail in the EQ section.When the menu button glows purple the device can enter “Lockdown Mode.” While the menu button glows purple pressboth the ‘ ’ and ‘-’ to Lockdown the buttons. The ‘ ’ and ‘-’ will Glow purple for a few seconds before returning to displayyour current volume settings. To leave “Lockdown Mode” press the menu button, and then ‘ ’ and ‘-’ simultaneously. Thiswill re-enable all device controlsCrossfeedWhen the menu button is Dark Blue, pressing the “ ” option will cycle through crossfeed options. Crossfeed is done toimprove the imaging and soundstage presentation of your music. There are four options available:Red: MinimumGreen: ModerateBlue: MaximumUnlit: Crossfeed off
EqualizationEqualization is the process of adjusting different audio frequencies to get a desired effect from your audio equipment.A common example of this would be “bass boost” mode on an amplifier. This setting boosts the lower frequencies toenhance the presence of the bass when this setting is active.Along these lines, if you were to press ‘ ’ while the menu button is displaying Red (bass is selected) you can increase thebass presence of this player.Each frequency range can either be increased via the ‘ ’ or decreased via the ‘-’.Another use for the EQ would be adjusting headphones that some people find “bright” or fatiguing, such as the originalSennheiser HD 800.To EQ this headphone, you could decrease the Light Blue option to roll off the treble, to make listening for long hours farmore enjoyable.Try adjusting EQ on equipment and music you are very familiar with to get the best idea of how it can improve yourlistening experience.There are many headphone EQ guides available online if you want to try other recommendations.When pressing the menu button, the following colors will appear:The colors above show that you are in are in that EQ setting and any adjustments made will be in that frequency range.To change each option, you will press the menu button until it changes to one of the above colors.In each of these EQ options, the ‘ ’ button will “lift” or increase this frequency range’s presence up to 9 stages. The ‘-’button can “cut” or decrease each of these same frequency ranges by 9 stages as well.This means that you will have a total of 19 different stages for each of these four options. When both the ‘ ’ and ‘-’ buttonsare not displaying a color, referred to as “flat,” it means that no DSP EQ is currently applied.
EQ steps represented by color.Lockdown ModeThis mode turns off all other buttons, locking in your settings to what they where when you entered “lockdown mode.”When the menu button glows purple the device can enter “Lockdown Mode.” While the menu button glows purple pressboth the ‘ ’ and ‘-’ to Lockdown the buttons. The ‘ ’ and ‘-’ will Glow purple for a few seconds before returning to displayyour current volume settings.To leave “Lockdown Mode” press the menu button, and then ‘ ’ and ‘-’ simultaneously. This will re-enable all device controls
Using the Mojo 2 with the PolyIf you already have the Poly (with the updated 3.0 firmware!), it will plug and play directly with the Mojo 2 just likeit did with the original Mojo. No other updates are needed.Installing GoFigure and Updating Firmware1. Navigate to your device’s App Store and search for GoFigure by Chord.2. Find the GoFigure App and install it.3. Once installation is complete, open the app.4. Make sure your 2go/Poly is powered on and connected to the same network as this device.5. Click on Set-Up your device in the app.6. It will scan for local devices.a. If your device does not show up, check your internet connection. Make sure your device is close to the streamer, andthen pull down on the screen to search for devices again.7. Click on the device to set up and the app will walk you through the setup process.8. Once you are in the main menu, find the settings “gear” icon and tap on it.9. In this settings menu, find “Firmware Update.”a. If a firmware update is available, apply it. If there are any issues with updating the firmware, keep trying. It cansometimes already be applied but still show that the update is available before refreshing the screen.b. Make sure your device is plugged into power when applying the update so there isn’t any possibility of it running outof power mid-update.10. Close the GoFigure app and then restart. Check the firmware update section again. The firmware should now show asup to date!
Connecting to RoonMake sure that you already have Roon set up on your computer, Nucleus, or other Roon hub. Open up the Roonsoftware and then you are ready to begin:1. Once Roon is finished opening, navigate to the “Settings” in the far left column near the bottom.a. If you just see a hamburger menu icon (3 horizontally stacked lines), the settings menu will pop up when you click on that icon.2. In the settings menu, select “Audio.”3. Scroll down until you get to the section labeled “Other Network Device.”4. Find the “Poly” device.5. Click on “Enable” on the same button as the Poly.6. Create your own device name.7. Lastly, select the device as under audio zone.8. For the Chord Poly, make sure you have the device in “Roon” mode for the best listening experience.Setting Up the Poly for Use in Hotspot ModeUsing your Chord streamer as a hotspot1. Open GoFigure and select your device.2. Touch the small circle inside the larger circle icon found on the top left of the screen. This will prompt you to make sure you want toenter into hotspot mode.a. Entering into hotspot mode will turn off other network connections!3. Select the Poly hotspot as your network connection on your device and you are now connected directly to your streamer for music playback.Using your phone/tablet as a hotspot1. Open your device’s settings menu.2. Touch on “General” and then “About.”a. This will give you this device’s name that you can use in just a bit.3. Navigate to your mobile/phone setup and enable mobile hotspot (personal hotspot in iOS.) If there is a password, write it down.4. Make sure that the hotspot is active and then open up the GoFigure app.5. Once in the main menu of the GoFigure App, click on “Network” and select your device’s hotspot. Enter the password here (ifneeded).6. Close the app and relaunch GoFigure.7. Make sure that the network shows as connected to GoFigure.Creating a MPD PlaylistYou will need a separately purchased microSD card and a way to connect this card to your computer to reformat. You willalso need to have GoFigure on your mobile device already set up.1.2.3.4.5.6.7.8.9.10.11.12.13.14.15.Insert your microSD card into your computer.Reformat card to exFAT Format.Drag and drop your music onto the SD card. Organize music ahead of time to help you with playback later. Chord recommendsorganizing by artist name.Safely eject the SD card from your computer.Plug the SD card into your streamer.Turn on the device you wish to use.Make sure your device is connected to the same network as your mobile device!a. You can check this by opening up the GoFigure app on your device and make sure that it is connected to your Chord streamer.Download an MPD (music player daemon) client app on your device.a. For iOS Chord recommends “8player” and for Android Chord recommends “M.A.L.P.”b. Open your app and then open the “profiles” menu.c. You will need the IP address to finish the set up.To find the IP address of this device, open GoFigure and go to the Network page.Select the network you are connected to.The IP address is found at the top of the screen. Copy or write down this IP address and then exit the GoFigure App.Reopen your MPD Client. Click on the “ ” sign to create a new profile.Enter the information of your streamer including the IP address from earlier.The app will populate with the music from your SD card.Use your MPD client to create any playlist you would like.
Using the Mojo 2 with the Poly. If you already have the Poly (with the updated 3.0 firmware!), it will plug and play directly with the Mojo 2 just like . it did with the original Mojo. No other updates are needed. Installing GoFigure and Updating Firmware. 1. Navigate to your device's App Store and search for GoFigure by Chord. 2.