Transcription
Manuals User Manuals Simplified.CHORD Mojo 2 DAC and Headphone Amplifier User ManualFebruary 5, 2022February 5, 2022Home » chord » CHORD Mojo 2 DAC and Headphone Amplifier User ManualContents [ hide1 CHORD Mojo 2 DAC and HeadphoneAmplifier2 Introduction3 Registering Mojo 24 Getting to know Mojo 25 Getting started6 Basic operation7 Advanced operation8 Adding wireless streaming with Poly9 Technical specifications10 Documents / Resources10.1 Related Manuals / ResourcesCHORD Mojo 2 DAC and Headphone Amplifier
The Pumphouse, Farleigh Lane, East Farleigh, Kent, ME16 9NB. United Kingdom. 44 (0) 1622 721 ukIntroductionMojo 2 is a next-generation portable DAC/headphone amplifier that builds on the success of the original and offers exciting new features,enhanced functionality, plus improved sound and battery performance.SafetyPlease take note of the following safety instructions before using Mojo 2:Never allow Mojo 2 to come into contact with water or other liquids.Never spray cleaning products onto Mojo 2. Only use a clean micro-fibre cloth to clean the casing.Before using this product please read the safety document included in the box.There are no user-serviceable components within Mojo 2. Never attempt to open, dismantle or apply internal third-party devices,doing so will invalidate your warranty.Registering Mojo 2Mojo 2 comes with a one-year warranty that covers defects in materials and workmanship through fair wear and tear.Register your Mojo 2 via the Chord Electronics website: ring your product helps us to provide you with the best possible after-sales support.In the unlikely event of a claim, contact your supplying dealer.Getting to know Mojo 2
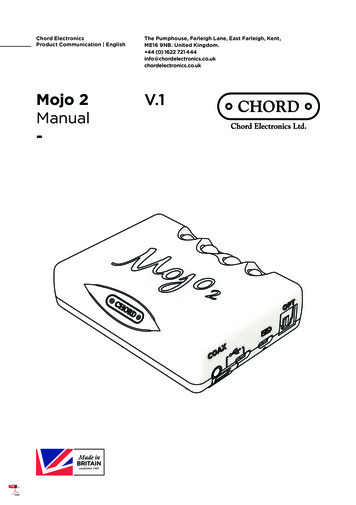
Connect compatible digital devices using aCoaxial input3.5mm coaxial digital cable. Single coax:(single inputAtip: signal, sleeve: ground. Dual data coax:or dual datatip: signal 1, ring: signal 2 sleeve: groundonly)(for use with Hugo M-Scaler)B USB-C inputCMicro-USBinputConnect compatible digital devices using aUSB-C cable for playbackConnect compatible digital devices using aMicro-USB cable for playbackMicro-USBD charginginputConnect to power using the supplied MicroUSB cable (use with a charger capable of a2 A minimum output)E Optical inputConnect compatible digital devices usingan optical cable for playbackFChargestatus LEDG MenuDisplays charge and battery status using apolychromatic scale (see section 6.2)Press to cycle through the menu optionsVolumeDecrease volume or adjust the selectedH down/menumenu mode‘-‘IVolumeIncrease volume or adjust the selectedup/menu ’ ’ menu modePower buttonJ (DisplaysPress and hold to power on/offsample rate)KConnect up to two pairs of headphonesHeadphone(not independently controllable – 3.5 mmoutputsx2)Getting startedThe Mojo 2 manual is divided into two key sections: basic operation and advanced operation. Basic operation (6.0) covers everythingneeded to get started and enjoy using Mojo 2. More advanced menu options are explained in 7.0.Basic operationConnecting to powerMojo 2 can be used while constantly connected to power, or on the go, thanks to powerful, rechargeable batteries. A charger capable ofoutputting a minimum of 2 A (amps) is recommended for Mojo 2; please check your charger specifications. Connect the supplied cable toMojo 2’s Micro-USB charging input (see D, above) and then to a 5 V power source to begin charging.Battery status indicatorWith Mojo 2 connected to power, the charge status LED (see F, above) will pulse and show battery charge status using color (see chartbelow); the charge status is also displayed when operating on battery power alone.
NOTE A blue charge status LED indicates the maximum battery capacity range has been reached. If Mojo 2 is left constantly on charge,it will enter intelligent desktop mode to protect the battery from overcharging. This will be indicated by a purple battery status light.Depleted batteryFollowing full depletion of the batteries, the charge status LED will flash red for ten seconds. If coupled with the device shutting down, arecharge is required.If following a period of inactivity the device fails to power-on (suggesting a severely depleted battery) then the device needs to berecharged overnight, with the unit switched off.Connectivity: inputsConnect compatible digital devices, including laptops, smartphones, tablets and more to Mojo 2’s corresponding digital inputs.These include: 3.5 mm coaxial (single coax: tip: signal, sleeve: ground.Dual data coax [for use with Hugo M-Scaler]: tip: signal 1,ring: signal 2 sleeve: ground, USB-C, Micro-USB and optical inputs.If all four inputs are connected simultaneously, Mojo 2 will auto-select the correct input when music is played to the device. Mojo 2 willpriorities specific inputs if all four are connected simultaneously. USB has priority followed by coaxial and then optical. It is only possibleto connect one USB at a time (Micro-USB takes priority over USB-C).
Connectivity: outputsConnectup to two pairs of (3.5 mm mini-jack) headphones to Mojo 2, simultaneously. The device’s volume control (see section 6.8) will adjustboth headphone outputs together (there is no independent volume control for each headphone).Powering on/offPress and hold the power button (see section 4) until it becomes illuminated, then release. Mojo 2 will perform a number of start-upchecks indicated by the power button cycling through a range of colors. During this process, the menu button will also automatically cyclethrough its designated colours; any previously saved menu settings will be displayed using color on the ‘ ’ and ‘- ‘ buttons (see section 7for menu options and a full guide to colours). Mojo 2 is ready to use once the colors have stopped cycling. To power down, press andhold the power button until the lights are extinguished.TIP Mojo 2 will auto-shutdown after 10 minutes without an input signal.Brightness adjustmentMojo 2 offers two levels of button brightness: normal and low. Normal is activated as standard, however, to alternate between low andnormal brightness modes, press menu once (menu button will show blue) then ‘-’ repeatedly to move between normal and low modes;any lit buttons will increase or decrease in brightness accordingly. Once chosen, the selection will be remembered and Mojo 2 willautomatically exit the menu settings in 10 seconds. Alternatively, press and hold menu to exit the menu immediately.Volume adjustmentMojo 2 benefits from two main volume ‘ranges’: low and high, as indicated by the color of the menu button: unlit (low); white (high). Asthe volume is changed, Mojo 2 moves automatically into the respective volume ranges; the menu button color changes accordingly.With chosen devices and headphones now connected (but not on/in ear), and Mojo 2 powered on, the volume can be reduced to zerousing the volume down ‘-‘ controls until both volume buttons and menu button are unlit. From unlit, the volume can be slowly increased bypressing the volume up ‘ ’ button. Both buttons slowly change colour with changing volume level.WARNING:Always set the volume level to zero before commencing initial playback and take precautions when using Mojo 2 in high volume mode toprotect from hearing damage.Advanced operationMojo 2 benefits from a cutting-edge UHD DSP control which provides a number of advanced features, accessible via the menu button.Pressing the menu button sequentially, cycles through the various features explained in this section.Menu: button color informationThe menu button changes color as menu options are selected. The chart below provides a guide.TIP Lift fingers between menu button presses to see the menu button colour and function selected.
Menu: button colour informationwhen chargingAdditionally, when Mojo 2 is switched off, the menu button displays a colour when charging to indicate charging current, indicated by thetable below. Charging current status can give a useful indicator of the charger/charging quality available to Mojo 2 and/or battery health.For example, a white menu button indicates the device is charging at maximum capacity. Green indicates charging is slow and can beimproved with a different charger/cable. Red signifies insufficient current to charge.NOTE Poly users(see section 8) will not achieve a white charge status whilst the devices are charging simultaneously.TIP If the charging LED flashes red for ten seconds and the device shuts down, a recharge is required.TIP If the device fails to power-on (possibly suggesting a severely depleted battery) then it needs to be recharged overnight, with thedevice switched off.Intelligent Desktop ModeMojo 2 can be left connected to a power source at all times if desired. In this mode, when fully charged, Mojo 2’s menu button andbattery status light displays magenta, indicating the end of the charge cycle and the initiation of Intelligent Desktop Mode which regulatescharging to preserve the battery.MutePress ‘ ’ and ‘-’ simultaneously to mute the device; Mojo 2’s menu button will pulse. Press menu or ‘ /-‘ together again to exit mute.Menu: equalizationMojo 2 offers comprehensive equalization adjustment (tone controls) to suit a wide range of partnering equipment and digital file formats.There are four main equalization modes which can be altered from the factory setting (flat) if desired: lower bass; mid-bass; lower trebleand high treble.For each of the four equalization modes, there are nine positive (lift) and nine negative (cut) 1 dB adjustment steps (18 in total) available.To access the equalization modes, press menu twice until the button displays red: this indicated the first of the four equalization options:lower bass adjustment. From here, further menu presses cycle through the remaining three modes: yellow: mid-bass; green: lower treble;
blue: upper treble and then through the remainder of the menu.Once the desired equalization mode has been selected as indicated by the menu button color, press the volume up ‘ ’ OR down ‘-‘buttons sequentially to move through the range of adjustment: up ‘ ’ providing ‘lift’, down ‘-‘ providing ‘cut’. The respective volume buttonschange colour to indicate the chosen level. The chart below shows each of the 18 available adjustment levels for each of the fourequalization modesAdjustments will be automatically saved. Pressing menu again will move to the next equalization mode.NOTE If the buttons remain untouched for 10 seconds when in menu mode, Mojo 2 will automatically revert back to playback mode.Alternatively, press and hold menu to exit the menu immediately.TIP Referring to the chart below, unlit or grey represents the volume up ‘ ’ or down ‘-‘ button/s as unlit. If both buttons are unlit, thefactory setting (0 dB ‘flat’) is selected.
NOTE The following three graphs aresimplified for illustrative purposes and should in no way be interpreted as a exact representation of the subject matter.Please see the next page for examples of the DSP equalization.These four graphs below show Mojo2s four DSP equalization modes, they affect frequency response, providing either lift or cut to thebass and treble across the four main ranges of adjustability: red: lower bass; yellow: mid-bass; green: lower treble and blue: upper treble.The shape of the coloured areas demonstrate how the DSP lift and cut (‘shelf’ controls) affect the range of frequencies within each of thefour main groupings. The lift/cut effect either tapers off (with bass) or swells(with treble), when moving through the frequency range.Graph 1All headphones will have their own frequency response curve, deviating from the ideal. The website raph/) lists the frequency response curves of many popular headphones and can be usedas a guide for experimentation with Mojo 2’s DSP feature. DSP can be used to flatten the response curve for a more neutral sound.The dotted line seen in Graph 2 shows a frequency response curve: a wavy line with peaks and troughs, that has been altered by Mojo2’s DSP.The four colors show how the DSP’s equalization tone controls have been used to change the summed output (dotted line). The bassand mid bass have been boosted, the low mid has been reduced, and the treble has been boosted, changing the frequency response(tone) of the device.
Graph 2Graph 3overlays common musical instruments on the frequency spectrum, in a very broad sense, demonstrating how the prominence ofinstruments might be affected when making adjustments using the DSP tone controls. It is not definitive and is a guide forexperimentation only.Graph 3Menu:crossfeedMojo 2 offers three levels of crossfeed to improve spatial effects for a more ‘speaker-like’ sound-stage when using headphones. Pressmenu once (menu button will show blue), then press the volume up ‘ ’ button to cycle between the four available options: red: minimum;green: moderate; blue: maximum; unlit (crossfeed off). Once chosen, the selection will be remembered and Mojo 2 will automatically exitthe menu setting in approximately 10 seconds. Alternatively, press and hold menu to exit the menu immediately.NOTE When changing crossfeed, the ‘-’ button also illuminates to show the button brightness level (white: normal; unlit: low) as persection 6.7.Lockdown modeMojo 2 benefits from a button-lock option where all controls can be disabled for travel use. To activate button lock, press the menu buttonsix times until magenta is displayed, then simultaneously press both the volume up ‘ ’ and volume down buttons ‘-‘ once, until all threeMojo 2 buttons display magenta; the controls are now disabled. After two seconds, the volume buttons will revert to displaying the setoutput volume once again, however, the menu button will continue to display magenta to indicate button-lock mode is active.With button-lock mode activated, a single press of the (magenta) menu button will immediately return to the button-lock menu. From here,simultaneously press both volume up ‘ ’ and volume down buttons ‘-’ once to unlock the buttons (indicated by the volume buttonsreturning to unlit) and press menu again to exit button-lock mode and proceed through the menu.NOTE When in button-lock mode, the power button is temporarily disabled, however, the auto power-shutdown feature is still functional.Restore factory settingsMojo 2 features a factory reset mode that restores the device to the original factory settings: DSP flat and Crossfeed off. To reset thedevice, press both the ‘ ’ and ‘-‘ simultaneously from either the DSP menu mode, or the Crossfeed menu mode.
Power button sample rate informationMojo 2 is capable of playing files up to 768 kHz 32- bit and DSD 256. This is indicated by the following colours on the power button whenmusic is playing.Adding wireless streaming with PolyMojo 2 is compatible with Chord Electronics’ Poly streamer/server (available separately) which adds a world of wireless music streaming,network audio compatibility and SD card library playback. Contact a Chord Electronics retailer for more information or find full details onthe Chord Electronics website. Existing Poly owners should refer to the supplied Poly manual (also available on the Chord Electronicswebsite) in order to use Poly with Mojo 2.NOTE Poly must be updated to at least version 3.0 firmware to function with Mojo 2.Technical specificationsPlease refer to www.chordelectronics.co.uk for the most recent specifications.Dimensions83 mm x 62 mm x 22.9 mmWeight Mojo 2185 gWeight Mojo 2 Poly270 gBattery life8 hours (approximately)Operating voltage5 V DCCharging current1.5 AOutput power @ 1kHz/300 Ù90 mWOutput power @ 1kHz/30 Ù600 mWOutput impedance0.06 ÙDynamic range125 dBTHD @ 2.5 V/300 Ù0.0003 %Documents / Resources
CHORD Mojo 2 DAC and Headphone Amplifier [pdf] User ManualMojo 2, DAC and Headphone Amplifier, Mojo 2 DAC and Headphone AmplifierRelated Manuals / ResourcesLotoo PAW S1 Headphone Amplifier-DAC User ManualLotoo PAW S1 Headphone Amplifier-DAC User Manual Instructions Connect PAW S1 toplayback device PC/Phone Run software or TOPPING Dx5 Headphone Amplifier User ManualDx5 Headphone Amplifier FCC WARNING This device complies with part 15 of the FCC Rules. Operation is subject CEntrance DACport Pro DAC/Headphone Amplifier User GuideQuick Start Guide Connect supplied USB cable between your laptop and DACport ProStart playback on the laptop, CHORD COAX1 Hugo 2 Digital To Analogue Converter and Headphone AmplifierUser ManualCHORD COAX1 Hugo 2 Digital To Analogue Converter and Headphone Amplifier How tocharge and connect to power Manuals ,homeprivacy
for menu options and a full guide to colours). Mojo 2 is ready to use once the colors have stopped cycling. To power down, press and hold the power button until the lights are extinguished. TIP Mojo 2 will auto-shutdown after 10 minutes without an input signal. Brightness adjustment Mojo 2 offers two levels of button brightness: normal and low.