Transcription
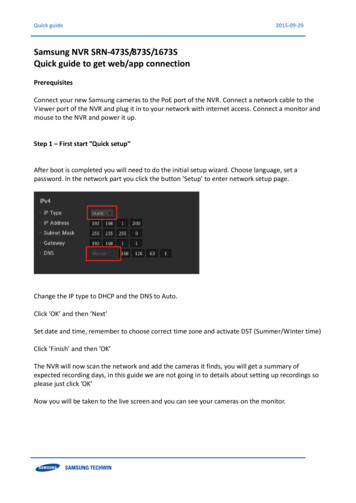
Quick guide2015-09-29Samsung NVR SRN-473S/873S/1673SQuick guide to get web/app connectionPrerequisitesConnect your new Samsung cameras to the PoE port of the NVR. Connect a network cable to theViewer port of the NVR and plug it in to your network with internet access. Connect a monitor andmouse to the NVR and power it up.Step 1 – First start ”Quick setup”After boot is completed you will need to do the initial setup wizard. Choose language, set apassword. In the network part you click the button ’Setup’ to enter network setup page.Change the IP type to DHCP and the DNS to Auto.Click ’OK’ and then ’Next’Set date and time, remember to choose correct time zone and activate DST (Summer/Winter time)Click ’Finish’ and then ’OK’The NVR will now scan the network and add the cameras it finds, you will get a summary ofexpected recording days, in this guide we are not going in to details about setting up recordings soplease just click ’OK’Now you will be taken to the live screen and you can see your cameras on the monitor.
Quick guide2015-09-29Step 2 – DDNS SetupNow you need to create an account at the Samsung DDNS Service. Please use a PC with internetconnection and head over to www.samsungipolis.com and click ’Sign up’ in the right top corner ofthe site:That will bring you to the account terms that you have to agree withThen click ’Next’ and fill in your details in the form to create your account, after that you will beback to the start page so please click ’Login’ in top right corner to login to you account.
Quick guide2015-09-29When you are logged in to your account you need to create a unique ID for your NVR so pleaseclick ’Product registration’ buttonClick on the textbox where it says ’Product ID’ and a new form will be shown where you enter andsearch for a unique name that you want to use, if the name is free after you have done a searchyou can choose that name, this name will then be added in the NVR so please remember the nameyou choose. Continue to fill in the rest of the form and finish with clicking register.
Quick guide2015-09-29Go back to the NVR and you will find that you probably are automatially logged out so please rightclick and choose ’Menu’ and log in againThen click on ’Network’ and on ’DDNS’, make sure to select ’Network 2’. In the dropdown menuchoose samsungipolis.com and write your Product ID, from the registration earlier, in the textbox.The Quick connect should be changed to ’Use’. Click ’OK’ to do a connection test, if you get amessage ’Quick connect success’ then you are all done and can proceed to step 4 client/app setup.If you get an error you may have to change ports in the next step.
Quick guide2015-09-29Step 3 – Port setupIf you got a error in the DDNS setup you may have to change the ports as the default ones may beoccupied by something else on the network, if all was fine in DDNS setup then you can proceed tostep 4.Click on ’Network’ and on ’Interface’To bring up the Network interface menuIn there click on ’Port’In this section please change ’Device port’ to 1554 and the ’HTTP Port’ to 1080
Quick guide2015-09-29Click ’OK’ and then click DDNS again. Click ’Not Use’ and then ’Use’ and after that click ’OK’ if allgoes well you get a ’Quick connect success’ message and you can proceed to Step 4 client/appsetup. If you still got an error message, a feature called ’UpnP’ is not activated in your router. Askyou network administrator to do a port forward of port 80 and 554 to 558 and point them to the IPthat the NVR was given by the DHCP server to network port 2. Also remember to change the portsback to default 80 and 554 in the NVR.Step 4 – Client & Mobile app setupThe standalone client for use in a Windows PC is called SmartViewer, latest version can be roduct view.asp?pagesize 8&sort &dscYN N&cid 45&clvl 1&page 1&idx 6275After installation you need to give a password. After logging in you need to click the gear symbol inthe right top corner to bring up the settings menu.From the setup menu click on ’Device’And then on the symbol for adding a device manually
Quick guide2015-09-29In the setup menu for adding a device you select ’Samsung NVR’ and ’samsungipolis’ then fill in thename you chosed when registering on the DDNS site earlier in this guide. Media protocol is TCPand finally username and password that you use when logging in to the NVR.Then click ’Connection Test’ to see it all works fine.Please note that the Product ID is case sensitive so make sure you type the same letters in bothNVR and in SmartViewer setup.
Quick guide2015-09-29After test is done press ’Register’ to register the device with SmartViewer and click ’Close’ to closeand again ’Close’ to close the setup.Back in SmartViewer main window select the NVR from the device selection drop-down menu andpress the connect button to make the connection to the NVR:Now the configuration is done and you can start to view live and recorded video from your NVR.
Quick guide2015-09-29The mobile app for use with the NVR is called iPolis Mobile and exist for Android and IOS platform.You can download them from here, scan with your phone:iPolis MobileAndroid/IOSWhen you first start the app you will be asked to adda device. Enter a name of your device, that can beanything you like.Model is NVR, address Type is DDNS and in theDDNS field you should add the DDNS name you gaveyour device at the DDNS registration.RTSP port is the last port in the settings for RTSP inthe NVR, defult is 558. You can find this settingsfrom the NVR – Setup – Network – Interface – Port.And add user name and password and press ’Save’After settings is saved click live and the Name yougave your NVR and if all is correct you can see liveimages from your NVRThe full manual for the apps can be downloaded from here:AndroidApple
Quick guide2015-09-29Step 5 - Backup of settingsLast but not least, after you have done all your settings it’s a good time to do a backup of yourNVR. Put an USB Memory to the free USB port on the front of the NVR. Open the menu and clickon ’System’ – ’System Management’ and then click on the tab ’Settings’.Here you can see that the NVR found your USB stick and you can click ’Export’Now all your settings is stored on the USB memory under a folder called samsung nvr. If you everneed to set the NVR back to the state you currently have just plug the same usb stick back and click’Import’ and you will have every setting back. All video data is keept as it is and is not deleted.Manuals and more information about all our products can be found on our website:http://www.samsungsecurity.com/main.asp
Samsung NVR SRN-473S/873S/1673S Quick guide to get web/app connection Prerequisites Connect your new Samsung cameras to the PoE port of the NVR. Connect a network cable to the Viewer port of the NVR and plug it in to your network with internet access. Connect a monitor and mouse to the NVR and power i