Transcription
Your HTC FlyerUser guide
2ContentsContentsGetting startedInside the box8HTC Flyer8Top cover10SIM card11Storage card12Battery13Switching the power on or off13Entering your PIN14Finger gestures14Setting up HTC Flyer for the first time15Ways of getting contacts into HTC Flyer15Home screen16BasicsAdjusting the volume18Sleep mode18Status and notifications19Notifications panel22Connecting HTC Flyer to a computer23Copying files to or from the internal storage or storage card24Copying text, looking up information, and sharing25Printing26PersonalizingMaking HTC Flyer truly yours27Personalizing HTC Flyer with scenes27Changing your wallpaper28Applying a new skin29Personalizing your Home screen with widgets29Adding icons and other shortcuts on your Home screen31Adding folders on your Home screen31Rearranging or removing widgets and icons on your Home screen32Customizing the launch bar33Rearranging the Home screen34Using sound sets34Rearranging or hiding application tabs36Customizing the lock screen37Search and Web browserSearching HTC Flyer and the Web38Using the web browser39
3ContentsDownloading from the Web42Viewing bookmarks and previously visited pages42Setting browser options44Tablet pen and fun appsAbout the tablet pen45Choosing your pen type, color, and stroke47Highlighting and drawing in pen-integrated apps48About Notes50Writing a note51Reviewing a note53Switching to Kid Mode54Scribble mode55Snapbooth and CameraSnapbooth57Camera58Photos, videos, and musicGallery63Music71Connected Media75HTC servicesHTC Watch77HTCSense.com81Accounts and syncAbout online accounts84Synchronizing with a Google Account84Adding a social network account85Managing your online accounts85SocialFacebook for HTC Sense87Facebook app88What’s the difference between Facebook app and Facebook for HTC Sense?89Twitter for HTC Sense89Using Friend Stream90Tweeting in Friend Stream93Chatting in Google Talk94EmailGmail97Mail98CalendarAbout Calendar107
4ContentsCreating an event107Changing Calendar views109Managing Calendar events110Dismissing or snoozing event reminders111Showing or hiding calendars111Changing Calendar settings112About the Calendar widget112Maps and locationLocation settings113Locations113Car Panel120Google Maps121PeopleTransferring contacts from your phone125About the People app126Your contacts list127Setting up your profile128Importing contacts from your SIM card128Adding a new contact128Searching for a contact129Importing a contact from an Exchange ActiveSync account129Merging contact information130Backing up your contacts to the storage card131Contact information and conversations131Sending contact information as a vCard133Contact groups133Adding People widgets135MessagesOpening Messages137Sending a text message (SMS)137Sending a multimedia message (MMS)138Resuming a draft message140Viewing and replying to a message140Forwarding a message141Previewing message conversations142Viewing and saving an attachment from a multimedia message142Push messages143Managing message conversations143Setting message options145Android Market and other appsFinding and installing apps from Android Market146Using the Clock148Checking Weather151Reading eBooks152Reading news feeds155Keeping track of your stocks157Working on documents158Viewing a PDF159
5ContentsWatching videos on YouTube159Sharing games and apps161HTC SyncAbout HTC Sync162Installing HTC Sync162Setting up HTC Sync to recognize HTC Flyer163Getting to know the workspace163Setting up synchronization164Synchronizing HTC Flyer167Installing an app from your computer to HTC Flyer167Synchronizing another device with your computer168Downloading the latest HTC Sync upgrade168KeyboardUsing the onscreen keyboard169Entering words with predictive text170Entering text by speaking172Entering text by tracing173Editing text173Adjusting input settings174Internet connectionsData connection176Wi-Fi177About connection widgets179Connecting to a virtual private network (VPN)179Using HTC Flyer as a modem (USB tethering)180Connecting HTC Flyer to the Internet through a computer (Internet Pass-through)181Using HTC Flyer as a wireless router181BluetoothBluetooth basics182Connecting a Bluetooth headset or car kit182Disconnecting or unpairing from a Bluetooth device183Sending information using Bluetooth184Receiving information using Bluetooth186SecurityProtecting your SIM card with a PIN187Protecting HTC Flyer with a screen lock pattern, PIN, or password187SettingsSettings on HTC Flyer189Changing display settings190Changing sound settings192Changing the language192Optimizing battery life192Managing memory193Checking information about HTC Flyer194
6ContentsUpdate and resetSoftware updates195Restarting HTC Flyer196Resetting HTC Flyer196Trademarks and copyrightsIndex
7Conventions used in this guideConventions used in this guideIn this user guide, we use the following symbols to indicate useful and importantinformation:This is a note. A note often gives additional information, such as what happenswhen you choose to do or not to do a certain action. A note also providesinformation that may only be applicable to some situations.This is a tip. A tip gives you an alternative way to do a particular step or procedure,or lets you know of an option that you may find helpful.This indicates important information that you need in order to accomplish a certaintask or to get a feature to work properly.This provides safety precaution information, that is, information that you need to becareful about to prevent potential problems.
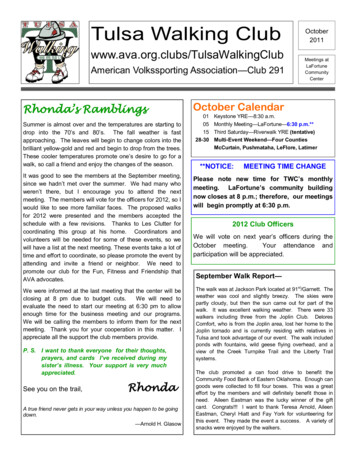
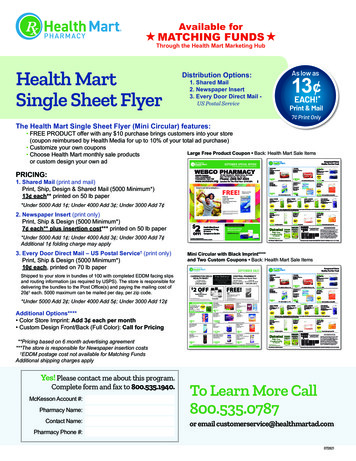
8Getting startedGetting startedInside the boxYou will find the following inside the box:§ HTC Flyer§ USB cable§ Power adapter§ Quick guide§ Safety and regulatory guide§ Call center card (hotline card)§ Warranty cardHTC FlyerFront panel1. HOME2. MENU3. BACK4. PEN OPTIONS5. Front camera6. Front camera on or off indicator
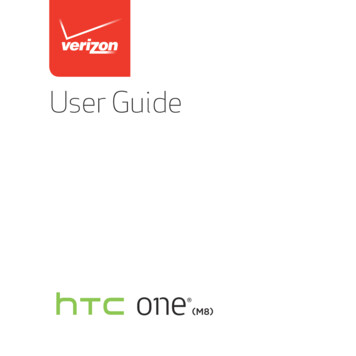
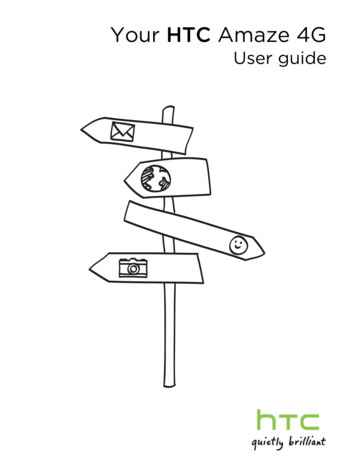
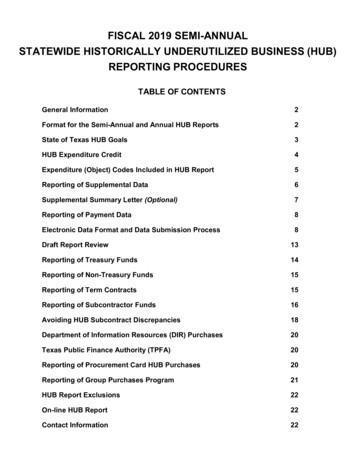
9Getting startedRight panel1. Microphones2. VOLUME UP3. VOLUME DOWNBack panel1. Top cover2. 5 megapixel camera3. Speakers4. USB connectorTop panel1. 3.5mm headset jack2. POWER3. Charging notification
10Getting startedTop coverRemoving the top coverRemove the top cover to access the SIM card and storage card slots.1. Turn off HTC Flyer and hold it securely with the front facing down.2. With your right and left thumbs, push the top cover out to remove it.Replacing the top cover1. Align the two teeth underneath the top cover (one on each side) with the twonotches on the top of HTC Flyer.2. Place the top cover on HTC Flyer, gently press down on the cover with yourthumbs, and then push it in until it clicks and locks into place.
11Getting startedSIM cardYou'll need a SIM card inserted in HTC Flyer to use a data connection. Both 1.8V and3V SIM cards can be used.Some legacy SIM cards may not function with HTC Flyer. You should consult withyour mobile operator for a replacement SIM card. There may be fees for thisservice.Inserting the SIM card1. Turn off HTC Flyer and hold it securely with the front facing down.2. Take the top cover off.3. With the SIM card’s gold contacts facing down and its cut-off corner facing out,insert the SIM card into the SIM card slot.Removing the SIM cardMake sure to switch off HTC Flyer before removing your SIM card.1. Take the top cover off.2. With your finger, press down the small tab located near the opening of the SIMcard slot.3. Slide the SIM card out from the SIM card slot.
12Getting startedStorage cardHTC Flyer comes with an internal storage that you can use to store your photos,videos, and music. If you need more storage space, you can insert a storage card intoHTC Flyer.Inserting the storage card1. Take the top cover off.2. Insert the storage card into the storage card slot with its gold contacts facingdown and push it until it clicks into place.Removing the storage cardIf HTC Flyer is on you must first "unmount" the storage card before removing it toprevent corrupting or damaging the files in the storage card.1. Take the top cover off.2. Push the storage card in to eject it from its slot.3. Slide the storage card out from its slot.Unmounting the storage cardWhen you need to remove the storage card while HTC Flyer is on, unmount thestorage card first to prevent corrupting or damaging the files in the storage card.1. From the Home screen, press, and then tap Settings.2. Tap Storage Unmount SD card.
13Getting startedBatteryHTC Flyer uses a rechargeable battery. How long the battery can last before it needsrecharging depends on how you use HTC Flyer. Among these are the features andaccessories you use (for example, leaving your Bluetooth connection always on usesmore power). Frequent web browsing also uses up a lot of battery power.Charging the batteryThe battery is partially charged when shipped. Before you turn on and start using HTCFlyer, it is recommended that you charge the battery. Some batteries perform bestafter several full charge/discharge cycles.Only the power adapter provided in the box must be used to charge the battery.1. Plug the power adapter into the USB connector of HTC Flyer.2. Plug in the power adapter to an electrical outlet to start charging the battery.As the battery is being charged, the notification LED shows a solid orange light. Thelight turns to solid green when HTC Flyer is fully charged.When you charge the battery while HTC Flyer is on, the charging battery iconisdisplayed in your tablet’s status bar. After the battery has been fully charged, thecharging battery icon turns to a full battery icon.As a safety precaution, the battery stops charging when it overheats.Switching the power on or offSwitching the power onPress the POWER button. Easy.When you turn on HTC Flyer for the first time, you’ll need to set it up.
14Getting startedSwitching the power off1. If the display is off, press the POWER button to turn it back on, then unlock thescreen.2. Press and hold the POWER button for a few seconds.3. When the Power options menu appears, tap Power off.Entering your PINMost SIM cards come with a PIN (personal identification number) set by your mobileoperator. If you’re asked for a PIN, enter it and then tap OK.If you enter the wrong PIN three times, your SIM card is blocked. No problem. Justcontact your mobile operator and ask for the PUK (PIN Unblocking Key).Finger gesturesTapWhen you want to type using the keyboard, select items onscreen suchas application and settings icons, or press onscreen buttons, simply tapthem with your finger.Press andholdTo open the available options for an item (for example, a contact or linkin a web page), simply press and hold the item.Swipe orslideTo swipe or slide means to quickly drag your finger vertically orhorizontally across the screen.DragPress and hold your finger with some pressure before you start to drag.While dragging, do not release your finger until you have reached thetarget position.FlickFlicking the screen is similar to swiping, except that you need to swipeyour finger in light, quicker strokes. This finger gesture is always in avertical direction, such as when flicking the contacts or message list.RotateFor most screens, you can automatically change the screen orientationfrom portrait to landscape by turning HTC Flyer sideways. Whenentering text, you can turn HTC Flyer sideways to bring up a biggerkeyboard.PinchIn some apps, like Gallery or the web browser, you can “pinch” the screenusing two fingers (for example, thumb and index finger) to zoom in orzoom out when viewing a picture or a web page.
15Getting startedSetting up HTC Flyer for the first timeWhen you switch on HTC Flyer for the first time, you’ll be asked to set it up. You canchoose how you want to connect to the Internet and whether you want your currentlocation to be automatically detected. If you still have personal contacts and calendarevents stored on your phone, you can easily transfer them to HTC Flyer throughBluetooth as well.Be sure to sign in to your Google Account so you can use Google apps like Gmail and Android Market . You can also set up your other email accounts, favorite socialnetworks like Facebook and Twitter , and more.Just follow the onscreen instructions and you’ll be up and running in no time.Some features that need to connect to the Internet such as location-based servicesand auto-sync of your online accounts may incur extra data fees. Don’t worry. Youcan enable or disable them in settings later on.Ways of getting contacts into HTC FlyerThere are several ways you can add contacts to HTC Flyer. You can sync HTC Flyerwith contacts from your Google Account, computer, Facebook, and more.HTC Sync Sync the contacts from your phone to your computer, and thenuse HTC Sync to sync HTC Flyer with your computer's Microsoft Outlook , Outlook Express or Windows Contacts.GmailGoogle contacts are imported to HTC Flyer after you sign in toyour Google Account. You can also create more Google contactsright from HTC Flyer.FacebookLog in to your Facebook account through Facebook for HTCSense to import your Facebook friends' contact information.Phone contactsYou can choose to create and store contacts directly in HTC Flyeror transfer existing ones from your phone.SIM cardCopy all your SIM contacts to HTC Flyer.MicrosoftExchangeActiveSync HTC Flyer syncs your work contacts from the Microsoft ExchangeActiveSync Server in your workplace.TransferUse the Transfer app to transfer not only your contacts, but alsocalendar events and text messages from your phone to HTC Flyer.
16Getting startedHome screenYour Home screen is where you make HTC Flyer your own. It comes with a weatherclock widget that shows the time and weather in your current location. You can alsoadd your favorite applications, shortcuts, folders and widgets so they’re always just atap away. To find out how, see Personalizing on page 27.Extended Home screenAs you start to do more things with HTC Flyer, you might find that one Home screenis not enough. No problem. You can use up to seven extra screens. It should be plenty.Slide your finger horizontally to the left or right and you’ll discover more space foradding icons, widgets, and more.Pressto return to the main Home screen (that is, the left-most home screen).
17Getting startedUsing Leap viewTo jump straight to the screen that you want, pressor pinch the screen to showthe Leap view. It reveals all eight Home screens as thumbnails.Just tap the one you want and you’ll leap right there.
18BasicsBasicsAdjusting the volumeChange the volume levels for alarms, notifications, and when you're playing backmusic or video on HTC Flyer.Adjusting the media volumePress the VOLUME UP or VOLUME DOWN button to adjust the volume. The Mediavolume window appears on the screen to display the volume level.Adjusting the volume via settings1. From the Home screen, press, and then tap Settings Sound Volume.2. Drag the volume sliders to the left or right to adjust the volume levels of mediaplayback, alarms, and notifications. A sample tone is briefly played with thevolume being adjusted as you drag a slider.3. When you’re done, tap OK.Sleep modeSleep mode saves battery power by putting HTC Flyer into a low power state whilethe display is off. It also stops accidental button presses when HTC Flyer is in yourbag.Switching to Sleep modeBriefly press the POWER button to turn off the display and switch to Sleep mode.HTC Flyer also automatically goes into Sleep mode when it’s idle for a while.Waking up from Sleep modeTo wake HTC Flyer up manually, press the POWER button. You’ll need to unlock thescreen.HTC Flyer automatically wakes up when you have an event reminder or set analarm.
19BasicsUnlocking the screenPull up the ring to unlock the screen.If you have set up a screen unlock pattern, pin, or password, you will be asked todraw the pattern on the screen or enter the PIN or password before it unlocks.If you've set an event reminder or an alarm, you can dragsnooze or dismiss the event or alarm.orto the ring toOpening an app from the lock screenOn the lock screen, drag an app icon to the ring to unlock the screen and directly goto the app.You can customize the lock screen in Settings Personalize Lock screen to showyour four favorite apps.Status and notificationsStatus iconsHere’s what each icon means:Signal strengthBattery is fullRoamingBattery is charging
20BasicsNo signalBattery is low (20% remaining)GPRS connectedBattery is very low (10% or lessremaining)GPRS in useSilent modeEDGE connectedVibrate modeEDGE in useWired microphone headsetconnected3G connectedWired headset connected3G in useBluetooth is on4G connectedConnected to a Bluetooth device4G in useAirplane modeNo SIM card installedGPS is onConnected to a Wi-Fi networkAlarm is setData synchronizingNotification iconsNotification icons on the status bar make it easy for you to keep on top of yourmessages, calendar events, and alarms.Here’s what each one means:New Gmail messageMore (not displayed) notificationsNew Microsoft ExchangeActiveSync or POP3/IMAP emailGeneral notification
21BasicsProblem with email deliveryHTC Flyer is connected to acomputer via USB cableNew SMS/MMSWi-Fi is on and wireless networksare availableProblem with SMS/MMS deliveryPortable Wi-Fi Hotspot is onNew Google Talk instantmessageUploading data (animated)Upcoming eventDownloading data (animated)New updates from your socialnetworksWaiting to uploadMatched contacts suggestionDownloaded Android Market appinstalled successfullyBluetooth pairing requestUpdate available for an appdownloaded from Android MarketHTC Flyer software updateavailableStorage card is safe to remove orstorage card is being preparedSong is playingStorage card or internal storage islow on free spaceNotification LEDThe notification LED shows a:§ Solid green light when HTC Flyer is connected to the power adapter or acomputer and the battery is fully charged.§ Flashing green light when you have a pending notification.§ Solid orange light when the battery is being charged.§ Flashing red light when the battery level reaches very low.
22BasicsNotifications panelWhen you get a new notification, you can open the Notifications panel to see whatevent notification or new information you've received. The Notifications panel lets youquickly switch between recently-opened apps, and also lets you easily turn on settingssuch as Wi-Fi and Bluetooth.To open the Notifications panel, press and hold the status bar, then slide your fingerdownward.If you have several notifications, you can scroll downthe screen to see them all.You can also open the Notifications panel on the Home screen by pressingthen tapping Notifications.andSwitching between recently opened appsOn the Notifications panel, you can easily access up to ten apps you just recentlyopened.1. Press and hold the status bar, then slide your finger downward to open theNotifications panel.2. In the Recent apps section, tap an app to open it.Press and holdto view recently used apps.
23BasicsUsing Quick SettingsThe Quick Settings tab lets you easily turn on Wi-Fi, Bluetooth, GPS, and more, andalso provides a quick shortcut to all HTC Flyer settings.1. Press and hold the status bar, then slide your finger downward to open theNotifications panel.2. Tap the Quick Settings tab.3. Tap the check box next to an item to turn it off or on.Closing the Notifications panelPress and hold the bottom bar of the Notifications panel, then slide your finger up thescreen. Or just press.Connecting HTC Flyer to a computerWhenever you connect HTC Flyer to a computer using the USB cable, the Connect toPC screen opens and lets you choose the type of USB connection.Select one of the following choices, and then tap Done:Charge onlySelect this option if you only want to charge the battery while HTCFlyer is connected to your computer.HTC SyncSelect this option to synchronize contacts, calendar, and otherinformation between your computer and HTC Flyer.
24BasicsDisk driveSelect this mode when you want to copy files between the internalstorage of HTC Flyer or storage card (if one is inserted) and yourcomputer.When Disk drive mode is enabled while HTC Flyer is connected to thecomputer, you will not be able to use apps on HTC Flyer to access theinternal storage or storage card (if one is inserted).USBtetheringWhen you do not have Internet connection on your computer, youcan select this mode to share the Internet connection of HTC Flyerwith your computer.InternetIf you don’t have a data plan or you don’t have access to a Wi-Fipass-through network, you can select this mode to share your computer’s Internetconnection with HTC Flyer.Copying files to or from the internal storage orstorage cardYou can copy your music, photos, and other files to the internal storage or storagecard (if one is inserted).1. Connect HTC Flyer to your computer using the supplied USB cable.2. On the Choose a connection type screen, select Disk drive, and then tap Done.On your computer, the internal storage of HTC Flyer and storage card arerecognized as two removable disks.3. Navigate to the internal storage of HTC Flyer or storage card.4. Do one of the following:§ Copy the files from the computer to the internal storage of HTC Flyer orstorage card’s root folder.§ Copy the files from the internal storage of HTC Flyer or storage card to afolder in your computer.5. After copying the files, unmount the removable disk (that is, HTC Flyer) asrequired by your computer’s operating system to safely remove HTC Flyer.6. Do one of the following:§ Disconnect HTC Flyer from the computer.§ If you want to keep HTC Flyer connected to the computer but want HTCFlyer to be able to access the internal storage or storage card, open theNotifications panel, tap Disk drive, select an option except Disk drive, andthen tap Done.
25BasicsCopying text, looking up information, andsharingIn apps such as the web browser and Mail, you can select text and choose what youwant to do with it.Selecting text1. Press and hold on a word.2. Drag the start and end markers to highlight the surrounding text you want toselect.To copy the address of a linked web page, press and hold the link, and then tapCopy link URL.Copying and pasting text1. After you have selected the text you want to copy, tap Copy.The selected text is then copied to the clipboard.2. In a text entry field (for example while composing an email), press and hold atthe point where you want to paste the text.3. Tap Paste.Searching or translating text1. After you have selected the text you want to search for or translate, tap.2. Tap one of the following tabs:Google SearchLook for related information using Google Search, based on the text thatyou selected.WikipediaLook for related information on Wikipedia , based on the text that youselected.
26BasicsYouTubeLook for videos on YouTube , based on the text that you selected.Google TranslateTranslate the text to another language.Google DictionaryLook up the selected text in the dictionary.Sharing text1. After you have selected the text you want to share, tap.2. Choose where to paste and share the selected text, such as in an email messageor Facebook status update.PrintingConnect HTC Flyer to a supported printer and print out documents, email messages,photos, and more.§ Both printer and HTC Flyer must be turned on and connected to the same localnetwork. Connect HTC Flyer to the local network using Wi-Fi. To learn how toconnect the printer to a local network, refer to your printer user guide.§ The local network must not be behind a firewall.1. While in an app such as Mail or Gallery, open the item you want to print.2. Press, and then tap Print (or More Print).3. On the Print screen, tap the printer you want to use.4. If there's more than one page to print, set the page range that you want.Tap Advanced to set the page size, print layout, and page orientation, and chooseif you want to print in color or black and white.5. Tap Print.You can check the printing details by opening the Notifications panel, and thentapping the item you're printing.
27PersonalizingPersonalizingMaking HTC Flyer truly yoursMake HTC Flyer look and sound just the way you want it. Personalize it with adifferent wallpaper, skin, and notification sound for events such as incoming email andcalendar reminders.Tap the Personalize buttonright on the Home screen to get started.Personalizing HTC Flyer with scenesUse scenes to create different Home screen arrangements that reflect differentaspects of your life. Customize different Home screens for your work, play or travel,and easily switch between them.Everytime you add or modify something on the Home screen, HTC Flyerautomatically saves your changes to the current scene.Using a preset sceneHTC Flyer features preset scenes, each preconfigured with a different wallpaper andcollection of widgets that reflect different moments in your life. You can choose ascene that is suitable for work, play, travel, or your social life.1. From the Home screen, tap Scene.2. Slide your finger on the screen from right to left to select the scene you want.3. Tap Apply.To download more scenes, tap Scene Get more.Creating a new sceneYou’ll start with an empty Home screen when you create a new scene.1. From the Home screen, tap2. Press Scene., and then tap New.3. Enter a new scene name, then tap Done.4. Personalize the scene by adding widgets and other elements, arranging theHome screen layout, and changing the skin or wallpaper. All of your changes willbe automatically saved to this scene.
28PersonalizingRenaming a scene1. From the Home screen, tap Scene.2. Slide your finger on the screen from right to left to select the scene you want torename.3. Press and hold a scene thumbnail, then tap Rename.4. Enter a new scene name, then tap Done.Deleting scenes1. From the Home screen, tap2. Press Scene., and then tap Delete.3. Slide your finger on the screen from right to left to browse through scenes, thentap one or more scenes you want to delete.4. Tap Delete.Changing your wallpaperPersonalizing your wallpaper with your favorite photo is a quick and easy way to giveHTC Flyer a fresh look. Browse the collection of wallpapers included in HTC Flyer orchoose from photos that you have taken with the camera. You can also change yourHome screen to use an animated wallpaper.1. From the Home screen, tap Wallpaper.2. Tap one of the following:HTC wallpapers Choose a preset wallpaper, then tap Preview Apply.Live wallpapers Choose from preset animated wallpapers. Tap Preview toview the animation, and then tap Apply.GalleryChoose an existing photo. Crop the photo and then tap Save.To download more wallpapers, tap Wallpaper HTC wallpapers Get more.
29PersonalizingApplying a new skinPersonalize beyond the Home screen by applying a new skin. Skins are set to give adifferent look and feel to most onscreen buttons, application screens, option menus,and other items. Skin.1. From the Home screen, tap2. Slide your finger on the screen from right to left to select the skin you want.3. Tap Apply.To download more skins, tap Skin Get more.Personalizing your Home screen with widgetsWidgets put at-a-glance important information and media content up front on yourHome screen. Some widgets are already added to your Home screen for yourconvenience. You can add more from the available selections of widgets.Adding a widget to your Home screen1. Go to a part of the Home screen where there’s space to add a new widget.2. Tap Widget.3. Select a widget that you want.4. Most HTC widgets are available in a variety of designs and sizes to suit yourneeds. Slide your finger on the screen from right to left to view the differentstyles, and then tap Select to choose one.You can also add widgets that allow you to quickly switch on or off certain settingssuch as Wi-Fi and Bluetooth. Scroll down the widgets list, tap Settings, and then tapthe widget that you want.To download more widgets, tap Widget Get more HTC widgets.
30PersonalizingChanging the settings of a widgetYou can modify basic settings of some widgets (for example, the People and Mailwidgets) from the Home screen.1. Press and hold a widget on the Home screen. HTC Flyer vibrates and you’ll see acolored box around the widget. Don’t lift your finger just yet.2. Drag the widget to the edit button(if it’s enabled).The relevant screen where you can change some settings for this widget thenopens.3. Customize the widget settings.
31PersonalizingAdding icons and other shortcuts on yourHome screenPlace app icons on your Home screen to open apps quicker. You can also addshortcuts to settings and specific information such as a bookmarked webpage,someone’s phone number, a music playlist, route directions, and many other items, toyour Home screen.The shortcuts available depend on the apps that are installed on HTC Flyer.1. Go to a part of the Home screen where there’s space to add a new icon orshortcut.2. Tapand then tap App to add an app icon, or Shortcut to add a shortcut to asetting or information.To add an app icon on the Home screen, you can also press, tap, and thenpress and hold an app icon. Without lifting your finger, drag the icon to an emptyarea on the Home screen, and then release it.Adding folders on your Home screenUse folders to group related apps and other shortcuts to keep your Home screen tidyand organized. You can also add information folders that show up-to-date informationsuch as Bluetooth received files, your Facebook phonebook, and more.Creating a new folder and adding items to it1. Go to a part of the Home screen where there’s space to add a new folder.2. Tap Folder.3. Tap New Folder.4. Press and hold an app icon or a shortcut that you want to move to the folder.HTC Flyer then vibrates. Don’t lift your finger just yet.5. Drag the app icon or shortcut and drop it on top of the folder.Simply tap the folder to open it so you can access the apps and shortcuts inside thefolder.
32PersonalizingRenaming a folder1. Tap the folder to open it.2. Pr
Connecting HTC Flyer to the Internet through a computer (Internet Pass-through) 181 Using HTC Flyer as a wireless router 181 Bluetooth . service. Inserting the SIM card 1. Turn off HTC Flyer and hold it securely with the front facing down. 2. Take the top cover off. 3. With the SIM card's gold contacts facing down and its cut-off corner .