Transcription
Series 9000 Water TreatmentSystemOwners ManualInstallationService & PartsOperation GuideThe Clear Choice for Soft, Conditioned Water
TABLE OF CONTENTSPagePre-Installation Review ------------------------------ 2Installation Procedures & Start ----------------3-6System Design & Flow Diagrams ------------- 4-12Valve Parts Diagram & List --------------------- 6-16Timer-Controlled ----------------------------- 15-20Meter-Controlled ----------------------------- 21-27Warranty Information --------------------------------29The Series 9000 Water Treatment Systems are designed and manufactured by:AQUA SYSTEMS7785 East U.S. Highway 36Avon, IN 46123Phone: 317-272-3000Fax: 317-272-50001
Pre Installation ReviewLocation Specifications: Not intended to be used to treat water that is microbiologically unsafe or of unknown quality without adequatedisinfection before or after the system.Hardness in grains:Estimated Water Usage:Iron in parts per million:Service Line Size:Notes:Requirements for Proper Operation:Water Pressure: A minimum water pressureof 20 psi and a maximum of 125 psi must besupplied to the equipment.Water Temperature: The water temperatureoperating range is a minimum of 35 F anda maximum of 100 F. The system and drainmust be protected from freezing.Flow Rate: A minimum of 5 gallons per minuteDrain: A drain must be within 20 ft. of theis required for equipment to work properly. Ifinstallation. There must be a proper backyou have less than 5 gal./min., consult withsiphon provision put in place.factory for special settings.Electricity: Plug sytems into a standard 110volt outlet. System uses 110 v - 60 hz - 3wattsTips for Maximizing the Benefits From the Series 9000:Salt: By using a clean grade of salt, you canreduce or eliminate brine tank clean outs. Ifyou have iron in your water, using an ironinhibiting salt can help. Always keep the saltlevel above the water level in the brine tank.Power: In the event of a power outage,checkthe timer for the current time and adjust ifnecessary.2Bypass: If you require well or pump work,always bypass your Series 9000 until thework is finished and the water runs clear.Sand: If sand is present, use a specialfilter to remove the sand before the system.
Installation Procedure System and Installation must comply with state and local codes.Read all instructions before starting!A. Do you want your outside spigots on hard water? If so1. Unpackage system and visually inspect. Note: If the systemplace provisions in the water line before entercomes equipped with demand regeneration. The By-Pass valve ing the unitby placing appropriate number of tees andfor these units is located in a separate box inside the main box.extendingthem to the outside.It is required that the By-Pass valve be installed onto the meter.B. Is there a main shut off valve for the building? If not, aTo do so simply loosen the 2 adapter clips located on the back ofconvenient place for one is in the inlet line to the unit.the meter with a 1/4” nut driver or a screwdriver. Slip the bypassC. The inlet water line should be a minimum of 3/4” inover the “O” rings on the meter and tighten the adapter clips.size. If yours is smaller consult our manufacturing plantfor required adjustments.2. Find a location with accessibility to:D. Do not solder fittings directly into the By-Pass valve,A. The main inlet water supply.use threaded adapter with a minimum 3” between sweatB. Adequate drain Fixture, capable of 5 gallons perfitting and By-Pass.min. flow.With the above considerations connect the water line to the inletC. Electrical Outlets.of the conditioner which is designated by an arrow pointing toward3. Place Unit in chosen location, if the floor is not level the unitthe valve of the unit on the By-Pass.may be leveled with the built in adjustable base by lightly tappingthe unit on the floor.4. Connect the outlet, designated by an arrow pointing away from4. There should be a minimum of 12ʼ of Water Line betweenthe unit on the By-Pass, to the water line that feeds the inside ofsoftener and water heater.the building.1. Turn off electric or gas to water heater and the inlet (cold)water valve to heater.2. Turn off main water supply to building and drain off pressureat all cold water outlets.3. In placing the inlet line to the unit make these considerations.Note: If the building is pre-plumbed with a three way By-Pass thatBy-Pass must be inspected. If the By-Pass does not seal 100%there will be hard water intrusion.Drain Line ConnectionOn the back of the water control center there is a 1/2” Threaded port. This is the connector for the system drain. Use only teflontape on the connection. Do not use pipe dope or paste of any kind.Note:You may elevate the drain line up to 6 feet if you are discharging into an open drain and if you have a minimum of 40 psi water pressure at the softener. You may elevate an additional 2 feet for each additional 10 psi over 40 psi.Also, the total run of the drain line should not exceed 20 feet.Some codes require, and it is advisable, that you leave a 4” air gap between the drain line and the floor drain.Brine LineOn these units it is necessary to install the brine line between the control valve and the brine tank. A 4 foot piece of3/8” poly tubing is included with the unit. Install one end of the tubing to the compression elbow at the brine tank making sure thebrass sleeve is inserted into the tube before hookup. Install the other end of the tubing into the compression nut on the right handside of the control valve making sure to first insert a brass sleeve into the tubing and then insert the brine screen (included) into thebrass sleeve. Tighten fittings.OverflowEach unit has the provision for connecting an overflow drain line. On the brine tank is a slip fitting for 5/8” plastic line. This should berun to an area where a small amount of spillage would be accepted in the event a malfunction should occur.Sanitizing the SystemThe materials of construction of the modern water conditioner will not promote bacterial growth, nor will these materials contaminatea water supply. However, the normal conditions that exist during shipment, storage and installation make it advisable to disinfect aconditioner after installation, before the conditioner is used to treat potable water. In addition, during normal use, a conditioner maybecome fouled with organic matter, or in some cases, with bacteria from the water supply. Therefore every conditioner should bedisinfected after installation, some will require periodic disinfection during their normal life.To Disinfect the System:1. Add 1.2 fluid ounce of 5.25% sodium hypochlorite solution (household bleach; Clorox, Bo Peep, etc.) for each cubic foot of resin tothe brine well of the brine tank. ( the 4” tube with a cap on it inside of the brine tank)2. Manually start a normal regeneration. Allow the system to complete the regeneration.3
4
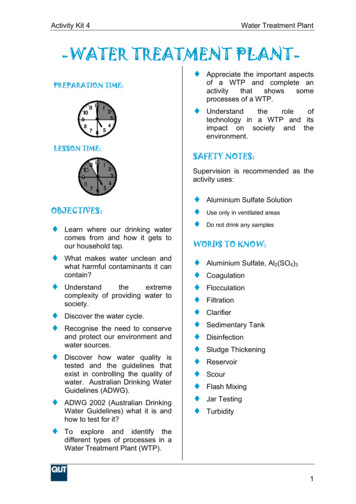
TIMER MODELinstallation and start-up procedure5
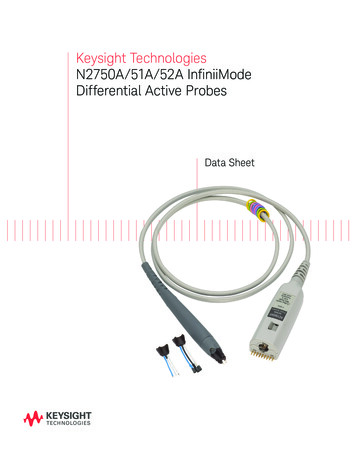
METERED MODELinstallation and start-up procedure6
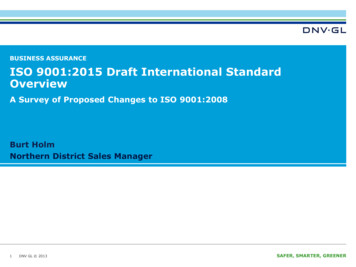
Distributor System and Brine TankParts List for Main System and Brine Tank*Item No.1.2.3.4.5.6.7.8.DescriptionNot UsedTurbulator Distributor SystemTank ShroudBrine WellSalt ShelfResinMediaSafety Shut Off - Brine Valve* In ordering these parts you must specify your model number.7
Maintenance InformationQuick Disconnect Procedure:1. Uplug unit from electrical power source.2. Move the Bypass lever from the “Service” position tothe “Bypass” position3. Turn the Manual Regeneration knob to the“Backwash” position to relieve the pressure.4. Remove the drain line from the back of the ControlHead.5. Remove the Brine Line from the control valve usinga5/8 wrench.86. Remove the two clips between the bypass and thecontrol valve using a screwdriver or a 1/4” nut driver.Then gently slip the unit off of the bypass.7. Remove the two valve mounting pins at the base ofthe valve. Then gently rock the valve from front toback while lifting up.8. To reinstall the control valve, center the controlvalveover the distributor tube and gently pushdown whilegently rocking the valve front toback.9. Sanitize system when finished. (see page 3 forinstructions on sanitizing.)Note: When removing the head there may be some spillage of water.It is recommended to have a towel handy.
TURBO DISTRIBUTORwater conditioner flow diagrams9
10
VALVE BODY ASSEMBLY(see parts list)11
MODEL WCCVALVE BODY ASSEMBLYPARTS LIST12
BY-PASS ASSEMBLY13
METERED MODELmeter assembly14
TIMER MODELcontrol valve drive assembly(see opposite page for parts list)15
TIMER MODELCONTROL VALVE DRIVE ASSEMBLYPARTS LIST16
TIMER MODELservice instructions17
18
TIMER MODELservice instructions19
20
METERED MODELcontrol valve drive assembly(see opposite page for parts list)21
METERED MODELMETER INITIATEDPARTS LIST22
METERED MODELservice instructions23
METERED MODELservice instructions24
25
METERED MODELservice instructions26
27
28
LIMITED LIFETIME WARRANTYWARRANTY POLICYAQUA SYSTEMS, Avon IN, warrants this water treatment system as stated herein:From the date of shipment, when we receive any part (or parts) described below, during the specified period below,which we find defective because of faulty materials or workmanship or corrosion we will repair or replace the part (orparts) and return it to you, you pay only freight to and from our factory and local labor and service charges. Five Years On All PartsLife time on Brine TankLife time on Mineral TankGENERAL CONDITIONSDamage to any part of this water treatment system because of misuse, misapplication, neglect, alteration,accident, installation or operation contrary to our printed instructions, or damage caused by freezing, flood, fireor Acts of God, is not covered by this warranty. In all such cases, regular parts and service charges apply.We assume no warranty liability in connection with this water treatment system other than specified herein.This warrantyis in lieu of all other warranties, expressed or implied, including warranties of fitness for a particular purpose.We do not authorize any person or representative to assume for us any other obligations on the sale of thiswater treatment system.This warranty becomes effective on the shipment date of the covered system. Should a malfunction occur,contact AQUA SYSTEMS at the convenient phone number or the address listed on this warranty.This warranty applies to the original owner at the original location. This warranty is transferable to subsequentowners or locations only with prior written consent by AQUA SYSTEMS. Prior to written consent on transferringthis warranty the system may require inspection by a service technician from AQUA SYSTEMS or onecertified by AQUA SYSTEMS.Owners NameInstallerAddressModel #Date of InstallationAQUA SYSTEMS7785 East U.S. Highway 36Avon, Indiana 46123Serial #RepresentativeManufacturing Plant and Offices317-272-3000Fax: 317-272-500029
4. There should be a minimum of 12ʼ of Water Line between softener and water heater. 1. Turn off electric or gas to water heater and the inlet (cold) water valve to heater. 2. Turn off main water supply to building and drain off pressure at all cold water outlets. 3. In placing the inlet line to the unit make these considerations. A.