Transcription
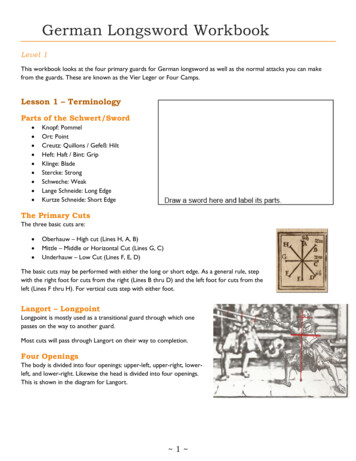
German Longsword WorkbookLevel 1This workbook looks at the four primary guards for German longsword as well as the normal attacks you can makefrom the guards. These are known as the Vier Leger or Four Camps.Lesson 1 – TerminologyParts of the Schwert/Sword Knopf: PommelOrt: PointCreutz: Quillons / Gefeß: HiltHeft: Haft / Bint: GripKlinge: BladeStercke: StrongSchweche: WeakLange Schneide: Long EdgeKurtze Schneide: Short EdgeThe Primary CutsThe three basic cuts are: Oberhauw – High cut (Lines H, A, B)Mittle – Middle or Horizontal Cut (Lines G, C)Underhauw – Low Cut (Lines F, E, D)The basic cuts may be performed with either the long or short edge. As a general rule, stepwith the right foot for cuts from the right (Lines B thru D) and the left foot for cuts from theleft (Lines F thru H). For vertical cuts step with either foot.Langort – LongpointLongpoint is mostly used as a transitional guard through which onepasses on the way to another guard.Most cuts will pass through Langort on their way to completion.Four OpeningsThe body is divided into four openings: upper-left, upper-right, lowerleft, and lower-right. Likewise the head is divided into four openings.This is shown in the diagram for Langort. 1
ThrustingAs you can see in this illustrations from Talhoffer’s 1467 book, thrusting can be done by either leaving the hands in theirnatural position or by moving the left hand to the pommel of the sword. The latter is often used to change a cut into athrust at the last moment.Sign ManIt is traditional for fencing schools to have a sign man posted on the wall. This is used to act as a visual reminder of thecuts and what lines they occur on. Using the space below, label the cuts and openings. 2
Lesson 2 – Ochs – OxRingeckThe first guard. The Ox.Hold it like this: stand with the left foot forwards, and hold your sword beside and slightly in front of the right sideof your head, and let the point hang towards his face.MeyerThe upper part of the combatant is allotted to the Ox, and as that has two quarters, the right and left, so onecan divide the posture of the Ox into two parts, namely the right and left. The right Ox is done thus: stand withyour left foot forward, and hold the sword with the hilt up by your head on the right side, so that your pointextends toward your opponent’s face. For the left Ox, position yourself opposite to this, that is, stand with yourright foot forward, and hold your sword with the hilt by your head on the left side as I have said. Thus you haveboth Ox guards or postures; this posture is depicted on the left side of Image B.These illustrations from Paulus Hector Mair show both the left and right Ochs. Note how the left Ochs doesn’t have thearms crossed. 3
Cutting and Thrusting ExperimentsAcquire a wooden post, or another fencer in suitable protective gear. While you stand in Right Ochs, attempt to throwa cut in each of the eight lines. Record how each cut feels, whether it is easy or hard, fast or slow, and powerful orweak. Note that some cuts may not be possible.For the center box, record how well you can thrust.HAGFBCEDParrying ExperimentsAcquire another fencer in suitable protective gear. While you stand in Right Ochs, the other fencer attempts to throw acut in each of the eight lines. Record the ones that are easy or hard to defend. If you can safely hit your opponent as youparry his attack, record that as well.The other fencer may start in any position he chooses. If you cannot parry a cut, dodge it by stepping backwards orsideways.For the center box, record how well you can parry thrusts from the left and the right.HAGFBCE 4 D
Cutting and Thrusting ExperimentsRepeat the cutting and thrusting experiments from Left Ochs.HAGFBCEDABParrying ExperimentsRepeat the parrying experiments from Left Ochs.HGFCE 5 D
ReviewDraw your own fencers standing in Left and Right Ochs1. Does it feel more comfortable to have the quillons straight up and down or more of an angle?2. Which is better for attacking?3. Which is better for defending?4. Do you prefer to “unwind” your arms when you thrust from Right Ochs?5. Do you use a passing step when thrusting? Or do you just step forward without changing your lead foot?6. Are there any cuts that feel better when stepping wide (i.e. to the side)?7. When stepping backwards?8. Do you feel your lower body is adequately protected in this guard?9. Do you prefer to stand more upright? Or is a lower, wider stance better for you? 6
Lesson 3 – Pflug or PlowRingeckThe second guard. The Plough.Hold it like this: stand with the left foot forward, and hold your sword with crossed hands beside and slightlyabove your right knee, in such a way that the point is towards his face.MeyerThe lower part of the combatant belongs to the Plow, and as that has two quarters or two sides, right and left, sothe Plow is called right or left. Both are in essence merely the position of a thrust from below. Execute the rightPlow as follows: stand with your right foot forward, hold your weapon with the hilt by your forward knee, and amthe tip or point at your opponent’s face as if you intended to thrust at him from below; thus you are in the rightPlow. If you stand with your left foot forward and do the same thing, then you are in the left Plow. And the rightPlow is also illustrated in the same image [B] on the right.Notice how Ringeck prefers his Pflug to be retracted while Meyer has it extended.Here are two more examples, one from Solothurner and the other Paulus Hector Mair. 7
Cutting and Thrusting ExperimentsFor the first set of cuts and thrusts, use Ringeck’s Right Pflug.HAGFBCEDABParrying ExperimentsFor the first set of parries, use Ringeck’s Right Pflug.HGFCE 8 D
Cutting and Thrusting ExperimentsFor the second set of cuts and thrusts, use Meyer’s Right Pflug.HAGFBCEDABParrying ExperimentsFor the second set of parries, use Meyer’s Right Pflug.HGFCE 9 D
Cutting and Thrusting ExperimentsFor the third set of cuts and thrusts, use Ringeck’s Left Pflug.HAGFBCEDABParrying ExperimentsFor the third set of parries, use Ringeck’s Left Pflug.HGFCE 10 D
Cutting and Thrusting ExperimentsFor the fourth set of cuts and thrusts, use Meyer’s Left Pflug.HAGFBCEDABParrying ExperimentsFor the fourth set of parries, use Meyer’s Left Pflug.HGFCE 11 D
ReviewDraw your own fencer standing in Pflug1. Do you feel safer in Ringeck’s or Meyer’s Pflug?2. Is it easier to cut from Ringeck’s or Meyer’s Pflug?3. Is it easier to thrust from Ringeck’s or Meyer’s Pflug?4. Do you raise your sword before using Oberhauws? Or do you just aim lower?5. When someone thrusts at you, do you thrust in return?6.Do you feel your head is adequately protected while in this guard?7. Do you prefer to stand more upright? Or is a lower, wider stance better for you? 12
Lesson 4 – Alber, The Fool’s GuardRingeckThe third guard. The Fool.Hold it like this: stand with your right foot forwards, and hold your sword with outstretched arms in front of youwith the point towards the ground.MeyerThe Fool in my opinion takes its name from the word Alber, which is to say ‘simple-minded’, since from this guardno proper stroke can be readily achieved, unless one gathers for a new cut after the opponent’s cut has beencaught by means of a parry, which is truly the part of a fool and simple man, to allow someone to strike himwithout a prepared counterstroke. It is performed thus: stand with your left foot forward, and hold your swordwith the point extended toward the ground in front of you before your forward foot, such that the short edge liesabove, the long edge below. Thus you lie properly in this guard, as you can see in the same image [C] on theright.Notice how Ringeck prefers his Alber somewhat to the side while Meyer extends it directly forward. Also note thatRingeck prefers the right foot forward while Meyer prefers the left. 13
Cutting and Thrusting ExperimentsFor the first set of cuts and thrusts, use Ringeck’s Alber with the Right foot forward.HAGFBCEDParrying ExperimentsFor the first set of parries, use Ringeck’s Alber with the Right foot forward.HAGFBCE 14 D
Cutting and Thrusting ExperimentsFor the second set of cuts and thrusts, use Meyer’s Alber with the Left foot forward.HAGFBCEDParrying ExperimentsFor the second set of parries, use Meyer’s Alber with the Left foot forward.HAGFBCE 15 D
ReviewDraw your own fencer standing in Alber1. Do you prefer the point to be straight forward or off to the side a bit?2. Do you prefer to have a balanced posture or to lean forward like Meyer?3. Were you able to make your partner miss by shifting your weight backwards?4. When your partner cut your head, did you have a tendency to thrust him in the chest at the same time?5. If so, were you able to do so safely? Or was it a “double-kill”?6. Do you try to deflect downward cuts by battering them away with your short edge?7. Do you try to block downward cuts by turning over your sword and catching them with long edge? 16
Lesson 5 – vom Tag or From the RoofThis is also known as Tag, which means Day.RingeckThe fourth guard. From the Roof.Hold it like this: stand with the left foot forwards, and hold your sword at your right shoulder. Or hold it withoutstretched arms above your head. And how you shall fence from these guards, you will find described in thisbook.MeyerThe guard of the Day, which is also called the High Guard [Oberhut], is executed in the following manner: standwith your left foot forward, and hold your sword up over your head so that the point extends right upwards, asshown by the figure on the left in Image C. Now any attack that is delivered from above is said to be executedfrom the Day or High Guard; therefore this posture is called the Day.In modern speech, we refer to the two variants as “Right vom Tag” and “High vom Tag”.Some right-handed fencers like to adopt a posture they call “Left vom Tag”. For the right-handed fencer this involveshaving the Short edge facing forward instead of the Long edge. As this posture is not found in either of the Germanlongsword systems covered by this workbook, no worksheet for it will be provided. 17
Cutting and Thrusting ExperimentsFor the first set of cuts and thrusts, use Ringeck’s Rigth vom Tag with the Left foot forward.HAGFBCEDParrying ExperimentsFor the first set of parries, use Ringeck’s Rigth vom Tag with the Left foot forward.HAGFBCE 18 D
Cutting and Thrusting ExperimentsFor the second set of cuts and thrusts, use Meyer’s High vom Tag Left foot forward.HAGFBCEDParrying ExperimentsFor the second set of parries, use Meyer’s High vom Tag with the Left foot forward.HAGFBCE 19 D
ReviewDraw your own fencers standing in Right and High vom Tag1. For defending yourself, do you prefer Right vom Tag or High vom Tag?2. For attacking, do you prefer Right vom Tag or High vom Tag?3. Did you feel that High vom Tag left you exposed to low cuts?4. Did you feel that High vom Tag left you exposed to thrusts?5. Do you prefer to hold your Right vom Tag close to the body or do you push your arms out some?6. Were you able to thrust from high vom Tag? If so, did you have to let go with one hand? 20
CopyrightsFundamental Description of the Noble and Knightly Art of Fencing, 1570, by Joachim Meyer. Translation by Jeffrey L.ForgengMS Dresden C 487, circa 1504-1519, by Sigmund Schining ein Ringeck Translated by Keith Farrell.[name?], 1467, by Hans TalhofferNext StepsWe have two paths for the workbook.The Meisterhauwen of the German Longsword: This workbook will look at using the master strikes to break theguards discussed here. There will be a heavy emphasis on thrusting and range control. This will be mostly in preparationfor Ringeck and other Liechtenauer-based manuals.More German Longsword Guards: This workbook will introduce more guards, many of which are unique to Meyer.It will follow the same layout as this workbook. 21
German Longsword Workbook Level 1 This workbook looks at the four primary guards for German longsword as well as the normal attacks you can make from the guards. These are known as the Vier Leger or Four Camps. Lesson 1 – Terminology Parts of the Schwert/Sword Knopf: Pommel Ort: Point Creutz: Quillons / Gefeß: Hilt