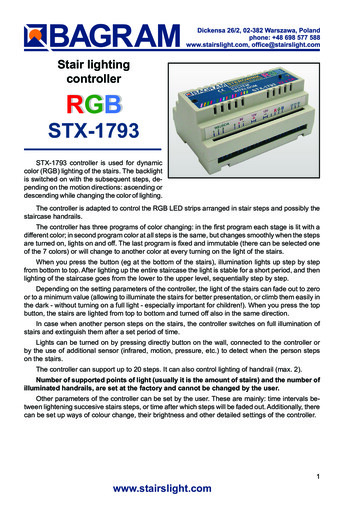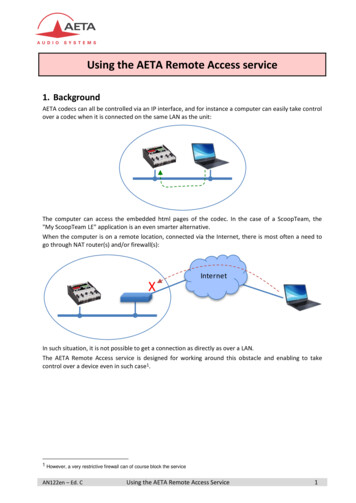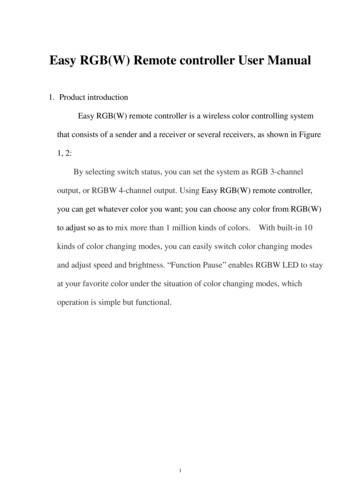
Transcription
Easy RGB(W) Remote controller User Manual1. Product introductionEasy RGB(W) remote controller is a wireless color controlling systemthat consists of a sender and a receiver or several receivers, as shown in Figure1, 2:By selecting switch status, you can set the system as RGB 3-channeloutput, or RGBW 4-channel output. Using Easy RGB(W) remote controller,you can get whatever color you want; you can choose any color from RGB(W)to adjust so as to mix more than 1 million kinds of colors. With built-in 10kinds of color changing modes, you can easily switch color changing modesand adjust speed and brightness. “Function Pause” enables RGBW LED to stayat your favorite color under the situation of color changing modes, whichoperation is simple but functional.1
Fig.12
Fig.22. Performance parameters2.1Sender:Working temepature:4.5V(3 1.5V 7 AAA battery)Working current: 22mADormancy current: 20μAWorking frequency:434MHZ (/868MHZ/915MHZ) (optional)Transmit power : 5dBm2.2 ReceiverInput Voltage:12-36VDCOutput Voltage:12-36VDCInput Current:4CH 5A maxOutput power:4CH (36-160W)Working Frequency:434MHZ(/868MHZ/915MHZ) (optional)3. components description:3.1 Sender“ R” button and indicator。“G” button and indicator。3
“B” button and indicator。“W” button and indicator。Working status indicator, the sender is in sleep mode when the indicator is off.The sender is transmitting when the indicator is flashing rapidly. If theindicator continues flashing at the frequency of 1 second, it indicates that thesender batteries low and needs to replace new batteries.Slow down the speed when color is changingSpeed up when color is changing.Multifunction button, used for selecting, Synchronous or asynchronousmode. (all zones change at the same time or chase)Brightness downBrightness upMultifunction button, used for turn ON/OFF and white output.Figure 1-10 is for selecting receiver’s ID and ID itself to turnON/OFF.Touch wheel for selecting R/G/B colors.4
3.2 ReceiverJ1---power input socketJ2---RGB(W) output socketJ3—RGB/RGBW output switch,closed circuitis RGB 3 channel output,open circuitis RGBW 4 channel output.Receiver ID code learning ButtonReceiver ID code learning indicator and for receiving message4. Basic Usage4.1 Install batteryInitial using easy RGB(W) remote controller, open the battery cover on theback of the sender, load 3pcs 7 AAA (1.5V) batteries. Please pay attention tothe battery’s negative and positive; otherwise it will fail to work.4.2 Receiver learning ID5
Initial using easy RGB(W) remote controller must learn the ID of the receiver,the purpose of learning ID code is to make a certain receiver which cancorrespond the sender.The method of Receiver learning ID is as follows: press the ID learningbuttonon the sender, the ID learning indicatorone of the number buttonis on, then presson the sender, press the numberthat you want this receiver to be, E.g. If you want this receiver to be No. 1,please press buttonfirst, then touch the wheel, or you can pressany functional button on the sender, such asetc. to transmit signal to the Sender,after Receiver receives the signal from the sender, the indicator will flash a fewtimes and then turns off, then receiver ID is activated. If the ID activation isfailed at the first time, please repeat the previous procedures.Attention: The receiver ID learned by touching color wheeltherecieverthatlearnedbypressingis different fromfunctionbutton。The receiver ID learned by touching colorwheelthat we define it as SLAVE receiver, the receiver ID learned bypressing function buttonthat we define it as6
MASTER receiver. The purpose of learning these two kinds of receivers is to ensurethe receivers and color changing synchronously to avoid the color changing out ofsync between controllers. This point will be noted later.4.3 Delete ID and ID re-learningIf you need to delete the ID learned in the receiver, press ID learningbuttonfor more than 5 seconds, when learning indicator is off, then thelearned ID is deleted. If you need the receiver learn a new ID, repeat theoperation of 4.2 (Receiver learning ID).4.4 Choose color by touching color wheelAfter the receiver learned the ID, you can change each receiver’s colorby touching color wheel. If you want to change the color of receiver NO.1.Press button, then make rotating touch on color wheelbyyour figures, at this time, the color of receiver No.1 will be changedconstantly, when your favorite color appears, stop rotating and leave thecolor wheel.If you need change color of several receivers at the same, just choose anumber for these several receivers first, then touch color disc. Forexample, change color for receivers NO.1, 2, 3,4,5,6 at the same time, you7
need press number 1 to 6 buttonwheelfirst, then touch the color.4.5 Select or adjust color by R, G, B, W buttonIn addition to change the color by touching color wheel, but you canalso select the single color through R,G, B, W buttonsor adjust the color by color wheel to get yourwanted color. For example, you choose a color by touching color wheeland still want add a bit more brightness to red color, just press Rbuttonfor over 2 seconds, then the indicator of R will be on and redis selected, make clockwise rotationon the color wheelbyfinger, then the brightness of red will be increased. If you want the red colorto be darker, just make counter clockwise rotationwheelon the color. If need to adjust the color brighter or dim several colors atsame time, also just choose the colors , such as R,G, then make clockwiserotationor counterclockwise rotation, it cansimultaneously adjust the brightness for both colors. If you want to cancel8
the selected color, just press selected button for 2 seconds, thecorresponding color will be off, and the color is abandoned.By pressing of R ,G, B, W button,you can turnon/off the corresponding single color. For example, if you want LED lightingsto get red, press Rfor over 1 second, then the red color will be turn on. Ifyou want to turn off red again, press Rfor 1 second, the red will be offagain. The same operation is for other colors.Note that: If you select a color output, such as red, then you select anothercolor output, such as green. So red and green are output at the same time. Ifyou only need to separate out the second output “green”, just turn off the frontcolor “red”.In short, using R, G, B, W buttonswheeland operating color, you can mix more than 1 million colors or any color you want.Attention: The receiver is under single or multi-color adjustmentcondition when any single or multi-color is selected. Under this condition, youcan only make clockwise rotationrotationor counterclockwiseoperation to adjust the color. A direct touch on color9
wheelwill not work. Only after exiting from the single or multi- colorcondition, a direct touch on color wheelwill work.4.6 Choose color changing modeSelecting the mode button, receiver change colors according todifferent modes, a total of 10 built-in color changing modes.If you want one or several receivers under color changing mode, pressnumber buttonbutton, and choose receiver number, then pressagain. For first press of buttonaccording to mode 1, one more time press of button, receiver will change, the receiver willbe paused, it will stay at one color under mode 1 condition. Pressbuttonagain, the color will change according to mode 2, press buttonone more time, it will be paused at one color under mode 2. Pressbuttonfor seconds, the receiver will keep changing as DE7---STOP---MODE8---STO10
P---MODE9---STOP---MODE10---OFF----MODE1 .The receiver will be at one of static colors by touching the color wheel in colorchanging modes. Then press M button , receiver will be changed as Mode 1 again.4.7Brightness adjustmentUnder the static color status or color changing status, you can adjustthe brightness by press Band pressing buttonto increase thebrightness. The brightness is divided into 8 levels, the minimum is 10%, andthe maximum is 100%.4.8 Changing speed adjustmentUnder color changing mode, you can slow down the changing speedby pressing buttonbutton, or speed up changing speed by pressing, 16 speed levels in total are available. The maximumchanging cycle is 4 seconds; the minimum changing cycle is 256 seconds.5. Expanded Usage5.1 Color changing for multiple same ID receivers under same mode.One receiver of the sender can be learned (unrestricted) bymultiple receivers, a receiver can be only defined one ID No. from one11
sender .If one of senders is learned by several receivers, all these receiverswill share the same ID No. When all these receivers are changing color at thesame time, to ensure long-time changing in order, one of the receivers fromthis group is needed to be set as Master receiver and other receivers need tobe set as Slave receivers. How to set Master receiver and Slave receiver,please refer to 4.2(Receiver learning ID code.) Notice: Only onereceiver(Master) can be set in a group of receivers, otherwise it may causechaotic phenomena.When Master receiver is set, this group receivers are changing color at sametime, synchronized signal will be emitted so as to ensure this group receiverwill be in order no matter how long the color changes and keep changingforever . For example, 10 receivers are learned to be ID 1. , these 10 receiverswill change according to one mode, in order to avoid chaos of working unitsafter a long time, one of the receivers is needed to be set as Master ,the Masterwill launch synchronized signal when color is changing, thus ensure this groupof receivers are in good order no matter how long the color is changing5.5 Color changes of multiple-different ID receivers in the same modeIn order to avoid chaotic phenomena after a long time, whenmultiple-different ID receivers are changing the color under the same mode,one MASTER receiver is needed to be set in this group .How to set MASTERreceiver and SLAVE receiver , please refer to 4.2 (Receive learning ID code).Notice: Only one master receiver can be set among a group of receivers,otherwise it may cause chaotic phenomena. , the Master will launch12
synchronized signal when color is changing to ensure this group of receiverswill be in good order no matter how long the color changes. For example,Receiver 1,2,3,4,5 move color under the same mode 1, at this time, you needto set one of the receivers as Master receiver , if receiver 1 is set asMASTER, then receiver 1 will launch synchronized signal to other receivers2,3,4,5, meantime they will keep changing constantly without chaos accordingto the synchronized signal from receiver 1. In addition: if there are severalreceiver 1, only one of them can be set as MASTER receiver, others must beset as SLAVE receiver, otherwise it will cause chaos .5.3 The usage of button M ---the switch between Synchronous color changingand asynchronous color changingPress buttonfor 2 seconds to switch between Synchronous colormove and Asynchronous color changing when multiple different receivers arein the same mode. Synchronous color changing means the starting point andending point are at the same time, Asynchronous color changing means there iscertain time delay of the starting point and ending point, the later receiver startor ending point is always later than the previous receiver. For example,Receiver 1,2,3,4,5 changing together under mode 1, if it is Synchronous colorchanging, all of the receivers change will start and end at the same time. If it isAsynchronous color changing , then receiver 1 will start change firstly , thenfollows by receiver.2 , and later by receiver 3 and receiver 4 and receiver5 and recycle to receiver 1 .The purpose of asynchronous color changeis to achieve the color changing effect which looks like water chasing .13
5.4 Usage of ON/OFF5.4.1 Press of ON/OFF button5.4.2 Press ON/OFF buttonfor turning ON/OFF receiver.for more than 2 seconds, it can revealwhite light output, each channel is 100% output.5.5 The usage of number button5.5.1 Press on number button for choosing the corresponding receiver, E.g. toadjust the brightness of receiver 1, you need to press 1 buttonpress buttonor button, thento adjust its brightness.5.5.2 Pressing number button can turn on/Off the corresponding singlereceiver, E.g. If you need to turn off receiver 1, press buttonmorethan 2 seconds, if you need turn it on again, please press buttonagain for more than 2 seconds.Notice: If you turn off the extension by pressing the corresponding numberbutton, you must turn on this receiver in the same way, The receiver can notbe switched on through button ON/OFF.6.Symptoms and solutions14
SymptomThe ReceiverAnalysissolution1. Exceeded learning1. Press receiver learningcannot be learnedtime; learning timebutton,LED indicator isto the senderis only 5 seconds。ON,press the number2.Sender is in sleepbutton before led indicatormodeis OFF,then pressfunction button or touchcolor wheel。2. Press On/Off to make thesender under workingstatus.The sender1. Receiver isn’tcannot controllearned to thethe receiversender。1. To learn the receiver bythe sender.2. When receiver is learned2. The receiver isn’tto the sender, presslearned to thenumber button first,thensender correctly。press function button or3. Remote distance isout of range。4. Incorrect receiver。touch color wheel。3. Shorten the remotedistance。4. Choose correct receiverID。Color changing1. MASTER receiver151. Reset a new MASTER
isn’tisn’t set.synchronizedreceiver.2. More than twoMASTER receivers2. Relearn all the receiverswith one MASTR receiverare set.Wrong color1. Wrong connection1. Reconnect RGB(W)of RGB(W) electricelectric wireswires.LED flashing1. the power supply is1. Change a higher wattagenot large enoughpower supply7.Precautions7.1Please remove the batteries if the unit is not used for a long time.7.2Don’t drop the sender from a high place or don’t squash it.7.3Please replace new batteries if there is a warning indicator of insufficientpower, otherwise it would cause damage to the sender.7.4 Receiver is non-waterproof, and not for outdoor use.16
1 Easy RGB(W) Remote controller User Manual 1. Product introduction Easy RGB(W) remote controller is a wireless color controlling system that consists of a sender and a receiver or several receivers, as shown in Figure
