Transcription
P/N P474-2150OWNER'S MANUAL1 For AllProgrammableDigital l Locking CoverDual Setpoint5 1 1 Day Programmable3 Occupied, 1 UnoccupiedVery Easy to ProgramLarge, Easy To Read DisplayThermoglow BacklightNo Batteries RequiredAuto ChangeoverEnergy Saving Smart FanLocking KeypadOverride ButtonMeets California Title 24 Both Commercial & ResidentialUse with most Air Conditioning & Heating Systems including: 1 or 2 StageElectric Cooling & Gas Heating, Heat Pump, Electric or Hydronic Heat.TOTALINEReplacement Components DivisionCarrier Corporation 11/98
Table Of ContentsFRONT PANELDISPLAYQUICK START Set the clock and goBASIC OPERATIONPROGRAMMING Occupied / UnoccupiedADVANCED SETUPABOUT ADVANCED OPERATIONWARRANTY23568131722CAUTIONFollow Installation Instructions before proceeding.SET THERMOSTAT TO MODE “OFF” PRIOR TOCHANGING SETTINGS IN SETUP OR RESTORINGFACTORY DEFAULTS.Replacement Components DivisionCarrier Corporation 11/98P/N P474-2150Page 1
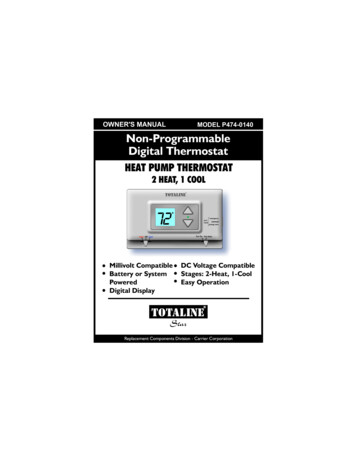
Front PanelTOTALINEI2:0072Mo174COOLAUTO70HEAT32451Liquid Crystal Display2Up/Down Buttons3Mode Button4Override Button5Heat or Cool Indicatorwith ThermoglowHeat Red, Cool GreenPage 2
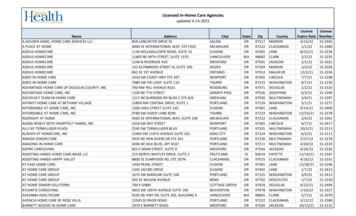
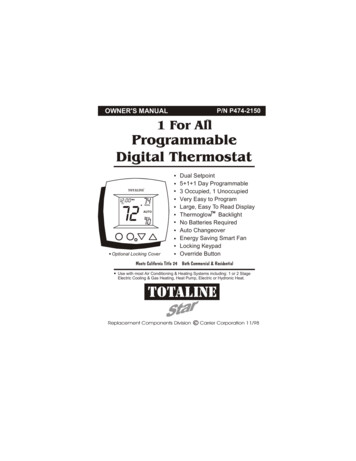
Display11742615131148101Mode IndicatorsSelects the operation mode of the equipment.HEAT - indicates the heat mode.COOL - indicates the air conditioning mode.AUTO - indicates the system will automaticallychangeover between heat and cool modesas the temperature varies.OFF - indicates the entire system is turned off.PROGRAM ON - indicates the stored programis enabled to run. Page 6.2Clock with Day of the WeekIndicates the current time and day. This clock isalso used to program the timer periods. Page 5.3Room Temperature DisplayIndicates the current room temperature.4Desired Set TemperatureIndicates desired room temperature(s). Page 7.Page 3
Display5Override IndicationIndicates the current program is currently beingoverridden for up to 4 hours. Page 7,17.6Occupied or Unoccupied IndicationIndicates the program number: Occupied 1,2,3,or Unoccupied. Page 8-11.7Setup IndicationIndicates the thermostat is in the programmingmode. Page 13.8Fan Operation IndicationFan On - indicates constant, continuous fanoperation.When Fan On is not lit - indicates the fan willonly operate when necessary to heat orto cool. Page 13.10Locked IndicationLocked appears after the right combination ofbuttons are pressed, rendering the buttonsinoperative. Page 19.11Start / Stop IndicationStart or Stop appears when programmingtimer functions. Page 9.Page 4
Quick Start Set the Clock and GoPress the Mode button.While holding the Mode,press the Override buttonfor 2 seconds to enter Setupscreens.MODEOVERRIDEI2:00During Setup & Programming:Pressing the Mode buttonselects different flashing items.(Represented in dark black)Pressing the Up and Downbuttons will modify the flashingselection.IPressSu2To adjust theclock or Day useMODEbuttons.Press both Mode andOverride buttons asabove to return tonormal operation.MODEOVERRIDEThe thermostat is preprogrammed from thefactory to operate 1 or 2 Stage equipment* withoutthe need for further programming. To optimize theinstallation of this thermostat follow the instructionsin the Advanced Setup section.* The thermostat is not preprogrammed from thefactory to operate electric heat or heat pump systems.To control these systems, follow the steps in theAdvanced Setup section, pages 14.Page 5
Basic OperationSelect ModeI2:00The HEAT setting indicates thetemperature the room has toreach before the furnace willturn on to heat the room.70 69The COOL setting indicates thetemperature the room has toreach before the air conditionerwill turn on to cool the room.70SuI2:00SuPressMODE72PressMODEI2:007270 69SuAUTO will automatically selectheat or cool based on roomtemperature demand.I2:007370 70SuProgram On will activate thestored timer operation.(occupied &unoccupied periods.)occupied 170Page 6MODEPressMODEI2:00SuOFF indicates both heatingand air conditioningsystems are turned off.PressOFF
Basic OperationSelect Desired TemperatureI2:0070PmMo72In any mode, adjust thedesired Set TemperaturewithCOOLAUTO69HEATbuttons.Pressing the up/down buttons in Auto mode will adjust both the heat and coolset temperatures simultaneously.Pressing the up/down buttons in Heat or Cool modes will adjust only theheat or cool set temperature.PressOverrideI2:00OVERRIDE65Pm ed 1ProgramOnCOOL85COOL55HEATDuring programmed, unoccupied periodsa press of the Override button will forcethe thermostat into Occupied 1 comfortsettings, temporarily.With each successive push of the Overridebutton, the override timer will add 30minutes, until the maximum of 4 hours isreached. Then the next press will zero outthe override timer, returning to unoccupiedif there are no further button presses.When in Override, the Override icon andthe Occupied 1 icon appear on the display.The time of day clock alternates with thetime remaining in override.Override72HEATDuring Override, the setpoints areadjustable, provided the keypad is notlocked.Page 7
ProgrammingMODEOccupied & Unoccupied PeriodsPress the Mode button. While holding the Mode,press the Up button for 2 seconds to entertime period programming.Occupied 1Select the maximum # ofoccupied periods to beused on any one day.Typically 1.(1,2 or 3)Press74Occupied 1Adjust the coolingsetpoint for occupied 1.MODECOOL(35 - 99 )PressMODE74Occupied 1Adjust the heatingsetpoint for occupied 1.COOL(35 - 99 )7285HEATAdjust the coolingsetpoint for unoccupiedperiods.(35 - 99 )unoccupiedPressMODECOOLPressMODEContinuedPage 8
ProgrammingOccupied & Unoccupied PeriodsAdjust the heating setpoint for unoccupiedperiods.unoccupied(35 - 99)Select the day forOccupied 1.(MoTuWeThFr, Sa, Su)55HEATPressMODEMoTuWeThFrOccupied 1PressMODE7:00Adjust the start timefor occupied 1.Am StartMoTuWeThFrOccupied 1PressMODE6:00Adjust the stop timefor occupied 1.Pm StopMoTuWeThFrOccupied 1PressMODEOnSelect Occupied 1 to runon this day (On), or not torun this day (Off).MoTuWeThFrOccupied 1ONOffPressMODEPage 9Continued
ProgrammingOccupied & Unoccupied PeriodsSaOccupied 1Select the dayfor Occupied 1.(Sa, Su, MoTuWeThFr)PressMODE9:00Am StartSaOccupied 1Adjust the start timefor occupied 1.PressMODE5:00Pm StopSaOccupied1Adjust the stop timefor occupied 1.PressMODEOnSuSelect Occupied 1 to runon this day (On), or not torun this day (Off).occupied 1ONOffPressMODEContinuedPage 10
ProgrammingOccupied & Unoccupied PeriodsSuoccupied 1Select the dayfor Occupied 1.PressMODE9:00Am StartSuoccupied 1Adjust the start timefor occupied 1.PressMODE5:00Pm StopSuoccupied 1Adjust the stop timefor occupied 1.PressMODEOnSuSelect Occupied 1 to runon this day (On), or not torun this day (Off).occupied 1ONOffTo Exit ProgrammingMODEPress the Mode button. While holding the Mode,press the Up button for 2 seconds to exittime period programming.Page 11
ProgrammingOccupied & Unoccupied PeriodsPROGRAMMING NOTESIf only 1 Occupied period is selected in step 1 on page 8, Occupied 2 & 3programming steps are skipped.Further, if only 2 occupieds are selected, Occupied 3 programmingsteps are skipped.Heat & Cool setpoints for Occupied 1 are the same for every day of the week.Heat & Cool setpoints for Occupied 2 & 3 can be adjusted differently foreach day of the week, if desired.If the start time is set later in the day than the stop time,the program will run from the start time to midnight and from midnight tothe stop time on the same day. For example: 9:00pm start, 8:00am stop,on MTWTF. In this example the program will run from 12:00am MTWTF to8:00am MTWTF and again from 9:00pm MTWTF to 12:00pm MTWTF.The Unoccupied settings take effect at all times when:(1) the program is on and (2) the current time is outside a preset occupiedperiod.For this reason start and stop times aren’t necessary for unoccupied.If the same start and stop times are programmed in for an occupied period,then it will run 24 hours.If one occupied period starts and stops within another occupied period,the lower occupied # has priority.For example: If Occupied 3 is programmed to be “on” 24 hours,and Occupied 2 is programmed to run that day, then Occupied 2settings will take over from occupied 3 between Occupied 2 start andstop times.Page 12
Advanced SetupPress the Mode button.While holding the Mode,press the Override buttonfor 5 seconds to enter Setupscreens.MODEOVERRIDEI2:00NOTE: Each step # is located atthe top right corner of thedisplay for easy reference.IAmSetupAdjust the time of dayclock.PressTip: To change hours quickly, press andhold the override button in and pressthe up or down buttons.MODEMoSetup2Select the day of theweek.PressMODEDisplay OndspSetupSelect Display operation,Full Display (On), orMinimal display (Off).3ONPressDisplay OffSetupFan OnSelect fan operation,Fan On, or Fan Auto.4MODEAUTOPressFan OffMODEFanPage 13Continued
Advanced SetupOnHp0Eh22SetupSelect residential Heat Pump,ON or OFF.OffBSelect the reversingvalve polarity forHeat Pump, O or B.(Step 6 only appears ifheat pump is on in step 5)OSelect Electric Heat Onor Off. (Step 7 onlyappears if heat pump isoff in step 5)SetupSetup88SetupAdjust the deadbandfrom 1 - 6 degrees.81fAdjust the minimumdifference betweencooling & heatingsetpoints.(0 - 6 )Page MODECOOLHEATPressMODEContinued
Advanced SetupSelect the cycles perhour limit.d cycles per hourlimit defeated.d1 d defeat 5 min.Compressor lockout.(d, d1, 2 - 6)6SetupI0CyPressMODEOnLISetupSelect the display backlight always On, or Offafter 8 seconds.OffIIONPressMODECFFSetupSelect thermostatoperation in degreesFahrenheit or Centigrade.I2MODEOVERRIDEPress the Mode button.While holding the Mode, press the Overridebutton for 2 seconds to leave the Setupscreens. If no buttons are pressed, thedisplay will leave the setup screens after30 seconds.Page 15
Advanced SetupAdvanced Setup TableStep #123456789101112DescriptionRangeTime of day clock setDay of the weekDisplay BlankingFan operationHeat PumpReversing Valve polarityElectric HeatDeadband or Temperature swingForced minimum difference heat/coolCycles per hourThermoglow backlightFahrenheit or CentigradePage 1624 hourSun - SatOff / OnAuto / OnOff / OnO/BOff / On1-60-6d, d1, 2 - 6Off / OnF/CFactory Default12:00 AmMondayOnAutoOffOOff226OnF
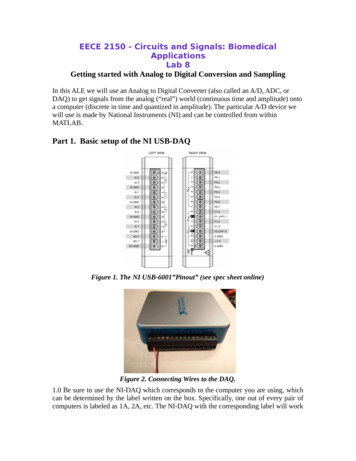
About Advanced Features & OperationCLOCK BACKUP - In the event of a power loss, the thermostatinternal clock will continue to keep proper time for aminimum of 48 hours without external power or batteries.2 STAGE OPERATION - The 2nd Stage of heat or cool isturned on when (1) the 1st Stage has been on for aminimum of two minutes, and (2) the temperature spreadfrom the setpoint is equal to or greater than: the setpointplus the deadband, plus 2 degrees.CoolingHeating2 degrees2nd Stageturn on1st Stageturn onDeadBandHeatSetpointDeadBandCoolSetpoint2 degrees1st Stageturn on2nd Stageturn onMINIMUM HEAT/COOL SETPOINT DIFFERENCE - The Heatand Cool setpoints will not be allowed to come any closerto each other than the value set in Advanced Setup step# 9, on page 14. This minimum difference is enforcedduring Auto changeover and Program On operation.ENERGY SAVING SMART FAN - If Fan On is selected,page 13, step 4, the fan will run continuously at all times,except in Off, and will only run if there is a heating orcooling demand in Unoccupied periods.OVERRIDE - As explained on page 7, pressing the Overridebutton during a programmed, Unoccupied period will forcethe thermostat into Occupied 1, temporarily, up to 4 hours.If the Override button is pressed during an Occupiedperiod, the thermostat will be forced into Unoccupied andthe occupied # (1,2 or 3), it was forced out of will beturned off, only for that day.During Override periods the setpoints may be adjusted,but they will not be remembered after Override ends.Page 17
About Advanced Features & OperationEMERGENCY HEAT - Is a feature available to Heat Pumpinstallations. To turn on Emergency Heat press in theOverride button. While holding the Override button pressthe Up button for 2 seconds. The Cool setpoint displaywill read ‘EH’.I2:0073SuPress forEmergency Heateh74OVERRIDEDuring Emergency Heat the thermostat will turnon the fan and the 2nd stage of heat, when there is ademand for heat, locking out the 1st stage compressor.Exiting Emergency Heat is the same as entering. DuringEmergency Heat only OFF and HEAT are available.ELECTRIC HEAT - Selecting Electric Heat on, page 14,step 7, will cause the thermostat to turn on the fanimmediately any time there is a heat demand. Since allgas furnaces control the fan, this feature should be offunless the heater is only electric.Page 18
About Advanced Features & OperationKEYPAD LOCK - To prevent unauthorized use of the thermostat,the front panel buttons may be disabled. To disable, or‘lock’ the keypad, press and hold in the Mode button.While holding the Mode button in, press the Up and Downbuttons in together. The Locked icon will appear on thedisplay.AmI2:0070SuunoccupiedPress all 3 forKeypad LockoutMODEProgramOn85COOLLocked55HEATTo unlock the buttons, again press and hold the Modebutton. While holding the Mode button in, press the Upand Down buttons in together. The Locked icon willdisappear from the display.DISPLAY BLANKINGThe thermostat display may be configured in advancedsetup, page 13, step 3, to always be visible as normallyexpected, or may be selected Off. When selected Off,only the time of day will appear until a button is pressed.When a button is pressed the full, normal display willappear then revert to the time of day only, after roughly10 seconds.Page 19
About Advanced Features & OperationDUAL SETPOINT BEHAVIOR - The adjustable setpoint rangeis: 35 - 99 degrees in Fahrenheit and 7 - 35 degrees inCentigrade. When in the modes Heat or Cool, thisadjustable range is unhampered.When adjusting any Auto mode, including programmingOccupied and Unoccupied periods, the 2150 will notallow the Heat setpoint to get closer to the Cool setpointthan the value programmed as the minimum difference instep 9, page 14.When entering the Auto mode from Cool, the Heat andCool setpoints will remain spread apart by the amountthat they were adjusted, prior to entering Auto.For example: If the Cool setpoint was set to 80 whilein the Cool mode and the Heat setpoint was adjusted to70 while in the Heat mode, upon entering the Auto modethe Heat and Cool setpoints would be 80 and 70. Bothsetpoints would then move up and down together, (in thisexample spread by 10 degrees), by pressing the up ordown buttons.To move the Heat and Cool setpoints closer together,enter the Cool or Heat mode by pressing the Mode button,then adjust the setpoint(s) closer together. Heat is limitedto how close it can come to Cool by step 9, page 14.Page 20
About Advanced Features & OperationFACTORY DEFAULTS - If, for any reason it is desirable toreturn all stored settings back to the factory defaultsettings, press the Mode button. While holding the Modebutton in, press the Down button for 2 sec. All icons willappear. Press and hold in the Override button until Fdappears. This resets all factory settings. To calibrateroom temperature, press the Mode button once more.At this point use the Up and Down buttons to calibrateroom temperature, if needed. Press the Mode button toreturn to normal operation. NOTE CAUTION ON PAGE 1.OPTIONAL LOCK e 2174COOLAUTO70HEAT
WarrantyOne-Year Warranty - This Product is warranted to be free from defects In materialand workmanship. If It appears within one year from the date of original Installation, whether or notactual use begins on that date, that the product does not meet this warranty, a new or remanufacturedpart, at the manufacturer's sole option, to replace any defective part will be provided without chargefor the part itself: PROVIDED the defective part is returned to the distributor through a qualifiedservicing dealer.THIS WARRANTY DOES NOT INCLUDE LABOR OR OTHER COSTS incurred for diagnosing. repairing,removing, installing, shipping, servicing or handling of either defective parts or replacement parts.Such costs may be covered by a separate warranty provided by the installer.THIS WARRANTY APPLIES ONLY TO PRODUCTS IN THEIR ORIGINAL INSTALLATION LOCATION ANDBECOMES VOID UPON REINSTALLATION.LIMITATIONS OF WARRANTIES - ALL IMPLIED WARRANTIES (INCLUDING IMPLIED WARRANTIESOF FITNESS FOR A PARTICULAR PURPOSE AND MERCHANTABILITY) ARE HEREBY LIMITED INDURATION TO THE PERIOD FOR WHICH THE LIMITED WARRANTY IS GIVEN. SOME STATES DO NOTALLOW LIMITATIONS ON HOW LONG AN IMPLIED WARRANTY LASTS, SO THE ABOVE MAY NOTAPPLY TO YOU. THE EXPRESSED WARRANTIES MADE IN THIS WARRANTY ARE EXCLUSIVE ANDMANY NOT BE ALTERED. ENLARGED. OR CHANGED BY ANY DISTRIBUTOR, DEALER, OR OTHERPERSON WHATSOEVER.ALL WORK UNDER THE TERMS OF THIS WARRANTY SHALL BE PERFORMED DURING NORMALWORKING HOURS. ALL REPLACEMENT PARTS, WHETHER NEW OR REMANUFACTURED, ASSUMEAS THEIR WARRANTY PERIOD ONLY THE REMAINING TIME PERIOD OF THIS WARRANTY.THE MANUFACTURER WILL NOT BE RESPONSIBLE FOR:1. Normal maintenance as outlined in the installation and servicing instructions or owners manualincluding filter cleaning and/or replacement and lubrication.2. Damage or repairs required as a consequence of faulty installation, misapplication, abuse,improper servicing, unauthorized alteration or improper operation.3. Failure to start due to voltage conditions, blown fuses, open circuit breakers or other damagesdue to the inadequacy or interruption of electrical service.4. Damage as a result of floods, winds, fires, lightning, accidents, corrosive environments or otherconditions beyond the control of the Manufacturer.5. Parts not supplied or designated by the Manufacturer, or damages resulting from their use.6. Manufacturer products installed outside the continental U.S.A., Alaska, Hawaii, and Canada.7. Electricity or fuel costs or increases in electricity or fuel costs from any reason whatsoeverincluding additional or unusual use of supplemental electric heat.8. ANY SPECIAL INDIRECT OR CONSEQUENTIAL PROPERTY OR COMMERCIAL DAMAGE OF ANYNATURE WHATSOEVER. Some states do not allow the exclusion of incidental or consequentialdamages, so the above may not apply to you.This warranty gives you specific legal rights, and you may also have other rights which may vary formstate to state.Page 22
1 2 4 3 Mode Indicators Selects the operation mode of the equipment. HEAT - indicates the heat mode. COOL - indicates the air conditioning mode. AUTO - indicates the system will automatically changeover between heat and cool modes as the temperature varies. OFF - indicates the entire system is turned off. PROGRAM ON - indicates the stored program is enabled to run.