Transcription
OWNER’SMANUALRESIDENTIALTHERMOSTATP/N TA1-DAYLINEPROGRAMMABLEDIGITAL THERMOSTATControl up to 2 Heat &1 Cool StagesBacklit Display & ButtonLegendsAux Heat IndicatorOutdoor Sensor ReadyAccepts EZ ProgrammerAccepts Optional IRRemote ControlCONFIGURABLE IN SETUP:Auto or Manual ChangeoverProgrammable or NonProgrammableUse with most Air Conditioning & Heating Systems including: 1 Stage ElectricCooling & 2 Stage Gas Heating, Heat Pump, Electric or Hydronic Heat.TOTALINESignatureReplacement Components DivisionCarrier Corporation 08/05
TOTALINECAUTIONFollow the Installation Instructions before proceeding.Set the thermostat mode to “OFF” prior to changingsettings in setup or restoring Factory Defaults.This device complies with Part 15 of the FCC Rules. Operation issubject to the following two conditions: (1) this device may not causeharmful interference, and (2) this device must accept any interferencereceived, including interference that may cause undesired operation.ThermostatP374-1700cFCTested to Complywith FCC Standards4Z95FOR HOME OR OFFICE USEPage i
How to Use This ManualTOTALINEThe Table of Contents divides the thermostat features into sectionsmaking it easier to quickly find information.The first page of each section contains a more detailed Contents of eachsection, such as the example page shown below.SECTION 14Timers and DeadbandsTOTALINEHeader shows section #and title of sectionSection 14 Contents:Adjusting the Heat/CoolDifferential.14.2Adjusting the CyclesPer Hour.14.3Adjusting the Deadband.14.4Adjusting the Minutes ofRun-Time Before the14Next Stage.14.6Selecting 2nd Stage TurnOff Temperature.14.7Section contentsVisible section tabon the side of thepageSection and page #Page 14.1In addition, this manual also has an Index to help you find any informationregarding this thermostat quickly.Page ii
Glossary of TermsTOTALINEAuto-Changeover: A mode in which the thermostat will turn onthe heating or cooling based on room temperature demand.Cool Setpoint: The warmest temperature that the space shouldrise to before cooling is turned on (without regards todeadband).Deadband: The number of degrees the thermostat will wait, oncesetpoint has been reached, before energizing heating or cooling.Differential: The forced temperature difference between theheat setpoint and the cool setpoint.Heat Setpoint: The coolest temperature that the space shoulddrop to before heating is turned on (without regards todeadband).Icon: The word or symbol that appears on the thermostatdisplay.Mode: The current operating condition of the thermostat (i.e. Off,Heat, Cool, Auto, Program On).Non-Programmable Thermostat: A thermostat that does nothave the capability of running the Time Period Programming.Programmable Thermostat: A thermostat that has the capabilityof running the Time Period Programming.Temperature Swing: Same as Deadband.Time Period Programming: A program that allows thethermostat to automatically adjust the heat setpoint and/or thecool setpoint based on the time of day.Page iii
Table of ContentsTOTALINEGetting to Know YourThermostatQuick Start12Setting Clock3Basic Operation4Viewing the Outside5TemperatureProgramming the6Daily ScheduleProgramming the Fan7OperationThermostat Display8OptionsSetting and ResettingEquipment Run-Times 9Electric Heat andHeat Pump Operation 10Timers and Deadbands 11Factory Defaults and12CalibrationAccessories13Advanced Setup Table 14Page iv
SECTION 1Getting to Know Your ThermostatTOTALINE1Section 1 Contents:Front Panel Buttons.1.2Display Features.1.3Page 1.1
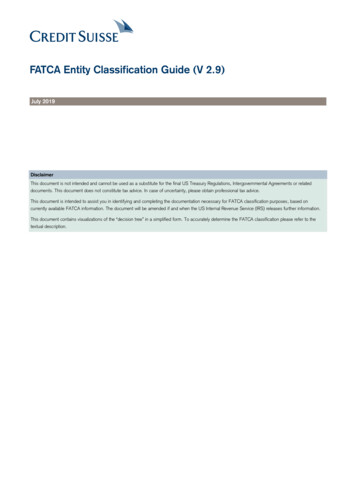
TOTALINE1Front PanelBacklit LCD DisplayI2:00Warmer Button(glows red)[]sometimes referredto as the UP button74PmSuCOOLAUTO72HEATTOTALINECooler Button(glows blue)Heat or Cool Demand Indicator ModeButtonRed Heat, Green FANFANEMRG HT.EMRG HT. OUTSIDE PROGRAMSETCLOCKMODEOUTSIDE PROGRAMPage 1.2]sometimes referred to as theDOWN buttonSETCLOCK
TOTALINE11 Display FeaturesI8:88Service FilterAUTOOFFON88I88 88Am Program On SetupPm anOnMode Indicators - Section 4Selects the operational mode of the equipment.HEAT - Indicates the heating mode.COOL - Indicates the air conditioning mode.AUTO - Indicates the system will automatically changeoverbetween heat and cool modes as the temperature varies.OFF - Indicates heating and cooling is turned off.PROGRAM ON - Indicates the time period program is enabled torun.Clock - Section 3Indicates the current time. This clock is also used to programthe timer periods.Room Temperature Display - Section 5Indicates the current room temperature and displays the outsidetemperature when selected.Desired Set Temperature - Section 4/5Indicates desired room temperature(s).Outside icon - Section 5Indicates the temperature displayed is from the optional outsidesensor.Morning, Day, Evening & Night icons - Section 6Indicates the day part of the time period program.Page 1.3
TOTALINEDisplay FeaturesI8:881Service FilterPan UV LightAUTOOFFON88I88 88Am Program On SetupPm anOnSetup icon - Sections 6-11Indicates the thermostat is in the setup mode.Fan On icon - Section 7Indicates constant, continuous fan operation.When Fan On is not lit - indicates the fan will only operate whennecessary to heat or to cool.Service Filter icon - Section 9Appears when the filter should be serviced under normal conditions.Adjustable from 0 - 1950 hours of blower operation.icon - Section 8Indicates the keypad has been locked.StartStop icon - Section 6Appears when programming timer functions.AuxHeat icon - Section 10Indicates the Heat Pump is currently using 2nd stage electricstrip heat.UV Light icon - Section 9Appears when the UV bulb should be serviced under normalconditions. Adjustable from 0 - 1990 days of operation.Page 1.4
SECTION 2Quick StartTOTALINE2Section 2 Contents:Setting the Clock .2.2Selecting the Heat or CoolMode.2.3Selecting Your DesiredTemperature.2.4Using the Fan Button.2.4Note: Following the instructions in this section will allow you tooperate your thermostat using the factory default settings. Thesesettings are depicted in the illustrations throughout this manual.Page 2.1
TOTALINERAMSETCLOCKM2Press the SETCLOCK buttonDuring Setup & Programming:Setting the ClockI2:00AmISetupPressing the UP or DOWNbuttons will modify the flashingselection.To adjust theClock or Day usePress the SETCLOCK buttonto return tonormal operation.RAMSETCLOCKMButtons.To adjust the time byhours press and holdthe FAN button whilepressing the UP orDOWN buttons.Page 2.2
TOTALINESelecting the Heat or Cool Mode2Select Mode by Pressing the MODE ButtonHeating OnlyThe HEAT setting indicates thetemperature the room has toreach before the furnace willturn on to heat the room.Cooling OnlyThe COOL setting indicates thetemperature the room has toreach before the air conditionerwill turn on to cool the room.I2:00HEATI2:00Time Schedule forHeating or CoolingThe Program On setting willactivate the time periodprogramming for the coolingor heating setpoint ONLY(Morning, Day, Evening& Night Periods).PmPressMODEPmCOOLAUTOHEATI2:00PmProgram On76PressMODECOOLDayI2:00OffOFF indicates both heatingand air conditioningsystems are turned off.PressMODECOOLI2:00Heating or CoolingAUTO will automatically selectheat or cool based on roomtemperature demand.70 687670 7670 687070PmOFF68HEATPmPage 2.3PressMODE
TOTALINESelecting Your Desired Temperature (adjusting the setpoints)2AUTO OR PROGRAM MODEPressing the UP or DOWN buttons in Auto or Program modewill adjust both the heat and cool set temperaturessimultaneously.I2:00Adjust the desiredset temperature with the7670 68PmCOOLAUTOHEATButtons.HEAT OR COOL MODEPressing the UP or DOWN buttons in Heat or Cool mode willadjust only the heat or cool set temperature.I2:0070PmAdjust the desiredset temperature with the76COOLButtons.Using the Fan ButtonI2:00Press7670 68PmCOOLAUTOHEATFanOnFANFan On indicates constant fanoperation. You may turn the fanon even if the thermostat is in theOff mode. Pressing the FAN buttontoggles this feature on or off.Page 2.4
SECTION 3Setting the ClockTOTALINE3Section 3 Contents:Setting the Clock.3.2Note: During setup & programming pressing the UP or DOWNbuttons will modify the flashing selection.Page 3.1
TOTALINERAMSETCLOCKMPress the SETCLOCK buttonDuring Setup & Programming:Setting the ClockI2:00AmISetup3Pressing the UP or DOWNbuttons will modify the flashingselection.To adjust theClock or Day usePress the SETCLOCK buttonto return tonormal operation.RAMSETCLOCKMbuttons.To adjust the time byhours press and holdthe FAN button whilepressing the UP orDOWN buttons.Page 3.2
SECTION 4Basic OperationTOTALINE4Section 4 Contents:Programmable or NonProgrammable Thermostat.4.2Manual or Auto-ChangeoverThermostat.4.3Selecting the Operating Mode.4.4Selecting Your DesiredTemperature.4.8Note: During setup & programming pressing the UP or DOWNbuttons will modify the flashing selection.Page 4.1
TOTALINEProgrammable or Non-ProgrammableThermostatWhen the very simplest operation is desired, this thermostat maybe configured to be non-programmable, with or without AutoChangeover. Follow the step below.4If ‘NO’ is selected, the thermostat will lockout the Program On screen;only the Off, Heat, Cool, and Auto screens may be accessed bypressing the MODE button.Select ‘YES’ if you would like your thermostat to be programmable,then the Program mode will be accessible through the use of theMODE button. This is the default, factory setting.MODEPROGRAMPress the MODE button. While holdingthe MODE, press the PROGRAMbutton to enter Setup screens.Program On SetupYESSelect Yes if you would likethe thermostat to be programmable or No for non-programmable.Note: Press the MODEbutton momentarilyto move through thesetup screens. Pressand hold the MODEbutton to move backwards through thesetup screens.iPressNOPROGRAMPress the PROGRAM button to leave the Setup screens. If no buttons arepressed, the display will leave the setup screens after 30 seconds.Page 4.2
TOTALINEManual or Auto-ChangeoverThermostat4When the very simplest operation is desired, this thermostat maybe configured to be a manual heat and cool thermostat, with orwithout time period programmability. Follow the step below.The thermostat may be programmed to function as a Heat Only orCool Only thermostat by selecting ‘NO’ in the setup screen below.This will lockout the Auto-Changeover screen and only allow the Off,Heat, Cool, and Program On screens to be accessed.MODEPROGRAMMODEPress the MODE button. While holdingthe MODE, press the PROGRAMbutton to enter Setup screens.Note: Press the MODEbutton momentarilyto move through thesetup screens. Pressand hold the MODEbutton to move backwards through thesetup screens.Press the MODE button repeatedlyuntil this setup screen appears.SetupYESSelect Yes if you wouldlike the thermostat tobe Auto-Changeover orNo for a Heat Only andCool Only Thermostat.2AUTOPressNOPROGRAMPress the PROGRAM button to leave the Setup screens. If no buttons arepressed, the display will leave the setup screens after 30 seconds.Page 4.3
TOTALINEOperating Mode when the Thermostatis Configured to be:NON-PROGRAMMABLE WITH MANUAL-CHANGEOVER - If thethermostat is configured to be a non-programmable thermostatwith Manual-Changeover, the following screens will be availableby pressing the MODE button.4Select the Mode by Pressing the MODE ButtonHeating OnlyThe HEAT setting indicates thetemperature the room has toreach before the furnace willturn on to heat the room.Cooling OnlyThe COOL setting indicates thetemperature the room has toreach before the air conditionerwill turn on to cool the room.I2:00HEATI2:00PressMODEPmCOOLI2:00OffOFF indicates both heatingand air conditioningsystems are turned off.70 68767070PmOFFPmPage 4.4PressMODE
TOTALINEOperating Mode when the Thermostatis Configured to be:NON-PROGRAMMABLE WITH AUTO-CHANGEOVER - If thethermostat is configured to be a non-programmable thermostat4 with Auto-Changeover, the following screens will be available bypressing the MODE buttonSelect the Mode by Pressing the MODE ButtonHeating OnlyThe HEAT setting indicates thetemperature the room has toreach before the furnace willturn on to heat the room.Cooling OnlyThe COOL setting indicates thetemperature the room has toreach before the air conditionerwill turn on to cool the ffOFF indicates both heatingand air conditioningsystems are turned off.PressMODECOOLI2:00Heating or CoolingAUTO will automatically selectheat or cool based on roomtemperature demand.70 6876707670 6870PmOFFPmPage 4.5PressMODE
TOTALINEOperating Mode when the Thermostatis Configured to be:PROGRAMMABLE WITH MANUAL-CHANGEOVER - If the thermostat isconfigured to be a programmable thermostat with Manual-Changeover,the following screens will be available by pressing the MODE button.4Select the Mode by Pressing the MODE ButtonHeating OnlyThe HEAT setting indicates thetemperature the room has toreach before the furnace willturn on to heat the room.Cooling OnlyThe COOL setting indicates thetemperature the room has toreach before the air conditionerwill turn on to cool the room.Time Schedule forHeating OnlyThe HEAT Program On settingwill activate the time periodprogram for the heatingsetpoint ONLY (Morning, Day,Evening & Night Periods).Time Schedule forCooling OnlyThe COOL Program On settingwill activate the time periodprogram for the coolingsetpoint ONLY (Morning, Day,Evening & Night 0PmProgram OnHEATPmPressMODEPressMODEProgram OnCOOLDayI2:00OffOFF indicates both heatingand air conditioningsystems are turned off.70 68767070 68767070PmOFFPmPage 4.6PressMODE
TOTALINEOperating Mode when the Thermostatis Configured to be:4PROGRAMMABLE WITH AUTO-CHANGEOVER - If the thermostat isconfigured to be a programmable thermostat with Auto-Changeover,the following screens will be available by pressing the MODE button.Select the Mode by Pressing the MODE ButtonHeating OnlyThe HEAT setting indicates thetemperature the room has toreach before the furnace willturn on to heat the room.Cooling OnlyThe COOL setting indicates thetemperature the room has toreach before the air conditionerwill turn on to cool the room.I2:00HEATI2:00Time Schedule forHeating or CoolingThe Program On setting willactivate the time periodprogramming for the coolingor heating setpoint ONLY(Morning, Day, Evening& Night Periods).OffOFF indicates both heatingand air conditioningsystems are turned off.PressMODEPmCOOLI2:00Heating or CoolingAUTO will automatically selectheat or cool based on roomtemperature demand.70 687670 7670 687670 6870PmPressMODEPmCOOLAUTOHEATI2:00PmProgram OnPressMODECOOLDayI2:00OFFHEATPressPmPage 4.7MODE
TOTALINESelecting Your Desired Temperature (adjusting setpoints)AUTO OR PROGRAM MODEPressing the UP or DOWN buttons in Auto or Programmodes will adjust both the heat and cool set temperaturessimultaneously. For more information on this see page 11.2.I2:007670 68PmAdjust the desiredset temperature with theCOOLAUTOHEATbuttons.HEAT OR COOL MODEPressing the UP or DOWN buttons in Heat or Cool modes willadjust only the heat or cool set temperature.I2:0070Pm76Adjust the desiredset temperature with theCOOLbuttons.Page 4.84
SECTION 5Viewing the Outside TemperatureTOTALINE5Section 5 Contents:Viewing the OutsideTemperature.5.2Page 5.1
TOTALINEViewing the Outside TemperatureThis requires an outside sensor (optional accessory) to be installed.To read the temperature from the Outside Sensor, press theOUTSIDE button. The display will then show the current outsidetemperature.5OUTSIDE HUPress the OUTSIDEbutton.The current outsidetemperature will bedisplayed. This readingis from the sensorconnected to RS2.This reading is from thesensor connected toRS1.Press the OUTSIDEbutton to return tonormal operation.8378OutsideCurrent outsidetemperature.PressMODEOUTSIDE HUNote: If no sensors are connected 2 dashes [- -] will appear on the display.Page 5.2
SECTION 6Programming the Daily ScheduleTOTALINESection 6 Contents:6Programming a DailySchedule.6.2Page 6.1
TOTALINEProgramming a Daily SchedulePressPROGRAMPress the PROGRAM button to enter time period programming.6:00Am6StartAdjust the start timefor Morning.MorningPressMODE6:0078AmAdjust the coolingsetpoint for Morning.(35 - 99 )COOLMorningPressMODE6:0078AmAdjust the heatingsetpoint for Morning.(35 - 99 )COOL70HEATMorning8:00AmPressMODEStartAdjust the start timefor Day.DayPressMODEPage 6.2Continued
TOTALINE8:00AmStartAdjust the start timefor Day.DayPressMODE68:0085AmCOOLAdjust the coolingsetpoint for Day.(35 - 99 )DayPressMODE8:0085AmAdjust the heatingsetpoint for Day.COOL62HEAT(35 - 99 )DayPressMODE6:00PmStartAdjust the start timefor Evening.EveningPressMODE6:00PmAdjust the coolingsetpoint for Evening.78COOL(35 - 99 )PressEveningPage 6.3MODEContinued
TOTALINE6:0078PmAdjust the heatingsetpoint for Evening.COOL70HEAT(35 - 99 )EveningPressMODEI0:006PmStartAdjust the start timefor Night.NightPressMODEI0:00PmAdjust the coolingsetpoint for Night.(35 - 99 )82COOLNightPressMODEI0:00PmAdjust the heatingsetpoint for Night82COOL(35 - 99 )Night62HEATPressPROGRAMPress the PROGRAM button to leave the Setup screens. If no buttons arepressed, the display will leave the setup screens after 30 seconds.Page 6.4
SECTION 7Programming the Fan OperationTOTALINESection 7 Contents:7Using the Fan Button.7.2Setting the Fan-Off TimeDelay.7.3Page 7.1
TOTALINEUsing the Fan ButtonWhen the fan is set for automatic operation it will energize any timethere is a call for heating or cooling, otherwise the fan will remain off.Pressing the FAN button will energize the fan and display the FanOnicon on the thermostat display. To operate the fan in the automaticmode, press the FAN button again and the FanOn icon will disappear.PressFANI2:007670 68PmCOOLAUTOHEATFanOnFan On indicates constant fanoperation. You may turn the fanon even if the thermostat is in theOff mode. Pressing the FAN buttontoggles this feature on or off.Page 7.27
TOTALINESetting the Fan-Off Time DelayTo increase the cooling efficiency of your unit, the thermostat may beprogrammed to continue running the fan after a call for cooling hasbeen satisfied. This delay may be set for 30, 60, or 90 seconds. Ifthe Fan Off Delay is set for zero seconds, the fan will not energizeafter a call for cooling has been satisfied.7MODEPROGRAMMODEPress the MODE button. While holdingthe MODE, press the PROGRAMbutton to enter Setup screens.Note: Press the MODEbutton momentarilyto move through thesetup screens. Pressand hold the MODEbutton to move backwards through thesetup screens.Press the MODE button repeatedlyuntil this setup screen appears.:00Setup3Set the Fan Off Delayto 0, 30, 60, or 90seconds.FanOnPressPROGRAMPress the PROGRAM button to leave the Setup screens. If no buttons arepressed, the display will leave the setup screens after 30 seconds.Page 7.3
SECTION 8Thermostat Display OptionsTOTALINESection 8 Contents:Turning On/Off theBacklight.8.28Programming the Thermostatto Display Temperature inFahrenheit or Celsius.8.2Locking/Unlocking theKeypad.8.3Page 8.1
TOTALINETurning On/Off the BacklightMODEPROGRAMMODEPress the MODE button. While holdingthe MODE, press the PROGRAMbutton to enter Setup screens.Press the MODE button repeatedlyuntil this setup screen appears.8SetupSelect backlight operation:AUTO - Light from 6pm to6am nightly.ON - Light continuously.OFF - Light for 8 secondsafter a button press.Note: Press the MODEbutton momentarilyto move through thesetup screens. Pressand hold the MODEbutton to move backwards through thesetup screens.4AUTOPressMODEProgramming the Thermostat to DisplayTemperature in Fahrenheit or CelsiusSetupfCSelect thermostatoperation in degreesFahrenheit or Centigrade.F5PressPROGRAMPress the PROGRAM button to leave the Setup screens. If no buttons arepressed, the display will leave the setup screens after 30 seconds.Page 8.2
TOTALINELocking/Unlocking the KeypadTo prevent unauthorized use of the thermostat, the front panelbuttons may be disabled. To disable, or ‘lock’ the keypad, pressand hold the MODE button. While holding the MODE button,press the UP and DOWN buttons together. Theicon willappear on the display, then release the buttons.I2:00Press all threebuttons in the orderoutlined above forkeypad lockout8565 55PmCOOLHEATMODETo unlock the keypad, press and hold the MODE button. Whileholding the MODE button, press the UP and DOWN buttonstogether. Theicon will disappear from the display, thenrelease the buttons.Page 8.38
SECTION 9Setting and Resetting Equipment Run-TimesTOTALINESection 9 Contents:9Setting and Resetting theService Filter (Fan Run-Time)Alarm.9.2Setting and Resetting the UVLight Run-Time Alarm.9.3Page 9.1
TOTALINEHow to Set and Reset the Service Filter(Fan Run-Time) AlarmThis counter keeps track of the number of hours of fan run-timewhether the fan is energized in the Heating or Cooling modes, or instand alone fan operation. The Service Filter icon will appear after thepreset number of hours of fan run-time in step #7 (below) has beenachieved. Setting this counter to zero in step #7 will prevent theService Filter icon from ever appearing.MODEPROGRAMMODEPress the MODE button. While holdingthe MODE, press the PROGRAMbutton to enter Setup screens.Press the MODE button repeatedlyuntil this setup screen appears.Hours the fan hasrun since last resetPressReset the counter to 0 toremove the Service Filtericon from the display.0SetupService FilterNote: Press the MODEbutton momentarilyto move through thesetup screens. Pressand hold the MODEbutton to move backwards through thesetup screens.6FANPressAdjust the number ofhours in increments of50 the fan will runbefore the ServiceFilter icon appears onthe display. 0 off.0Service FilterSetup7MODEPressPROGRAM(0 - 1950 hours)Press the PROGRAM button to leave the Setup screens. If no buttons arepressed, the display will leave the setup screens after 30 seconds.Page 9.29
TOTALINEHow to Set and Reset the UV LightRun-Time AlarmThis counter keeps track of the number of days since the UV Lightcounter has been reset. The UV Light icon will appear after thenumber of days has been achieved, as shown in step #9 (below).Setting the counter to zero in Step #9 will prevent the Service UVLight icon from ever appearing.MODE9PROGRAMMODEPress the MODE button. While holdingthe MODE, press the PROGRAMbutton to enter Setup screens.Press the MODE button repeatedlyuntil this setup screen appears.Days since the UV Lighticon has been reset0PressReset the counter to 0 toremove the Service UVLight icon from the display.Note: Press the MODEbutton momentarilyto move through thesetup screens. Pressand hold the MODEbutton to move backwards through thesetup screens.Setup8Setup9ServiceUV LightFANMODEPress the MODE button repeatedlyuntil this setup screen appears.0Adjust the number of daysin increments of 10 beforethe UV Light icon appearson the display. 0 off.ServiceUV Light(0 - 1990 days)PressPROGRAMPress the PROGRAM button to leave the Setup screens. If no buttons arepressed, the display will leave the setup screens after 30 seconds.Page 9.3
SECTION 10Electric Heat and Heat Pump OperationTOTALINESection 10 Contents:Viewing the Heat Pump andReversing Valve Jumper10Setting.10.2Viewing the Electric HeatJumper Setting.10.3Using Emergency Heat.10.4Page 10.1
TOTALINEViewing the Heat Pump andReversing Valve Jumper SettingsSteps 10 and 11 are ‘Read Only’ and may only be set with thejumpers on the circuit board of the thermostat.MODEPROGRAMMODEPress the MODE button. While holdingthe MODE, press the PROGRAMbutton to enter Setup screens.Press the MODE button repeatedlyuntil this setup screen appears.10SetupON Heat PumpoperationOFF Gas ElectricoperationNote: Press the MODEbutton momentarilyto move through thesetup screens. Pressand hold the MODEbutton to move backwards through thesetup screens.I0OFFPressSetupOIndicates that thethermostat jumperis set for an Oreversing valve(energize in cooling)or a b reversing valve(energize in heating).IiMODEPressPROGRAMPress the PROGRAM button to leave the Setup screens. If no buttons arepressed, the display will leave the setup screens after 30 seconds.Page 10.2
TOTALINEViewing the Electric Heat Jumper SettingPlacing the jumper on ELEC will cause the thermostat to turn on thefan immediately any time there is a heat demand. Since most gasfurnaces control the fan, this feature should be off unless the heater isonly electric.Step 12 is ‘Read Only’ and may only be set with the jumpers on thecircuit board of the thermostat.MODEPROGRAMMODEPress the MODE button. While holdingthe MODE, press the PROGRAMbutton to enter Setup screens.Press the MODE button repeatedlyuntil this setup screen appears.SetupON indicates that thethermostat jumper isset for Electric Heatoperation, or OFF forGas/Electric or HeatPump operation.OFFEHNote: Press the MODEbutton momentarilyto move through thesetup screens. Pressand hold the MODEbutton to move backwards through thesetup screens.I2PressPROGRAMPress the PROGRAM button to leave the Setup screens. If no buttons arepressed, the display will leave the setup screens after 30 seconds.Page 10.310
TOTALINEUsing Emergency HeatENTER EMERGENCY HEAT: Only available if you have a Heat Pumpinstalled. To initiate the Emergency Heat feature, press the EMERHT. button. The Cool setpoint display will read ‘EH’(emergency heat).Press forEmergency HeatAN10EMRG HT. OUTI2:0073Pm74HEATOPERATION: During Emergency Heat operation thethermostat will turn on the fan and the 2nd stage of heatwhen there is a demand for heat. Also during EmergencyHeat the 1st stage of heating or cooling will be unavailable.EXIT EMERGENCY HEAT: Follow the same steps as enteringEmergency Heat by pressing the EMER HT. button. DuringEmergency Heat, only OFF and HEAT modes are available bypressing the MODE button.Page 10.4
SECTION 11Timers and DeadbandsTOTALINESection 11 Contents:Adjusting the Heat/CoolDifferential.11.2Adjusting the CyclesPer Hour.11.3Adjusting the Deadband.11.411Page 11.1
TOTALINEAdjusting the Heat/Cool DifferentialThe Heat and Cool setpoints will not be allowed to come any closer toeach other than the value in this step. This minimum difference isenforced during Auto-Changeover operation.MODEPROGRAMMODEPress the MODE button. While holdingthe MODE, press the PROGRAMbutton to enter Setup screens.Press the MODE button repeatedlyuntil this setup screen appears.2Setup11Note: Press the MODEbutton momentarilyto move through thesetup screens. Pressand hold the MODEbutton to move backwards through thesetup screens.Adjust the minimumdifference betweencooling & heatingsetpoints.(0 - 6 )I3COOLHEATPressPROGRAMPress the PROGRAM button to leave the Setup screens. If no buttonsare pressed, the display will leave the setup screens after 30 seconds.Note: To increase the spread between the heating and coolingsetpoints, press the MODE button until only the heat setpoint isdisplayed. Adjust the desired setpoint. Press the MODE buttonuntil only the cool setpoint is displayed. Adjust the desired setpoint.Press the MODE button again to enter the Auto-Changeover modewhere both the heat and cool setpoints are displayed.Page 11.2
TOTALINEAdjusting the Cycles Per HourThe Cycles Per Hour setting may limit the number of times per houryour HVAC unit may energize. For example, at a setting of 6 cyclesper hour the HVAC unit will only be allowed to energize once every 10minutes. The Cycles Per Hour limit may be overridden and reset bypressing any button on the thermostat.MODEPROGRAMMODEPress the MODE button. While holdingthe MODE, press the PROGRAMbutton to enter Setup screens.Note: Press the MODEbutton momentarilyto move through thesetup screens. Pressand hold the MODEbutton to move backwards through thesetup screens.Press the MODE button repeatedlyuntil this setup screen appears.6SetupSelect the cycles perhour limit.d cycles per hourlimit defeated.d1 d defeat 5 min.compressor lockout.(d1, d, 2 - 6)I4CyPress the PROGRAM button to leave the Setup screens. If no buttons arepressed, the display will leave the setup screens after 30 seconds.Page 11.311PressPROGRAM
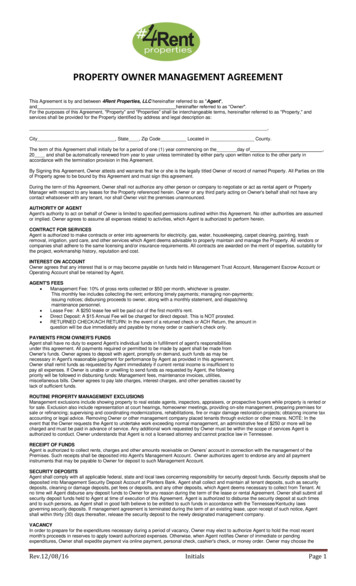
TOTALINEAdjusting the DeadbandMULTI-STAGE OPERATION - Controls up to two Heat and one Coolstages.The 2nd Stage of heat is turned on when:(A) The 1st Stage has been on for a minimum of two minutes.And(B) The temperature spread from the setpoint is equal to or greaterthan: the setpoint plus the 1st stage deadband (step #15, nextpage), plus two degrees.CoolingHeating112nd Stageturn onDeadbandDeadbandDeadbanddb 2(fixed 2 )db 1(adj. 1-6 )db 1(adj. 1-6 )1st Stageturn onDECREASEHeatSetpointCoolSetpointTEMPERATUREPage 11.41st Stageturn onINCREASE
TOTALINEAdjusting the DeadbandFor more detailed information, please see the explanation on theprevious page.MODEPROGRAMMODEPress the MODE button. While holdingthe MODE, press the PROGRAMbutton to enter Setup screens.Note: Press the MODEbutton momentarilyto move through t
TOTALINE Signature HEAT COOL HEAT PUMP HEAT COOL HET PM Replacement Components Division Carrier Corporation 08/05 Use with most Air Conditioning & Heating Systems including: 1 Stage Electric Cooling & 2 Stage Gas Heating, Heat Pump, Electric or Hydronic Heat. OWNER'S M ANU L OWN R'S MANUAL 1-DAY P ROG AMBLE D IG TAL THERMOS