Transcription
Organize for Mac//task fabric
Organize for Mac1Welcome to Organize1.123565New Features and Changes2.1Change-log for Organize 1.2.092.2Change-log for Organize 1.0.110The Organize User Interface3.14The Welcome DialogUser Interface Overview12Managing Collections - Projects, Folders and Meetings4.1Adding new Projects174.2Deleting Projects184.3Moving Collections and creating Subprojects194.4Collection Categories - Projects, Folders, Meetings204.5Collection Status - Traffic Light and Activity224.6Flagging Collections244.7Using Collection Defaults (Task Templates)26Managing Contexts5.1Adding new Contexts285.2Deleting Contexts295.3Moving Contexts and creating Subcontexts305.4Setting Context Details31Review your tasks6.1Review your Next Steps336.2Using the Project Dashboard35
78910Task Lists in Detail7.1Adding new Tasks397.2Completing and Deleting Tasks407.3Moving Tasks to another Project427.4Managing Subtasks437.5Sorting List Entries447.6Show/Hide Completed Tasks and Subtasks457.7Searching Items477.8Sharing - Email and Printing49Task Details and Settings Task Options8.1Task Details Explained528.2Scheduling Recurring Events54Security and Authorization9.1Security Levels589.2Setting and Changing Passwords619.3Get Clearance for a Security Level (Authorize)639.4Classifying Tasks and Changing Default Classification65Sharing Tasks and Lists10.1 Import11WiFi Sync11.1 WiFi Sync Manual126769Cloud Sync12.1 Cloud Sync Manual71
Welcome to OrganizeOrganize for Mac - 4 2011 //task fabric. All Rights Reserved. 2011-01-10
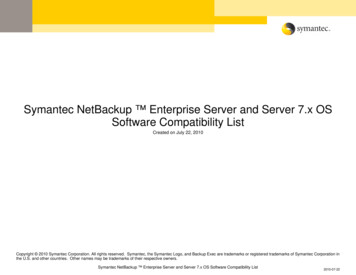
The Welcome DialogWhere to start?On starting Organize for the first time, you will see the Welcome dialog displayed above. TheWelcome dialog allows you to access online ressources, like short introductions to the conceptsbehind Organize or the manual and tutorials. Additionally it helps you to set up Organize and learnhow to use it.If you are new to Organize "Run Organize for the first time" is the place to start for you. Press thedown arrow in the Welcome dialog and continue reading with the "Run Organize for the first time"section.If you are already running Organize on another platform, like iPhone, iPad, "Sync with Organize foriPhone or iPad" is the best way to easily set up task transfer between your devices. Press the downarrow in the Welcome dialog and continue reading with the "Sync with Organize for iPhone and iPad"section.If you just curious and can't wait to try it yourself, press the "Close" button to hide the Welcomedialog. You can always come back to the Welcome dialog by selecting Help Show WelcomeDialog. from the menu.Organize for Mac - 5 2011 //task fabric. All Rights Reserved. 2011-01-10
Run Organize for the first timeIf you want to learn how Organize works, "Create Tutorial Entries" is the best way to do so. Click it toautomatically fill the Organize database with sample Projects, Contexts and Tasks. After the entriesare created click on "Start Organize Tutorial" to learn more about how to manage your private tasksand your work day with Organize.If you already tried another task manager before and want to upgrade to Organize, you can use theImport button to load the tasks from your previous application into Organize - this way you don'thave to waste your time entering tasks you've already entered before. For more information on howto import tasks go to the Import section in the manual here.Organize for Mac - 6 2011 //task fabric. All Rights Reserved. 2011-01-10
Sync with Organize for iPhone or iPadOrganize support synchronization via the Cloud (Internet) or direct synchronization via WiFi for asmany devices and installations as you like. So which kind of synchronization is better? There's noeasy answer, but consider the following:Cloud Sync- You're data is stored on a Server in the Cloud and can be integrated with additional servicesprovided in the Cloud- Connection to the Server is made by regular web access - so you can sync wherever you get anInternet connection- You can configure to use your local proxy server for network connections, if your Mac is behind afirewall- No direct connection between your Organize installations is necessaryWiFi Sync- Data is only stored on your systems, no copy is made anywhere- All Organize installations need to be on the same network to be able to synchronize- Synchronization is usually faster on your local network- Devices detect each other with Apple's Bonjour service for synchronization. You have to makesure no firewall blocks Bonjour broadcastsTo learn how to setup Cloud and WiFi Sync with Organize press the button "Open Organize CloudSync Manual" or "Open Organize WiFi Sync Manual". They contain step-by-step instructions for allplatforms. The Cloud Sync Setup dialog can be accessed by clicking "Setup Organize Cloud Sync".Organize for Mac - 7 2011 //task fabric. All Rights Reserved. 2011-01-10
New Features and ChangesOrganize for Mac - 8 2011 //task fabric. All Rights Reserved. 2011-01-10
Change-log for Organize 1.2.0Organize 1.2.0 brings many improvements and bug fixes. The most requested change is a new wayto handle recurring tasks. The recurring task model now works more like many are used from theirOffice package. Other improvements include better sync stability and speed, enhanced task viewand sorting options.Bug Fixes and New Features Recurring Tasks: Recurring tasks now have a special icon displayed next to the task date. In the“Review Next Steps” view they are displayed for each recurrence as actual task and as template,so you can either modify (i.e. check) one recurrence or the whole series.Project Dashboard: Added an explanation how to work with the Dashboard at the bottom of thepage.Drop Frame: Shows a tooltip explaining the Drop Frame after it has been on screen for morethan 2 seconds.Drop Frame: Click the items in the Drop Frame to open Organize and select the view from theDrop FrameProxy Support: Proxy server connection details can now be entered manually.WiFi Sync: Added a WiFi Sync section to the Options/Preferences dialog. You canenable/disable WiFi Sync there and see the current connection details.WiFi Sync: Fixed a bug that prevented attachments to be synced via WiFiBackup: Fixed a bug with the backup routine after changing the database locationTask List: Changed the task list selection marker to improve visibility of the currently selectedtaskWindows XP: Organize is now officially supported for Windows XP.Windows 7: Organize now displays an icon badge in your taskbar. Use the Options/Preferencesdialog to select the number to display (i.e. overdue tasks)Automation: Organize will get many predefined tasks for automation in the future. The first isto move all overdue tasks to today for review.Outlook Integration: we’re preparing an Outlook Add-In right now, so you can mark an emailor task in Outlook and convert it to a task in Organize with a simple menu selection. Organize1.2.0 is already prepared for the Outlook Add-In. The Add-In itself will be available for previewnext week.Apple Mail Support: Organize now accepts direct drops from Apple Mails. Drag and Drop anymail message on Organize to create a new task based on the mail message.Printing: Fixed a bug that destroyed the print layout when printing a task list on Windows.Library: Show/Hide paused, cancelled and completed projects.DocumentationThis document is now available online and as PDF document athttp://www.taskfabric.com/support.phpOrganize for Mac - 9 2011 //task fabric. All Rights Reserved. 2011-01-10
Change-log for Organize 1.0.1Organize 1.0.1 fixes some minor issues and brings several enhancements to Organize for Mac andOrganize for Windows.Bug Fixes and New Features Project Dashboard: Re-order dashboard tiles by drag and dropProject Dashboard: New special tile “Priority”Focus: New “Review Priority” listLibrary: Select different font sizes with the preferences/options dialogTask List: Color marker for tasksTask List: Different fonts for tasks and subtasks can now be selected using thepreferences/options dialogTask List: Customize your “Add Task” behavior with the preferences/options dialog. Useshortcuts to create subtasks, tasks on the same level or on the top levelTask List: ToolTips to display full project path and comment for a taskDate/Time Picker: Improved support for localized date and time inputBackup: Create a manual backup with the click of a button (preferences/options dialog)Backup: Automatically create a database backup on shutdownSynchronization: Full support for international characters setsMac OS Integration: Supports the organize:// url format to automatically add tasks sent byemail with Organize for iPad or Organize for iPhoneMac OS Integration: Organize can now be accessed through the Services menu from anyapplication. Mark some text and select “Organize: Create Task in Inbox” from the Servicesmenu.Windows Integration: Supports the organize:// url format to automatically add tasks sent byemail with Organize for iPad or Organize for iPhoneDocumentationThis document is now available online and as PDF document athttp://www.taskfabric.com/support.phpOrganize for Mac - 10 2011 //task fabric. All Rights Reserved. 2011-01-10
The Organize User InterfaceOrganize for Mac - 11 2011 //task fabric. All Rights Reserved. 2011-01-10
User Interface OverviewThe Organize LibraryThe library is displayed on the left side of the main window. You can show and hide the library byselecting View Show Library from the menu.Library SectionsThe Library contains four sections. Focus for quickly creating new tasks you want to organize laterand for reviewing your tasks, Projects for all you projects, Contexts for people, locations, situationsand Archive for completed and deleted tasks.The FOCUS SectionInbox: Add Tasks to the Inbox to get them of your mind quickly. The Inbox is not meant aspermanent storage. It should be reviewed on a regular basis and all items from the Inbox should bemoved to an appropriate Project.Project Dashboard: It shows you what to do next for your projects at a glance. Add only your mostimportant projects to the Project Dashboard and take a look at it every morning. This way you canbe sure you don't miss anything important. This is kind of a personal early morning briefing.Review Next Steps: As soon as you assign a review date to your tasks they will show up in theOrganize for Mac - 12 2011 //task fabric. All Rights Reserved. 2011-01-10
Review Next Steps view. The Next Review Date for each task means that you should have a look at itand decide if you can take any actions or delay it till later (i.e. because you're still waiting on afeedback from somebody else). This view allows you to access your tasks by date (for yesterday,today and the next few days), week or month.Review Flagged: You can set a flag on any task to mark it as especially important. All flagged tasksshow up in this list.Review Everything: Want a look at all tasks - no matter which Project they are in. Review Everythingis just that.Review Priority: This list displays all tasks with a priority above normal.Review Repeating: This list displays all Repeat Templates.The PROJECTS SectionCreate your own projects here. You can divide any project in as many subprojects as you like andre-order them by drag and drop. To assign a task to a project just drop it on the project entry.The CONTEXTS SectionCreate your own contexts here. Contexts are situation, locations or people that are closely linked toa task. I.e. if you need to discuss a task with Joe, you can create a context "Joe" and assign it to theTask by dragging the context "Joe" and dropping it on the task. Later on if you meet Joe, click on hiscontext and you will see all tasks that have the context "Joe" assigned.As with projects you can create as many contexts and subcontexts as you like and re-order themby drag and drop.The ARCHIVE SectionCompleted: This list shows all completed items - no matter which project they have been assignedto. If you want to see only the completed items for a specific project, you can select the project andclick the "Show Completed" button at the bottom of the task list view.Trash: This list shows all deleted items.Organize for Mac - 13 2011 //task fabric. All Rights Reserved. 2011-01-10
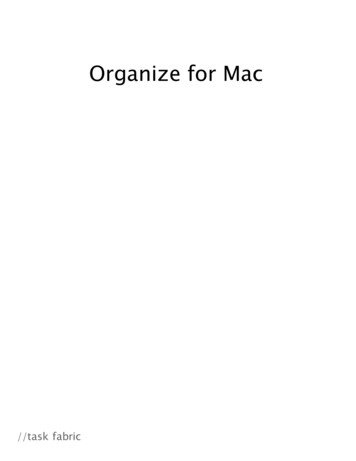
The Task List ViewThe Task List View is displayed on the right side of the window. It is made up of the followingsections:Scope Bar (1): This section displays all Projects and Contexts that appear in the currently displayedtask list. If you have a larger list and want to limit the items displayed to a specific project (i.e. in theReview Next Steps view) or to a specific context, press on the context or project in the Scope Barand all other items are temporarily hidden.Search Field (2): The search field is in the upper right corner displayed as part of the Scope Bar.Enter any text you want to search for and Organize immediately searches it's full database for thekeyword entered. The Search Field always operates on a global basis. That means it does not onlysearch in the current list, but in all projects and entries.Task List (3): The actual Tasks are displayed as task bars, which give you a compact view on themost important task details, like priority, assigned contexts, project, next review date and wetherthere are any comments or attachments releated to this task.Next Review Quick Reschedule Bar (4): Select the Next Review Date here to quickly reschedule thecurrently selected task.Organize for Mac - 14 2011 //task fabric. All Rights Reserved. 2011-01-10
Action Bar (5): The Action Bar contains the most important actions for quick access. Here you canadd a new Task, show/hide completed tasks and subtasks or access the integrated attachmentpreview.The Status Bar on Mac OS XThe Status Bar contains on Mac OS X shortcuts for the most important actions to manage theOrganize Library:Add ( ): Context sensitive add. Depending on your current selection a new project or context iscreated.Delete (-): The currently selected item from the Organize Library is removed.Wheel Menu: Displays all available options based on the currently selected entry in the OrganizeLibrary.Inspector (i): Display a HUD window to modify the details of the currently selected item in theOrganize Library. Here you can set project details, default values or context details.Cloud: Quick access to go directly to the Cloud Sync dialog.Organize for Mac - 15 2011 //task fabric. All Rights Reserved. 2011-01-10
Managing Collections Projects, Folders andMeetingsOrganize for Mac - 16 2011 //task fabric. All Rights Reserved. 2011-01-10
Adding new ProjectsOrganize allows you to add projects in multiple ways:Add Button ( ): If you want to create a new project on the same level as the currently selectedproject, click the Add Button in the status bar. The now project will be created immediately and putinto edit mode, so you can directly type in the name of the new project. However for this to workyou must select a project before clicking the Add Button.Wheel Button Add Project: Clicking the Wheel Button displays a context menu. The menu item"Add Project" is always part of this menu. Other menu items appear/disappear based on thecurrently selected item. Select Add Project from the menu to create a new subproject. That meansyou have a project selected, the new project is created as subproject for the current selection. Ifyou have no project selected, the new project is created on the top level.You can also select File Add Project from the menu. This is the same as selecting Add Projectfrom the Wheel Button menu.Organize for Mac - 17 2011 //task fabric. All Rights Reserved. 2011-01-10
Deleting ProjectsOrganize allows you to remove the currently selected project by- clicking the Delete Button (-) in the Status Bar- clicking the Wheel Button in the Status Bar an selecting "Delete Project" from the menu- pressing the DEL or BACKSPACE key on your keyboardNo matter how you delete the project the following happens:- If the project is empty (no subprojects and no tasks) it is deleted immediately- If Organize finds any subprojects or tasks it requests a confirmation to also delete all tasks andsubprojects. This way Organize ensures you get no orphaned tasks, which means tasks withoutassociated project.Organize for Mac - 18 2011 //task fabric. All Rights Reserved. 2011-01-10
Moving Collections and creating SubprojectsCreating a SubprojectProjects can be moved by drag and drop:- click and hold the mouse on a project- drag it to the destination project- release the mouse button to drop itThe dragged project is moved below the project you dropped it on.Moving a Subproject to Top LevelTo move a subproject back to the top level drag the subproject an drop it on the "PROJECTS" sectiontitle.Organize for Mac - 19 2011 //task fabric. All Rights Reserved. 2011-01-10
Collection Categories - Projects, Folders,MeetingsOrganize know three types of collections:1. Projects: Projects have a defined start and end date and a defined target.2. Meetings: One-time or regular event with a defined number of participants and an agenda3. Folders: Everything else - mostly used for reference information, data collection or just thatinteresting thing you've seen yesterday, but don't know yet what to do with it.Setting the Collection Category using thecontext menuTo set the collection category you have to:- Select the project in the Organize Library (1)- Ctrl-Click the project or click the Wheel Button in the status bar to show the context menu- Move your mouse over "Folder Type" to open the Folder Type submenu- Select the Folder TypeBy changing the Folder Type the icon for your project is updated accordingly.Organize for Mac - 20 2011 //task fabric. All Rights Reserved. 2011-01-10
Setting the Collection Category using theInspectorTo set the collection type you have to:- Select the project from the Organize Library (1)- Show the Inspector by clicking the Inspector Button (i) in the Status Bar (2)- Make sure the "Type and Status" section is selected (3)- Select the "Folder Type" (4)By changing the Folder Type the icon for your project is updated accordingly.Organize for Mac - 21 2011 //task fabric. All Rights Reserved. 2011-01-10
Collection Status - Traffic Light and ActivityEach collection type - Project, Folders and Meetings - can have two status details:Traffic LightThis is a high-level perspective of how well the project performs: Green: in time/in budget. Everything is fine! Yellow: in risk of running out of time/out of budget Red: not in time or running out of budget. In short: urgent actions and attention needed!ActivityThis shows if there are still action that have to be done in a project and if the project is currentlymanaged and processed: Active: Project is ongoing. On Hold: Project has been halted (maybe due to lack of resources or intermediate change ofpriorities), but is expected to be continued Cancelled: Project has been stopped without completion. Completed: Project has been successfully completed.Setting the Project Status using the contextmenuTo set the collection category you have to:- Select the project in the Organize Library (1)Organize for Mac - 22 2011 //task fabric. All Rights Reserved. 2011-01-10
- Ctrl-Click the project or click the Wheel Button in the status bar to show the context menu- Move your mouse over "Status" to open the Status submenu- Select the Traffic Light or ActivityBy changing Traffic Light or Activity the icon for your project is updated accordingly.Setting the Project Status using the InspectorTo set the Project Status you have to:- Select the project from the Organize Library (1)- Show the Inspector by clicking the Inspector Button (i) in the Status Bar (2)- Make sure the "Type and Status" section is selected (3)- Select the "Traffic Light" and "Activity" (4)By changing Traffic Light and Activity the icon for your project is updated accordingly.Organize for Mac - 23 2011 //task fabric. All Rights Reserved. 2011-01-10
Flagging CollectionsTo mark a project as especially important you can flag it. Every flagged project is displayed with ared flag in the icon to improve visibility in a large project list.Flagging Collections using the context menuTo flag or unflag a collection you have to:- Select the project in the Organize Library (1)- Ctrl-Click the project or click the Wheel Button in the status bar to show the context menu- Move your mouse over "Folder Type" to open the Folder Type submenu- Select "Flagged" to toggle the current flaggingBy changing the flagging the icon for your project is updated accordingly.Organize for Mac - 24 2011 //task fabric. All Rights Reserved. 2011-01-10
Flagging Collections using the InspectorTo flag or unflag a collection you have to:- Select the project from the Organize Library (1)- Show the Inspector by clicking the Inspector Button (i) in the Status Bar (2)- Make sure the "Type and Status" section is selected (3)- Turn the "Flagged" switch on/off by clicking the switch (4)By changing the flagging the icon for your project is updated accordingly.Organize for Mac - 25 2011 //task fabric. All Rights Reserved. 2011-01-10
Using Collection Defaults (Task Templates)Organize allows you to define default values for collections. If you use a Folder for collectinginteresting articles about work related stuff they all should be created as Information (see AID). Youcan set the AID-Value to Information manually for every new entry. But wouldn't it be much nicer, ifOrganize would do this automatically? This is what Collection Defaults are for. Use them to setdefault values for Priority, AID, Context and RACI for each item created in a Collection.To set the Collection Defaults you have to:- Select the project from the Organize Library (1)- Show the Inspector by clicking the Inspector Button (i) in the Status Bar (2)- Click on "Item Settings" in the Inspector window (3)- Select the "Default Item Priority", "Default Item Type" and "Default Item Security Level" (4)If you want to automatically assign a context or RACI entry to every newly created task in thisproject, click on the according line in the Defaults section and select the context assignments.Organize for Mac - 26 2011 //task fabric. All Rights Reserved. 2011-01-10
Managing ContextsOrganize for Mac - 27 2011 //task fabric. All Rights Reserved. 2011-01-10
Adding new ContextsOrganize allows you to add contexts in multiple ways:Add Button ( ): If you want to create a new context on the same level as the currently selectedcontext, click the Add Button in the status bar. The now context will be created immediately and putinto edit mode, so you can directly type in the name of the new context. However for this to workyou must select a context before clicking the Add Button.Wheel Button Add Context: Clicking the Wheel Button displays a context menu. The menu item"Add Context" is always part of this menu. Other menu items appear/disappear based on thecurrently selected item. Select Add Context from the menu to create a new subcontext. That meansyou have a context selected, the new context is created as subcontext for the current selection. Ifyou have no context selected, the new context is created on the top level.You can also select File Add Context from the menu. This is the same as selecting Add Contextfrom the Wheel Button menu.Organize for Mac - 28 2011 //task fabric. All Rights Reserved. 2011-01-10
Deleting ContextsOrganize allows you to remove the currently selected context by- clicking the Delete Button (-) in the Status Bar- clicking the Wheel Button in the Status Bar an selecting "Delete Context" from the menu- pressing the DEL or BACKSPACE key on your keyboardNo matter how you delete the context the following happens:- If the context is empty (no subcontexts and no tasks) it is deleted immediately- If Organize finds any subcontexts or tasks it requests a confirmation to also delete all contextassignments for the tasks and subcontexts. Organize will never delete a task when deleting acontext - only the context assignments are removed.Organize for Mac - 29 2011 //task fabric. All Rights Reserved. 2011-01-10
Moving Contexts and creating SubcontextsCreating a SubcontextContexts can be moved by drag and drop:- click and hold the mouse on a context- drag it to the destination context- release the mouse button to drop itThe dragged context is moved below the context you dropped it on.Moving a Subproject to Top LevelTo move a subcontext back to the top level drag the subcontext an drop it on the "CONTEXTS"section title.Organize for Mac - 30 2011 //task fabric. All Rights Reserved. 2011-01-10
Setting Context DetailsAs contexts are in many cases persons or locations we provided Organize with the ability to storeadditional information for each context, like contact details and location.Providing those details is especially helpful if you synchronize Organize with your iPhone or iPad.I.e. on your iPhone you can dial the provided phone number with the tap of a button.Providing Context DetailsTo enter context details you have to:- Select the context from the Organize Library (1)- Show the Inspector by clicking the Inspector Button (i) in the Status Bar (2)- Enter the Contact or Location details for the context (3)If you enter location details you can click "Preview Map" (4) to show a preview of the location withGoogle Maps in the preview area.Organize for Mac - 31 2011 //task fabric. All Rights Reserved. 2011-01-10
Review your tasksOrganize for Mac - 32 2011 //task fabric. All Rights Reserved. 2011-01-10
Review your Next StepsYou can review your tasks the following ways: Project Dashboard: Displays the 5 Next Steps for your most important ProjectsReview Next Steps: This lists all items with a Next Review Date set in order of the Next ReviewDate.Review Flagged: Review only items that are flagged.Review Everything: Show all tasks entered into any Project or Context (Attention: can be along list!)Using the Projects and Context sections you can review by: Project: This lists all items belonging to a Collection (Project, Folder or Meeting) Context: This lists all associated items for a context. This means items can show up multipletimes if they have more than one Context assigned.Project DashboardThe Project Dashboard displays the Next Steps for your most important Projects. For moreinformation on how to configure and use the Project Dashboard, see the Project Dashboard sectionin this manual.Organize for Mac - 33 2011 //task fabric. All Rights Reserved. 2011-01-10
Review Next StepsThis "Review Next Steps" view show you only items with an assigned "Next Review" date. At the datebar (1) you can select the time periode you want to see: Overdue: Show all tasks with a review date in the past. Month: Displays all tasks with a review date in the current month. Week: Displays all tasks with a review date in the current week. The number in the title bar nextto "Week" displays the current calendar week. Days: You can always directly access yesterday, today and the next two days to see all thetasks marked for review at these dates. Upcoming: Displays all tasks with a review date more than 2 days into the future.While you're in the "Review Next Steps" list all newly created tasked have an automatically assignedNext Review date based on your current selection. I.e. if you are in the "Today" list and add a newtask, the new task is automatically scheduled for review today.Organize for Mac - 34 2011 //task fabric. All Rights Reserved. 2011-01-10
Using the Project DashboardOrganize includes a Project Dashboard that gives you all the information you need about your mostimportant projects at a glance.Setup your personal Project DashboardUnlike with a car where the most important things are speed and direction, with a business it's notso easily decided how to measure progress and what the most important things are.So you need to sit back by yourself and think a moment about what your strategic projects are,what really matters if you don't get it done in the short and the long term. These are the projectsyou need to put on your personal dashboard!To add your projects to the Project Dashboard:- Select Project Dashboard from the Organize Library to display the Project Dashboard- Drag any project you want to add from the Organize Library and drop it on the gray ProjectDashboard background (not on a white task list)To add pre-defined Special Folders activate / deactive them with the View Project DashboardDefaults submenu. You can activate the following pre-defined folders:Organize for Mac - 35 2011 //task fabric. All Rights Reserved. 2011-01-10
- Inbox- Overdue- Today- This Week- Flagged- Someday- Everything- PriorityPlease don't overload the Project Dashboard! The goal is to give you a quick overview - so try tostick to the 5-10 most imporant things! This is sufficient for most of us. In this case, restriction tothe really important stuff is the key to successfully using the Project Dashboard.How to use the Project DashboardThe Project Dashboard in Organize shows you the 5 Next Steps (1) for every project added - the 5tasks you qualified as most important by settings Flags and Priorities. It doesn't show you all thenot so critical stuff, but only the most important things to do. So this is your place to start to getthings done!If you need a quick review you can tap on "Next Steps" (2) in the upper right corner to switchbetween "Next Steps" and "Recently Completed". The Completed view will show you the last 5 tasksyou completed for this project.Organize for Mac - 36 2011 //task fabric. All Rights Reserved. 2011-01-10
If you need more information, tap the title (3) - this will bring you directly to your project, so youcan review all tasks in detail
Mac OS Integration: Supports the organize:// url format to automatically add tasks sent by email with Organize for iPad or Organize for iPhone Mac OS Integration: Organize can now be accessed through the Services menu from any application. Mark some text and select "Organize: Create Task in Inbox" from the Services menu.