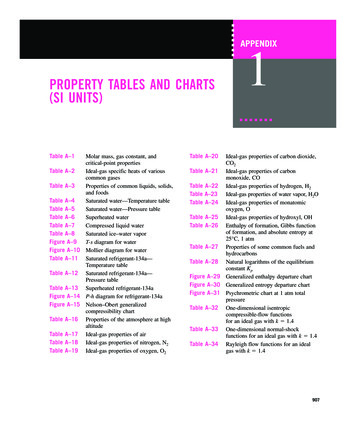
Transcription
SAGASAFEwww.sagasafe.comTable of Contents1. Introduction .31.1 Safety Precautions .31.2 Warranty .31.3 Initial Opening Instructions . .31.4 Features of Safes . . . .31.5 Locations of Important Parts . . .42. Mounting . 42.1 Mounting tips and precautions . .42.2 Mounting to the optional pedestal . .53. Programming .63.1 Features . . 63.2 Setup .64. Typical Safe Operations . .114.1 Changing your code .114.2 Opening the safe . .124.3 Closing the safe .124.4 Error Codes .124.5 Replacing the Batteries .125. Emergency Override Key .135.1 Precautions with the Override Keys . .135.2 Opening the safe using the Override Key . . .136. CEU .(optional) . .146.1 Opening the safe with the CEU .146.2 Changing the CEU codes . 15
SAGASAFEwww.sagasafe.com1. Introduction1.1 Safety Precautions: Please keep this manual in a safe place. (Not inside this safe!) Do NOT keep the Override Keys inside the safe Do not use liquid on the keypad or the back panel, use a damp cloth to clean. Make sure that the safe is anchored properly to prevent injury or damage.See section 2 for proper mounting instructions Do not place any liquid on top of the safe, as spills will short the keypad and render the safe inoperable. Do not open the panel on the back of the door or try to repair the safe yourself. Contact your distributor or Saga Electronic Co.,Ltd. Do not overstuff the safe or you can damage the motor mechanism or your contents.1.2 Warranty: This safe is warranted to be free from defects for a period of one (1) year from date of purchase(proven by receipt). This manual is owned by SAGA Electronic Co.,Ltd. and its licensed parties. Duplication of any or allof this manual is prohibited without the prior written consent of SAGA Electronic Co.,Ltd.1.3 Initial Opening Instructions: The safe comes set to the factory default code of 1234 Press 1234 and the display will show “-OPEN-” then when fully unlocked will show “OPENED”. To lock the door, press the pound (#). The display will show “CLOSE-” then, when fully locked, willshow “CLOSED” Should the display show “ERROR”, please refer to section 4.51.4 Features of safes:The safe has an attractive design, suitable for use in homes, offices, apartments and hotels andutilizing a proven and reliable digital operating system. Interior Carpet Time and Date Stamp Motorized Locking Master Code Two Solid Steel Bolts Audit Trail Audible Feedback Optional Computerized Emergency Unit Low Consumption Motor Interior Light Emergency Manual Key Override Automatic Shutdown Non-Volatile Memory Single-time molded case Option not to Display PIN Durable Finish2
SAGASAFEwww.sagasafe.com1.4 Locations of Important Parts:Front PanelBack PanelBack Panel (battery cover removed)1. Keypad5. Optional Interior Light2. Nameplate/Override key access6. Battery Cover3. USB Port7. 4 AA Alkaline Batteries4. Display8. MFG. Serial Number Sticker2. MountingThis section is, in no way, meant to be a comprehensive guide for mounting your safe.Responsibility for proper mounting of your safe is the sole responsibility of the purchaser.2.1 Mounting tips and Precautions: The safe may be mounted to a wall or the floor or to an optional pedestal.3
SAGASAFEwww.sagasafe.com When mounting to a wall, inside a cabinet or on a shelf, make sure of the load bearing capabilitiesof that surface to ensure it can support the weight of the safe and all contents. Failure to do socould result in possible injury or property damage! For concrete and masonry walls and floors, use expansion bolts of the size necessary to supportthe weight of the safe and your contents. For wood walls, use lag screws (bolts) set into studs or molly bolts of the size necessary to supportthe weight of the safe and your contents. Make sure that the surface is even and/or level so the safe sits flat on the surface to which it ismounting. Before drilling into either the floor or wall, check for concealed wires or pipes. For safety, have someone help to hold the safe during mounting thru the back of the safe. To secure the safe to the top of a cabinet you may want to use carriage bolts as anchors.2.2 Mounting to the optional pedestal:The optional Pedestal is a steel base used to raisethe safe off the floor but still be secure. The pedestalis bolted to the floor and then the safe is bolted to thepedestal and the wall. Check the floor for what type it is. (wood, tile, concrete) Get the appropriate anchors for the type of floor and wallthat you have. Temporally bolt the pedestal to the safe. Place the safe and pedestal where you want to mount it. Mark the floor and the wall for the mounting holes. Remove the pedestal from off of the safe. Place the pedestal back on the floor in the position youmarked and mark the drill points for the anchors in thebottom of the pedestal. Drill the holes for the anchors in the floor and the wall. Mount the pedestal to the floor. Bolt the safe to the pedestal and then to the wall. Do NOT mount the safe to the pedestal without alsomounting it to the wall.4
SAGASAFEwww.sagasafe.com. Programming3.1 Features:1. Code appearance on display and Hot keys.2. Preferred number of digits in your code.3. Lockout delay4. Master code5. Audit Trail6. Operational modeFeatures 1-6 will all appear on the first display. Date and time each have their own separate displays.Directions for accessing the programming for these features follows the explanations for sections 1-8.It is strongly recommended that you read all of the explanations and directions before accessing theprogramming.3.2 SetupTo set up the different features listed above, you must first decide how you want the safe to function.At the end of this section there will be a work table for you to write down your choices as they all mustbe entered at the same time.Sections 1-6 will refer to a digit position on the display (i.e. Section 1 is the first digit that will appearon the first display, Section 2 is the 2nd digit and so on). Date and time have their own separate displays.Section 1 (1st digit of first display)Code appearance on display and audit trailPress 0: If you DO NOT want your code to appear on the display (only dashes will appear).Press 1: If you WANT your code to appear each time you press your code and then will flash yourcode for verification one time. (Recommended & Default One Under Hotel Mode )Press 2: If you WANT your code to appear each time you press your codeHot Keys (Recommended Under Home Mode)If your lock is set so that your code does appear and you need it to not appear one time, you canpress 0# before your code. Only dashes will appear for that one time. The next time you press yourcode it will appear as usual.Likewise, if your lock is set up so that your code does not appear, you can press 9# before your codeand your code will appear for that one time only.5
SAGASAFEwww.sagasafe.comSection 2 (2nd digit): Preferred number of digits in your codePress 3: to use a 3-digit code.Press 4: to use a 4-digit code (Recommended & Default One Under Hotel Mode )Press 5: to use a 5-digit codePress 6: to use a 6-digit code.Press 7: to choose the length of code (3-6 digits) when you set the code.Section 3 (3rd digit): Lockout delayIf the wrong code is entered 4 times in a row, the keypad will shut down for a length of time that youset. This is to deter someone from opening your safe by trying random numbers. You must pick one ofthese three options:Press 0: for no lockout delay. (Not recommended)Press 1: for a 15 minute delay.(Recommended & Default One Under Hotel & Home Mode )Press 2: for a 30 minute delay.Section 4 (4th digit): Master CodeThe Master Code will open the safe if you lose your code and Override Keys. The MasterCode is preset at the factory.Press 2: To turn off the Master Code feature. (NOT recommended)Press 3: To turn on the Master Code feature.(If you have multiple safes and need special settings for the Master Code, please contact your localDistributor.Section 5 (5th digit): For Upgrade Only.Section 6 (6th digit): Operational ModeThis feature allows you to change how the safe operates, either for home use or hotel use.Press 0: to set for Home ModePress 1: to set for Hotel Mode.6
SAGASAFEwww.sagasafe.comExample of first display:Your safe is currently set to the following programming.“241301”1st digit– Code to appear each time you press your code and then will flash your code for verificationone time. .2nd digit– 4 digit code length.3rd digit– 15 minute lockout delay.4th digit– To turn on the Master Code feature.5th digit– For Upgrade Only .6th digit– set for Hotel Mode.Note : If you wish to setup your safe differently, please use the work table below to helpyou prepare before entering the locks programming. If you pause too long while makingyour programming changes, the display will turn off.Work TableSection1Section 2 Section 3 Section 47Section 5 Section 6
SAGASAFEwww.sagasafe.comTo access the programming: Unlock the safe. Press * * (star-star) the display will show “PROG” Press 751019 while the word “PROG” is still on the display The current setup will appear with the 1st digit flashing. All 6 sections must be entered within 10 seconds. You can change all sections or as fewas one section but all 6 sections must be entered if you are making any changes tosection 1-6. To keep a section programmed as it is currently set, simply press the samenumbers that is currently displayed for that section.The display will turn off. Press your code and pound (#) to activate the changes and lock the safe.8
SAGASAFEwww.sagasafe.comDisplay #3 (Time)4. Typical Safe Operations4.1 Changing your Code:Warning! For security purposes, you should change the factory set code as soon as possible. SAGAElectronic Company shall not be responsible for any theft caused by not changing the factory set code.To change your code ( For Home Mode ): Open the safe. (See Section 4.2 for instructions) Press star twice. Press 68 pound (68#). The display will show “NEU” Press your new code (3-6 digits, depending on setup) (Factory setting is for a 4 digit code). Press pound (#) and the safe will lock. Test your new code by opening the safe. If you get an error code, try the new code again, if you get a error again then try the previous code. If you get another error code then follow the directions for resetting the safe with the Override Keys.9
SAGASAFEwww.sagasafe.com4.2 Opening the Safe To open the safe for the first time press 1234. The display will show “-OPEN-” while the bolts are in motion and then “OPENED” when fully retracted. Remember when opening the safe with the code hidden that only dashes will appear on the displaywhile you are pressing your code. To open the safe after you have changed the code, use your code instead of 1234. If you see “Error” on the display, then the wrong code was pressed. If you press the wrong code 4times in a row, the keypad will lock you out for 15 minutes. (Please refer to the section on ErrorCodes for explanation of the lockout feature).4.3 Closing the safe: Press pound (#) and the display will show “CLOSE-” followed by “CLOSED” when the bolts are fullylocked. If you get any other message on the display, please refer to the section on Error Codes.4.4 Error Codes: HOLD 15 Indicates that the wrong code has been pressed 4 times in a row. You will not be able toopen your safe for 15 minutes. (Pressing any button during this time will show how many minutesare remaining.) ERROR Indicates that the wrong code was pressed. Check your code and try again. ERROR 1 Indicates that the bolts failed to retract fully to allow the door to open. Press in on thedoor to relive the pressure and try to open the door again. If you continually get this error code thenyou will need to contact your distributor or Wilson Safe Company for service. ERROR 2 Indicates that the bolts have failed to close fully. This is usually because the safe is toofull. Redistribute the contents or remove something to allow the door to close completely. If youcontinually get this message even if the safe is empty then you will need to call your distributor orWilson Safe Company.4.5 Testing and Replacing Batteries: Test battery level:The battery level can be tested either with the door open or with thedoor closed and locked.10
SAGASAFEwww.sagasafe.comWith door open: Press any number and then pound (#). Display will show“bA-HI” or “bA-LO”. “bA-LO” means that you need to replace thebatteries.With the door locked: Press pound (#). The display will show“bA-HI” or “bA-LO”. “bA-LO” means that you need to replace thebatteries. How to replace the batteries:1. Open the safe using your code or, if the batteries are dead, the Override Key.2. Remove the battery cover on the back panel by unscrewing the Phillips screw.3. Replace the batteries with 4 AA alkaline batteries.4. Replace the battery cover.5. Test the safe before you close the door.5. Emergency Override Key5.1 Precautions with the Override Keys: Never keep the Override Keys inside the safe! If you keep the Override Keys inside the safe and something happens requiring them to open thesafe, they will be locked inside the safe. You will have no ability to open your safe. Keep a record of the Key code stamped on the head of the keys. If the keys are lost, contact yourlocal distributor to order another pair of keys from the manufacturer.Key Code5.2 Opening the safe using the Override Keys: Using the supplied Allen wrench, unscrew one of the screws holding the Wilson Safe name plate onthe front of the safe and rotate to expose the key cylinder. Take one of the Override Keys and insert it into the cylinder and turn clockwise to open the safe,thenturn the key back to locked position and remove it. Press the pound (#) within 15 seconds,the bolts will be retracted. If you need to change the batteries, do so now. If you need to change/reset your code,please see Section 4.1 forinstructions)11
SAGASAFEwww.sagasafe.com6. Computerized Emergency Unit (CEU) The CEU is designed to be used by building managers or general managers that have multiple safesand is an option that must be purchased separately. Due to security reasons it should be kept secure and it’s use restricted to management or securitypersonnel. If your CEU has an on/off switch, it should be kept off so as not to drain the batteries needlessly. The unit uses 4 AA alkaline batteries and 1 LR6 alkaline battery.6.1 Changing the CEU Codes:Warning! For security purposes, you should change the factory default codes as soon as possible. Wilson Safe Company shall not be responsible for any theft caused by not changing the factory default code.Change the Manager Code: If applicable, turn the CEU on. Press star-star (**). The display will show “PROG”. Press the existing manager code (Factory default code is 3333). Press the star (*) followed by the 1 key. The display will show “NEW-C1” Press a new 4 digit manager code followed by pound (#). The display will show “DONE”.Change the Opening Code If applicable, turn the CEU on. Press star-star (**). The display will show “PROG” Press the existing opening code (Factory default code is 4444). Press the star (*) followed by the 2 key. The display will show “NEW-C2” Press a new 4 digit opening code followed by pound (#). The display will show “DONE”.It is important that these codes be kept secure!Note: If the manager and/or the opening code is lost, please contact your local distributor for instructions.Note: If multiple safes are purchased at different times, it might be necessary to reset the serial numberof the CEU to work with the new series of safes. If so, please contact Wilson Safe Company for help inresetting this number.12
SAGASAFEwww.sagasafe.com6.2 Opening the safe with the CEU:Warning! This should only be done if the opening code is lost and the owner of the safe’s contents isthere and security personnel are present. Insert the USB cable into the port located under the right side edge of the keypad. If applicable, turn the CEU on. Press the manager code followed by pound (#). The display on the CEU will show “GOOD” Press the CEU opening code followed by pound (#) the display on the CEU will show “-OPEN-”followed by “OPENED” when the bolts have fully retracted.13
SAGASAFEwww.sagasafe.comSaga Electronic Co.,Ltd.151 N.Shanshan Road,Ningbo Shanshan Hi-tech Park,Zhejiang Province,315177Contact Person : Nick YangSales ManagerTel: 86-574-87909608Fax: 86-574-87909600Mobile: 86-013777978670E-mail: sales@sagasafe.com14
Press 4: to use a 4-digit code (Recommended & Default One Under Hotel Mode ) Press 5: to use a 5-digit code Press 6: to use a 6-digit code. Press 7: to choose the length of code (3-6 digits) when you set the code. Section 3 (3rd digit): Lockout delay If the wrong code is entered 4 times in a row, the keypad will shut down for a length of time .