Transcription
ratComodo OneSoftware Version 3.8Dome FirewallAdministrator GuideGuide Version 1.1.062217Comodo Security Solutions1255 Broad StreetClifton, NJ 07013
C1 – Dome Firewall -Admin GuideTable of Contents1 Introduction to Dome Firewall . 41.1 Logging-in to the Dome Firewall Module. 51.2 Getting Started. 82 The Main Interface . 163 The Dashboard. 184 Viewing and Modifying System Status and General Configuration. 214.1 Configuring GUI Settings. 224.2 Viewing and Updating DFW Version. 234.3 Creating and Scheduling Backup of DFW State. 244.3.1 Manually Creating a Backup. 254.3.2 Scheduling Backup Operations. 264.3.3 Encrypting Backup Archives. 284.3.4 Exporting a Backup. 284.3.5 Importing a Backup Archive from a Local Computer. 294.3.6 Rolling Back DFW Sate to a Previous Time Point. 304.3.7 Resetting DFW State to Factory Defaults . 305 Viewing Dome Firewall Status . 305.1 System Status. 315.2 Network Status. 365.3 System Usage Summaries. 395.4 Network Traffic. 415.5 Network Connections. 435.6 SSLVPN Connections. 446 Network Configuration . 457 Configuring ICAP Services. 508 Managing Firewall Configuration. 518.1 Firewall Objects. 528.1.1 Managing Firewall Address Objects. 538.1.2 Managing Firewall Object Groups. 568.1.3 Managing Firewall Schedules. 588.1.4 Active Directory Integration. 618.2 Source Network Address Translation. 708.3 Configuring Virtual IP for Destination Network Address Translation. 758.4 Configuring System Access. 778.5 Configuring Firewall Policy Rules. 828.5.1 Managing Firewall Policy Rules. 838.5.2 Managing VPN Firewall Rules. 899 Configuring HTTPS Proxy Services. 9610 Configuring Virtual Private Network Settings. 9810.1 SSL VPN Server. 9910.1.1 Configuring General SSL VPN Server Settings. 100C1 – Dome Firewall – Admin Guide 2017 Comodo Security Solutions Inc. All rights reserved.2
C1 – Dome Firewall -Admin Guide10.1.2 Managing SSL VPN Client Accounts. 10210.1.3 Configuring Advanced SSL VPN Server Settings. 10410.1.4 Configuring LDAP Server Settings. 10710.1.5 Configuring Clients to Connect to Dome Firewall . 10810.2 SSLVPN Client . 11210.3 IPSec Configuration. 11610.4 L2TP Server Configuration. 12610.5 IPSec / L2TP Users Configuration. 12711 Viewing Logs. 13011.1 Realtime Logs. 13011.2 Configuring Log Settings. 133About Comodo. 135C1 – Dome Firewall – Admin Guide 2017 Comodo Security Solutions Inc. All rights reserved.3
C1 – Dome Firewall -Admin Guide1Introduction to Dome FirewallComodo Dome Firewall is an enterprise class unified firewall solution for networks and provides a secure VPNservice. Dome firewall module is an integrated application in Comodo One and can be placed as gateway of Domepremium services such as Dome Data Protection.Key Features Stateful Packet Inspection Firewall Source, Destination, IP, Service, Port and Schedule Based Rule Management VPN Firewall Virtual IP, DNAT,SNAT and ICAP Support IPSec, L2TP, SSLVPN Support Client-to-site and Site-to-Site VPN Tunnels Logs and Monitoring Add-on Module for Dome PremiumGuide StructureThis guide is intended to take you through the configuration and use of Comodo Dome Firewall. Introduction to Dome Firewall Logging-in to the Dome Firewall Module Getting StartedThe Main Interface The Dashboard Viewing and Modifying System Status and General Configuration Configuring GUI Settings Viewing and Updating Firmware VersionViewing Dome Firewall Status System Status Network Status System Usage Summaries Network Traffic Network Connections SSLVPN ConnectionsNetwork Configuration Configuring ICAP Services Managing Firewall Configuration Firewall Objects Managing Firewall Address Objects Managing Firewall Object Groups Managing Firewall Schedules Active Directory IntegrationC1 – Dome Firewall – Admin Guide 2017 Comodo Security Solutions Inc. All rights reserved.4
C1 – Dome Firewall -Admin Guide Source Network Address Translation Configuring Virtual IP for Destination Network Address Translation Configuring System Access Configuring Firewall Policy Rules Managing Firewall Policy Rules Managing VPN Firewall RulesConfiguring HTTPS Proxy Services Configuring Virtual Private Network Settings SSL VPN Server Configuring General SSL VPN Server Settings Managing SSL VPN Client Accounts Configuring Advanced SSL VPN Server Settings Configuring LDAP Server Settings SSLVPN Client IPsec Configuration L2TP Server Configuration IPsec / L2TP Users ConfigurationViewing Logs 1.1Realtime LogsConfiguring Log SettingsLogging-in to the Dome Firewall ModuleTo access the Dome Firewall module, login to C1 with your user name and password athttps://one.comodo.com/app/login.C1 – Dome Firewall – Admin Guide 2017 Comodo Security Solutions Inc. All rights reserved.5
C1 – Dome Firewall -Admin GuideThe C1 dashboard will be displayed.To open the Dome Firewall module Click 'Applications' at the top then click 'Dome Firewall' Alternatively, click 'All Licensed Applications' under 'Applications', then click 'Open Module' in the 'DomeFirewall' tile.C1 – Dome Firewall – Admin Guide 2017 Comodo Security Solutions Inc. All rights reserved.6
C1 – Dome Firewall -Admin GuideNote: You should have configured the Dome Firewall URL details in the Settings tab under Management Applications. Information about this will be shown at the end of product sign up process. The service URL will bemailed to your email address when ready.By default, the Dome Firewall 'Dashboard' screen will be displayed.C1 – Dome Firewall – Admin Guide 2017 Comodo Security Solutions Inc. All rights reserved.7
C1 – Dome Firewall -Admin Guide1.2Getting StartedThe first step is to configure your network clients to work with the Dome Firewall service. There are two ways toconnect to Dome Firewall: Client to Site VPN Site to Site VPNClient to Site VPNIn this method, all users/clients must be configured individually in order to route traffic via Dome Firewall. Theadvantage in this method is the clients will always be routed via Dome Firewall irrespective of their location.To configure a client to connect to Dome Firewall Click 'VPN' on the left then 'SSLVPN Server'In the Server Configuration screen, configure the following:SSLVPN server enabled - Select the checkbox to enable the SSLVPN server Bridged - Select the checkbox if you wish to run the server in bridged mode. Bridge to - Choose the local network zone to which the server is to be bridged. This option willappear only if you chose to run the server in bridged mode in the previous option. Dynamic IP pool start address and Dynamic IP pool end address - Enter the first and last addressof the IP address pool from which the IP addresses are to be dynamically assigned to the clientsthat are connecting to the server. All the traffic from these IP addresses will pass through the VPNfirewall, if enabled.Click 'Save and Restart'. The SSL VPN server service will be restarted for your settings to take effect. To download the server certificate for deployment to the clients, click 'Download CA certificate'. Thecertificate can also be downloaded from the 'Accounts' interface.Next, click the 'Accounts' tab:C1 – Dome Firewall – Admin Guide 2017 Comodo Security Solutions Inc. All rights reserved.8
C1 – Dome Firewall -Admin GuideTo add a new user account Click the 'Add account' button. The 'Add new user' pane for adding a new domain will open.Account informationSpecify the username and password for the user account. These credentials are to be entered to the SSL VPN clientfor authenticating itself to the server. Username - Enter a username for the accountPassword - Enter a password for the accountVerify password - Re-enter the password for confirmationClient routingConfigure the routing traffic for the client Direct all client traffic through the VPN server - Select this option for all the incoming and outgoingtraffic pertaining to the client to pass through the VPN serverPush only global options to this client - Instructs the server to push only the network routes, nameservers and domains specified under the Global Push Options under the 'Advanced' settings tab.Networks behind client - Enter the network subnet address of the VPN gateway server for theclient to connect to VPN.C1 – Dome Firewall – Admin Guide 2017 Comodo Security Solutions Inc. All rights reserved.9
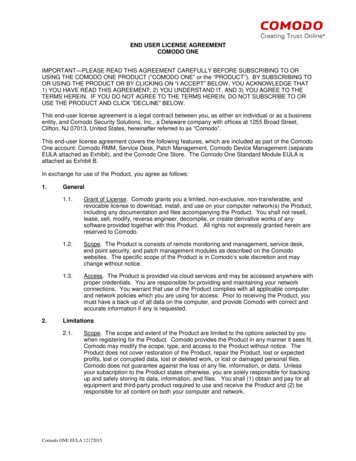
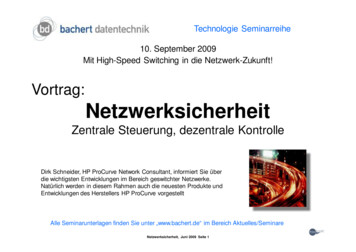
C1 – Dome Firewall -Admin GuidePush only these networks - If you wish to push the routes of only selected networks to the client,then enter the network/subnet addresses of the networks. If you wish to push the routes ofnetworks of all the other clients, leave this field blank.Custom push configuration Static ip addresses - If you wish to assign static IP addresses for the clients using this account,enter the IP addresses in CIDR format. To avoid IP address clashes, it is recommended to specifythe static IP addresses outside the Dynamic IP address pool specified under the 'ServerConfiguration' tab. Push these nameservers - If you wish the clients to use specific name servers for DNS resolution,select the 'Enable' checkbox and enter the IP addresses of the name servers in the text box. Push domain - If you wish to specify a specific search domain for the clients using this account, toidentify the servers and network resources in the VPN network, select the 'Enable' checkbox andenter the domain name in the text box.Click 'Save'. The account will be added to the list of accounts. The account will be activated enabling theclients to connect to the server only after the next restart of the SSL VPN server. Click 'Restart SSL VPN server' to instantly restart the server.Download the server certificate and the SSL VPN client configuration file from the 'Accounts' interface. The servercertificate type for authentication can be configured under 'Advanced' tab Authentication Settings. Click the 'Download CA certificate' link to download the server certificate. Click the 'Download Client Configuration' link to download the SSL VPN client configuration file in .ovpnformat.Next, transfer the certificate and the configuration file to the client. In order to connect for the client to connect toDome Firewall, download and install openvpn client. You can download the client loads.html After installing the OpenVPN GUI client, you need to paste the downloaded CA certificate and configurationfile into the OPVN config file. The configuration file will be available in Program Files OpenVPN config. Open the configuration file and make sure the parameters are as shown below:C1 – Dome Firewall – Admin Guide 2017 Comodo Security Solutions Inc. All rights reserved.10
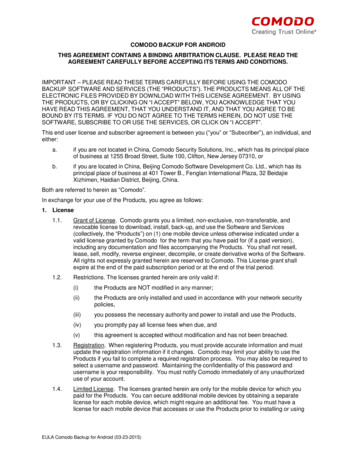
C1 – Dome Firewall -Admin Guide In the third line, the protocol beside 'proto' depends on the protocol defined in 'Advanced' section. In the fourth line, the IP beside 'remote' should be the IP of your DFW account and the port as configured in'Advanced' section. For example, if the Firewall URL is 52.41.147.187, then add '52.41.147.187' in theplace of 'remote ip'. To connect the client to DFW, right-click the OpenVPN GUI icon in the task bar then 'Connect'.The connection process will start and the user authentication should be provided.C1 – Dome Firewall – Admin Guide 2017 Comodo Security Solutions Inc. All rights reserved.11
C1 – Dome Firewall -Admin Guide Enter the credentials in the 'Username' and 'Password' fields and click 'OK'. That's it, the client will be connected to Dome Firewall and can be viewed in SSLVPN Server ServerConfiguration tab under 'Connection Status and Control' pane.See 'SSL VPN Server' and 'Configuring Clients to Connect to Dome Firewall' for more details.Site to Site VPNIn this method, a network is configured to connect to Dome Firewall. Once done, all the clients behind the networkwill be routed via Dome Firewall but one disadvantage here is any client (roaming device) leaving the office networkwill not be routed via Dome Firewall. These roaming agents if required to connect to internet via Dome Firewall thenthey have to be routed via the office network.You can use a router that supports VPN or a local firewall to create a virtual private network between that and DomeFW.To configure a network to connect to Dome FirewallEnable VPN tunnel at Dome Firewall Click 'VPN' on the left then 'IPSec'C1 – Dome Firewall – Admin Guide 2017 Comodo Security Solutions Inc. All rights reserved.12
C1 – Dome Firewall -Admin GuideIn the 'Global Settings' area:Enabled - Select the checkbox to enable the IPsec VPN service Zone - Choose the network zone to allow networks to access Dome FW through the IPsec VPN Dynamic IP pool network address/cidr - Specify the IP addresses for dynamic assignment to theclients in CIDR notationClick 'Save' for your settings to take effect In the 'Certificate Authorities' area: Click 'Generate root/host certificate' to generate a new certificate or upload an existing certificate. Thecertificate is used for authentication purpose between Dome FW and your router/firewall at your premises.You can also use a pre-shared key for authentication if you do not want certificate authentication option.The pre-shared key option is available in the 'Connection Configuration' screen.In the 'Connection Status and Control' area: Click 'Add' to create a new tunnel Select 'Net-to-Net Virtual Private Network' in the next screen 'Connection Type'C1 – Dome Firewall – Admin Guide 2017 Comodo Security Solutions Inc. All rights reserved.13
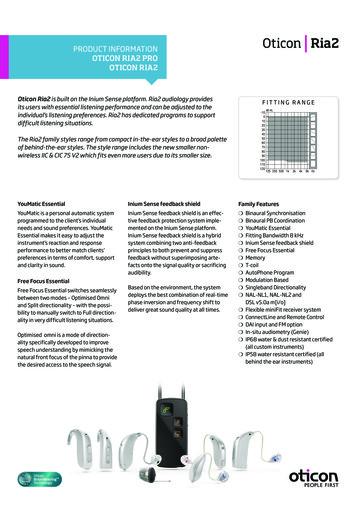
C1 – Dome Firewall -Admin Guide Click 'Add'The 'Connection Configuration' interface will be displayed: Name - Enter a name to identify the connection tunnelEnabled - Select this checkbox for the tunnel to be enabled upon creation.Local Interface - Choose the internet interface for this connection.Local Subnet – Edit the local subnet if necessaryLocal ID - Enter an identification string for the local network. Remote host/IP - Enter the IP address or hostname of the external host or network that is to be RemoteC1 – Dome Firewall – Admin Guide 2017 Comodo Security Solutions Inc. All rights reserved.14
C1 – Dome Firewall -Admin Guide connected to Dome FW.Remote subnet - Specify the sub network of the external network that can connect through thetunnel.Remote ID - Enter an identification string for the local network.AuthenticationSelect the authentication method. For example here we are using the pre-shared key.Click 'Save' to complete the tunnel setup in Dome FW. Enable VPN tunnel at your siteIn order for the connection to be established between your network and Dome FW, the same IPSec VPNconfiguration has to be done at the network router, firewall or gateway.The settings in the device may vary but the main configuration should be the same at both ends. Important settingsto be configured is given below:Select IPSec under VPN Provide the public or hostname of the Dome Firewall in the 'Remote host / IP field' Edit the local subnet field, if necessary In the 'Remote Subnet' field, enter the parameters of 'Local Subnet' that you provided in Dome FW Configure the authentication method that you selected in Dome FW. If you have chosen pre-sharedkey, provide the same key here.Click 'Save' to complete the tunnel setup in your network router, firewall or gateway. Next, test the VPN connectivity between your network and Dome Firewall. If you need more help with this, pleasewrite to c1-support@comodo.comSee 'IPsec Configuration' section for more details.C1 – Dome Firewall – Admin Guide 2017 Comodo Security Solutions Inc. All rights reserved.15
C1 – Dome Firewall -Admin Guide2The Main InterfaceThe Dome Firewall dashboard provides administrators with visibility and control over all services and settings. Thedashboard contains 'must know' statistics about network traffic, service status and uplinks, and serves as alaunchpad from which administrators can access other settings in the interface.Dome FW application menus are on the the left of the interface. Click on a menu to expand/collapse and access itssub-menus. Click the arrow at topoverview of the modules:to expand / collapse the side menu bar. The following table is a quickC1 – Dome Firewall – Admin Guide 2017 Comodo Security Solutions Inc. All rights reserved.16
C1 – Dome Firewall -Admin Guide System - View dashboard, FW version detailsand configure interface language settings. Status - View Dome FW status data such assystem status, network status, SSL VPNconnections and more. Network – View .the number of interfacesconfigured for your account. Services - Configure ICAP services. Firewall - Configure firewall and apply rules forcontrolling inbound and outbound traffic to/fromthe network. Proxy - Configure proxy servers for serviceslike HTTP/HTTPS proxy services. VPN - Configure SSLVPN server, SSLVPNclient, IPsec-based VPN tunnels and L2TPconnections. Logs - View logs for system events and firewall.You can also configure syslog servers forremote logging.The user-friendly graphical interface of the administrative console provides easy access to the information andconfiguration screens of all Dome FW features with the LHS Navigation design.C1 – Dome Firewall – Admin Guide 2017 Comodo Security Solutions Inc. All rights reserved.17
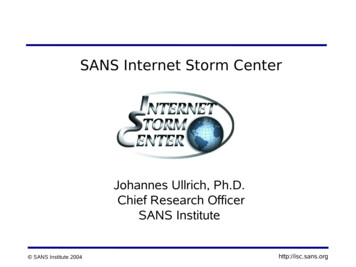
C1 – Dome Firewall -Admin Guide The Left Navigation Menu - The left hand navigation displays Dome Firewall modules as tabs. Clicking on amodule opens sub-tabs to open different configuration screens of the selected module. The Main Configuration Area - The main configuration area displays information pertinent to the tabselected on the left. The Title Bar Controls - The title bar contains controls for:Logout - The administrator can logout of the Firewall administrator console Help - Opens the online help page of Dome Firewall corresponding to the currently open configurationscreen.Version and Copyright Information - Version number and copyright information of the application isdisplayed at the bottom left of the interface. 3The DashboardThe dashboard provides a at-a-glance summary of the current running status, health and usage of the FW.The dashboard is displayed by default whenever you login to the administrative interface. To access the dashboardfrom a different configuration screen, select 'System' 'Dashboard' from the left-hand navigation.The dashboard displays the front panel of the device model and tiles which provide details on current hardwareresource use, system information, currently running services, network information and uplink status. The device model panel indicates the connection status of the uplink, DMZ, LAN and WiFi network zoneinterface devices. Each tile can be expanded or collapsed by clicking the down arrow at the top left of it. The tiles can be positioned as per the desired lay out by just dragging and dropping them to the desiredposition. The plugins which control these panes can be configured by clicking the 'Show Settings' link at the top leftC1 – Dome Firewall – Admin Guide 2017 Comodo Security Solutions Inc. All rights reserved.18
C1 – Dome Firewall -Admin Guideof the interface. For more details on configuring the tiles, refer to the section Configuring the DashboardHardware InformationThe Hardware information tile shows the hardware resource usage statistics of Dome Firewall. CPU x: The usage of the CPU resources. In a multi-processor server, the load on each CPU is indicatedseparately, with the suffix 'x' denoting the CPU number. Memory - The usage of the system memory. Main disk - Usage of the root partition of the main disk for your account. The disk usage should not exceed95%. Boot disk - Usage of the boot partition of the hard disk for your account. The disk usage should not exceed95%. Temp - Usage of disk space in /tmp partition, allotted for temporary files for your account. The Temp spaceusage should not exceed 95%. Log - Usage of disk space allotted for log files for your account. The log space usage should not exceed95%. The log files are available at /var/logs. If the log space usage exceeds the threshold, the administratorcan move the log files to a different storage device and free the disk space. Cache - Usage of disk space for cache memory allotted for your account. Tmp - Usage of disk space by .tmp files created in Dome Firewall.System InformationThe System Information tile shows the host name and the network domain to which the Dome FW is connected in itstitle bar. The tile displays the general information about the appliance connected. Appliance - Indicates the DFW type Device ID - The identification number of DFW Version - The version number of the DFW hosted for your account. Contract - Indicates whether the DFW license is valid. Clicking the circled arrow refreshes the information. Contract Valid Until - Expiry date of the license Uptime - Indicates the period for which DFW is up since the last rebootServicesThe Services tile shows the On/Off status and statistics of the services like Intrusion Detection, mail filters currentlyloaded to the appliance. Clicking on the Live Log in the title bar opens the Realtime logs screen. Clicking on the service name expands the pane below it showing the detailed statistics.The services displayed are: Attacks Logged - Shows the number of attacks logged by the UTM SMTP Proxy - Shows the statics of mails in queue, total mails received, clean mails and infected mails thatwere rejected HTTP/HTTPS Proxy - Shows the statics of cache hits and missesNetwork InterfacesThe network interfaces tile shows statistics of the network interface devices configured for your FW account andrealtime updated graphical charts of incoming and outgoing traffic through these devices.The table in the upper half of the tile displays realtime statics of each network device.Network Interfaces - Column DescriptionsColumn HeaderDescriptionC1 – Dome Firewall – Admin Guide 2017 Comodo Security Solutions Inc. All rights reserved.19
C1 – Dome Firewall -Admin GuideDeviceThe name of the network interface device. The font color in which the name is displayedindicates the network zone to which the device belongs:Red - External network like WAN, for Internet connectionGreen - Local network to which workstations are connected, like LANTypeThe connection type of the deviceLinkLink status of the deviceStatusRunning status of the deviceIn/OutIncoming/Outgoing traffic through the deviceThe lower half of the tile displays realtime graphical charts of the incoming and outgoing traffic through the devicesselected from the list in the upper half. The administrator can select the devices to monitor the traffic through them byselecting the checkboxes beside the device names and deselect the others in the upper half. The lines are displayedin colors depending on the network zone to which the device belongs and the legend is shown at the top right ofeach graph.UplinksThe Uplinks area displays a table of uplinks configured for your account through which the FW connects to internet.The table shows the connection status and running status of each uplink and allows the administrator to enable ordisable them.Uplinks - Column DescriptionsColumn HeaderDescriptionNameThe name of the uplinks configured by Compdo for your FW account.IP AddressIP Address of the uplinkStatusRunning status of the uplink. The status coulmn can have one of the following values: Stopped or Inactive - The uplink is not connected. Connecting - The uplink is connecting to DFW, but connection is not yetcomplete. Connected or UP - The connection has been established and operational. Disconnecting - The uplink is closing the connection Failure - The connection could not be completed Failure, reconnecting - The connection could not be completed, but DFW isattempting to reconnect again. Dead link- The uplink is connected, but the defined hosts could not bereached. The uplink is not operational.UptimeThe period for which the uplink is Up since the
clients to connect to the server only after the next restart of the SSL VPN server. Click 'Restart SSL VPN server' to instantly restart the server. Download the server certificate and the SSL VPN client configuration file from the 'Accounts' interface. The server