Transcription
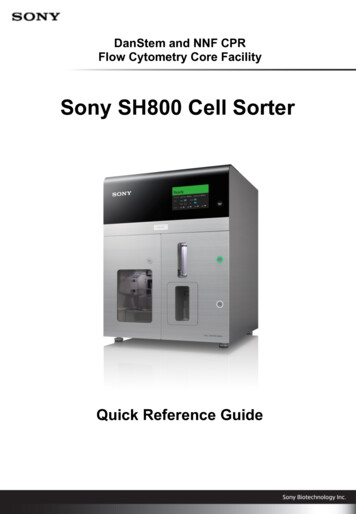
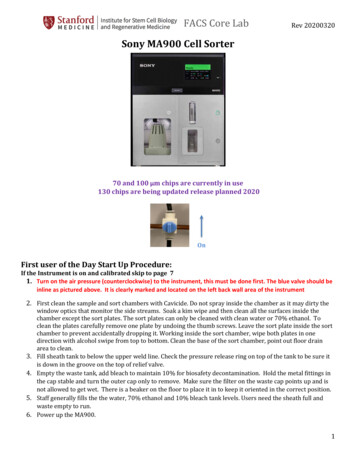
SONY SH800SFP cell sorterBioImaging Facility IST Austriav1.4 27/08/2020System description Lasers: 405nm, 488nm, 561nm and 638nm Beam spot: 1 (! necessary to compensate between dyes with overlapping emission spectra!) Detectors: FSC, BSC (back-scatter, equivalent to side scatter), 6 PMTs for fluorescent signal detection Filter set:oFSC and BSC: 488/17oLong pass filters: 639LP, 561LP, 487.5LP, 752LP, 685LPoBandpass filters: FL1 450/50, FL2 525/50, FL3 600/60, FL4 665/30, FL5 720/60, FL6 785/60 Nozzle sizes: 70um, 100um and 130um Sorting chip available (order separately in PPMS) Sort deposition: 2-way sorting (2 sorted populations non-sorted) Sort deposition system: bulk or single-cell sorting into tubes, 6-, 12-, 24-, 48-, 96- and 384-well platesincl. PCR plates Index sorting: each deposited event in a multi-well plate can be tracked back on the scatter-plots. Sorting modes: 8 different settings for different purity/yield levels, incl. single cell sortingpower buttonSH800 main unitSH800 main unit – side viewpower switchat the back (right side)pressure regulatorDON’T CHANGE ITpressure indicatorcompressor1
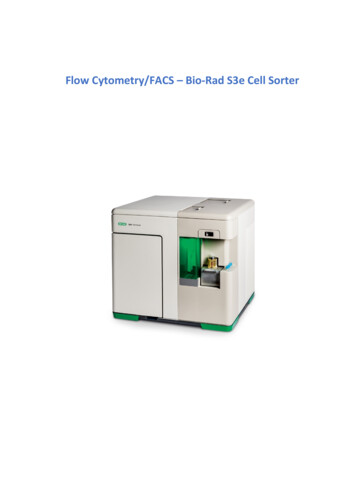
SONY SH800SFP cell sorterBioImaging Facility IST Austriav1.4 27/08/2020Startup – preparation while system still OFF1. De-pressurize sheath tank by lifting the ring-pull air relief valve on top of the tank.2. Check if Sheath tank (a) is reasonably full (consumption rate 2.5 liters/8h). If not,replace it with a full tank by first disconnecting the air line (clear), then the sheath fluid line(blue) and remove it WITHOUT tilting. Place the full tank on the fluidics cart (again withouttilting tank) and reconnect all lines.3. Check that the waste tank in the fluidics cart is empty (b).4. Inspect and clean the sort chamber: make sure there are no splashes and salt depositsanywhere, especially not on the deflection plates. Use Millipore water soaked wipes to cleanthe transparent door in front of deflection plates, the waste catcher and the black side streamsensor windows including the large sensor window below the waste catcher.Remove/clean/dry/reinstall the deflection plates using a Millipore water soaked wipe. Be sureto clean the white plastic mounting blocks being careful not to get the copper posts on theback of the plates wet.5. Open the fluidics maintenance door (left side) and check that there are no bubbles in thesheath filter (d). Check only. If there are bubbles, de-bubble the filter after turning on thepower (described later)6. Open the fluidics maintenance door (left side) and check that the DI water tank level is notlow (e).7. Refill with MilliQ water if needed: disconnect fluidic line, carefully open the latch and take outthe bottle. Unscrew the cap carefully and make sure that no fluid drips into the air filter. Refillbottle and place it back to the rack, close latch and re-connect the DI water line.Startup procedure1. Turn on the compressor (power switch is at the back of the device on the right side). It iscrucial to turn the compressor on to have pressurized air ( 6 bar) before doing anything else,esp. opening the front lid of the main unit.2. Press the power button on the right of the front panel of the SH800 main unit. A greenindicator lights up and system initialization starts (“Standby” appears after about 30 seconds).3. Turn on the computer, login name: fcm, password: fcm4. Wait until the SH800 has finished the initialization and the monitor displays “Standby”5. Double-click the SH800 icon on the desktop to launch SH800 software.2
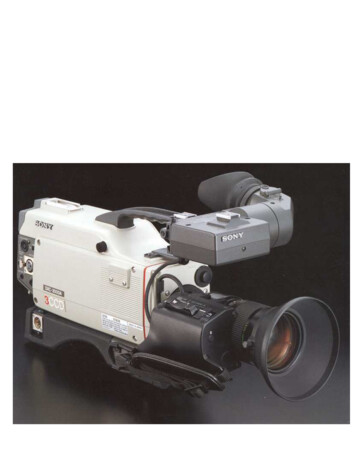
SONY SH800SFP cell sorterBioImaging Facility IST Austriav1.4 27/08/20206. To access cleaning routines or to exchange/insert a sample line, press [Maintenance] (d) (seebelow)7. If you would like to shut down the instrument, press [Shutdown] (c)8. To start the setup and calibration of the device, enter your Username and Password (a), andthen press [Login] (b).Exchanging sample lineSample line exchange can be done by BIF staff only. If you wish to use your own sample line (or yoursample requires it, eg. Bacterial or yeast samples), you have to request it via email tobioimaging@ist.ac.at at least 24h in advance. Sample line exchange can only be done during normalfacility working hours.Instrument setupRegistering and loading a sorting chip with the SH800 main unit.1. Open the camera – it’s on the top of the monitor. Hold the QR code on the sorting chippackage in front of the built-in camera on the host computer.2. Check the information displayed on the screen for the sorting chip, and then click [Next].- The Chip Loading window appears.The sorting chip can be used for 24 hours after it is registered.3. Open the flip-up door on the top of the front panel of the main unit.4. Remove the sorting chip ejected automatically from the chip insertion slot.5. Insert the new registered sorting chip, make sure that you donot touch the chip surface. Insert the chip part-way into thechip insertion slot with the “100 μm” label facing toward you.The chip loader automatically loads the chip. Do not exertexcessive force when inserting the chip!6. Click [Next] - The Laser Setting window appears.7. Choose your desired laser configuration for your experiment. The blue (488 nm) laser ismandatory for the system setup. You can change these settings later as well.8. Click [Next]3
SONY SH800SFP cell sorterBioImaging Facility IST Austriav1.4 27/08/20209. Check that the physical optical filter pattern is the same as the displayed filter pattern. Bydefault, select the middle option (with 405 laser).10. Click [Next]11. Automatic fluidics check starts, which takes approx. 5 min to complete. This includes startupof the fluidics, followed by repeated de-bubbling of the sorting chip and stabilization ofpressure and flow.12. Verify that liquid is dripping from sample line. If not, perform sample line cleaning.13. Right after fluidics check start, click on [De-bubble sheath filter] and follow the instructions inthe corresponding section below! The fluidics startup will continue in the background.De-bubbling the Sheath Filter1. Open the fluidics maintenance door, remove the sheath filter from the retaining clamp(without disconnecting the connectors), tap the side of the filter 2 or 3 times with your hand,and check for bubbles in the filter. If there is no air trapped in the filter, place the sheath filterback and reattach the clamp (no further action is required). Reinsert the filter with the arrowon the side of the filter facing up.2. If there is air trapped in the filter, open the air release port on the top of the filter to expel thetrapped air. Hold a paper towel around the port to collect any sheath fluid overflow from theair release port. Flip the sheath filter upside down and repeat the procedure to releasetrapped air from the air release port on the bottom of the filter. Reinsert the filter with thearrow on the side of the filter facing up and reattach the clamp.3. Once back in the fluidics check window, verify that droplet shape is stable. If droplets/streamare bouncing, morphing, etc., de-bubble the sheath filter again.Auto calibration1. Prepare a 5ml FACS tube with automatic setup beads: Check if there’s a pre-existing tube withauto-setup beads in the fridge at 4 C. If yes and not older than 7 days, take the originalcalibration bead bottle, shake it well (do not vortex!) and fill up the tube until the line. If dateolder than 7 days, prepare a fresh FACS tube with 10 drops of calibration beads, write the dateon the tube and mark the level of liquid on the side of the tube.2. Load the sample tube with the automatic setup beads (use the correct tube holder!), thenclick [OK]. If running samples without sorting, click [Analyzer mode] to reduce the time neededfor calibration3. Calibration starts and automatically performs the 4 calibration steps listed on the left side ofthe screen.4. Once all steps are finished, check if automatic calibration has “completed successfully”. Ifsuccessful, click [OK] to display the Create Experiment window.4
SONY SH800SFP cell sorterBioImaging Facility IST Austriav1.4 27/08/2020Creating an Experiment1. Enter the name of the experiment, operator, cell type, and other information in [ExperimentInformation].2. Enter the name of markers and select the corresponding fluorochromes.3. Select the acquisition parameters (Area, Height and Width) to be measured for the FSC andBSC ( side scatter) and fluorescent (FL) channels. Select the laser wavelengths to be used, ifyou haven’t done so during startup.4. When finished, click [Create Experiment] to display the Experiment Explorer in the mainwindow.5. Alternatively, you can create new experiments based on existing experiment templates.6. You can also use recent experiments as a template for creating new experiments.New Experiment Startup Procedure1. You can choose to directly start by acquiring the first tube. This option is recommended, if youdon‘t want to run automatic compensation procedure.2. You can also start the compensation wizard, if you wish to run automatic compensationprocedure.3. It is also possible to start the compensation wizard later in the software. Go to [Compensation]tab and click [Compensation Wizard].Once you are ready, you can start acquiring your samples. Click [Detector & Threshold] on the leftmiddle side of the screen and adjust the detection sensitivity of the detectors, adjusting the valuesappropriately so that events appear on the plots.Please remember that EVERY tube has to be filtered with the blue filter caps before loading themin the cytometer!The microfluidic sorting chip is very sensitive to clogging by large particles - anything with a largerdiameter than the nozzle size WILL clog it for sure!5
SONY SH800SFP cell sorterBioImaging Facility IST Austriav1.4 27/08/2020Shutdown1. Select the Cytometer tab and click on the Shutdown menu[Software and Device]2. The Shutdown window will pop up. DO NOT click [Shutdown] in this window! It would turn offthe machine immediately without cleaning the sample line and the chip first. Bear in mindthat skipping the cleaning steps will ruin your own sample line and we cannot provide youwith a replacement - you’ll need to buy a new one.3. Click [Start] to start with the cleaning procedure and follow the instructions to load a 15 mlfalcon tube with 10 ml of FACS Clean (bleach) solution in the sample loader (use thecorresponding sample holder!). Do not overfill with bleach! The level of MilliQ (DI) water inthe next cleaning phase must be higher than the level of bleach in order to remove all bleachfrom the sample probe.4. When cleaning is finished, unload the sample tube and click [Next]5. Prepare a 15 ml falcon tube with 12-13 ml of MilliQ water (remember to always add more DIwater to cleaning tubes than bleach to remove all traces of bleach from the sample line).6. Perform the DI rinse.7. When cleaning is finished, the software will ask you if the Main Unit and the Software shouldshut down automatically. Click shutdown if you used the standard sample line.If you want to retrieve your own sample line and/or chip, cancel shutdown at this point andlog out from your account. This will redirect you to the login window. Inform the BIF staff whowill assist you with the sample line exchange.8. Turn off the computer.9. Turn off the compressor.10. Release all pressure from the sheath tank by lifting the pressure release valve at the ring.Leaving the device pressurized will lead to instrument damage on the long run.11. Empty the waste container: disconnect the waste line (pink tube), remove the cap carefullywithout pouring any liquids into the air filter and empty the contents of the tank into the sink.Replace and reconnect the waste tank. Try to avoid contamination of the fluidics cart by wastefluid – wipe off any splashes with 70% EtOH and a paper towel.6
SONY SH800SFP cell sorter BioImaging Facility IST Austria v1.4 27/08/2020 2 Startup - preparation while system still OFF 1. De-pressurize sheath tank by lifting the ring-pull air relief valve on top of the tank. 2. Check if Sheath tank (a) is reasonably full (consumption rate 2.5 liters/8h). If not,