Transcription
STANDARDOPERATINGPROCEDURESInspections Application - MobileFor Maintenance Supervisors and Maintenance TechsRevised: July 3, 2018Singh Management Company7125 Orchard Lake Road, Suite 200West Bloomfield, Michigan 48322www.singhweb.comv4.30.18 1
HOW-TO: Utilize the Yardi Inspections mobile applicationThe following instructions will assist you in creating, performing, and completing inspections using thenew Yardi Inspections Module, both through your desktop Yardi access and through the mobileapplication now located on your tablets.PART 1: Creating an InspectionStep 1: You will notice on the first screen is empty. This is where pending inspections will be accessibleonce they are created. To begin a new inspection, click the ‘ ’ symbol in the upper right.Step 2: When selected, a new screen will pop up titled “Inspection Entity”. Nine times out of ten, youwill be selected ‘Unit’ as most inspections pertain to an individual unit, but we will have inspection thatare property based, such as landscaping or lighting inspections. In those cases you can also select‘Property’, as we do not have inspections broken down into the other categories.
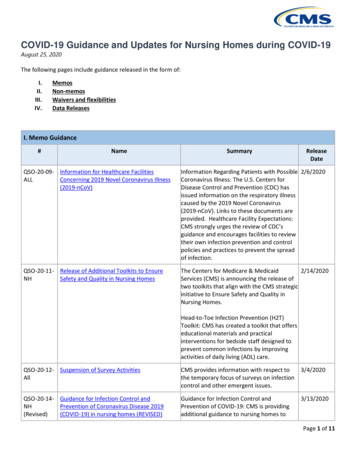
Step 3A: Unit-centric inspections are inspections on the unit itself, not pertaining to the resident. Thiswill be the majority of your inspections, including vacant inspections, preventative inspections, andREAC inspections. On this screen, you will be entering the basic information to set up your inspection.RED: You can use these hyperlinks to search available options to select property and unit. (Mandatory)GREEN: You can manually enter the property and unit information as well if you know it. (Mandatory)PURPLE: You can select the template for the inspection that you wish to conduct. (Mandatory)YELLOW: All other fields, including scheduled future time, estimated duration, and any notes. (Optional)STEP 3B: Resident-centric inspections are inspections that need to include the resident’s information.This will allow us to connect inspections historically to the resident and not just the unit. This will onlybe used with the unit inspection checklist for move-ins and move-outs unless otherwise informed. In thescreenshot below, click the resident hyperlink bemeath ‘Unit’ and select the current resident for thatspecific unit.
Part 2: Performing an InspectionStep 1: When you save in the previous section, you can now select the inspection from the home screen.From there, you can select ‘Assign’, which will send you back to the main screen again. From there, youcan begin performing the inspection.Step 2: This page will give you a layout of the previous information that connects to Step 3 in Part 1. Hadwe selected the ‘Resident’ hyperlink we could have attached the inspection to the tenant as well. Toproceed, we will click the next arrow in the bottom right. You can also select the back arrow in thebottom left to head back to the previous screen at any time during the inspection.
Step 3: The inspection is now open to perform. By selecting the green arrow, you will begin the timer onthe inspection. The timer will log with the inspection to let us know how long the inspections are takingon average to complete. You can select it to start the inspection as well as the red circle that willeventually appear to pause the inspection at any time until it is complete.Step 4: Once the inspection has started, the checklist will be open to you. You can use the ‘ ’ and ‘-‘icons to open and close sections of the inspection. Any items marked with the asterisk ‘*’ are requiredto complete the inspection. To proceed to those portions, press the magnifying glass on that line.
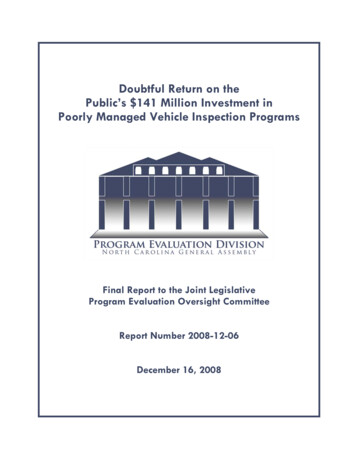
Step 5: This is the drilled-down portion of each inspection, where you will make you observation on thespecific part of the inspection and save your notes. There are a variety of different options to choosefrom, which are all detailed below:RED: Rating: Here you can select a decision based on the template. Some will give you a rating optionfrom ‘Excellent’ to ‘Poor’ while others will simply offer a ‘Pass’ or ‘Fail’. This selection will determinewhether or not this portion of the inspection passes or fails.RED: Responsibility: This section, in most cases, will only be used for move-out inspections. From here, ifthere is a failing grade in the ‘Rating’ section, you can select who is at fault, the community or thecurrent resident. This will assist you in assessing damage charges when processing the move-out.RED: Observations: When you select the “SET” button, the following screen will come up. This screenwill allow to select what will need to be done if the inspection has failed. In most cases, it will simply say‘Repairs Required’ which will generate a work order for your further review.
RED: Notes: You can select this section to type in any additional notes during the inspection.YELLOW: While the section in this example is currently an empty space, a button will appear here thatcan open up additional instructions to be reviewed during this inspection.GREEN: If there is a failure, or even sometimes just as a note for a passed inspection, an image isrequired in order to complete this portion. You can select the image tab, open the camera, and take apicture. This will attach directly to the inspection for further reference.RED ARROW: When you have completed this section, make sure to SAVE.Step 6: As you continue, you’ll notice that a green check mark will appear in place of the magnifyingglass. This signifies that you have given a pass rating to this section. If it were to be a failure, it would bea red X. However, you can access these again at anytime during the inspection. Once all of themagnifying glasses in required areas have turned to either a green check mark or red X, you can begincompleting the inspection.
Part 3: Completing the InspectionStep 1: Once all options have a green check or red X, proceed to the finalization steps by pressing thedouble forward arrows in the bottom right.Step 2: You will now reach the finalization screen. This will detail area that you can edit beforesubmitting the inspection. Continue on the next page to see the how to finalize the inspection.
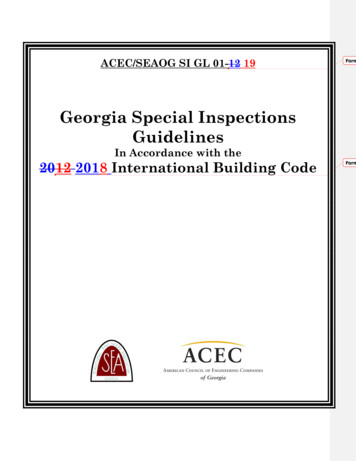
RED: Select a primary status of pass/fail. In some instances, you can also select complete if you are justsubmitting completed information without ratings. Otherwise, select pass/fail.YELLOW: Add any additional notes you would like to see.BLUE: If an inspection has failed, you can select the re-inspection checkbox, which will automaticallyregenerate a follow-up inspection with the same parameters as the original. Use this only if required.PURPLE: Any failed details can be reviewed her specifically. More on this later.GREEN: Press the edit button next to this option to open the signatures page. This will only be requiredfor situations where a resident or outside source may be included. If it is an in-house inspection, thesignature is not necessary.
Select the ‘Edit’ button.Use your finger to create the signature and hit submit. From there, return to the finalization screen.
There will be times when an inspection fails. Referring to a one of the previous slides, when this occurs,you will be able to select the option titled “Failed Details” in order to inspect further and make sure thatthese details match up with what you believe failed the inspections. From there, you can select ‘Fail’ inthe ‘Primary Status’ section to fail the inspection, as seen below.Depending on the settings for that inspection, failing an inspection can automatically create a follow-upinspection to be completed at a later date. This will be determined by your system administrator or yourregional maintenance supervisor but will appear in your inspections cue on the opening screen if it ispresent.
Step 4: When you have completed the boxed sections, select finalize at the bottom of the page. Whenasked if you would like to finalize, select ‘yes’. This will bring up the main screen, which will now showthe inspection you completed in a reddish color. This means it is ready to be submitted. Do so bypressing ‘SYNC’ at the bottom.When it syncs, which may take a moment, the inspections will disappear and will load into Yardi ascompleted. At any time, these inspections can be reviewed from a desktop computer by anyone whohas access to the property. From there, you can make any additional edits or add information. In thenext section, we have a few screenshots from Yardi on the desktop to see where to access thisinformation.
Singh Management Company : 7125 Orchard Lake Road, Suite 200 : . www.singhweb.com v4.30.18 1: HOW-TO: Utilize the Yardi Inspections mobile application : The following instructions will assist you in creating, performing, and completing inspections using the new Yardi Inspections Module, both through your desktop Yardi access and through the .