Transcription
Popular Woodworking - Woodworking Plans, Woodworking projects, Designs PatternsDownload FREE woodworking plansfor these projectsThe following projects were featured in Popular Woodworking in the last couple years. Ineach free plan you get a cutting list, a decription of the construction process and adownloadable construction drawing in PDF format.Pattern Cutting on the TableSawWith a simple jig, as seen in these freewoodworking plans, you can transform your tablesaw into an accurate pattern-cutting machine.CLICK HEREA Contemporary Mobile FileCabinetLooking for a sleek and contemporary project thathelps organize? Just read this free plan to see howeasy it can be. CLICK jects.asp (1 of 4) [1/20/2004 7:50:46 PM]
Popular Woodworking - Woodworking Plans, Woodworking projects, Designs PatternsHeirloom Photo AlbumA special board and some hardware are all youneed to make this album. CLICK HERERough Lumber Cut-off StandCut long lengths of lumber to rough size withoutfour sawhorses or a helper. CLICK HEREArts & Crafts Globe StandIf this globe-stand design doesn't suit you, we offerthree other drawings to give you some options.CLICK HEREShaker Storage CabinetWith two different shelving systems, this face-framecabinet stores light or heavy stuff. Just look atthese drawings, techniques and plans to see foryourself. CLICK HEREEuropean Telephone ConsoleKeep your phone, phone books, keys and smallumbrellas in order with this fashionable modernconsole. CLICK jects.asp (2 of 4) [1/20/2004 7:50:46 PM]
Popular Woodworking - Woodworking Plans, Woodworking projects, Designs PatternsRouter Table-MateMake your own router table for less than 50 byusing these woodworking drawings and techniques.This one is easy to make and store. CLICK HEREWhat You Must Know AboutShelvingLearning to build shelving is a basic skill everywoodworker must master. Here are the basic ruleseveryone must follow. CLICK HEREGarden SwingThis swing is simple to build but looks great inyour yard or on your porch CLICK HEREMorris ChairI don't care what they say about dogs, Morris chairsare a man's best friend. This reproduction of aShop of the Crafters chair is sturdy andcomfortable, as you can learn from these freewoodworking plans. CLICK HERETansu ChestThis Japanese-style Tansu chest can be used inseveral different configurations to fit your lifestyle.No matter how you stack it, it stores a lot of items,as we show you with this free project. s/projects.asp (3 of 4) [1/20/2004 7:50:46 PM]
Popular Woodworking - Woodworking Plans, Woodworking projects, Designs PatternsContemporary ShelvesIt's rare that bookshelves look as interesting as theobjects you display on them. These shelves areeasy to build and knock down for storage. CLICKHEREDrill Press TableDrill presses are designed mostly for metalworking.Dress yours up with this table - we give you all theproject plans - and you'll find it indispensable forwoodworking, too. CLICK HEREBungalow MailboxThis project was by request. As I live in the 'burbsand have to walk to the curb to pick up my bills, amailbox mounted next to my front door would bepurely decorative. CLICK HERE Popular Woodworking F W Publications Inc.Customer Service jects.asp (4 of 4) [1/20/2004 7:50:46 PM]
Popular Woodworking MagazinePattern Cutting on the Table asp?id 1234 (1 of 4) [1/20/2004 7:50:50 PM]
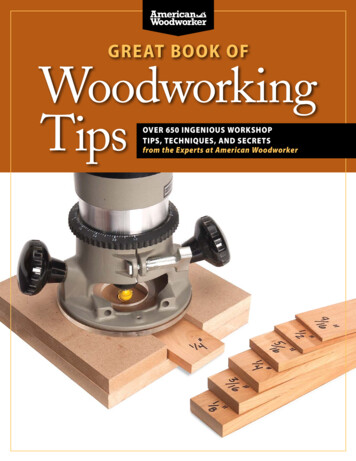
Popular Woodworking MagazineWith a simple jig, you can useyour saw to cut duplicates ofparts.Sure, I have a router and a handfulof pattern-cutting bits. But manytimes when I need to makeduplicates of an odd-shaped part, Iturn to my table saw instead.This complex shelf was traced, roughed outand trimmed to size in less than five minuteswith only one clamping setup. Try that withyour router.With a shamefully simple jig (it’s twopieces of wood) clamped to mysaw’s fence, I can cut patterns allday long. I think it’s faster thanpattern cutting with my router forseveral reasons.First, when roughing out the shapeof the blank on my band saw, I don’tneed to cut real close to my line likeI do when pattern routing. I onlyhave to get within 1-½" of the lineinstead of within 1/16" to 1/8".Second, there’s less clampinginvolved with this table-saw method.Normally I screw or nail my templateto the side of the part that won’tshow (the underside of a shelf, forexample) and go. I can do this withpattern routing, too, but I’ll still needto clamp everything to my bench,make part of the cut, readjust theclamps and then finish the cut.When I use the table saw, I screw itand cut it.Build the JigThe jig should take five minutes tobuild. It is simply two narrow stripsof ¾"-thick wood nailed and gluedon one long edge into an “L” shape.One of the strips of wood should beas long as your table saw’s fence.Its width depends on how thick yourproject’s stock is. For cuttingpatterns in ¾" stock, rip this board to1-5/8" wide. The second one shouldbe 1-¾" wide and about 6" shorterOnce your jig is clamped to your fence, youneed to align its edge with your sawblade. Asquare will get you close, but a follow-up testcut or two will get you exactly where youwant to be.One of the big advantages to cutting patternswith your table saw is you don't have to bereal accurate when roughing out the stock.With a router, you need to cut pretty close tothe line so the tool can handle trimming thelast bit of stock flush. With this table sawsetup, you have to be within 1-1/2" of yourline –– which means you're much less likelyto accidentally cross it, too.FOr this cherry corner cabinet, I screwed thepattern to the shelf on its sappy underside. p?id 1234 (2 of 4) [1/20/2004 7:50:50 PM]
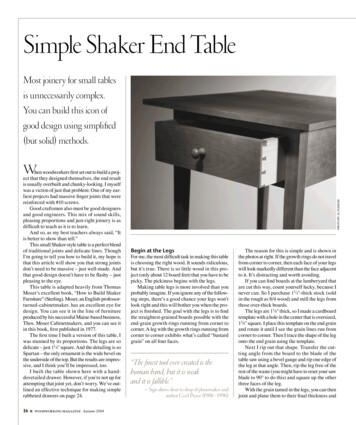
Popular Woodworking Magazinethan the first board. Nail and gluethese two boards together using thedrawing as a guide.couple brad nails would also do the trick.Align the shortest part of the pattern flushwith a jointed or straight-sawn edge.Set Up Your Jig and Use ItInstall a quality combination blade inyour saw. Clamp the jig to yourfence with the jig flush to the table.Slide the table saw’s fence over sothe jig overhangs the blade andraise the blade until it almosttouches the jig.Using a square, line up the edge ofthe jig with the edge of yoursawblade’s teeth. Now wax the edgeof the jig to make things slide moreeasily.Screw a couple pieces of scraptogether and test your setup. Whenthe cut is complete, the two piecesshould be perfectly flush. Adjust thefence until this is the case.Now you’re set. Align the shortestpart of the pattern with a jointed orstraight-sawn edge. Trace thepattern on your stock using yourtemplate as a guide. Rough out itsshape using your band saw andthen screw the template to yourstock. Push the pattern against yourjig’s face and slide it forward. Becautious when sawing short lengths.You’ll probably be surprised howaccurate and easy this is, and giveyour router a rest every once in awhile. PWChristopher Schwarz is a senior editor atPopular WoodworkingReturn to Free Projects a.asp?id 1234 (3 of 4) [1/20/2004 7:50:50 PM]
Popular Woodworking /fea.asp?id 1259 (1 of 9) [1/20/2004 7:50:55 PM]
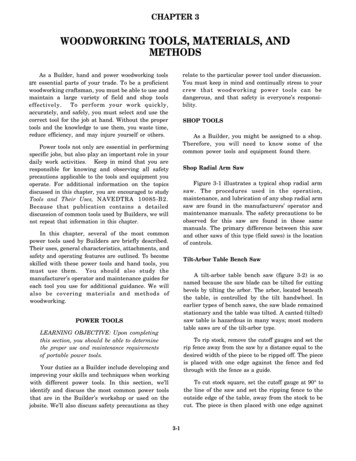
Popular Woodworking MagazineA Contemporary Mobile FileCabinetAn elegant design that provides nononsense functionality.A few years ago I built some officefurniture for a local internetconsulting company, and recentlythey called me back: Not only hadthey survived the dot-com crash, butthey needed some mobile filecabinets. I had already developed aunique look for their computerworkstations: birch surfacessurrounded by rounded-over solidcherry edge-banding. The style wascrisp, clean and a nice fit for thecompany’s bright and airy office.My clients had a few ideas in mind:They planned to move the cabinetsaround so that people could sharefiles, and they wanted to wheel thecabinets underneath their desks tobe easily accessible withoutoccupying extra floor space. Lockingcasters and the ability to hold lettersize hanging file folders would alsobe nice. These guidelines created aset of dimensions to work from, andthe fact that these cabinets aremobile also dictated that they befinished on all sides so that theycould be enjoyed from all angles.In terms of materials, we ruled outsolid-wood panels because of theirinevitable cross-grain expansion andcontraction, and laying up theveneers myself would’ve beenprohibitively expensive.During the second stage of cabinetassembly, laying the cabinet on its sidekeeps you from fighting with gravity. Thecabinet comes together relatively easily, andthe alignment is a snap thanks to thebiscuits.Go slowly while rounding over the edges, asthe cherry can tear out and splinter if a cut isrushed. The roundover is key to the fea.asp?id 1259 (2 of 9) [1/20/2004 7:50:55 PM]
Popular Woodworking MagazineFortunately I was able to locatesome nicely figured ¾"-thick birchplywood, and this allowed us tokeep the look we were after withoutspending a fortune or sacrificingdurable construction.clean feel of the piece.Cutting and Edge-bandingthe Cabinet PartsFirst inspect the edges of theplywood, because the joint betweenthe solid-wood edge-banding andthe plywood panel needs to be crisp.Although it is tempting, you can’tassume that a factory edge is up tosnuff, and a quick glance may revealnumerous dings, dents andscratches. I often end up ripping ½"off of each factory edge. Tominimize tear-out on cross-cuts, Iuse a sharp plywood blade and azero-clearance throat plate. Feedingthe panels more slowly, good-sidefacing up, also helps keep the cutsfree of tear-out.Once your panels are neatlytrimmed to size, it’s time to millsome edge-banding. I use cherrybecause I like the color that itdarkens to, but substitute as youlike: I’ve also used walnut withpleasing results. I simply plane thecherry to ¾", then rip it into ¼"strips. Precision is critical, asinaccurately sized strips will eitheroverhang the plywood panels andneed to be trimmed, or they won’tcover the edge entirely and you’llhave to make new ones. I usuallymill some extra stock in case Inotice a defect in one of the stripsthat wasn’t evident beforehand. Thecut list calls for 12 strips, whichallows for one extra.Using spacers to position the drawer slideseliminates one of the leading causes of poorfitting drawers: inconsistent spacing ofslides. Before putting in the spacers, be sureto brush out any sawdust or woodchips thatmay have accumulated inside the cabinet. A1/16" discrepancy at this point could causean annoying misalignment that you’ll have tobacktrack to correct later on.A consistent reveal is key to the crisp feel ofthe piece. The shims shouldn’t bow thecabinet sides out at all, but should fit snuglyto ensure that the drawer front is centeredand that the reveal is even on both sides.I own a few clamps that aredesigned for attaching solid-woodedge-banding, but they end upgathering dust for several /fea.asp?id 1259 (3 of 9) [1/20/2004 7:50:55 PM]
Popular Woodworking MagazineTo edge-band a number of panelsrequires more clamps than I’mwilling to buy, and some clampsseem to lack the clamping pressurethat I’d like. I also hate luggingheavy, clamp-laden panels aroundthe shop while I wait for glue to dry.My solution is probably not original,but it is highly practical: I use bluepainter’s-grade masking tape. It isquick, inexpensive and lightweight.You can even stack a series ofpanels on top of each other to usespace efficiently. And because anounce of prevention is worth apound of cure, I use just enoughglue to create a tiny amount ofsqueeze out, which I then wipe up.Because the edge-banding mayoverhang a bit, I use a router with aflush-trim bit to carefully remove theoffending cherry; a careful touchwith a random-orbit sander willremove any glue residue left over.The side panels need to be edgebanded on all four edges, and thetop and bottom panels get edgebanded on their front and backedges only. The back receives noedge-banding at all. As a word ofcaution, veneered plywood isnotoriously unforgiving when itcomes to sanding. I’ve learned thehard way that there is no adequatemethod for repairing sand-throughsin the top layer of veneer, so workcarefully to ensure that you’ll have todo a minimal amount of sanding.Assembling the CabinetI use biscuits here because they arestrong and reliable. In addition, theyare invisible once the cabinet goestogether, and I didn’t want any fillednail holes or plugged screwsinterfering with the lines of the pieceor interrupting the flow of the grain.I assemble the cabinet in two steps:First I sandwich the back fea.asp?id 1259 (4 of 9) [1/20/2004 7:50:55 PM]
Popular Woodworking Magazinethe top and bottom, and once theglue there has set, I sandwich thatassembly between the sides. Forthe first step, I clamp the three partstogether and line them up precisely.After marking the locations forbiscuits, I pull off the clamps and cutthe slots. After dry-fitting, I glue it upand wait a few hours. For thesecond step, I place one side panelflat on the table, inside facing up. Iposition the top-back-bottomassembly correctly on top of that,and finally place the remaining sideon top of it all. With a couple ofclamps holding the parts snugly inplace, I mark the biscuit locations,then repeat the process I used onthe first half of the cabinet assembly.With a roundover bit in a router, Iease each edge, which softens thesharp lines of the cabinet. By routingthe edge-banding after the cabinet isassembled, the inside corners of theedge-banding flow togethersmoothly, and the eye is s
Popular Woodworking Magazine With a simple jig, you can use your saw to cut duplicates of parts. Sure, I have a router and a handful of pattern-cutting bits. But many times when I need to make duplicates of an odd-shaped part, I turn to my table saw instead. With a shamefully simple jig