Transcription
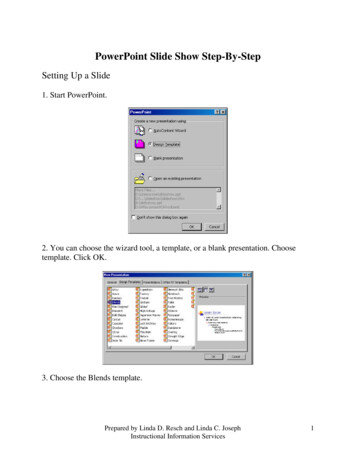
ESSENTIAL MICROSOFT OFFICE 2016: Tutorials for TeachersCopyright Bernard John Poole, 2016. All rights reserved9POWERPOINT PRESENTATIONSCreating slide shows and related teachingmaterialsLEARNING OUTCOMESThis lesson introduces you to the basic features of PowerPoint which are particularly valuable inthe teaching and learning environment. You will learn how to use PowerPoint to capture yourideas in outline form and convert those ideas into multimedia presentations. You will also learnhow to use the application to create your own presentations both from scratch and with the helpof one of the PowerPoint Wizards.Most people think of a slide show as a way of presenting a series of still images orphotographs using a slide projector. If you think about it, however, a slide does not have to be astill image; using PowerPoint it can also be an audio or video clip. For that matter, a slide doesnot have to be even a picture; it can also be text, an outline of ideas, whatever you want.PowerPoint provides an easy-to-use multimedia presentation production system, which youwill no doubt enjoy learning and which you and your students will find useful for individual orgroup projects of all kinds.In the various courses that you take as an Education major you learn how to design curricula,with lesson plans and unit plans. You also learn methodologies for effective teaching. The betterthe teacher you are, the more visual and audio aids such as PowerPoint will empower you inyour work.Here, then, are the topics that will be covered in this lesson: introductory thoughts about presentations;PowerPoint at work;building the presentation;adding bells and whistles to the presentation;printing presentation handouts.A caveat before you begin: In the earlier tutorials for Office 2016, the steps to accomplish thetasks assigned have been rather detailed. This time, however, the directions will be less specific,especially in the latter half of the lesson, because PowerPoint is a program you can figure out byplaying with it. You’ll find that you’ll soon become confident about how to design and develophigh quality multimedia slide presentations. So relax, and have fun!308
Lesson 9: PowerPoint presentations9.1 SOME INTRODUCTORY THOUGHTS ABOUT PRESENTATIONSMaking a successful—well-designed, content-rich, pedagogically-sound—PowerPointpresentation requires forethought and advance preparation. It’s rather like what good cooks orchefs do before starting to cook a delicious dish of food. They read the recipe, make sure theyhave all the ingredients they need, gather all the ingredients together—the raw food such asvegetables and eggs and milk and wine and spices and other flavoring—what they call the miseen place. They make sure they have all the tools they need to do the job.Good cooks don’t start cooking till they’re good and ready.In the same way, you have to get your thoughts together, know what you’re going to talkabout, and have your audio-visual material gathered together in one place (mise en place) so thatwhen you come to create the presentation, it’s a snap.A good presentation, like a term paper, is usually based on an outline, such as is illustrated inFig. 9.1 and in Fig. 9.13 later in the lesson.Each of these Headersrepresents a slide in thePowerPoint presentationFig. 9.1 Outline View for the Tudor Monarchs presentation309
ESSENTIAL MICROSOFT OFFICE 2016: Tutorials for TeachersCopyright Bernard John Poole, 2016. All rights reservedIn Fig. 9.1 above, you see on the left an outline of the text for each slide in the Tudor Monarchspresentation. Think of the titles and text for each slide as an outline you would have made for ahigh school or college paper. Similar, right? This is why the outlining tool is built intoPowerPoint—to help you plan.Remember the golden rules of successful design: Rule 1—Plan; Rule 2—Plan; Rule 3—Plan!These golden rules apply whether you are designing a term paper, an audio-visual aid, a classouting, or a class syllabus and schedule.You might begin with a brainstorming session with classmates or colleagues to help you puttogether an outline. During brainstorming, members of the group will come up with as manyideas as possible related to the topic of the project. Nobody's ideas are rejected in the early stagesso as to encourage a fertile flow of useful suggestions.The result of the brainstorming session might be a somewhat disorganized list of ideas. Thislist might have been entered directly into the computer during the brainstorming session, or itmight have been collected on a blackboard or flip chart. Before changing the list into outlineform, you would re-organize it so that the ideas flow naturally and logically from one to theother. Along the way you might toss out some of the ideas for one reason or another. Eventuallyyou'll have a working list which would end up as an outline in a word processor document.9.2 POWERPOINT AT WORKLet’s see these ideas and others at work by looking at an example of a PowerPoint presentation.Open PowerPoint then, in the Backstage View, click on Open OtherPresentations, and click Browse to bring up the Open dialog box (Fig. 9.2)Fig. 9.2 The Open dialog box310
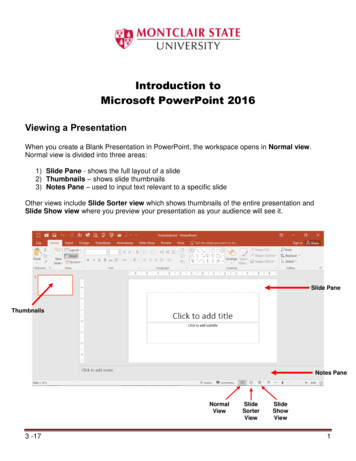
Lesson 9: PowerPoint presentationsIn the Open dialog box, navigate to your USB drive Work Files for Office2016 PowerPoint Files folder, then open the document Tudor MonarchsFig. 9.3 shows the Tudor Monarchs presentation in Normal View, as it appears on your screenafter you open the document.Slide View ToolsFig. 9.3 The Tudor Monarchs presentation (Normal View)Take a look at the Slide View tools in the lower left of the PowerPoint window (Fig. 9.3 above).Let's get a close up view of them right away and find out what each of them is about (Fig. 9.4).Normal viewSlide Sorter viewReading viewFig. 9.4 The Slide View toolbar (annotated)311Slide Show view
ESSENTIAL MICROSOFT OFFICE 2016: Tutorials for TeachersCopyright Bernard John Poole, 2016. All rights reservedNormal viewThis is the view you see illustrated in Fig. 9.3 above. It is the one you'll use most of the timewhile you're actually putting information on each slide. In this view you have the left hand framewhere you have the option to either see a thumbnail of all your slides or the outline for yourpresentation. In the center of the window you have the slide you are actually working on—theactive slide. Then, over in the right hand frame you have the Task Pane where you'll find all thehelp you need to develop your presentation.Slide Sorter viewThis is the view you see illustrated in Fig. 9.5 and it is the one you'll find most useful when youwant to get an overview of your show since you'll be able to see most all your slides at once. Youalso can easily move your slides around, changing the order to suit your purposes. This is whyit's called the Slide Sorter view.This is theSlide SortertoolFig. 9.5 The Slide Sorter View of the PresentationReading ViewUse reading view to deliver your presentation not to an audience (via a large screen, forexample), but instead to someone viewing your presentation on their own computer. Or, useReading view on your own computer when you want to view a presentation not in full-screenSlide Show view, but in a window with simple controls that make the presentation easy to312
Lesson 9: PowerPoint presentationsreview. You can always switch from Reading view to one of the other views if you want tochange the presentation.Slide Show viewWhen you click on the Slide Show button, you'll be able to see how the slide you're actuallyworking on (the current or active slide) looks when you run the slide show. You'll use this buttonwhen you've been working on a slide for a while and you want to see how it will look to youraudience during your presentation.You'll find yourself using these tools frequently to switch from one view to another as youare developing your PowerPoint presentation. Let's check out the Slide Sorter view now.Click on the Slide Sorter tool in the Slide View toolbar (you can also accessthese views in the View Ribbon Presentation Views Group)Take a look at the Slide Sorter View window that is presented to you now (more or less the sameas Fig. 9.5 on the previous page, though your screen may be a different width, so the slides maybe arranged differently across the page). The presentation you are looking at demonstrates someof the basic features of PowerPoint. By the end of this lesson you will be able to build your ownpresentations along the same lines.It’s time you learned about the Tudor Kings and Queens of England.In the Slide View toolbar, click on the Slide Show button (or from the ViewRibbon in the Presentation Views Group, select Slide Show)Features to look out for in the demonstration presentationWhile you click your way through the presentation, look out for the following PowerPointfeatures that have been used in the creation of the Tudor Monarchs slide show.Transition effects and text preset animationsThe transition effects from one slide to another and the text preset animations (which determinehow the text will arrive on each slide) have been set at random for the demonstration. This is togive you some idea of the variety of transitions and animations you can use in PowerPoint. Butthis is not necessarily a good thing to do.Normally you would not want to use so many different transitions and animations since itmight distract from the impact you are trying to make. A good designer homes in on a style thathe or she likes best for a particular theme and tends to stay with it for all the slides in the show.Inserting clip art, pictures and other mediaMicrosoft Corporation maintains a rich database of clip art on a wide range of topics. This onlinedatabase is available to all the programs in the Microsoft Office suite. You just have to go to theweb to access it if you are a registered user of Office or other Microsoft programs.Fig. 9.6 illustrates the Insert Ribbon from which you can choose to include clip art and othermedia (such as photos, movie clips, sound files, and so forth).Fig. 9.6 Ribbon for inserting images, illustrations, and other media313
ESSENTIAL MICROSOFT OFFICE 2016: Tutorials for TeachersCopyright Bernard John Poole, 2016. All rights reservedTake a closer look at the Images Group by positioning the mouse pointerover Pictures and read the description of what the tool is used for—to Inserta Picture you have saved in a file on your disk (Fig. 9.7)Fig. 9.7 One way of learning what each of the tools in the Ribbon are forNow do the same for Clip Art and Photo Album, and, in the IllustrationsGroup, check out the Shapes, Smart Art, and Chart tools, noting what eachtool can be used for to illustrate your presentationsNotice, too, the Insert Ribbon Media Group at the far right of the InsertRibbon (not shown in Fig. 9.7), with its tools for inserting Video (like moviesand video clips) and Audio (sound)You can download clip art, photographs, sound files, video clips and other media from a file youhave saved on disk, or from Microsoft’s collection on the Web, or you can bring onto a slide allkinds of charts and tables from other Office programs such as Word or Excel.You can also scan pictures directly onto a slide, so if you have a scanner connected to yourcomputer, you’re in business. If you’re looking for multimedia material to accompany yourslides, the Web is the place to go. Companies, universities, schools, and individuals, especiallyteachers, are creating and making available magnificent multimedia materials. These materialsare available, mostly free of charge, from websites such as flickr.com, youtube.com, and so forth.PowerPoint makes it easy to incorporate such material into presentations, with or withoutaccompanying text.Action Buttons and Hidden SlidesIn the Tudor Monarchs slide show, notice the use of Action Buttons to allow the user to controlmovement through the slides, thus making slideshows both interactive and non-linear—in otherwords, the user decides the sequencing of the slides.There also is a Hidden Slide (slide #5) which is only seen if you click on an Action Buttonwhich takes you to the slide that has the answer to the question posed on slide #4.314
Lesson 9: PowerPoint presentationsIf you are still viewing the slide show, you want to exit the slide show before the next exercise,where you will learn more about Hidden Slides.Hit the Esc(ape) key on the keyboard to exit the slide showNow, in the Slides menu on the left of the PowerPoint window, click on Slide#4 to make it the active slideIn the Slide View toolbar at the bottom of the window, click on the SlideShow button (or from the Slide Show Ribbon Start Slide Show Group,select From Current Slide)Slide #4 is now showing on your full screen.Now, do NOT click on the orange Action Button lower left of the picture ofHenry VIII to find out the answer to the question as to why Henry VIII brokeaway from the Church of Rome—click anywhere else on the screenPowerPoint skips the next slide (slide #5) and jumps directly to slide #6! This is because slide #5is a Hidden Slide which can only be reached if you click on the orange Action Button on eitherslide #4 or, since you missed it, slide #6.Hit the Esc(ape) key again on the keyboard to exit the slide showNow in the Slides menu on the left of the PowerPoint window, look at theicon for slide #5 and notice that the slide number has a slash runningdiagonally across the number (Fig. 9.8)Notice the slash (\) acrossnumber 5, indicating that itis a Hidden SlideFig. 9.8 A Hidden Slide is identified in the Slides menu by the box around its number315
ESSENTIAL MICROSOFT OFFICE 2016: Tutorials for TeachersCopyright Bernard John Poole, 2016. All rights reservedThe orange buttons (orange only because that’s the color the author chose for them) are calledAction Buttons. Action buttons and Hidden Slides give you control over how you want the userto view the presentation.Now click on the orange Action Button on slide #6 to go back to theprevious slide so you can check out the answer to the questionThis shows you that you can create interesting interactive learning materials using PowerPoint.Lesson 10 will help you learn more about interactive presentations such as this. Your students,too, will have a lot of fun using PowerPoint to develop projects of all kinds for every subjectunder the sun.Let’s check out some other features demonstrated in the Tudor Monarchs slide show.Timing considerationsFig. 9.9 shows the Slide Sorter View of the presentation and highlights where PowerPointindicates the timing for each slide.Timing settingsFig. 9.9 The Slide Sorter View showing the time each slide will show on the screenbefore automatic transition to the next slide316
Lesson 9: PowerPoint presentationsYou’ll notice that under each slide is a number on the left, indicating which slide it is in thesequence of slides in the presentation, and a ":30" on the left, showing that the slide willtransition to the next slide after 30 seconds.Now, 30 seconds is more than enough time for anyone to read and absorb the data on slidessuch as those in the Tudor Monarchs presentation. So you might think 30 seconds is too long tohold the user’s attention. Won’t they get antsy waiting for the next slide?Well, if you look at each of the slides, you will see that there is a button which the user canclick on to control when to proceed to the next slide. Thus, by allowing a generous amount oftime, along with user control, you're allowing each individual student the freedom to proceed athis or her own pace. The speed at which our minds absorb data varies enormously from person toperson.Your goal should always be to design teaching materials and lessons in such a way as toaddress individual student needs. The timing features of PowerPoint allow for this.Acknowledgements: Always give credit where credit is dueThe last slide in any presentation, just as the last item in a term paper, or the credits that run atthe end of a movie, should usually be your list of sources cited or used—yourAcknowledgements slide (Fig. 9.10).Fig. 9.10 The first Acknowledgements slideSo If you haven't already done so, in the Slides menu at left click on thefirst slide and, in the Slide View toolbar towards the bottom right of thewindow, click on the Slide Show button—or from the Slide Show Ribbon Start Slide Show Group, select From BeginningClick your way through the presentation now; there are various ways to dothis: You can click the left button on your mouseYou can hit the space barYou can use the arrow keys to go back and forth through the show317
ESSENTIAL MICROSOFT OFFICE 2016: Tutorials for TeachersCopyright Bernard John Poole, 2016. All rights reserved You can click on the Action Buttons on the slides themselves toproceed to the next or previous slideThe slides have been timed to allow the user to easily view and read what is on each slidewithout feeling rushed. If you want the slides to proceed at a faster pace, simply click on the leftmouse button or hit the space bar.When you have finished reviewing the Tudor Monarchs slide show, exit theshow by right clicking the mouse, then select the last item in the menu toEnd Show or, slightly quicker, click on the Esc(ape) button in the top leftcorner of the keyboardSo much for an overview of PowerPoint. No doubt you are anxious to start creating your ownpresentation. The next section will help you do just that.Close (File Close) the Tudor Monarchs presentation when you are readyto continue with the tutorial9.3 BUILDING THE PRESENTATIONPreparation of the outlineYou are going to prepare a simple outline which will give you the experience to prepare yourown outlines when you're done with the tutorials.It's tempting to just barrel along into a presentation, like someone tempting fate at NiagaraFalls! But you should resist doing so at all costs because you'll save yourself no end of time inthe long run if you carefully plan what you want to do. You really have to think ahead if youwant to get where you want to go. Otherwise, there's no telling where you'll end up!To create an outline, here are the steps to follow.From the File menu select New, then click on the Blank Presentation icon(Fig. 9.11) to open a new PowerPoint presentationFig. 9.11 New Presentation dialog window318
Lesson 9: PowerPoint presentationsWhen you first open a new, blank presentation in PowerPoint 2016, the default View is theNormal View (Fig. 9.12), with the first slide, usually a Title Slide, listed in the Slide menu on theleft, and the same slide in Design View and filling the main section of the PowerPoint window.Design Viewof the first(Title) SlideFirst (Title)Slide in theSlide menuFig. 9.12 The screen at the start of a new blank presentationPowerPoint provides a lot of help while you're developing your presentation. The first slidelayout, by default, is the Title slide layout. You would normally want to start out a presentationwith a slide that displays the title of your show, along with sub titles such as your name and soforth. You don't have to use this slide layout, of course. PowerPoint provides a set of slide layouttemplates from which you can choose, including one layout which is blank. In other words, youcan create slides from scratch, entirely of your own design, using the Blank Slide layout.Let’s take a look at these Slide Layout templates now.In the Home Ribbon Slides Group click on Slide Layout (Fig. 9.13)Slide Layout tool in theHome Ribbon SlidesGroupFig. 9.13 Slide Layout templates319
ESSENTIAL MICROSOFT OFFICE 2016: Tutorials for TeachersCopyright Bernard John Poole, 2016. All rights reservedCheck out each of the templates, including the Blank template.First things first: Save the new PowerPoint presentationBefore you begin work on the presentation, you should save it with an appropriate name so thatyou can then easily save your work as you go along. Remember, this is always a wise precaution.Giving a new document a name and saving it on your disk helps you to get into good habitsabout saving your work. You should teach your students to be equally careful when they aredeveloping work on a computer.Make sure you still have the USB drive with your Work Files for Office 2016in the USB port, then from the File menu select Save As, Browse to yourUSB drive Work Files for Office 2016 Data Files folder, then create anew folder called PowerPoint Presentations and click on OKName the new PowerPoint document Screenbeans, and click on SaveTyping the outline entriesRight now you need the Outline view in the left hand pane, in order to start work on the outline.As you will see, the outline will be merged into the slide show with little effort on your part,thanks to PowerPoint’s slide layout features.In the View Ribbon Presentation Views, click on Outline ViewPowerPoint now presents the Outline View (Fig. 9.14), with a small slide icon in the top leftcorner of the left frame, waiting for you to begin entering the text for your first slide.Start typing theOutline for the firstslide hereFig. 9.14 The Outline view in the left hand pane320
Lesson 9: PowerPoint presentationsDon’t start typing text just yet! Fig. 9.15 illustrates the outline you are going to create.Bookmark this page (page 321) and use it as a guide when you work your way through thedirections that follow.Fig. 9.15 The outline for the Screenbeans presentationIn the left frame of the PowerPoint window, next to the small icon for the firstslide, type No Problems, Only Solutions for the ScreenbeansPresentation title (see Fig. 9.15 above), then hit Enter on the keyboard321
ESSENTIAL MICROSOFT OFFICE 2016: Tutorials for TeachersCopyright Bernard John Poole, 2016. All rights reservedNotice that the Title you just typed appears in the Title box of the slide template on the right.When you hit Enter, PowerPoint goes to a new slide, thinking that you are finished adding textto the first slide. But you need to add a subtext on that first (Title) slide. To do this, you need toIncrease the Outline list level.Increasing the Outline List LevelFig. 9.16 illustrates the Increase List Level tool that you will use to do this.Fig. 9.16 Increase list level toolIn the Home Ribbon Paragraph Group, click on the Increase List LeveltoolThe cursor jumps back up to the first slide, waiting for you to enter your name as the subtext(Fig. 9.17)Decreasethe ListLevelIncreasethe ListLevelFig. 9.17 The first slide in your presentation will look something like this322
Lesson 9: PowerPoint presentationsType By [your name]—type your own name, of course!—and hit the EnterkeyYour first slide should look something like Fig. 9.17 above.That’s all you need on the first slide. Now you need to go to a new slide. To do that in theoutline, you must Decrease the list level. The tool to do this is right next to the tool forincreasing the list level (Fig. 9.17 previous page).In the Home Ribbon Paragraph Group, click on the Decrease List Leveltool nowLook in the left-hand frame of the PowerPoint window and notice that thecursor is now waiting at the start of a new, second slideChanging the Slide LayoutBefore you type up the text for this second and remaining slides, you need to change the SlideLayout.In Home Ribbon Slides Group, click on the Slide Layout toolIn the selection of templates that pops up, locate and double click on thelayout for a Two Content slide (Fig. 9.18)Fig. 9.18 The Two Content slide layoutThis Two Content slide layout is what you want for the remaining slides in the Screenbeanspresentation. Now you are ready to type in the entries for all the slides, except the finalAcknowledgements slide, which will have a different Slide Layout (see Fig. 9.15 on page 321 forthe content of each slide).Turn your attention to the left hand frame of the PowerPoint window so thatyou can continue with Slide 2 of the Outline323
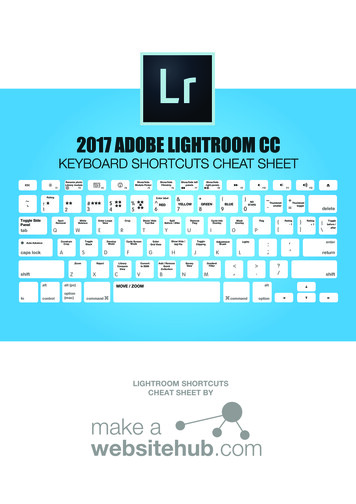
ESSENTIAL MICROSOFT OFFICE 2016: Tutorials for TeachersCopyright Bernard John Poole, 2016. All rights reservedType Confusion for the second slide Title, and hit EnterSwitching levelsYou already practiced doing this, but let’s review the steps, because it can be confusing if you’renot familiar with the process.Switching levels means increasing the level or decreasing the level. What does that mean?A Table might make this clearer:Increasing the List Levelincreases the indentmoves content to the rightmoves content forwardsmay move content up to a Previous SlideDecreasing the List Leveldecreases the indentmoves content to the leftmoves content backwardsmay move content down to a New SlideTurn back to Fig. 9.15 on page 321 and look at the content of the second slide. The wordConfusion is at the top level; then what immediately follows on the same slide—on a separateline and indented to the right—is the lower level text: A problem often presents itself , etc.When you switch to the next level down, the text is automatically indented to the right (moved tothe right); that is to say, the level is Increased.So, to summarize, moving the text to the LEFT decreases the list level in an outline (moves itback). Moving the text to the RIGHT increases the list level in an outline (moves it forward). Forthe remaining slides you have to enter text not only for the Title of each slide at the top level, butalso for the sub-text. This sub-text will be at an increased list level than the title.Still confused? Practice will hopefully make everything clear.In the Home Ribbon Paragraph Group, click on the Increase List Leveltool to move the cursor back up to Slide 2 for the text you are going to typenext into the PowerPoint outlineType the lower level text for the second slide (A problem often presentsitself ) from the illustration in Fig. 9.15 on page 321, then hit EnterDecreasing the List LevelThat is all you need by way of text for the second slide. As you can see, you must now decreasethe list level for the new slide 3. To do this you use the Slide Level tools once more.In the Home Ribbon Paragraph Group, click on the Decrease List Leveltool to start a new slide for the next text you are going to type into the outlineAs you see, this begins a new slide (slide 3). You should be starting to get the hang of this bynow.So go ahead and complete the rest of the outline (using Fig. 9.15 above onpage 321), increasing and decreasing the text levels as you go alongWhen you have typed the title and text entries for slide #9, be sure to saveyour work again with the document name Screenbeans11Screenbeans are cartoon characters created by Microsoft, Inc.324
Lesson 9: PowerPoint presentationsBefore you go on, in the View Ribbon Presentation Views Group, click onNormal so you can view the thumbnails of all your slides (Fig. 9.19)Click in the View Ribbon Presentation Views onNormal to see thumbnailsfor all the slides in theshowFig. 9.19 The Slides View in the left-hand frame of the PowerPoint windowSuch as they are, the slides look rather bland with a plain white background and some text.Fortunately, PowerPoint includes excellent tools to help you “jazz” things up. Let’s start with theslide design tools.325
ESSENTIAL MICROSOFT OFFICE 2016: Tutorials for TeachersCopyright Bernard John Poole, 2016. All rights reservedChoosing Slide DesignsPowerPoint gives you all kinds of assistance in the design of your slides. So far we've used oneor other of the Slide Layouts, which help with the general layout of each slide in the show. Butthe Design Ribbon lets you select from an extensive set of pre-formatted slide design themes thatinclude graphics, colors, and animations. Let's check out some of these options now.It’s best to be in the Slide Sorter view for the next set of exercises.Click on the Slide Sorter tool in the Slide View toolbar (you can alsoaccess these views in the View Ribbon Presentation Views Group)Hit Ctrl-a to select all the slides and, in the Design Ribbon Themes menu,click on the small arrow to bring down the menu of More Design Themes(Fig. 9.20)Click on the MoreDesign Themesbutton to see moreSlide Design optionsFig. 9.20 More Design Themes in the Design RibbonDesign ThemesThe easiest way to make your slides more interesting is to use one of the pre-set Design Themesthat come with PowerPoint (Fig. 9.20 above). You can select from a large set of Design Themes,most of which are quite attractive. Let's try some of them now.Use the mouse pointer to select a Design Theme by clicking on it—try out afew of themFor the sake of the exercises that follow, choose a Design Theme that has acolor background that is light-colored, but not white (the one used for thedesign in Fig. 9.20 on the previous page is called “Wisp”), so that the picturesyou are going to add next will stand out well against the background326
Lesson 9: PowerPoint presentationsPowerPoint applies the selected design template to all the slides in your show so you can checkit out. If you wanted to apply the Design Template to just a few slides, you would first select theslides you want, then click on one of the other Design Templates. Let's try that.Hold down the ctrl key while you click on any three or four of the slides inthe show to deselect them (since all the slides were originally selected)Now, in the Design Ribbon Themes Group, click on a Slide DesignTemplate different than the one you chose beforeVoilà! The slides that were still selected now use a different Design Theme. You see how easy itis to create a mix of different and attractive slides.Hit Ctrl z to undo the Design Theme change you just made, then hit Ctrl aagain to select all the slides in the Slide Sorter ViewPowerPoint is a beautiful program primarily because it is so easy to use once you know what'savailable to you. You can go to town when you're designing slides, as long as you know all thetips and tricks—the bells and whistles—offered by the software. Let’s check out a couple ofother features now.Adding picture
Lesson 9: PowerPoint presentations 311 In the Open dialog box, navigate to your USB drive Work Files for Office 2016 PowerPoint Files folder, then open the document Tudor Monarchs Fig. 9.3 shows the Tudor Monarchs presentation in Normal View, as it appears on your screen after you open the document. Fig. 9.3 The Tudor Monarchs presentation (Normal View)
