Transcription
Tango User Guide
WelcomeCongratulations on purchasing a Lightspeed Aviation Tango wireless headset. Your headset is a premiumproduct that will provide many years of comfortable high performance for your flying endeavors.If this is your first Lightspeed Aviation headset—welcome to the Lightspeed family! We look forward tobuilding a lasting community with our customers founded on products and service that are best in class.To support your passion for flying we invite you to visit LightspeedAviation.com where you’ll find usefulinsights about our other products and aviation.Thank you for choosing a Lightspeed Aviation headset.
ContentsIntroduction.2Getting Started.4Fitting your headset.4Battery installation.5The panel interface (front and side).6The panel interface (back).8The headset.10Using Your Tango Headset.12Turning the system ON and OFF.12Auto Shutoff .12Matching stereo/mono settingto an audio panel.13ComPriority .13Wired auxiliary devices.13Multiple Headsets.14Bluetooth Devices.16Connecting Bluetooth devicesfor the first time.16Bluetooth mode — ON and OFF.17Bluetooth cell phone features.17FlightLink.18Features .18How to activate .18Toggling between apps.18FAQs.19Peak Performance Tips.21Batteries and Compliance.22Specifications .23Warranty Information.24Registration.25
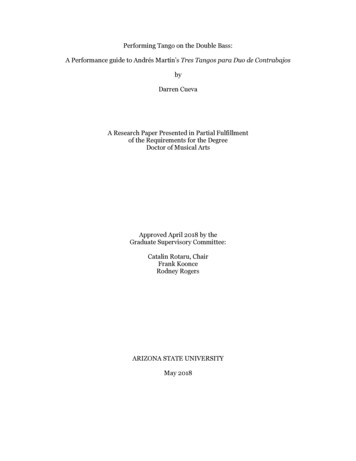
IntroductionYour Tango headset package includes (clockwise, from top left on the following page):2 Carrying case User Guide and Quick Start Guide with warranty information Tango ANR headset Tango panel interface Two Micro-USB charging cables Two Lightspeed rechargeable batteries (one with panel power version) Color chips for multiple headsets Dual USB wall charger Audio device cable with 3.5mm connector Steel clip
Introduction3
Getting StartedFitting your headsetFitting your headset properly is the key tocomfortable use and superior Active NoiseReduction (ANR) capabilities. To gain peakperformance from the ANR feature it’s necessary tohave a solid seal around your entire ear combinedwith a symmetrical fit on your head.The following tips will assist in achieving the proper fit.A. Fit your ears entirely within the ear cupsproviding a solid seal.B. Rest the headband lightly on top of your head withthe right and left sliders extended to equal lengths.4C. Position the microphone 1 8 inch from yourmouth, with the gain adjustment cap facing awayfrom you (visible when you remove the mic muff ).This side of the microphoneshould face away from you.Note: The microphone will not transmit unless thepanel interface is plugged into an intercom and thesystem is turned on.
Getting StartedBattery installationThe Tango headset requires two rechargeablelithium ion batteries, except the panel poweredversion, which requires only one (batteries included).A. Open the headset battery compartment door bypressing down on the battery door release. Alignthe contacts on the battery with the contactsin the compartment and close the batterycompartment door.B. To access the panel interface batterycompartment door, open the jacket, thenopen the battery compartment on the back ofthe panel interface. Align the contacts on thebattery with the contacts in the compartment,and close the battery compartment door.C. The LED flashes green when charged batteriesare in use and the power is on.The batteries will last approximately 12 hours whenfully charged. The power LED will flash red andan audible tone will play briefly when there are3 hours of battery life remaining. If this happensduring flight, the headset will continue to operate.Recharge batteries as soon as possible at anyindication of low batteries. (Note: The LED willcontinue to flash red and the audible tone will playafter increasingly short intervals as the battery drainsto zero.) Because lithium ion batteries — unlike NiCad batteries — do not develop a “memory” and donot need to be fully discharged before recharging,we recommend that you charge your batteriesbefore each flight. Heavy Bluetooth usage cansignificantly reduce battery life.The headset and panel interface include AutoShutoff to preserve battery life. Learn more aboutthis feature on page 12.5
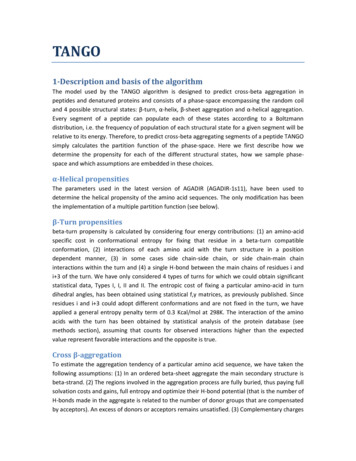
Getting StartedThe panel interface (front and side)ABCDEHIA. Auxiliary input: Use the supplied cable toconnect a wired auxiliary audio source or phone.Also use this connection for FlightLink recordingfunctions. See “FlightLink” section on page 18.B. Power button: Press button once to turn thepanel interface on; press and hold to turn it off.FGC. Power indicator LED: Flashes GREEN whenpower is supplied and batteries are strong.Flashes RED when there are approximately 3hours of battery life remaining.D. Bluetooth indicator LED: Flashes BLUE whenBluetooth mode is on and RED when Bluetoothis being turned off. In pairing mode, flashesalternating RED and BLUE.6
Getting StartedE. Bluetooth button: Turns the Bluetooth functionon and off and controls Bluetooth-connecteddevices, including cell phones and music players.F. Charging LED: RED/AMBER indicates charging inprogress. GREEN indicates charging complete.G. USB charging port: Plug in USB cable to chargethe battery. Note: You can charge the batterywhile using the panel interface.I. Backup cable: In the event that you lose powerin the headset or the panel interface, pull thebackup cable from the panel interface and plugit into the headset.Note: Plugging the backup cable into theheadset will turn off the ANR. The headset willrun in passive mode.H. Channel identification color chip7
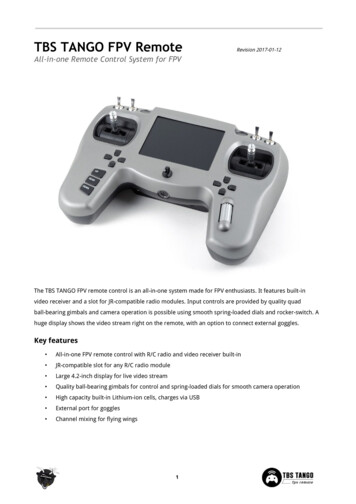
Getting StartedThe panel interface (back)ABCDEFA. Channel select switch: Changes the channelof the boom microphone link. Changing thefactory setting is only necessary when usingmultiple Tango headsets in the same aircraft.See “Multiple Headsets” on page 14.B. Link button: This button is used to establish thewireless link between the headset and panelinterface. The system is shipped with the linkalready established and this button is onlyneeded when a new headset/panel interfaceconnection needs to be established.See “Multiple Headsets” on page 14.C. Link LED: Blinking RED indicates not linked.Solid RED indicates link established.8
Getting StartedD. Battery compartment: Open this compartmentto access the panel interface battery.E. Stereo/mono select switch: Select the correctposition based on your intercom. If you onlyhear the intercom in one ear, select the oppositeposition for mono operation.F. Lower cable: Adjust the length of the lower cableto fit your application by winding or unwindingcable around the post.9
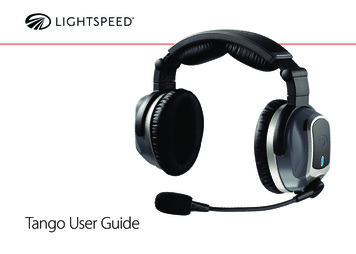
Getting StartedThe headsetA. Battery door release: Push down on this buttonto open the battery compartment door.B. Power indicator LED: Flashes GREEN whenpower is supplied and batteries are strong.Flashes RED when batteries are low.C. Power button: Press button once to turn theheadset on; press and hold to turn it off.ABC10D. USB charging port: Plug in USB cable to chargethe battery.E. Charging LED: RED/AMBER indicates charging inprogress. GREEN indicates charging complete.F. Channel select switch: Changes the channelof the boom microphone link. Changing thefactory setting is only necessary when usingmultiple Tango headsets in the same aircraft. See“Multiple Headset” on page 14.DEF
Getting StartedH. Volume control: Adjust volume by tapping theupper part of the volume control to increasethe volume and the lower part to decreasethe volume. To cover a range of situations andpreferences, we have engineered a wide volumerange, with a larger number of detents than youmay find in less expensive audio products. If youare not hearing a volume change as you tap thevolume control, pause briefly between taps.J. Link button: This button is used to establish thewireless link between the headset and panelinterface. The system is shipped with the linkalready established and this button is onlyneeded when a new headset/panel interfaceconnection needs to be established.See “Multiple Headsets” on page 14.I. ComPriority button: Lowers the volume of musicand other audio from auxiliary devices duringradio communications.HIJ11
Using Your Tango HeadsetTurning the system ON and OFFAuto Shutoff ON: Press the power button on panel interfaceonce. The GREEN power LED flashes when power issupplied. Lightspeed Link will automatically connectto the headset when the system is powered on.Press the power button on the headset once. TheGREEN power LED flashes when power is supplied.Active Noise Reduction (ANR) is engaged when youturn on the headset.Under quiet conditions Tango will automatically shutoff approximately five minutes after the headset isremoved from your head. The panel interface willshut off five minutes after it has been unpluggedfrom the intercom or intercom power is turnedoff. Auto Shutoff can be disabled on either deviceby holding the power switch for that device for 3seconds when turning the system on. The powerLED will double blink to indicate that Auto Shutoffhas been disabled.OFF: Press and hold the power button on theheadset until the GREEN power LED turns off. Pressand hold the power button on the panel interfaceuntil the GREEN power LED turns off.12Note: The panel-powered version (LEMO) of thepanel interface runs solely on aircraft power andturns off immediately when aircraft power is turnedoff or when it is disconnected from the aircraft.
Using Your Tango HeadsetMatching stereo/mono setting to an audio panelWired auxiliary devicesThe stereo/mono switch setting should match thesignal from your audio panel. Incorrect settingsresult in communications being heard in only oneear. The stereo/mono switch does not affect auxiliarydevices, so you can enjoy auxiliary audio in stereoregardless of how the stereo/mono switch is set.To connect a music player or cell phone to Tango’sauxiliary input jack, use the cord provided.ComPriority IMPORTANT: To use a cell phone via the auxiliary inputjack, the headset must be connected to the intercom.To adjust the volume on a device connected toTango’s auxiliary input jack, use the controls on thedevice itself.ComPriority lowers the volume of music andother audio from auxiliary devices during radiocommunications. Its button is next to the volumecontrol on the headset. An audible tone will notify theuser that ComPriority has been enabled or disabled.13
Multiple HeadsetsUp to 6 Tango headsets can be used simultaneouslyin an aircraft.When more than one headset is used in an aircraft,the Channel Select switch will need to be changedsuch that each headset/panel interface system isset to its own channel (i.e. first headset and panelinterface set to channel 1, second headset and panelinterface set to channel 2, etc.).HEADSETCHANNEL SELECTPANEL INTERFACECHANNEL SELECT14
Multiple HeadsetsWe have provided 6 sets of color chips with eachheadset. These allow you to color code the headsetand panel interface that go together.To change the color chip on the headset, pull thecolor chip out from the back. To change the colorchip on the panel interface, gently pry it out with afingernail or screwdriver.15
Bluetooth DevicesConnecting Bluetooth devices for the first timeBefore using a Bluetooth cell phone or otherBluetooth-capable device for the first time withTango it must be “paired” or electronically connected.To pair a Bluetooth cell phone with Tango:1. Turn on the panel interface and verify theGREEN LED is flashing. Make sure Bluetoothmode is turned off. BLUE or RED flashes fromthe Bluetooth LED should not be present. See“Bluetooth Mode—ON and OFF” on page 17.2. Press and hold the panel interface Bluetoothbutton for about five to ten seconds or until theBluetooth LED continually flashes RED and BLUE.16This lasts about two minutes. If this step takeslonger and the Bluetooth LED is no longeralternating RED and BLUE, start over from step one.3. With Tango in pairing mode, follow the menuprompts on your Bluetooth device directing it tolook for Bluetooth devices.4. Select Lightspeed-V### (numbers may vary)on your Bluetooth device from the list of founddevices.5. If asked to enter a password or PIN, enter 0000.Your Bluetooth device should now be paired andready for use with Tango.
Bluetooth DevicesBluetooth mode—ON and OFFBluetooth cell phone featuresON: With Tango turned ON, press and hold theBluetooth button until you hear a tone and theBluetooth indicator LED flashes three BLUE pulses.For first time pairing see instructions on page 16.Depending on the Bluetooth profile of the phone,you can use Tango’s Bluetooth button to performseveral functions. Some typical functions are:OFF: Press and hold Tango’s Bluetooth button forabout three seconds until a high tone is emitted andthe Bluetooth indicator LED flashes three RED pulses.Note: The Bluetooth feature must be turned ON forBluetooth connected devices to correctly function.When you turn on the Tango Bluetooth mode, it willconnect to the most recently paired device. MostBluetooth devices connect to Tango automatically. Ifthat doesn’t happen it may be necessary to use thedevice’s menu of found devices to manually connectto Lightspeed-V### (numbers may vary). Press and hold the Bluetooth button for twoseconds to redial the last number called. Press the Bluetooth button once for voice dialing(if supported by your phone). Press the Bluetooth button once to answer thephone when it rings. Press the Bluetooth button once to disconnectfrom a call.17
FlightLinkFlightLink is the first in-flightcockpit recording application forthe iPad and iPhone . The freeapp works seamlessly with all newLightspeed headsets to captureand retrieve all incoming andoutgoing communications.Features18How to activateDownload the FlightLink app from the App Store.Connect the provided auxiliary cable between youriOS device (iPhone or iPad ) and your Tango panelinterface auxiliary input.Tap the icon on your iPad or iPhone to begin usingthe app. Record all activity over the intercomToggling between apps Immediate replay of ATC calls Store high resolution or compressed files inyour libraryPress your device’s Home button and select anotherapp. Your recording will continue uninterrupted as youswitch between different applications. A red bar atthe top of the screen indicates FlightLink is recording. Draw notes, codes, or diagrams on theconvenient iPad scratchpad for reference
FAQsWhy do I hear radio communicationsin only one ear?Why doesn’t my Bluetooth device acceptTango’s 0000 passcode?Tango’s stereo/mono switch is probably set toStereo while your audio panel is transmitting amono signal. To fix this, change Tango’s stereo/monoswitch to Mono. This setting does not affect musicor audio from auxiliary devices; you can hear stereosound on auxiliary devices even when the stereo/mono switch is set to Mono.Your headset may not be in pairing mode. Somedevices prompt for a pass code without checkingfor pairing mode. When the device cannot pair withthe headset, it rejects the passcode. To enter pairingmode, you must start with Bluetooth mode turnedfully OFF. See “Connecting Bluetooth cell phones forthe first time” on page 16.When pairing Tango with my Bluetooth device,why does my device indicate it cannot connect?How can I reduce static noise duringcell phone calls?The headset may not be in pairing mode. To enterpairing mode, you must start with Bluetooth modeturned fully OFF. See “Connecting Bluetooth cellphones for the first time” on page 16.To reduce RF interference during phone calls,keep cell phones at least 12 inches from the Tangocontroller and headset when making calls.19
FAQsWhen flying what causes a warbling noisein the ear cup?If your ear is not entirely inside the cup, with atight seal, air can seep in and cause the ANR tocompensate for uneven internal cup pressure.My Bluetooth audio is dropping out, how can Ifix this?Try moving the Bluetooth source (phone or other) toa location closer to the panel interface. Also, if yourpanel interface is inside a pocket or box, try placingit on the outside and use the included hook formounting it on the outside of a pocket.20Where is my product serial number?The serial number (asmall, white, bar-codesticker with numbers)can be found onthe outside of theouter box, and onthe headset behindthe battery accessdoor in the batterycompartment.Tango Serial Number
Peak Performance TipsStart with an excellent fit. See “Fitting your headset”on page 4.Set Tango’s stereo/mono switch to match the signalfrom your audio panel. See “Matching Tango’sstereo/mono setting to your audio panel signal” onpage 12.Keep cell phones at least 12 inches from the Tangopanel interface and headset when making call toreduce static noise during phone calls.To conserve battery life, turn OFF Bluetooth modewhen not in use.Lightspeed Link has been optimized for wirelessaviation performance. However, there is still a slightdelay (latency) in the wireless path. To minimizethe sound of the echo, try placing the microphonecloser to your mouth. Slightly increasing the levelof your intercom either with the headset volumecontrol or directly on the intercom.Lightspeed recommends replacement of the softgoods on your headset (ear seals, head pads andmic muffs) every 18 months to ensure peak ANRperformance and comfort. These are wear itemsand are not covered by the Lightspeed warrantyand are available for purchase on our website atLightspeedAviation.com/Accessories.21
Batteries and ComplianceNote: This equipment has been tested and foundto comply with the limits for a Class B digital device,pursuant to part 15 of the FCC Rules.Operation is subject to the following two conditions:(1) This device may not cause harmful interference,and (2) this device must accept any interferencereceived, including interference that may causeundesired operation.This device complies with FCC RF radiation exposurelimits for general population.Caution: Any changes or modifications to thissystem will void the user’s authority to operatethe equipment.Lightspeed Aviation declares that this productcomplies with essential requirements and otherrelevant provisions of Directive 1999/5/EC.22A copy of the Declaration of Conformity is availableon request from Lightspeed Aviation:6135 Jean RoadLake Oswego, OR tery instructions: Only use genuine Lightspeed rechargeablebatteries designed for this product. Avoid prolonged exposure to extreme heat. If the system is to be stored for more than amonth, it is better to store them in a dischargedstate (not fully charged). The batteries will take approximately two hoursto fully charge from a discharged state. After 60minutes the batteries will be at 75% capacity.
SpecificationsConnectorsMicrophoneConnector Dual general aviation connectors with.250-inch commercial stereo headphone plug and.206- inch MIL-SPEC microphone plugGeneralTransducer principle: Noise-canceling electretFrequency response: 200 Hz-6000 HzMaximum SPL: 114 dBTerminating impedance: 220–2200 ohmsOperating voltage: 8V–16V DCBattery power supply: 3.7V Lithium Ion batteryHeadset Weight (with battery): 18 oz.ANRMaximum SPL: Greater than 120 dB at 100 HzHeadphoneTransducer: 40mm moving coilFrequency response: 20 Hz-20 kHzNominal impedance when wired with backup cable@ 1 kHz:Mono: 180 ohmsStereo: 250 ohms23
Warranty InformationLimited Warranty For New Aviation Headsets Sold By Lightspeed Aviation, Inc.(Including 2-Year Limited Warranty for batteries)Lightspeed Aviation, Inc. (“LSA”) warrants that the new aviation headset sold by LSA(“New Headset”) is free from all material defects in workmanship and materials. Withrespect to the New Headset but excluding all batteries provided with the New Headset(“Batteries”), all warranties provided by LSA and all implied warranties imposed by laware limited to a 5-year period, beginning on the purchase date shown on the NewHeadset’s sales receipt. With respect to the Batteries, all warranties provided by LSAand all implied warranties imposed by law are limited to a 2-year period, beginningon the purchase date shown on the New Headset’s sales receipt. “Warranty Period”means 5 years for the New Headset (excluding Batteries) and 2 years for the Batteries.This Limited Warranty (“Limited Warranty”) is provided solely for the benefit of theinitial purchaser of the New Headset (“Purchaser”), and it excludes all 3rd parties,including distributors, dealers, retailers, subsequent owners, and other users of theNew Headset. This Limited Warranty is not assignable and remains in full force andeffect during the Warranty Period, but only if the New Headset: (a) has been properlymaintained; (b) has not been abused or misused; and (c) has not been repaired, altered,or modified without LSA’s approval. This Limited Warranty specifically excludes all taxes,shipping costs, and problems relating to any: (1) repair, alteration, or modificationnot approved by LSA; (2) abuse or failure to properly maintain the New Headset; (3)faulty workmanship by any person, except LSA or its approved agent; (4) operationof the New Headset, except as specified in its operating manual; (5) ordinary wearand tear; or (6) finish and appearance item. For each claim made under this LimitedWarranty (“Claim”), Purchaser must, within 10 days of discovering a New Headsetproblem indicating a breach of this Limited Warranty, deliver to LSA a written noticethat explains in detail the New Headset’s specific defect, that shows proof of Purchaser’spurchase of the New Headset before the end of the Warranty Period, and that showsproof that this Limited Warranty applies to the New Headset. LSA or its agent mayinvestigate any Claim. For each Claim, LSA may, in its sole discretion, choose any of thefollowing exclusive remedies: (I) repair or replace the New Headset or any part thereof,without charge to Purchaser, but first Purchaser must return the New Headset to LSA’sauthorized repair facility, pre-paying all shipping charges, and Purchaser must accept24the same as repaired or replaced at the facility’s location (i.e., FOB the facility) within 10days of the date of LSA’s completion notice sent to Purchaser, or else LSA will deem theNew Headset abandoned, in which case LSA may keep, sell, or otherwise discard it; or(II) refund the New Headset’s purchase price to Purchaser. Without paying any amountto Purchaser, LSA may keep, sell, or otherwise discard all replaced New Headsets andparts thereof and all New Headsets where LSA has refunded the purchase price toPurchaser. In repairing or replacing any New Headset, LSA may, in its sole discretion,use new, used, or reconditioned parts or provide a refurbished used headset as areplacement. In connection therewith, LSA warrants that all new, used, or reconditionedparts or refurbished used headsets will be free from all material defects in workmanshipand materials during the Warranty Period and for a period of up to 90 days thereafter,but only to the extent that such event occurs during the final 90 days of the WarrantyPeriod. LSA may, in its sole discretion, (i) establish separate, additional, non-warrantyrepair and replacement programs for any new or used headset (“Non-Warranty ServicePrograms”), (ii) the Non-Warranty Service Programs may cover any time period, before orafter any Warranty Period has expired, and (iii) charge any amount and impose any termwith respect to any Non-Warranty Service Program. For Non-Warranty Service Programs,LSA warrants that all new, used, reconditioned, or refurbished parts and headsets usedto repair or replace any headset will be free from all material defects in workmanshipand materials, but only for a limited period of 90 days thereafter. Purchaseracknowledges that used or reconditioned parts may be used to repair any new or usedheadset, and that a refurbished used headset may be provided as a replacement forany new or used headset. LSA may hire a 3rd party to repair or replace any new or usedheadset. “Including” means “including, but not limited to.”THE TERMS IN THIS DOCUMENT ARE THE ONLY TERMS THAT GOVERN LSA’S WARRANTYOBLIGATIONS FOR ANY NEW OR USED HEADSET OR PART THEREOF. NO ORAL OR OTHERWRITTEN TERM APPLIES. THIS DOCUMENT PROVIDES THE EXCLUSIVE REMEDY FOR ALLCLAIMS AGAINST LSA WITH RESPECT TO ANY NEW OR USED HEADSET OR PART THEREOF.NOTWITHSTANDING ANY PROVISION TO THE CONTRARY IN THIS LIMITED WARRANTY,LSA RESERVES THE RIGHT TO MODIFY, AT ANY TIME AND FROM TIME TO TIME IN ITS SOLEDISCRETION, ANY AND ALL TERMS IN THIS LIMITED WARRANTY. EACH SUCH MODIFICATIONIS DEEMED EFFECTIVE UPON PUBLICATION ON LSA’S WEBSITE OR OTHERWISE.
RegistrationTO THE EXTENT ALLOWED BY LAW: LSA DISCLAIMS AND PROVIDES THIS LIMITEDWARRANTY IN LIEU OF ALL OTHER EXPRESS OR IMPLIED WARRANTIES, INCLUDING ANYWARRANTY OF MERCHANTABILITY OR FITNESS FOR A PARTICULAR PURPOSE. LSA IS NOTLIABLE FOR CONSEQUENTIAL, INCIDENTAL, PUNITIVE, INDIRECT, SPECIAL, LOST PROFITS,OR SIMILAR DAMAGES CLAIMED UNDER ANY STATUTE OR LEGAL OR EQUITABLE THEORY.LSA’S TOTAL LIABILITY FOR ALL CONTRACT, TORT (INCLUDING NEGLIGENCE), STATUTORY,OR OTHER CLAIMS ARISING FROM OR RELATING TO THIS LIMITED WARRANTY OR ANYHEADSET OR PART THEREOF IS LIMITED TO 1,000. SOME STATES DO NOT ALLOW THELIMITATION OF CONSEQUENTIAL DAMAGES, SO THE ABOVE LIMITATIONS MIGHT NOTAPPLY TO PURCHASER. THIS LIMITED WARRANTY GIVES PURCHASER SPECIFIC LEGALRIGHTS, AND PURCHASER MIGHT HAVE OTHER RIGHTS THAT VARY FROM STATE TO STATE.FOR PURCHASERS IN CALIFORNIA: PURCHASER HAS THE RIGHT TO HAVE THE NEWHEADSET SERVICED AND REPAIRED DURING THE WARRANTY PERIOD. THE WARRANTYPERIOD WILL BE EXTENDED FOR THE NUMBER OF WHOLE DAYS THAT THE NEWHEADSET HAS BEEN OUT OF PURCHASER’S HANDS FOR WARRANTY REPAIRS. IF ADEFECT EXISTS DURING THE WARRANTY PERIOD, THIS LIMITED WARRANTY WILL NOTEXPIRE UNTIL THE DEFECT HAS BEEN FIXED. IF ANY WARRANTY REPAIR HAS BEENDELAYED BECAUSE OF CIRCUMSTANCES BEYOND PURCHASER’S CONTROL, OR IFANY WARRANTY REPAIR DID NOT REMEDY A DEFECT AND PURCHASER NOTIFIES LSAOF SUCH FAILURE WITHIN 10 DAYS AFTER THE REPAIR, THE WARRANTY PERIOD WILLBE EXTENDED FOR A PERIOD EQUAL TO THE DURATION OF THE DELAY. IF, AFTER AREASONABLE NUMBER OF ATTEMPTS, THE DEFECT REMAINS UNFIXED, PURCHASERMAY RETURN THE NEW HEADSET FOR REPLACEMENT OR REFUND, SUBJECT TO AREASONABLE DEDUCTION FOR PURCHASER’S USE OF THE NEW HEADSET. ANYEXTENSION OF THE WARRANTY PERIOD DOES NOT AFFECT ANY PROTECTION ORREMEDY AVAILABLE TO PURCHASER UNDER APPLICABLE LAW.Product RegistrationTo optimize your customer experience,please register using your FlightLink appor at LightspeedAviation.com.Cert: 0046503Lightspeed Aviation, Inc.’s ManagementSystem is Registered to ISO 9001:2008 2015 Lightspeed Aviation, Inc. All rights reserved. ComPriority, Auto Shutoff, andLightspeed Link are trademarks of Lightspeed Aviation. Lightspeed and Tango areregistered trademarks of Lightspeed Aviation, Inc. Bluetooth is a registered trademark ofthe Bluetooth SIG. iPhone and iPad are trademarks of Apple, Inc. Specifications subject tochange without notice.Part number 704-00009-000.A1 1015
Lightspeed Aviation6135 Jean RoadLake Oswego, Oregon daviation.com800.332.2421 Toll Free503.968.3113 Tel503.968.7664 FaxLightspeedAviation.com
Tango it must be "paired" or electronically connected. To pair a Bluetooth cell phone with Tango: 1. Turn on the panel interface and verify the GREEN LED is flashing. Make sure Bluetooth mode is turned off. BLUE or RED flashes from the Bluetooth LED should not be present. See "Bluetooth Mode—ON and OFF" on page 17. 2.