Transcription
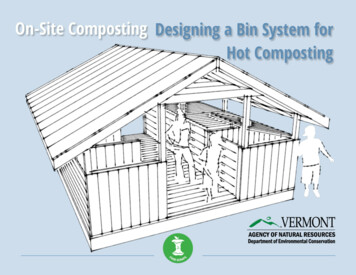
On-Site Composting Designing a Bin System forHot Composting
Table of ContentsIntroduction. 2Spotlight: Ferrisburgh Central School. 4Step 1. Size Your Bin System. 5Step 2. Decide on the Dimensions of the Bins. 6Step 3. Laying Out Your Bin System. 7Step 4. Create Building Plans for the Frame. 9Step 5. Design Your Bins. 12Estimating Building Materials. 22Acknowledgments. 23Companion Resources School Composting Options On-Site Composting For Schools: Planning andImplementation for Success Your On-Site School Composting Planning Checklist Managing you Bin Composting System Compost Recipes for Schools Compost Monitoring Log (Schools)Designing a Bin System for Hot Composting1
Designing a Bin Systemfor Hot CompostingSo you've decided to build a bin system for composting atyour school, business, or farm. This tool has effective bindesigns you can integrate into the design of your ownbuilding or system. We've seen numerous bin systems thatsimply don't meet people's needs. Some don't heat, someare too small for what is generated, some attract animals,some smell. These problems can be resolved with simpleand proven design and management solutions.Here's what you need to know: The design strategies in this guide will help you make hotcompost. We've seen compost as hot as 160º F in the deadof winter. The key is to insulate your bins if they are under300 FT3 in volume (if you live in a cold climate).can use the conceptual designs to create plans for yourown system. Animals are attracted by odors. Odors are caused byimproper recipe & lack of oxygen. Use our recipe and binmanagement guide to avoid odors. Fortify your bins withhardware cloth and lids to mitigate unwanted entry by smallanimals. Bin systems are easiest to manage under cover. If youcan't build a covered structure for your bins, do not buildthem in the drip zone of another building's roof. In addition to your compost bins, we recommenddedicating covered space for material and tool storage. Thisshould be at least half and up to equal the area of the binsthemselves, assuring plenty of storage capacity.More storage space means you need to source materialsless frequently. System size and materials flow are key. You will use theBin Sizing Table to size your own system. From there, youDesigning a Bin System for Hot Composting2
This system effectively composts meat, dairy, and bones. The larger the system, the more work it is to manage. At acertain scale, you'll really require a bucket loader to moveand turn the material. This is highlighted in the Bin SizingTable. Don't build a large bin system that requires a tractorunless you have a tractor! These systems are designed to hold compost for 8-9months, at which time there should be no more visiblefood scraps. Finished or finishing compost does not needto be stored under cover or in a bin. Outdoors and incontact with the soil is as good or better than a bin. At schools, a good design and management plan are onlyhalf of the story. Our guide, "On-Site Composting forSchools Planning and Implementing a Program forSuccess," will help get all of the pieces in place before youstart.Designing a Bin System for Hot Composting3
Spotlight: Ferrisburgh Central School On-Site CompostingThe Bin System at the Ferrisburgh Central School processes approximately 200 lbs/week of food scraps throughout the school year. Thissystem is turned by hand. Compost bins are on the left side of the building & materials storage is on the right. The system was built by ateam of parents and is managed by students, teachers & parent volunteers. The on-site composting system, which has been active since2010, feeds a robust & growing school gardening program. In 2012, the school constructed a greenhouse to extend their growing season.Materials for the system were almost entirely donated by local businesses. They leave a small trailer at a nearby horse farm & pick up thetrailer filled with manure & bedding every couple of months, to keep their materials fresh. The compost regularly reaches 160º F!Designing a Bin System for Hot Composting4
Step 1. Size Your Bin SystemUse Table 2 to estimate the cubic footage of your bins, based onthe number of students in your school. As you can see in Table 1,Elementaries produce significantly more food scraps per studentthan do High Schools. The color of the cell in Table 2 indicatesthe bins' estimated fill time & the number of bins you'll requirefor an 8-9 month residence time in the bins. In addition, theTable 1. Lbs/Week Food Scraps Generated By School Size# of Students inthe 71130Middle School375573110146183219292365438511584657730High School182635537088105140175210245280315350Adapted From: Food Scrap Generator Database Calculations. VT ANR 2014.Designing a Bin System for Hot Compostinglargest schools would require a bucket loader for materialsmanagement.Table 2. Compost Bin Size By School Size (FT3)# of Students inthe mentary SchoolMiddle School60906090120150180240299359419479539599High 674935674931111301481671863 Bins & 3 Month Fill Time/Bin4 Bins & 2 Month Fill Time/Bin *4 Bins & 2 Month Fill Time/Bin (Not recommended w/out a bucket loader)* Should consider using a bucket loader5
Step 2. Decide on the Dimensions of the BinsBased on the number of cubic feet capacity required (Table 2,now you can figure out the inner dimensions of your bins. Ifyou are loading the bins by hand, don't make the pile higherthan 4 ft, unless you have a plan to dump safely from abovethe bin down into it. A 4 ft tall compost pile in an insulated binis enough to get really hot, so it's the perfect height for mostsmall bins.height. The width of the bins and the height of the shedceiling will need to accommodate loader bucket movements.Cubic Foot of Bins (Table 2)Height of the BinsIn our example drawings, we use 5' Wide x 5' Deep x 4' Tallbins. This would serve an Elementary with 150-160 studentsor a Middle or High School with 250 students. Area of Bin Base (FT2)4'5'We came to these dimensions by dividing the cubic footage of3the bin, which would be 90 FT for an elementary, by theassumed 4' height of the bin, which gives us 22 1/2 FT2. We'llwant to use round numbers, so we rounded up to 25 squarefeet to give us a width and depth of 5' x 5'.In larger systems, the bins will be designed to operate with abucket loader. These bins could be piled 5 or even 6 feet inDesigning a Bin System for Hot Composting5'Round up the target square footage in the bins to find anumber that has round multiples. These will be the length andwidth of the bins. These multiples should provide an areathat's within a few square feet of the bin sizing estimates inTable 2.6
Step 3. Laying Out Your Bin SystemBefore you start designing your layout you should knowthe following:1. The number of bins you need to build.Figure 1.Hand-Turned Bin System LayoutCompost BinsWork AlleyStorage2. The dimensions of the bins.3. If the system will be operated by human power and apitchfork or with a bucket loader.Now you can design the layout of your system.Place your bins, storage, and work area so that everything isaccessible. Give yourself plenty of working room, 5-6 ft wide ifpossible, for hand turned systems. Figure 1. is an example ofa layout that we've used, which works very well for a smallhand turned system that is managed under cover.CompostBinRotationBinAccessShed AccessDesigning a Bin System for Hot Composting7
Figure 3.Loader-Turned Bin System LayoutFigure 2.Hand-Turned Bin System Once ConstructedStorage BinsIf the system is to be managed with a loader, the layout willbe different and might even warrant a small MaterialsBlending Area. An example layout is given in Figure 3.Designing a Bin System for Hot CompostingCompost BinsBinAccessBinCompostRotationBlending AreaNote:Leave 2-3sides openfor movement8
Step 4. Create Building Plans for the FrameThe next step is to develop plans for building the structure'sframe. We've given you some example drawings to start from,and adapt to your specific scale, needs, and innovations. Ifyou are going to build a floor and a roof, designing the frameis an important first step, as the bins will be built around theframe. If you're building free standing bins, you can skipahead to Step 5. for bin design concepts.Figures 3-6 are example building drawings based on the sheddesign used by the Ferrisburgh Central School, which werecreated by Nick Patch and other parent compost crusaders forthe school.Most people are going to build relatively simple shedstructures, but we do recommend finding an experiencedbuilder or designer to draw up your building plans. Schoolscan usually find a parent volunteer or maybe an architecturestudent at a local college. These designers will be very helpfulin building the structure too. A helpful process would be to: Draw the Floor Plan based on the LayoutDraw the Building FootingsDraw the Deck FrameDraw the PostsPlan the OverhangDraw the Beams and Roof StructureDesigning a Bin System for Hot CompostingNote: We assume the use of rough cut lumber in all ourdrawings, which is cheap and locally available throughoutmany rural regions. We use round dimensions such as 2" todescribe a typical 2 x 4. Use dimensional lumber in place ofrough cut with conversions as needed.9
Figure 5.PostsFigure 4.Floor, Beams, and JoistsJoistsBeamsPostsDesigning a Bin System for Hot Composting10
Figure 6.Front View: Posts, Beams, & Roof12 : 6 Pitch2' 0"6' 0"Designing a Bin System for Hot Composting11
Step 5. Design Your BinsAssuming your building plans are in place, including footings,structure, decking, and roofing, the next step is to design yourbins. Figures 7-13 illustrate the basic concepts that we knowwork well. Your general system design may follow these exactlayouts and designs or they may be very different. We wouldstrongly encourage you to employ the following key designcomponents (along with bin sizing).The key components include: Insulation in the walls and lidHardware cloth on the walls, floor, and cracksHoles in the floor to provide passive aerationSliding slat door to enable easy loadingPulley or other leverage for lifting and securing bin lidssafely Storage for raw materials and toolsDesigning a Bin System for Hot Composting12
1" SidingFigure 7.Blown Up Floor Plan5" Plate (holds slate door)1" Inner Siding1" Siding4" Posts1" Inner Siding2" Sliding Slat DoorStuds1" SidingStuds2' 0"Insulation2' 0"InsulationCompost Bins6" Plate (holds slate door)No InsulationNo InsulationStorage Bins1Designing a Bin System for Hot Composting13
Figure 8.Compost Bins FrameHalf LapJointPosts2"x4"stePlaDesigning a Bin System for Hot CompostingNote: Lidoverlapswith Bin1"-2"2' 0"2' 0"Note: Deckingruns horizontalto bin openingfor ease ofshovelmovement14
Figure 9.2-4" Blue Board RigidInsulation to Lid, Sides,and Back - Friction FitLeave air gapbetween foamand sidingDesigning a Bin System for Hot Composting15
Figure 10.Siding Over Insulation1/2" siding of sheetmetal for lid(to keep it light)1" siding walls(we like roughcut hemlock)Designing a Bin System for Hot Composting16
Figure 11.Face Plates to Hold Sliding Slat Door In PlaceSlats(Figure 12)Face PlateMake Gap1/4" Widerthan SlatThicknessre 12)ugiF(SlatsFace PlateDesigning a Bin System for Hot Composting17
Figure 12.Air Holes &Hardware ClothHardware ClothNotes:Hardware ClothAir Holes (1" - 1 1/2")Hardware ClothDesigning a Bin System for Hot CompostingHardwareCloth- Leave a hardware cloth flaparound the rim and anyother cracks for addedtightness.- Use a nail gun that shootsbrads for easy attachment ofhardware cloth- Hardware cloth can be putbeneath wood siding,however, this makesattaching siding moredifficult (and it absolutelyneeds to cover air holes)18
Figure 13.Sliding Slat DoorMake Gap 1/4" Widerthan SlatWidthSlatsgniSliddlenaHDesigning a Bin System for Hot Compostingal)nopt is (oNote:For Slats We Like 2"Rough Cut Hemlock19
Figure 14.Lid Pulley SystemSwivelling Pulleys(Single or Double)Eye BoltCleatLid Overlap of 1"-2"Note:Lids and pulleys need to be designedwith safety in mind, particularly whenoperating with kids. Supervision andtraining are key.Designing a Bin System for Hot Composting20
Lid Pulley Systems:Pulley systems at Vergennes Union High School (Left) and atthe Ferrisburgh Central School (Right), both designed by NickPatch. The lids are opened for loading of raw materials andfor unloading and turning. The Vergennes bins can be loadedfrom the top with a small tractor bucket. Nick's advice is tomake the lids as light as possible by using a half lap joint inthe corners and a thin light weight material to cover theinsulation (sheet metal for example).Designing a Bin System for Hot Composting21
Estimating Building MaterialsThe table below has two materials estimates for a covered binsystem like the one described in these designs. It works out toroughly 12.00/FT2.Estimated Total Nick Patch Highfields Center for CompostingOriginal Content and DesignsOn-Site Bin Materials otingsHardware ClothPhotos216' x 16' (256 FT ) 1,200 500 300 500 200 300220' x 24' (480 FT ) 2,400 1,000 500 1,000 400 500 3,000 5,800Having a rough estimate of materials will be helpful whenfundraising. Potential sources of grants or materials donationinclude: Grassroots community foundations (e.g. New EnglandGrassroots Environmental Fund) Local Solid Waste Management Entities (e.g. Local SolidWaste Districts in Vermont) Lumber & Hardware Outlets (e.g. Home Depot)Designing a Bin System for Hot CompostingBy James McSweeney(While at Highfields Center for Composting, with supportfrom the Harris and Francis Block Foundation, The JohnMerck Fund, & the Ben & Jerry's Foundation)ReferencesDesigning a Bin System for Hot Composting. HighfieldsCenter for Composting. Hardwick, VT. Web Resource: Nolonger available.Food Scrap Generator Database Calculations. VermontAgency of Natural Resources, Department of EnvironmentalConservation, Solid Waste Program. May 2014. WebResource: Retrieved July 24, 2015.22
AcknoledgementsThis guide was created under contract with the VermontAgency of Natural Resources, Department of EnvironmentalConservation, Solid Waste Program and uses or is adaptedfrom content originally developed by the Highfields Center forComposting in Hardwick VT. The Highfields Center forComposting dissolved as an organization in December 2014and ended its active involvement in the Close the LoopProgram.The content has been made publically available for use insupporting organics management in Vermont and elsewherethrough the generosity of the High Meadows Fund, the Harrisand Frances Block Foundation, and the Vermont CommunityFoundation. For more information about the use of Highfieldsrelated materials please contact jake@vsjf.org.Elementary, Vergennes Union High School, and WillowellFoundation and to our design reviewers, Nick Patch, HeatherBurt, Cornelius Murphy, Abigail Foulk, and Green MountainFarmto School for their tremendous help and leadership!Content Updateswww.CompostTechnicalServices.comDesignThe Vermont community wishes to thank the Highfields Centerfor Composting for its years of outstanding leadership in theservice of community composting and universal recycling inVermont.Also, huge thanks to the Ferrisburgh Central School, ThetfordDesigning a Bin System for Hot Composting23
For More Information ContactSolid Waste Management ProgramWaste Management & Prevention Division1 National Life Dr – Davis 1Montpelier VT gning a Bin System for Hot Composting24
Note: We assume the use of rough cut lumber in all our drawings, which is cheap and locally available throughout many rural regions. We use round dimensions such as 2" to describe a typical 2 x 4. Use dimensional lumber in place of rough cut with conversions as needed. Designing a Bin System for Hot Composting 9