Transcription
Degree Works Training ManualContent is written and organized in collaboration withUniversity Advising and the Registrar’s Office/Degree Works SpecialistFall 2018
Table of ContentsCreating Plans in Degree Works . .3What-If Tool . . . 11What-If Map . .15GPA Calculator. . . .202
Creating Plans in Degree WorksIt’s hard to stay on track if you can’t see where you are going. Creating and utilizing plansin Degree Works encourages students to plan ahead for future semesters in order to stayon track for graduation.3
Getting Started:Click the Plans tab within Degree Works.Once you’ve clicked this tab, the following pop-up will appear:If the student already has one or more plans, they will all pull up. You can edit/view eachof those plans by clicking on an individual plan and selecting the “EDIT” view.4
First, we’ll go over the steps of building a blank plan since you’ll use these same principlesto build templates. 1. Name the plano It is recommended to use the name of the program or major. This is helpful if a student changes majors because he/she will be alerted right awaythat that is not the plan they should be following now.o If you are specifically building a graduation plan, it is recommended to name it“Graduation Contract” or “Graduation Plan” for the last few semesters. 2. Ensure the degree matches the planned degree. 3. You have the option to mark the plan active and/or locked.o Active: Active plans should mean the plan is current. Outdated/old plans should not bemarked active.o Locked: Students cannot edit. You or another advisor are the only ones who can editlocked plans.o Misc. Info: Plans must be marked both active and locked to use the tracking feature (i.e., ontrack, off track, or warning). Only one plan per student should be marked both active and locked.Please note you need to be in the “Edit” view for Steps 1-3.5
Once you have this upper section set up, it’s time to add semesters. This is done by clicking on the “ ”icon under the View tab. Alternatively, you can click on the “-” icon to remove semester(s).Once you have the semesters entered, you are now ready to add requirements. This is done by clickingon the “ ” icon next to the semester you are adding a requirement to.You’ll notice there are a variety of requirement options to choose from. Reference the list on thenext page to know which option(s) to select.6
Requirement Options Choice: Use this when there are several course options that can fulfill a requirement.o e.g., student can take STAT 1040 or 1045 for major GPA Requirement: Three types of min. GPA’s for a term can be planned for. These include Overall StudentSystem GPA, Major GPA, & a Class List GPA.o If you don’t want to track the GPA requirements or if one of these GPA options doesn’t meet your needs, youcould use a GPA “Placeholder” requirement instead and add further specifications in the “value” box. Non-Course: Non-Course items that need to be completed as part of a degree can be planned for with thisrequirement. Some examples one might use are: GRE Exam, Aleks Math Placement, etc. Click on the arrowto see full list. Please note that you cannot track non-course items. Placeholder: These requirements are informational only and are not included in tracking. Many advisorsfind these beneficial because you can select “elective”, “Emphasis course”, or other options and canfurther specify by typing what you want the student to plan for in the “value” box. *Many use the“wildcard” placeholder option if one of the pre-set options do not meet a student’s needs. Planned Course: A single course can be planned for with this requirement. It can be entered manually orthe user can drag and drop a course from the course list on the right of the screen.*You’ll use this requirement option most often Test Score: Tests that need to be completed as part of a degree can be planned for with the testrequirement.Additional Notes: Some requirements could be input several ways into plans so find what works best for you and your major(s).For example, a test related to your specific major could be put in as a placeholder, non-course, or test score.7
Some find it easier to drag and drop course requirements rather than using the “planned course”option. This is done by using the course list on the right hand of the screen when you’re in the “Edit”view. It will look like this:Click on the blue arrow next to the correct subject and you can drag and drop specific courses into the desiredsemester. Note that if a student can take any General Education course, you could drag and drop a “GE”requirement. These courses automatically populate to 5 credits so keep in mind you may need to adjust it toequal 3 credits once you’ve placed it in a given semester to keep the total credit count accurate for a semester.8
To delete a requirement, click on the blank space next to the requirement (as indicated by the red arrowon the left side of the screen). This will highlight the whole row a darker blue and you can then click onthe “-“ icon to delete.If needed, you can also drag and drop requirements to different semesters. This is especially beneficial aschanges occur throughout a student’s progression towards their degree. If he/she didn’t take a courseduring the specified semester, simply move it to another semester.To further specify a requirement, you can also specify a minimum grade that must be received, thecampus it must be taken at, and the delivery method such as online, broadcast, or on campus.You’ll also notice the “Notes” option on the far-right side. To add a note to a requirement, click on thenote icon. Once your note is saved, a student can hover over the icon to read the note. Further, you’llnotice that if there is a note, the icon will be updated to show white lines indicating additional info.9
View Options in PlansThere are four different views within plans: Audit, Calendar, Edit, Notes. You’ll use each of the viewsfor various purposes.Creating and Editing Plans Edit: This is where you’ll do your “heavy” editing and the view that you will use to create a plan(naming it, marking it active/locked, etc.). You’ll spend most of your time in this view. Audit: This view displays the student audit side-by-side with the Calendar view. This is especiallyhelpful in verifying completeness of the plan. “Light” editing of the plan can be done in this screenby hovering over a class. Once a small hand icon appears, you can drag and drop it to the desiredsemester on the right hand of the screen.Printing or Saving Plans as a PDF (No editing available) Calendar: This view displays the plan by academic year. You can print by clicking the “print” iconat the bottom right of the screen. Notes: Displays the plan by semesters rather than academic yr. You can print in this view as well.10
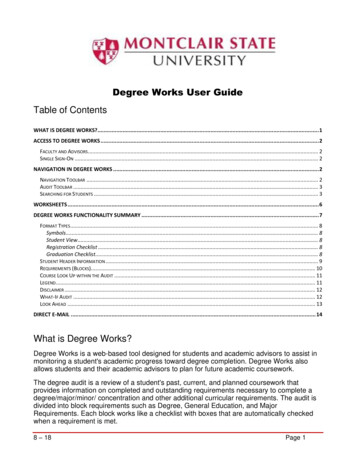
What-If ToolObjective 1: When to use the What-If toolAllows students and advisors to explore degrees, majors, minors, and concentrations, and to applythe student’s course history to a sample audit with any of the above changes.1) To access the What-If tool, click on the “What-If” link on the left side of the audit screen underthe “Worksheet” tab.2) Once at the What-If screen you will be able to use the drop-down menu boxes to select thedesired Level, Degree, Academic Year (Catalog Year), Major, Minor, and Concentration.11
Level, Degree, and AcademicYear are required fields.Major is the most commonlyused Areas of Study field. Becareful of over -selecting fieldsas this can result in errors.3) Your selection for each area will be added to a list box on the right-hand side. To remove any of yourchoices, select it from the list and click the “Remove” button located below the list box. After selecting thedesired criteria, press the “Process What-If” button. Degree Works will then take your entire course historyand apply it to an audit with the newly selected changes. Any wrong combination of degree, major, minor,or concentration will result in an error. *Note: If you would like to print your What If scenario, please jumpto the next page before you click “Process What-If.”12
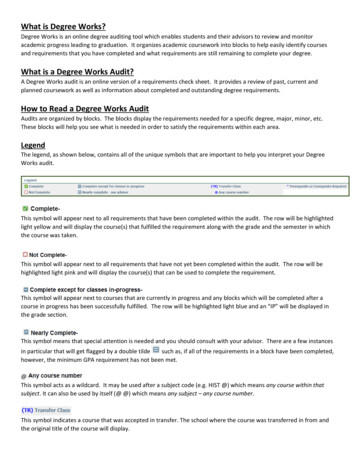
4) Once the new audit has been generated, you will notice that all of your selections will appearas if it were a real audit on the Worksheet page.Notice the “What-If” indicatorin the right-hand corner.13
Printing a What-If Audit:1) Once all of your selections have been made on the What If parameter screen, you have the option to “Saveas PDF”. Clicking this button at the top of the screen will run the What If scenario and insert it into a PDFdocument that you can either save or print out.Saving as a PDF first makes fora better document than simplyprinting from the new What Ifaudit (worksheet) page.14
Degree Works: What-If MapThe What-If tool in Degree Works is a powerful resource for both students and advisors. It allowsstudents to hypothetically change their major while seeing how the classes they have already takenwill apply.While this is a great tool, we recognize that some majors and programs are not very straightforward in knowing exactly what needs to be selected in order for the requirement block(s) to pullin. This is because of the way some program codes are built, so this “map” can be used as a guide.15
Biology, BA or BSo Select program, major, and concentration. Required emphasis options include:Biology, Cellular/Molecular, Environmental, Ecology/Biodiversity, and Human Biology Technology Systems, BSo Select program, major and concentration. Required Emphasis Options include:Information and Computer Technology, Robotics, Automation, and Controls, ProductDevelopment, and Technical Management16
Associate Degree-Seeking Studentso Select AS degree and the General Studies major. NursingNursing can be a bit tricky because there are several different degree types and programs. We will reviewthe most commonly used/sought Nursing degrees depending on location.o Logan Main Campus: Nursing, BSNo Regional Campus:17
Nursing, AAS Practical Nursing, (PN)18
Additional Tips: Make sure you have selected the intended degree and catalog year. The degree will automaticallypull in from what the student is currently matriculated in, whereas the catalog year will default tothe current catalog year. Just as you need to make sure you have selected ENOUGH criteria in the fields of study, also becareful to not over-select. Most what-if scenarios will just use one criterion such as major or minor.(The most common exceptions to that rule are included in this document). To remove any of your selections, click on the criteria under “chosen areas of study” and then clickon the “remove” button right below. To print a What-If audit, you’ll make the desired criteria selections and then click on “Save as PDF” toeither save or print.19
GPA CalculatorBuilt into Degree Works is a GPA calculator tool that allows you to make calculations based on yourcurrent and desired GPA. The tool includes three calculators: graduation, term, and advice. The tool canbe accessed from the GPA Calc tab in Degree Works.**Please note that the GPA calculator is not a guarantee of grades and is only meant to be aninformational tool.**Repeating a course does impact the GPA calculation, which won’t be accurate until the course iscompleted.Graduation CalculatorYour current GPA will auto-populate. Enter the number of remaining credits you have and then the creditsyou require for your degree (120 for most BA/BS and 60 for AS). Enter your desired GPA and then clickCalculate. The calculator will tell you what GPA you need to average over your remaining credits.20
Term CalculatorThe Term Calculator allows you to seehow the grades you earn in yourcurrent term affect your overall GPA.Your current GPA and credits earned sofar auto-populate. Fill in your coursesand credits, then the grade expected ordesired for each. Click Calculate.21
The result will tell you what your new overall GPA will be with those grades in the courses entered.22
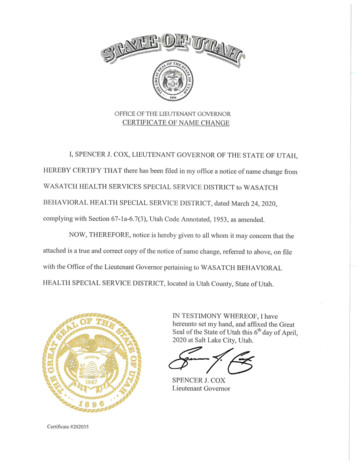
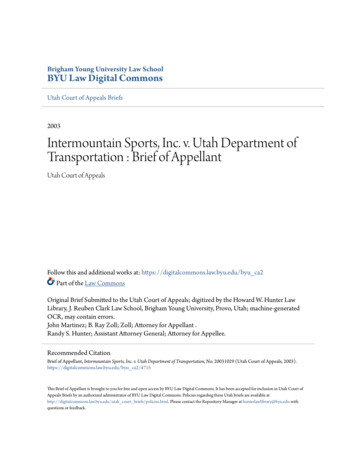
Advice CalculatorThis tool will give you potential options to reach your desired GPA. In the example below, this studentwants to raise their grade to a 3.7 from their current 3.53. The calculator will say how many credits atwhat GPA is required to get to that GPA.In this case, the student needs 19 credits at a 4.00 (A) grade average to raise their grade to a 3.7 GPA.23
3 Creating Plans in Degree Works It's hard to stay on track if you can't see where you are going. Creating and utilizing plans in Degree Works encourages students to plan ahead for future semesters in order to stay