Transcription
Advidia Camera Finder User GuideUpdated: 1/12/2015 v1.5
CONTENTSSystem Overview . 3Client Usage. 3Camera Finder . 4Launching Advidia Camera Finder . 4Main Window Menu Bar . 7Login Manager . 8Mass Firmware Updater . 11Zone Editor . 12Settings . 13Edit Table . 15Templates . 17Display Settings . 19FAQ . 20Contact Us . 21Page 2 2014 Advidia Inc.
SYSTEM OVERVIEWAdvidia Camera Finder allows users to identify, adjust, and update cameras on a network. It isdesigned with the ease of use and functionality that our customers have come to expect from anAdvidia software solution. The following pages will help guide you through the usage of theAdvidia Camera Finder.CLIENT USAGEThe Advidia Camera Finder is a robust solution for multi-camera environments that utilizeseveral different models to achieve a comprehensive overview of their monitored area. TheAdvidia Camera Finder can be used to locate cameras from varying models, and make changesincluding but not limited to DHCP ranges, FPS, Resolution, Compression, and firmware updatesall from one easy to use software.Page 3 2014 Advidia Inc.
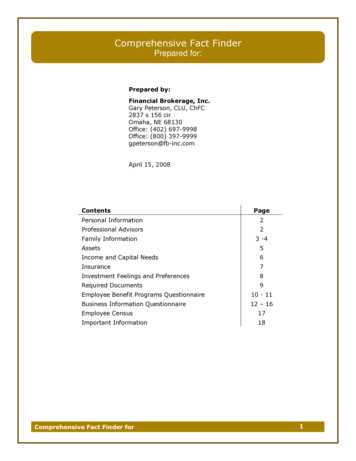
CAMERA FINDERThe Camera Finder has three main functions: Locate and identify cameras on your networkAllow you to make camera side changes to supported models of camerasAid in firmware updates for supported modelsLAUNCHING ADVIDIA CAMERA FINDERWhen the Advidia Camera Finder is launched, the program will scan your network for camerasin order to populate its database. While searching for cameras in your network, the imagebelow will display.Depending on the size and speed of your network, this process can take several minutes.Page 4 2014 Advidia Inc.
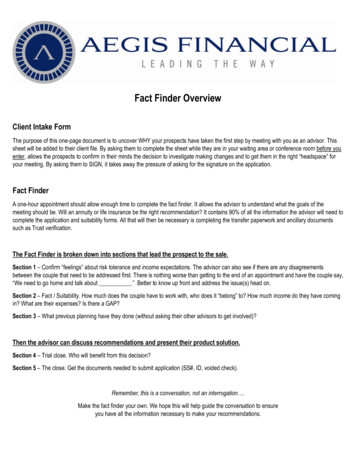
Once the program has scanned the network and identified the cameras, it will open the mainpage of the program which looks like the image below. This screen presents an overview of allvisible cameras on your network.On the primary screen, you will see a listing of the cameras available on your network (notlimited to your subnet, but rather across your whole broadcast range), MAC addresses, modelnumbers, firmware versions, network information, IP address, port number, and IP gateway.The Load Extended button is used for extended properties that require an individual ping to thecamera, such as DHCP status, Motion Detection, OSD, bit rate, resolution, and FPS. Using theLoad Extended feature, will take additional time to load, depending on the network environmentthat it operates within.Supported Quick Edit feature settings are editable on the Quick Edit Menu on this right side ofthe screen.Page 5 2014 Advidia Inc.
The Quick Edit Feature allows the change of IP Address, subnet mask, camera date and time,compression, BR (bit rate), FPS (frames per second), MD (motion detection enable/disabled),and OSD(on screen display). Some features may require the loading of extended properties.This is designed to make quick changes easier and faster for single cameras edits. In order tochange multiple cameras at a time, you must use the Edit Window.To enter the Edit Window to change additional camera properties, click the checkbox on theleftmost column in the main screen to select which cameras you want to edit. You can doubleclick the checkbox, use the keyboard shortcut Ctrl A, or click the checkbox on the top of themenu to select all cameras. You can also deselect all by double clicking the word ‘Checkbox’,using the keyboard shortcut Ctrl D, or clicking the checkbox at the top of the menu a secondtime.The search bar at the top of the main window can be used to locate specific terms found in thelist below. All rows with the searched-for text will appear highlighted for easy identification. Thiscan aid in rapidly locating specific types of cameras, information, firmware versions, or anythingelse to aid in finding and editing the appropriate cameras. You can also search individualcolumns for text by typing ‘column text’ for example ‘channel 4’ then you will search only thechannel column for the text 4, and the resulting rows with 4 in the channel column will behighlighted.After searching criteria, the rows with matching terms will be highlighted in the table. If youright-click within one of the highlighted rows, you can select or deselect all of the highlightedrows, to make choosing the exact setup that you want as easy as possible.Theicon can be used to see a quick snapshot preview of the camera’s feed by left clickingon the icon. These snapshots can only be obtained if you are on the same DNS subnet, andalso have the correct username and password for the camera being selected. An error will bedisplayed in the event the camera is unable to be accessed via HTTP, or if the username andpassword are incorrect explaining the problem, and all associated text will be read if a camerahas reported itself twice for some reason. Below, you can see an example of the snapshotpreview working properly.Page 6 2014 Advidia Inc.
MAIN WINDOW MENU BARAfter successfully launching Advidia Camera Finder, you will be presented with a menu ribbonacross the top. This section of the documentation will address those three menu items and theirfunctions.File Tab will display the following items:From here, you can access the Login Manager, update firmware all at once for selectedcameras, choose settings to change the way that Advidia Camera Finder operates, and alsoquit the program.Edit Tab will display the following items:Page 7 2014 Advidia Inc.
From this window, you may launch the Edit Table window, force a refresh of the cameras onyour network to locate new cameras, export the list of cameras in XLS or XML format, andselect or deselect all cameras. You can also use the Network tab to disable DDNS on selectedcameras.About Tab will display legal information along with the version of your Camera Finder.The menu ribbon will also display the time of your last camera search along with the totalnumber of cameras found on your network.Additional shortcut menu is available for features such as Refresh, Edit Table, FirmwareUpdate, Login Manager, Zone Editor and Settings.LOGIN MANAGERThe Login Manager is a tool used to manage the logins that Advidia Camera Finder uses toaccess the camera settings of the selected cameras. When you first launch the Login Manager,Advidia Camera Finder assigns the standard password for each camera based on itsmanufacturer and model number for supported cameras. Note that these passwords are onlypresent to provide the credentials that allow the camera to accept the changes made. It willshow as in the example below.*Note: This will only change usernames and passwords that are sent from Advidia CameraFinder to the cameras, not change or add users to cameras or edit their passwords. Also,depending on your settings choices, the Login Manager will select either all cameras, or thecameras that you have selected to edit.Page 8 2014 Advidia Inc.
The Username and Password fields are fully editable on a per-camera basis, or they can beedited with the first two icons at the top left of the menu.The iconwill revert all changes to default passwords once again, while the iconallows you to change the username and password for all cameras at once. This is not actuallychanging the password, it is only providing credentials that Advidia Camera Finder will usewhen making changes.The Login Manager also has the ability to validate credentials, and verify that they are what thecamera expects them to be with the icon. Clicking this icon will display a new popup with alisting of the invalid passwords and also highlight those passwords, on supported cameras, thatare incorrect as in the example below.Page 9 2014 Advidia Inc.
You can also use theandto export and import the list of credentials to an .XMLdocument if you want to move the changed credentials and cameras between mutliple locations.You can also use theicon to save your changes at any time.Page 10 2014 Advidia Inc.
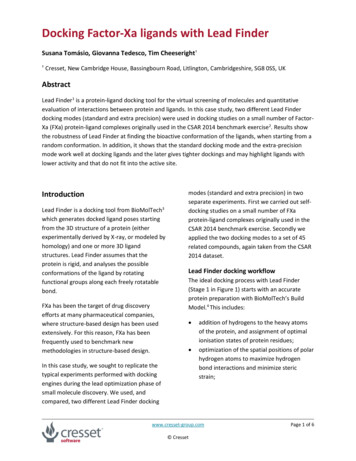
MASS FIRMWARE UPDATERThe Advidia Camera Finder makes it easy to update the firmware on supported camera models.With the Advidia Camera Finder, you can update multiple cameras or models at once from thesame menu.To launch the mass update window, you will first select the checkboxes on the cameras that youwish to update. Click on the File tab at the top left, or hit the keyboard shortcut Ctrl U once allcameras are selected. When launched, you will be presented with the Firmware Updaterscreen, as shown in the example below.From this screen, expand the Series from the right tree navigation to check how many camerasare in each category by clicking the plus symbol to the left of the series. However, you cannotselect firmware updates for individual cameras; you can only assign firmware updates to aseries. The firmware for each series will be applied to all cameras in that group.Use the ‘Firmware File Location For Series’ box to point the updater at the location of thefirmware image you are updating that series to, and after each series is selected, click theUpdate button on the bottom right. This may take several minutes per camera based upon yournetwork infrastructure, camera model, and other factors.Page 11 2014 Advidia Inc.
ZONE EDITORThe Zone Editor is a tool that can be used to identify, set, or clear motion zones on camerasthat support them. Not all cameras support motion zones, and there are differences in the typesof motion zones that can be applied. The Advidia Camera Finder will present appropriateoptions, depending on camera type.To add a new zone, select a camera using the drop down. Next, enable motion detection withthe Enable Motion Detection checkbox or select a zone to configure. You can draw zones oneat a time, either by clicking and dragging on the screen to draw a box. Newly drawn zones willbe represented by dashed lines. To save, click Stop Drawing once you have located an area ofinterest on the camera screen.To detect existing zone, click Show Current Zones at the top of the window. These will berepresented by solid line boxes.You can also use the buttons near the middle to clear all drawn zones, clear all current zones,apply the new zones, or try to pull the current existing zones by pulling them from the camera.Below that, you can actually set a motion zone recording schedule, to one or multiple camerasPage 12 2014 Advidia Inc.
through the bottom interface of this menu. You can also reset and remove all zones currentlyon a camera with the Reset Current Zones button.SETTINGSThe settings menu allows you to change how the Advidia Camera Finder operates. An image ofthe settings are shown below:Page 13 2014 Advidia Inc.
Confirm changes before existing: When checked, the application will create a confirmationwindow upon closing the Password Menu so that you do not accidentally lose your savedpasswords.Ask to Export Passwords: When checked, the application prompt you to export yourpasswords to .XML every time you use theicon to save your progress.Select all cameras when launching Login Manager: When checked, the Login Manager willautomatically select all cameras by default.Always Check All Cameras when Launching Firmware Update: When checked, theapplication will launch the Firmware Updater and automatically select all of your cameras bydefault.Confirm Exit: When checked, the application will create a confirmation window when you closethe Advidia Camera Finder itself, preventing you from accidentally closing the window beforeyou are finished working with the program.Ask to confirm before loading extended: When clicking the Load Extended it will either offeror not offer a warning prompt letting you know that it will take a while to load. This is to keepusers aware that clicking the Load Extended button will take a while depending on your networkand camera setup.NIC Card Selection: This allows the application to choose which NIC card Advidia CameraFinder will use, allowing it to search the correct network. The network will appear visibly as thenetwork address that the NIC has assigned itself to.Always Load Extended: This stops Advidia Camera Finder from needing to be manuallyupdated with the Extended Properties each time you open the program, or refresh the cameralist. Advidia Camera Finder will always pull the Extended Properties when this option ischecked.Page 14 2014 Advidia Inc.
EDIT TABLEThe Edit Table is useful for editing the settings of one or multiple cameras on your network allfrom within the Advidia Camera Finder tool. The settings that you can change are the HostName, Compression, Resolution, FPS, Gateway, Motion Detection, OSD, Bit Rate, andDate/Time as well as assigning a range on a network for the selected cameras. An example ofthe Edit Table is shown below.To make changes to a camera, you will need to select the checkbox on the cameras that youwish to edit. Once selected, select the Properties to mark which changes you are going tomake. This is to prevent accidental cell selection from overwriting information not intended to bechanged. You can also launch the Display Settings menu from here.Once the checkbox has been selected, any changes made to the selected items will be appliedwhen the ‘Apply’ button is pressed. There is no way to instantly revert the changes, so makecertain that the changes are intended and correct, or keep note of what the old settings were.Page 15 2014 Advidia Inc.
The Network section allows you to edit the IP address of a camera or a range of cameras. Inorder to change only one camera, select the ‘Edit One Camera’ box and put in the appropriateIP address, Gateway, and Subnet. To select multiple cameras, click the ‘Edit Range ofCameras’ box, select which cameras you wish to edit, then insert your network settings with astarting and ending IP address to give the range. You can choose to assign either a Static orDynamic IP address as well. To save the settings, click ‘Apply Network Changes’.Note: The network settings will list a default of 192.168.2.100 with a Gateway of 192.168.2.1and a subnet of 255.255.255.0. It is the user’s responsibility to insure that all network settingsare valid and appropriate for their own network, and that all ports and IP addresses are openand available for use.Page 16 2014 Advidia Inc.
TEMPLATESWhen editing several camera functions at once, you can utilize templates to make theassignation of standard settings to one or many cameras easier. The template window ispictured below.This window displays the settings and allows you to select a Template. To create a newtemplate, use the dropdown menu ‘Template Name’ and select New Template. When doing so,selecting ‘New Template’ will open up the window pictured below.Page 17 2014 Advidia Inc.
In this window, name the template, and choose which settings the newly created template willapply. You can change everything pictured, and when applying the template, the software willattempt to assign all of the template’s setting to the camera(s). This process may take severalminutes. The templates are saved across sessions, and can be used to quickly update newcameras to a standard resolution, FPS, compression, etc. to aid in the integration of newcameras to the network.Page 18 2014 Advidia Inc.
DISPLAY SETTINGSThe Display Settings menu allows you to edit settings that are related to the way that imagesare recorded by your cameras. Things like Day or Night mode, shutter speed, or I FrameInterval.To adjust a camera or group of cameras, mark the checkbox next to them and then makechanges to the options on the right. When you are finished, click Apply and the instructions willbe sent to the cameras. These changes may take a few minutes to take effect depending onyour network infrastructure, camera models, number of cameras, and other factors.Page 19 2014 Advidia Inc.
FAQBelow you will find our Frequently Asked Questions should you need it in the course of usingthis software.1. What are the system requirements for this software?The system requirements for this software are a 64bit windows OS, with WinpCap and thenewest C redistributable package installed.1. Why is a camera property not changing after I tell it to?The most likely cause of a property not changing is a bad password. If you havechecked and insured that your username and password are correct, then the cause is likelythat an HTTP connection is out of reach, preventing the signal from being received by thecamera.2.I changed my camera to DHCP, now it says ‘Unknown’ for the network, how can I fixthis?When sending a request to a camera to change to DHCP or a dynamic address, it is upto the camera to decide what router or network gateway it should attach to on the network.Should it decide that it wants a gateway that is not the same as your network subnet or thatis within HTTP reach, it will ignore HTTP requests from the Camera Finder since it is tryingto listen only to that gateway. Should this occur, it is recommended that the user changethe camera to a static IP and gateway, and keep it there while property changes are madeand edited.3. Can I use this software on multiple machines?Yes, the product is licensed for unlimited computers. Feel free to use this software on asmany computers as you need to suit the needs of your business.Page 20 2014 Advidia Inc.
CONTACT USIn Person:5120 Woodway, Suite 5006Houston, Texas 77056Hours of Operation9:00 AM - 6:00 PM CST, Monday – FridayBy Phone: 832-240-1768Website and mPage 21 2014 Advidia Inc.
Advidia software solution. The following pages will help guide you through the usage of the . The Load Extended button is used for extended properties that require an individual ping to the camera, such as DHCP status, Motion Detection, OSD, bit rate, resolution, and FPS. . expand the Series from the right tree navigation to check how many .