Transcription
Mohammed M. AlaniGuide toCisco RoutersConfigurationBecoming a Router GeekSecond Editionwww.hellodigi.ir
Guide to Cisco Routers Configurationwww.hellodigi.ir
Mohammed M. AlaniGuide to Cisco RoutersConfigurationBecoming a Router GeekSecond Edition123www.hellodigi.ir
Mohammed M. AlaniAl Khawarizmi International CollegeAbu DhabiUnited Arab EmiratesISBN 978-3-319-54629-2DOI 10.1007/978-3-319-54630-8ISBN 978-3-319-54630-8(eBook)Library of Congress Control Number: 20179346221st edition: Mohammed M. Alani 20122nd edition: Springer International Publishing AG 2017This work is subject to copyright. All rights are reserved by the Publisher, whether the whole or partof the material is concerned, specifically the rights of translation, reprinting, reuse of illustrations,recitation, broadcasting, reproduction on microfilms or in any other physical way, and transmissionor information storage and retrieval, electronic adaptation, computer software, or by similar or dissimilarmethodology now known or hereafter developed.The use of general descriptive names, registered names, trademarks, service marks, etc. in thispublication does not imply, even in the absence of a specific statement, that such names are exempt fromthe relevant protective laws and regulations and therefore free for general use.The publisher, the authors and the editors are safe to assume that the advice and information in thisbook are believed to be true and accurate at the date of publication. Neither the publisher nor theauthors or the editors give a warranty, express or implied, with respect to the material contained herein orfor any errors or omissions that may have been made. The publisher remains neutral with regard tojurisdictional claims in published maps and institutional affiliations.Printed on acid-free paperThis Springer imprint is published by Springer NatureThe registered company is Springer International Publishing AGThe registered company address is: Gewerbestrasse 11, 6330 Cham, Switzerlandwww.hellodigi.ir
PrefaceSince the first edition of this book, I have received many requests to do a secondversion that is extended and more thorough. With the research activities I gotinvolved in, I could not do that very early. However, at one point, I needed to dosome router configuration as a part of one of the courses I was teaching. I lookedthrough the first edition of the book, and I could not find what I was looking for.This came as a wake-up call to me that a second edition is a must.Cisco networking equipment still takes a major role in our lives. Many serviceproviders, corporate networks, government networks, and others rely on Ciscodevices, which basically means that we are relying on these devices on daily basis.All network administrators know that relying on Cisco devices gives them somerelief in terms of reliability.The uniqueness of this book lies in its cookbook-like way of writing that doesnot dive deep into theory and provides a ready-to-use reference for everydayconfiguration needs. My biggest concern when writing this book was to avoidcomplications and get directly to the simplified configuration steps.The second edition of this book included many important topics that weremissing from the first edition, such as MPLS, multicasting, GRE, HSRP, with manyothers. Some older topics like access-control lists were expanded to include moredetails like reflexive and timed access lists. The second edition included configuration steps for IPv6 versions for most of the protocols covered by the book. Withthe rapid increase of the use of IPv6, its configuration became an important skill tohave in your arsenal.An important addition to this edition of the book is the inclusion of trainingscenarios. In total, the second edition includes 61 training scenarios. These trainingscenarios were aimed to be a way of gaining skills by doing the tasks instead ofreading about them only. Most of these tasks can be implemented using the currently available commercial network simulator.This edition is divided into nine chapters: basic configuration, domestic duties,routing, advanced routing, WAN technologies, security, router management,remote connectivity, and tips. Each chapter explains in detail the steps required tovwww.hellodigi.ir
viPrefaceconfigure different protocols on Cisco router and explains when would you need toinvoke this procedure.Intended Audience of the Guide: field network engineers engaging Cisco routersstudents working on Cisco routers in their laboratorieslaboratory instructorsCisco certification seekersCisco networking academy studentseveryone working with or wanting to learn about Cisco router configurationHow to Use this Guide:To make guide easier to use, different parts of the text were formatted differently.The meanings of these formats: courier new font is used for output of the router courier new bold font is used for commands input to the router courier new italic font is used for commands parameters that the readerhave to choose. [ ] square brackets are used for optional commands.Finally, I would like to express my sincere gratitude to my editors WayneWheeler and Simon Rees for making this project possible again. I would also like toextend my thanks to the readers of the first edition for their feedback thatencouraged me to write the second expanded edition.Abu Dhabi, United Arab EmiratesDecember 2016www.hellodigi.irMohammed M. Alani
3 Routing Protocols Configuration . . . . . . . . . . . . . . . . . . . . . . . . . . . . .3.1 Static Routing . . . . . . . . . . . . . . . . . . . . . . . . . . . . . . . . . . . . . . .3.1.1 How to Configure Static Routing in Cisco Routers . . . . .4141411 Starting Up a Cisco Router . . . . . . . . . . . . . .1.1 Connecting the Router . . . . . . . . . . . . . .1.2 Basic Configuration . . . . . . . . . . . . . . . .1.3 Interfaces Configuration . . . . . . . . . . . . .1.3.1 Configuring IPv4 Addresses . . . .1.3.2 Configuring IPv6 Addresses . . . .1.3.3 Other Interface Settings . . . . . . .1.4 Additional Basic Configuration . . . . . . .1.5 Training Scenarios . . . . . . . . . . . . . . . . .2 Domestic Router Functions Configuration . . . . . . . . . . . . . . . . . . .2.1 How to Configure a Cisco Router as a DHCP Client. . . . . . . .2.2 How to Configure a Cisco Router as a DHCP Server . . . . . . .2.3 How to Configure a Cisco Router as a DHCP Serverfor IPv6 . . . . . . . . . . . . . . . . . . . . . . . . . . . . . . . . . . . . . . . . . .2.4 How to Configure DHCP Relay in Cisco Router . . . . . . . . . . .2.4.1 IPv4 . . . . . . . . . . . . . . . . . . . . . . . . . . . . . . . . . . . . . . .2.4.2 IPv6 . . . . . . . . . . . . . . . . . . . . . . . . . . . . . . . . . . . . . . .2.5 How to Configure NAT and PAT on a Cisco Router . . . . . . .2.5.1 Static NAT Configuration . . . . . . . . . . . . . . . . . . . . . . .2.5.2 Dynamic NAT Configuration . . . . . . . . . . . . . . . . . . . .2.5.3 Troubleshooting Commands . . . . . . . . . . . . . . . . . . . . .2.5.4 Disabling NAT . . . . . . . . . . . . . . . . . . . . . . . . . . . . . . .2.5.5 NAT-PT Configuration for IPv6 . . . . . . . . . . . . . . . . . .2.6 How to Configure Inter-VLAN Routing on a Cisco Router . . .2.7 Training Scenarios . . . . . . . . . . . . . . . . . . . . . . . . . . . . . . . . . .viiwww.hellodigi.ir
viiiContents.42434546.464849505152.53.54565759604 Advanced Routing Protocols Configuration . . . . . . . . . . . . . . . . . .4.1 How to Configure Multiple-Area OSPF on a Cisco Router . . .4.1.1 Configuration of Area 0 ABR . . . . . . . . . . . . . . . . . . .4.1.2 Configuration of Area X ABR . . . . . . . . . . . . . . . . . . .4.1.3 Other Commands . . . . . . . . . . . . . . . . . . . . . . . . . . . . .4.1.4 More About Multiple-Area OSPF Configuration . . . . .4.2 How to Configure Integrated IS–IS on a Cisco Router . . . . . .4.3 How to Configure Load Balancing on a Cisco Router . . . . . . .4.4 Per-Packet and Per-Destination Load Balancing . . . . . . . . . . . .4.5 How to Configure BGP on a Cisco Router . . . . . . . . . . . . . . .4.5.1 About BGP and IGP Synchronization . . . . . . . . . . . . .4.6 How to Configure BGP for IPv6 on a Cisco Router . . . . . . . .4.7 How to Configure MPLS on a Cisco Router . . . . . . . . . . . . . .4.7.1 Configuring the Router for MPLS Switching . . . . . . . .4.7.2 Configuring the Router for MPLS Forwarding . . . . . . .4.8 Training Scenarios . . . . . . . . . . . . . . . . . . . . . . . . . . . . . . . . . .838384858686888990919292949494955 .63.1.2 How to Configure Default Routes in Cisco Routers . . .3.1.3 Administrative Distance of Static Routes . . . . . . . . . . .3.1.4 How to Configure IP Multicast in Cisco Routers . . . . .Dynamic Routing . . . . . . . . . . . . . . . . . . . . . . . . . . . . . . . . . . .3.2.1 How to Configure RIPv1 and RIPv2 in CiscoRouters . . . . . . . . . . . . . . . . . . . . . . . . . . . . . . . . . . . . .3.2.2 How to Configure RIPng for IPv6 . . . . . . . . . . . . . . . .3.2.3 How to Configure EIGRP on a Cisco Router . . . . . . . .3.2.4 How to Configure EIGRP Metrics on a Cisco Router .3.2.5 How to Configure EIGRP for IPv6 on a Cisco Router .3.2.6 EIGRP Implementation Notes . . . . . . . . . . . . . . . . . . . .3.2.7 How to Configure Single-Area OSPF on a CiscoRouter. . . . . . . . . . . . . . . . . . . . . . . . . . . . . . . . . . . . . .3.2.8 How to Configure Single-Area OSPFv3 for IPv6on a Cisco Router . . . . . . . . . . . . . . . . . . . . . . . . . . . . .How to Configure HSRP on a Cisco Router . . . . . . . . . . . . . .How to Configure GLBP on a Cisco Router . . . . . . . . . . . . . .How to Configure VRRP on a Cisco Router . . . . . . . . . . . . . .Training Scenarios . . . . . . . . . . . . . . . . . . . . . . . . . . . . . . . . . .Technologies . . . . . . . . . . . . . . . . . . . . . . . . . . . . .How to Configure ADSL on a Cisco Router . . . . .How to Configure PPP on a Cisco Router . . . . . . .How to Configure HDLC on a Cisco Router . . . . .How to Configure BRI ISDN in a Cisco Router . .How to Configure ISDN Dialer Profiles in a Ciscowww.hellodigi.ir.Router .
Contents5.6ix.122.1221231251261281281306 Security Configuration . . . . . . . . . . . . . . . . . . . . . . . . . . . . . . . . . . .6.1 How to Secure Passwords on a Cisco Router . . . . . . . . . . . . .6.2 How to Configure Access-Control Lists on a Cisco Router . . .6.2.1 Standard Access-List Configuration for IPv4 . . . . . . . .6.2.2 Extended Access-List Configuration for IPv4 . . . . . . . .6.2.3 Removing Access-Lists . . . . . . . . . . . . . . . . . . . . . . . .6.3 How to Configure Advanced Access-Control Listson a Cisco Router . . . . . . . . . . . . . . . . . . . . . . . . . . . . . . . . . .6.3.1 Named Access-Lists . . . . . . . . . . . . . . . . . . . . . . . . . . .6.3.2 About Named Access-Lists. . . . . . . . . . . . . . . . . . . . . .6.3.3 Access-Lists for IPv6 . . . . . . . . . . . . . . . . . . . . . . . . . .6.3.4 Reflexive Access-Lists . . . . . . . . . . . . . . . . . . . . . . . . .6.3.5 Time-Based Access-Lists . . . . . . . . . . . . . . . . . . . . . . .6.4 How to Configure Routing Protocols Authenticationon a Cisco Router . . . . . . . . . . . . . . . . . . . . . . . . . . . . . . . . . .6.4.1 Configuring EIGRP Route Authentication . . . . . . . . . .6.4.2 Configuring EIGRP Route Authentication for IPv6 . . .6.4.3 Configuring BGP Peer Authentication . . . . . . . . . . . . .6.5 How to Configure Site-to-Site VPN in Cisco Routers . . . . . . .6.6 How to Configure a Cisco Router as a PPTP VPN Server . . . .6.7 How to Configure GRE Tunneling in a Cisco Router . . . . . . .6.7.1 GRE Configuration with no Encryption . . . . . . . . . . . .6.7.2 GRE Point-to-Point Configuration Over IPSec . . . . . . .6.8 How to Configure AAA Service on a Cisco Router . . . . . . . . .6.8.1 RADIUS Configuration . . . . . . . . . . . . . . . . . . . . . . . .6.8.2 TACACS Configuration . . . . . . . . . . . . . . . . . . . . . . .6.9 Training Scenarios . . . . . . . . . . . . . . . . . . . . . . . . . . . . . . . . . 41541561581581601621631631647 Cisco7.17.27.3.183183184.1861865.75.8How to Configure Frame-Relay in a Cisco Router . . . . . . . . . .5.6.1 Point-to-Point Connection of Two SitesUsing Physical Interfaces . . . . . . . . . . . . . . . . . . . . . . .5.6.2 Point-to-Multipoint Using Physical Interfaces . . . . . . . .5.6.3 Point-to-Multipoint Using Logical Interfaces . . . . . . . .5.6.4 Multiple Point-to-Point Using Logical Interfaces . . . . .5.6.5 Frame-Relay and Routing Issues . . . . . . . . . . . . . . . . .How to Configure a Cisco Router as a Frame-Relay Switch . .Training Scenarios . . . . . . . . . . . . . . . . . . . . . . . . . . . . . . . . . .Router Management . . . . . . . . . . . . . . . . . . . . . . . . . . . . . . . .Hints and Tips Before Upgrading the IOS of a Cisco Router .Understanding the IOS File Name Convention . . . . . . . . . . . .How to Back up and Restore the Configurationof a Cisco Router . . . . . . . . . . . . . . . . . . . . . . . . . . . . . . . . . . .7.3.1 TFTP . . . . . . . . . . . . . . . . . . . . . . . . . . . . . . . . . . . . . .www.hellodigi.ir
xContents7.3.2 FTP . . . . . . . . . . . . . . . . . . . . . . . . . . . . . . . . . . . . . . .7.3.3 HyperTerminal . . . . . . . . . . . . . . . . . . . . . . . . . . . . . . .7.4 How to Back up an IOS File from a Cisco Router . . . . . . . . .7.5 How to Upgrade IOS on a Cisco Router . . . . . . . . . . . . . . . . .7.5.1 Upgrade Procedure for Cisco Routerswith Internal Flash . . . . . . . . . . . . . . . . . . . . . . . . . . . .7.5.2 Upgrade Procedure for Cisco Routerswith PCMCIA Flash . . . . . . . . . . . . . . . . . . . . . . . . . . .7.6 How to Upgrade IOS of a Cisco RouterUsing HyperTerminal . . . . . . . . . . . . . . . . . . . . . . . . . . . . . . . .7.7 How to Upgrade or Install IOS on Cisco RouterUsing rommon Mode . . . . . . . . . . . . . . . . . . . . . . . . . . . . . . . .7.8 How to Copy IOS from One Cisco Router to Another . . . . . .7.9 How to Partition Internal Flash Memory of a Cisco Router . . .7.10 Training Scenarios . . . . . . . . . . . . . . . . . . . . . . . . . . . . . . . . . .187187188190.190.193.195.1961992002018 Remote Connectivity to Cisco Router . . . . . . . . . . . . . . . . . . . . . . .8.1 How to Configure SSH on a Cisco Router. . . . . . . . . . . . . . . .8.2 How to Secure Remote Access Sessions with Password Only .8.2.1 Telnet . . . . . . . . . . . . . . . . . . . . . . . . . . . . . . . . . . . . . .8.2.2 SSH . . . . . . . . . . . . . . . . . . . . . . . . . . . . . . . . . . . . . . .8.3 How to Secure Remote Access Sessions with Usernameand Password . . . . . . . . . . . . . . . . . . . . . . . . . . . . . . . . . . . . . .8.3.1 Telnet . . . . . . . . . . . . . . . . . . . . . . . . . . . . . . . . . . . . . .8.3.2 SSH . . . . . . . . . . . . . . . . . . . . . . . . . . . . . . . . . . . . . . .8.3.3 Console . . . . . . . . . . . . . . . . . . . . . . . . . . . . . . . . . . . .8.4 How to Secure Telnet Sessions Using Access-Listson a Cisco Router . . . . . . . . . . . . . . . . . . . . . . . . . . . . . . . . . .8.5 Training Scenarios . . . . . . . . . . . . . . . . . . . . . . . . . . . . . . . . . .207207208208209.209209210210.2112129 Hints and Tips . . . . . . . . . . . . . . . . . . . . . . . . . . . . . . . . . . . . . . . . .9.1 Top 10 Tips for Cisco Routers Configuration . . . . . . . . . . . . .9.2 Ten Show Commands Everybody Needs to Knowin Cisco Routers . . . . . . . . . . . . . . . . . . . . . . . . . . . . . . . . . . .9.3 How to Simulate Break Key Sequence in a Cisco Router . . . .9.4 How to Recover Cisco 2600 Routers Password . . . . . . . . . . . .9.5 How to Recover Cisco 2500 Routers Password . . . . . . . . . . . .9.6 How to Disable ROMMON Password Recoveryin a Cisco Router . . . . . . . . . . . . . . . . . . . . . . . . . . . . . . . . . . .9.7 How to Use a Cisco Router as a Packet Sniffer . . . . . . . . . . . .9.8 Training Scenarios . . . . . . . . . . . . . . . . . . . . . . . . . . . . . . . . . .219219.222223225226.227228229Further Guidance . . . . . . . . . . . . . . . . . . . . . . . . . . . . . . . . . . . . . . . . . . . .233www.hellodigi.ir
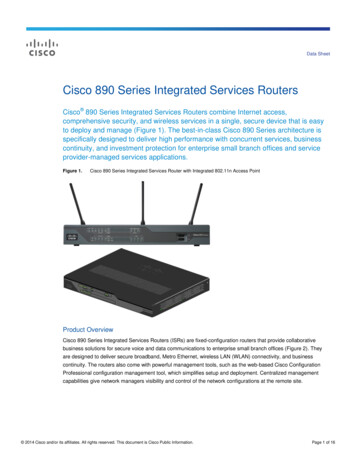
Chapter 1Starting Up a Cisco RouterKeywords Cisco1.1 Router Console Basic configuration IPv4 IPv6Connecting the RouterIn order to configure the Cisco router to perform the network operation desired, thefirst thing to do is to connect the router through console connection. This connection is used to configure the router and it does not carry user data.Most routers come with console cable that has one DB-9 end and the other end isRJ-45 connecter. These connectors can be seen in Fig. 1.1. The cable is usually aslim ribbon that looks different from the regular LAN twisted pair cables.Leave the router off and connect the RJ-45 end of the cable to the port of therouter labelled console. The other end, the DB-9 one, should be connected to thecomputer serial port. Most of the modern laptops do not have the legacy DB-9 serialport. Instead of the DB-9 serial port, a USB port can be used. This would requirethe use of a USB-to-DB9 adapter.Some older routers come with console cables that have RJ-45 connectors in bothof their ends. These cables come with RJ-45-to-DB9 adapters.After connecting the console cable to the computer, using the DB-9 connecter orthe USB, software for terminal emulation is required.The first choice is HyperTerminal if you are using Windows XP. If you are usingWindows Vista or Windows 7, there are several free alternatives such as PuTTY orTera Term. If you are using Linux, you can use MiniCom or CuteCom.For Mac, you can use MiniCom and ZTerm.The basic settings that need to be done in the terminal emulation software are thefollowing:1.2.3.4.5.Bits per sec: 9600Data bits: 8Parity: noneStop bits: 1Flow control: none Springer International Publishing AG 2017M.M. Alani, Guide to Cisco Routers Configuration,DOI 10.1007/978-3-319-54630-8 1www.hellodigi.ir1
21 Starting Up a Cisco RouterFig. 1.1 Console cableAfter connecting the cable and configuring the settings on the terminal emulationsoftware, turn the router power on.The screen should show the router boot-up process and information such as theIOS version, amount of memory available, and types of interfaces.Eventually, you will end up at the user EXEC mode with the prompt‘Router ’.If the router was configured before and it has console password configured in it,you will be asked to input the password before getting to the user EXEC mode.1.2Basic ConfigurationBasic configuration is simply what you need to configure on a router coming out ofthe box or surviving a configuration erase. Think of it as saying ‘Hi’ to the router.The following steps are what we refer to as the basic router configuration:1. Go to the global configuration mode and give the router a hostname:Router enableRouter#configure terminalRouter(config)#hostname new-hostnameThis would change the hostname of the router from ‘Router’ to new-hostname. Keep in mind that this name follows the old file name rules (it should startwith a letter, and should not contain spaces or symbols).2. Set up enable/secret password:Router(config)#enable password your-passwordOrRouter(config)#enable secret your-passwordwww.hellodigi.ir
1.2 Basic Configuration3.4.5.6.3This password will be required when you type ‘enable’ to go from user EXECmode to privilege mode.The first one saves the password in plain text, while the second one saves thepassword in encrypted format.The first one is almost obsolete. It is more secure to use the second one.Remember that only one of them is required. If you set them both, the secretpassword would prevail.Set up console password:Router(config)#line console 0Router(config-line)#password console-passwordRouter(config-line)#loginThis password will be required when a console connection is made. It is the firstpassword that an administrator will be asked for before entering any mode.To prevent the router status messages from interrupting your writing, use thefollowing command in the console line configuration mode:Router(config-line)#logging synchronousIf you plan to use Telnet, set up the Telnet password. If you do not intend to useTelnet in the near future, do not set it up.Router(config)#line vty 0 4Router(config-line)#password telnet-passwordRouter(config-line)#loginIn some routers, vty 0 15 is used instead of vty 0 4, depending on the number ofsimultaneous Telnet sessions you want to allow. If you need only one, just write‘line vty 0’.Save the configuration from the RAM to the NVRAM.Router#copy running-configuration startup-configurationOrRouter#copy run start1.3Interfaces ConfigurationBefore we dive into the interfaces settings, we need to understand the differencebetween an Interface and a Line. In the simplest distinction, interfaces are designedto carry user and routing data while lines are used for configuration purposes.1.3.1Configuring IPv4 Addresses1. Assign IPv4 addresses to interfaces you plan to ww.hellodigi.irinterface-
41 Starting Up a Cisco resssubnetmaskwhere,interface-type is the interface type such as ethernet, FastEthernet, or serial.interface-number is the interface number like 0, 0/0, or 0/1/0.interface-ip-address is the IPv4 address you want to assign to this interface.subnetmask is the subnet mask of the network this interface is connected to.2. By default, all router interfaces are shutdown. To turn on an interface, use thefollowing command in the interface configuration mode:Router(config-if)#no shutdown3. Repeat steps 1 and 2 for each interface you need.1.3.2Configuring IPv6 Addresses1. Assign IPv4 addresses to interfaces you plan to /prefixlengthwhere,interface-type is the interface type such as ethernet, FastEthernet, or serial.interface-number is the interface number like 0, 0/0, or 0/1/0.Ipv6-address is the IPv6 address you want to assign to this interface.Prefix-length is the IPv6 prefix length of the network this interface is connectedto.You can use the following parameters for special settings:a. Router(config-if)#ipv6 address ipv6-address/prefixlength eui-64The EUI-64 parameter is used to tell the router to complete the rest of theIPv6 address using the EUI-64 rules. In this case, you need to give only theprefix instead of the ipv6-address.b. Router(config-if)#ipv6 address ipv6-address/prefixlength link-localwww.hellodigi.ir
1.3 Interfaces Configuration5If you use the link-local parameter, the router will take the IPv6 addressgiven in the command instead of the automatically generated link-local IPv6address.c. Router(config-if)#ipv6 address ipv6-address/prefixlength anycastAnycast parameter can be used to configure IPv6 anycast addresses.2. Enable IPv6 on the interface:Router(config-if)#ipv6 enable3. By default, all router interfaces are shutdown. To turn on an interface, use thefollowing command in the interface configuration mode:Router(config-if)#no shutdown4. Repeat steps 1, 2, and 3 for each interface you need.1.3.3Other Interface Settings1. It is a very good practice to add interface descriptions. These descriptions aresimilar to remarks put into code of a program. It does not affect the operation ofthe interface in any way, but it gives information to the administrator viewingthe configuration. This command should be written inside the interface configuration mode.Router(config-if)#description Write Your Own DescriptionThis description can be used in many useful ways such as writing the networkname to which this interface is connected to, or writing the name of the otherend of this link.2. Configure bandwidth value on interfaces connected to other networks. Thebandwidth value set in the following command does not affect the actualbandwidth of the link. It only changes the value of bandwidth used in best routecalculation in dynamic routing protocols.Router(config-if)#bandwidth interface-bandwidthwhere interface-bandwidth is a number representing the bandwidth of the link inkilobits per second.It is highly advised that you set up the bandwidth of serial interfaces and evenEthernet interfaces when they are connected to other networks. If the interface isconnected to a host or a group of hosts, this configuration is not necessary.www.hellodigi.ir
61 Starting Up a Cisco Router3. Setting the connection speed and duplex type in Ethernet, Fast Ethernet, andGigabit Ethernet links is useful in some cases. By default, all interfacesauto-negotiate the speed and duplex settings. Sometimes, this negotiation doesnot accomplish the desired settings.Router(config-if)#duplex duplex-modeRouter(config-if)#speed port-speedwhere,duplex-mode is the duplex mode of operation which can be auto, half, orfull.port-speed is the speed of data transmission on port in megabits per secondwhich can be 10, 100, 1000, or auto.1.4Additional Basic ConfigurationThere are few other configurations that are useful but not necessary for the networkto operate:1. Setting a banner to be shown whenever someone tries to logon to the routerconfiguration:Router(config)#banner motd #Your Message Here#2. Encrypt the passwords such that they become non-comprehendible to anyoneviewing them in the running-configuration.Secret password is already encrypted. All other passwords (vty, console, andauxiliary) are not. The command to encrypt them is as follows:Router(config)#service password-encryptionThere are two recommended methods to use this command. Because it is aservice, it is not advised to keep it running all the time because it wouldconsume processing power and memory. Thus, it can be used and turned off andthe passwords will remain encrypted. One way to do this is to turn this command before setting up any passwords and turning it off after finishing thepassword set up commands using the following command:Router(config)#no service password-encryptionThe second way to do it is after finishing the set up of all passwords, turn onpassword encryption, issue a ‘show running-config’ at the privilege mode,and then turn the password encryption off.www.hellodigi.ir
1.4 Additional Basic Configuration7The encryption used here is very weak. The only purpose of it is to preventpeople looking at the configuration from knowing the password.1.5Training ScenariosScenario 1.1Connect the network shown in the diagram above using a console connection tolink PC A and Router 1 and a straight LAN cable to link the switch (port 1/1) to therouter (interface FE0/0). Use the configuration parameters shown in the table belowto do basic configuration on the router.DeviceParameterValueRouter 1HostnameConsole PasswordSecret PasswordVTY PasswordInterface FE0/0 IP 5.255.255.0www.hellodigi.ir
81 Starting Up a Cisco RouterScenario 1.2Connect the network shown in the figure above. Router 2 and Computer B arealready configured with the following settings:DeviceParameterValueRouter 2HostnameConsole PasswordSecret PasswordVTY PasswordInterface FE0/0 IP AddressInterface FE0/1 IP AddressEthernet 255.255.0Computer BMake the console connection to Router 1 and do the following configurationsteps:1. Set up the FE0/0 interface with IP address 172.16.0.1 and subnet mask255.255.255.0.2. Set up the VTY Password to be MyCiscoVtY.Now, move over to Computer B and set up a Telnet session to Router 1 using theIP address 172.16.0.1. In this Telnet session, do the following settings on Router 1:www.hellodigi.ir
1.5 Training Scenarios9DeviceParameterValueRouter 1HostnameConsole PasswordSecret PasswordInterface FE0/1 IP 55.0Scenario 1.3Connect the network shown in the diagram above using a console connection tolink PC A and Router 1 and a straight LAN cable to link the switch (port 1/1) to therouter (interface FE0/0). Use the configuration parameters shown in the table belowto do basic configuration on the router. Do not forget to enable IPv6 on theinterface.DeviceParameterValueRouter 1HostnameConsole PasswordSecret PasswordVTY PasswordInterface FE0/0 IPv6 /64www.hellodigi.ir
Chapter 2Domestic Router Functions ConfigurationKeywords Ciscorouting2.1 Router DHCP DHCP server NAT PAT Inter-VLANHow to Configure a Cisco Router as a DHCP ClientWhen would you need this: When your ISP gives you a dynamic IP address uponeach connection or you need to configure the router to obtain its interface IP addressautomatically.Special Requirements: None.This is done using a single command:Router(config-if)#ip address dhcpSome service providers might ask you to use a client-id and/or a hostname oftheir own choice. This can be done by adding the following parameters to thecommand above:Router(config-if)#ip address dhcp client-id interfacename hostname hostnamewhereinterface-name is the interface name that will be used for the client-id andhostname is the hostname that will be used for the DHCP binding.This hostname can be different from the one that was set for the router in theglobal configuration. You can use both of these parameters, one of them, or noneof them.If you need, use the ‘ip nat outsi
3.4 How to Configure GLBP on a Cisco Router.57 3.5 How to Configure VRRP on a Cisco Router.59 3.6 Training Scenarios . 4.3 How to Configure Load Balancing on a Cisco Router. 89 4.4 Per-Packet and Per-Destination Load Balancing.90 4.5 How to Configure BGP on a Cisco Router .