Transcription
ATI Radeon HD 2900 SeriesUser’s GuideP/N 137-41328-20
ii 2007 Advanced Micro Devices, Inc. All rights reserved.The contents of this document are provided in connection with Advanced Micro Devices, Inc. (“AMD”)products. AMD makes no representations or warranties with respect to the accuracy or completenessof the contents of this publication and reserves the right to make changes to specifications and productdescriptions at any time without notice. No license, whether express, implied, arising by estoppel orotherwise, to any intellectual property rights is granted by this publication. Except as set forth in AMD’sStandard Terms and Conditions of Sale, AMD assumes no liability whatsoever, and disclaims anyexpress or implied warranty, relating to its products including, but not limited to, the implied warranty ofmerchantability, fitness for a particular purpose, or infringement of any intellectual property right.AMD’s products are not designed, intended, authorized or warranted for use as components in systemsintended for surgical implant into the body, or in other applications intended to support or sustain life, orin any other application in which the failure of AMD’s product could create a situation where personalinjury, death, or severe property or environmental damage may occur. AMD reserves the right todiscontinue or make changes to its products at any time without notice.Reproduction of this manual, or parts thereof, in any form, without the express written permission ofAdvanced Micro Devices, Inc. is strictly prohibited.TrademarksAMD, the AMD Arrow logo, AMD Athlon, AMD Opteron and combinations therof, AMD-XXXX, ATI andATI product and product-feature names are trademarks of Advanced Micro Devices, Inc.Microsoft is a registered trademark of Microsoft Corporation.Other product names used in this publication are for identification purposes only and may betrademarks of their respective companies.DisclaimerWhile every precaution has been taken in the preparation of this document, Advanced Micro Devices,Inc. assumes no liability with respect to the operation or use of AMD hardware, software or otherproducts and documentation described herein, for any act or omission of AMD concerning suchproducts or this documentation, for any interruption of service, loss or interruption of business, loss ofanticipatory profits, or for punitive, incidental or consequential damages in connection with thefurnishing, performance, or use of the AMD hardware, software, or other products and documentationprovided herein.Advanced Micro Devices, Inc. reserves the right to make changes without further notice to a product orsystem described herein to improve reliability, function or design. With respect to AMD products whichthis document relates, AMD disclaims all express or implied warranties regarding such products,including but not limited to, the implied warranties of merchantability, fitness for a particular purpose,and non-infringement.MacrovisionApparatus Claims of U.S. Patent Nos. 4,631,603; 4,819,098; 4,907,093; 5,315,448; and 6,516,132.Licensed for limited viewing uses only.This product incorporates copyright protection technology that is protected by US patents and otherintellectual property rights. Use of this copyright protection technology must be authorized byMacrovision, and is intended for home and other limited viewing uses only unless otherwise authorizedby Macrovision. Reverse engineering or disassembly is prohibited.Documentation UpdatesAMD is constantly improving its product and associated documentation. To maximize the value of yourAMD product, you should ensure that you have the latest documentation. AMD’s documentationcontains helpful installation/configuration tips and other valuable feature information.
iiiImportant Safety Instructions Read Instructions—All the safety and operating instructions should be readbefore the product is operated.Retain Instructions—The safety and operating instructions should be retainedfor future reference.Heed Warnings—All warnings on the product and the operating instructionsshould be adhered to.Compatibility—This option card is for use only with IBM AT or compatible ULListed personal computers that have Installation Instructions detailing userinstallation of card cage accessories.Grounding—For continued protection against risk of electric shock and fire, thisaccessory should be installed only in products equipped with a three-wiregrounding plug, a plug having a third (grounding) pin. This plug will only fit into agrounding-type power outlet. This is a safety feature. If you are unable to insertthe plug into the outlet, contact your electrician to replace the obsolete outlet. Donot defeat the safety purpose of the grounding-type plug.Secure Attachment—All card securement pins shall be completely tightened asto provide continuous bonding between the option card and the PC chassis.Lightning—For added protection for this product during a lightning storm, orwhen it is left unattended and unused for long periods of time, unplug it from thewall outlet, and disconnect the antenna or cable system. This will preventdamage to the product due to lightning and power-line surges.Power Lines—An outside antenna system should not be located in the vicinity ofoverhead power lines or other light or power circuits, or where it can fall into suchpower lines or circuits.Note: This graphics card is for use only with compatible UL Listedpersonal computers that have installation instructions detailing userinstallation of card cage accessories.
iv
vTable of ContentsIntroduction . . . . . . . . . . . . . . . . . . . . . . . . . . . . . . . 1System Requirements1Installing the Graphics Card . . . . . . . . . . . . . . . . . 3Before You BeginRecord the Serial and Part NumbersUninstall Old Graphics DriversInstall the Graphics Card3345Installing and Configuring Displays . . . . . . . . . . . 9ConnectionsAdaptersSupported Display ConfigurationsInstalling and Configuring Displays991011Installing Software and Drivers . . . . . . . . . . . . . . 13ATI Catalyst Control Center . . . . . . . . . . . . . . . 15Help16Using TV Display and Capture Features . . . . . . . 17Viewing the PC’s Display on TV or HDTVConnecting to a TV, VCR, or HDTVCapturing VideoConnecting a media device for video captureAvivo Video Converter1718293132CrossFire . . . . . . . . . . . . . . . . . . . . . . . . . . . . . . 37CrossFire RequirementsInstall CrossFire Graphics CardsEnabling CrossFire 373742
viReference . . . . . . . . . . . . . . . . . . . . . . . . . . . . . . . . 45TroubleshootingDetermine the System Card Bus TypeUpdating your AGP Motherboard/Chipset DriversReinstalling DriversProduct RegistrationCustomer CareAdditional AccessoriesCompliance Information4548495152525354Index . . . . . . . . . . . . . . . . . . . . . . . . . . . . . . . . . . . . 57
1IntroductionThis guide will help you get your hardware and software installed. Use theATI Catalyst Control Center to access the comprehensive help system,generate a problem report, and get the software version information.System RequirementsHardware CrossFire RequirementsAMD Athlon or Intel Pentium 4512MB of system memory; 1GB or more for bestperformance.Optical drive for installation software (CD-ROM orDVD-ROM drive).A 550 Watt or better power supply with two 2 3-pinPCIe power connectors. For optimal performanceand flexibility for CrossFire and ATI Overdrive support,we recommend a 750W power supply with both 2x3-pinand 2 4-pin PCIe power connectors. For a list ofcertified power supplies, seeati.amd.com/certifiedpsuTo implement an CrossFire configuration using the ATIRadeon HD 2900 Series, requires: An CrossFire certified motherboard with two (2) PCIExpress x16 slots and correct PCIe chipset driver. A second ATI Radeon HD 2900 Series graphicscard. Two CrossFire internal bridge interconnects. A specialized PCI Express 750 watt or greater powersupply with one 2 4-pin and one 2 3-pin PCIe powerconnector is required. Consult your computer systemmanual to ensure the power supply is designed toaccommodate a high-end graphics card with a peakdissipation above 150 watts.For an up-to-date listing of CrossFire certifiedmotherboards, see ati.amd.com/products/certificationFor an up-to-date listing of certified power supplies, see: ati.amd.com/certifiedpsu
2
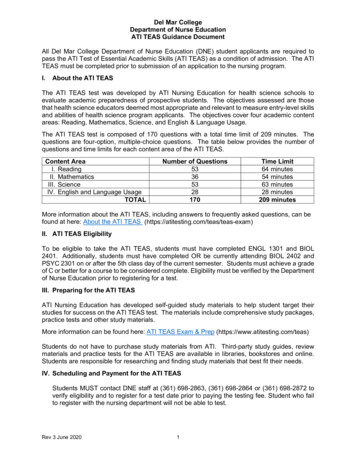
3Installing the Graphics CardThis topic guides you through the installation of the graphics card.Before You BeginBefore you begin installing the graphics card, do the following. Record the Serial and Part Numbers on page 3. Uninstall Old Graphics Drivers on page 4.When you have completed the above procedures, do the following:Install the Graphics Card on page 5.Record the Serial and Part NumbersTo register the graphics card, you need the serial number and part numberprinted on the graphics card.1Look for the serial number and part number on the graphics card.Note: They are usually located on a sticker on the back of the card,and are shown in boldface and underlined in the illustration thatfollows.Sample serial number and part number arrangement2Write down these numbers before installing the graphics card.
4Uninstall Old Graphics DriversTo ensure successful installation of the graphics card driver, uninstall thegraphic drivers for the existing graphics card before removing the graphicscard from the computer.Depending on the operating system, choose either the Windows XP orWindows Vista uninstall procedure: Uninstall old graphics drivers (Windows XP) on page 4. Uninstall old graphics drivers (Windows Vista ) on page 4.Uninstall old graphics drivers (Windows XP)1With the current graphics card still in the computer, close all openapplications.2From the Control Panel, select Add/Remove Programs.3Select the current graphics card drivers, and then click Add/Remove.The Wizard helps remove the current display drivers.Note: If the previously installed graphics card has any additionalsoftware installed, it may also be removed at this point. For example,DVD player or multimedia applications.4Turn off the system after removing the drivers.Uninstall old graphics drivers (Windows Vista )1With the current graphics card still in the computer, close all openapplications.2From Control Panel, double-click Programs and Features, andthen select the graphics card driver from the list of software programs.3Click Uninstall.4If the Programs and Features uninstall confirmation dialogappears, click Yes.Note: If the previously installed graphics card has any additionalsoftware installed, it may also be removed at this point. For example,DVD player or multimedia applications.5Turn off the system after removing the drivers.
5Install the Graphics Card1Make sure the computer, monitor, and other peripheral devices areoff.2Unplug the computer power cord and disconnect cables from the backof the computer.Caution! To avoid possible damage to the motherboard, waitapproximately 20 seconds after unplugging the power cord beforedisconnecting a peripheral or removing a component from themotherboard.3Remove the computer cover.If necessary, consult the computer manual for help removing thecover.Caution! To avoid possible damage to the computer components,discharge your body’s static electricity by touching the power supplycase or the metal surface of the computer chassis.4Remove any existing graphics cards from the computer.Warning! Some graphics cards can get hot whileoperating. Wait about five minutes after turning off thecomputer before touching the card.5Locate the appropriate slot for the graphics card and, if necessary,remove the metal back-plate cover.Note: High-performance graphics cards require good airflow toprevent overheating. Ensure adequate airflow around the card.6Align the graphics card with the slot and press it in firmly until thecard is fully seated.7Fasten the graphics card securely.
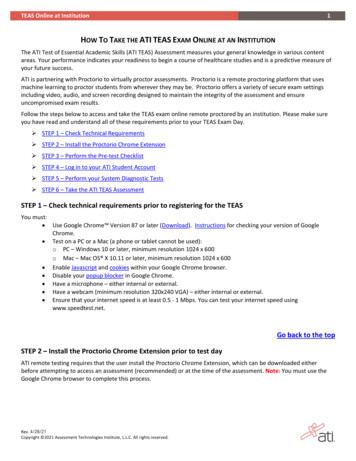
6Connect the power connectors8Locate the power connections on the graphics card as shown in thefollowing illustration.Power connectors for the graphics cardLegend912 3-pin 2 4-pin power connectors.22 3-pin 2 3-pin power connectors.Connect either two 2 3-pin PCIe power connectors, or one 2 3-pinand one 2 4-pin PCIe power connector to the graphics card.When connecting a 2 3-pin PCIe power connector to the 2 4-pinconnection, the connector should cover the 6 pins of the 2 4-pinconnection that are farthest away from the 2 3-pin connection on thegraphics card.Note: For optimal performance, and for ATI Overdrive, Overclock,and CrossFire configurations, use one 2 3-pin and one 2 4-pinPCIe power connectors on a 750 watt or better power supply. For
7more information, see Force Full Performance in the ATICatalyst Control Center.Note: The computer will beep, possibly show a warning message onyour display, and the boot process will stop if the graphics card is notcorrectly connected to the power supply.10 Make sure the cables are not interfering with anything inside thecomputer (for example, a cooling fan) and then replace the computercover.11 Reconnect any cables you have disconnected, connect the monitor,and then plug in the computer and monitors power cords.12 Turn on the monitor and then the computer.Note: For information on connecting monitors, see Installing andConfiguring Displays on page 9.Note: For troubleshooting information, see Reference on page 45.Note: If you are installing a CrossFire configuration, seeCrossFire on page 37.
8
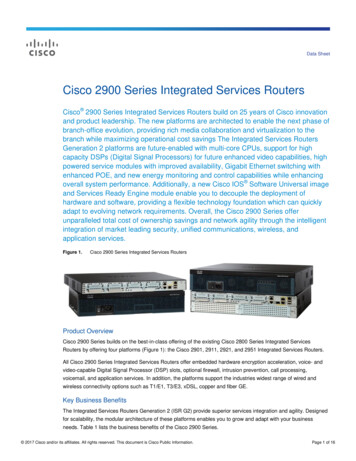
9Installing and Configuring DisplaysConnectionsThe following illustrates the connections on the ATI Radeon HD 2900Series graphics card.ATI Radeon HD 2900 Series ConnectionsLegend1DVI-I Dual Link connection2S-Video connection (Video In/Video Out)3DVI-I Dual Link connection (Provides audio and video digitalsignals. It provides HDMI output that is compatible with mostHDMI devices.)AdaptersThe following illustrates and describes the adapters you can use to connectthe graphics card to other display devices.DVI-to-VGA Adapter
10ATI DVI to HDMI AdapterThe HDMI adapter is a proprietary adaptermanufactured and sold by AMD approvedmanufacturers (like Wieson Technologies Co., Ltd.)that has a specific detection mechanism to allowproperly configured graphics cards to pass HDMI signals through a DVI connection to an HDMI compliant device.DVI-to-HDTV AdapterATI 9-Pin Cable for Video Input/Video Output)9-pin HDTV Output CableSupported Display ConfigurationsTo ensure the highest possible performance, only one display device issupported when CrossFire is active. When CrossFire is active otherdisplay devices connected to the other DVI connections on both graphicscards are rendered inactive.If additional displays are required when CrossFire is active, use eitherSurroundView (for more information see the SurroundView manual)or an additional PCIe graphics card.The ATI Radeon HD 2900 Series graphics card provides hardwaresupport for DVI-I and VGA monitors (using the supplied DVI-to-VGAadapter) and HDMI DTVs (using a DVI-to-HDMI adapter). It alsoprovides TV output via the S-Video VIVO connection in composite, SVideo, and component TV formats.
11The following table shows display configurations available whenCrossFire is not enabled.DisplayConnectionsCathode raytube analogdisplay DVI-I connection and DVI-I-to-VGA adapter and VGAcableLCD display DVI-I connection and DVI cableDVI-I connection and DVI-I-to-VGA adapter and VGAcableTV DVI connection and DVI-to-HDTV adapter and RCAcablesS-Video connection and S-Video cableS-Video connection and ATI 9-Pin HDTV Output Cableand RCA cables HDTV display HDMI HDTV DVI connection and DVI cableDVI connection and DVI-to-HDTV adapter and RCAcablesS-Video connection and ATI 9-Pin HDTV Output Cableand RCA cablesS-Video connection and S-Video cableDVI connection and DVI-to-HDMI adapter and HDMI cableInstalling and Configuring DisplaysConnect the monitor1Make sure the computer and monitor are off.2Plug the monitor cables into their appropriate connectors.3Power on the monitors first and then restart that computer so thatWindows can detect the new hardware settings.4When the New Hardware Found Wizard appears, at the appropriateprompt insert the installation CD to load the drivers for the graphicscard.Once the drivers and software have been installed, configure thedisplay.
12Configure the display1Navigate to the Control Panel and choose Display, or right-click onthe desktop and choose Properties.2Choose the Settings tab and select the screen resolution and colordepth that best suit your requirements and your display’sperformance.3Click Advanced and then select the Monitor tab.4Choose a refresh rate from the drop-down list.Caution! Choosing a refresh rate unsupported by your display maydamage your display. Consult your display’s documentation ifnecessary.5Click OK to return to the desktop.Once you have configured the main display you can configure anyother displays that are connected.6To configure another display, do the following:a) From the Start menu click Control Panel, and then clickDisplay.b) To access the basic multi-monitor configuration settings, clickthe Settings tab .c) Select the Monitor icon identified by the number 2.d) Click Extend my Windows desktop onto this monitor.e) Set the Screen Resolution and Color Quality as appropriatefor the second monitor. Click Apply or OK to apply these newvalues.Note: When using multiple monitors with the graphics card, onemonitor will always be the Primary display. Any additional monitorswill be designated as Secondary.Note: You can also enable and configure multiple monitors using theATI Catalyst Control Center.
13Installing Software and DriversSoftware is provided to take advantage of all the features of your ATIgraphics card, including: Graphics card driverATI Catalyst Control CenterHydraVision software (included in the Custom install)SurroundView software (included in the Custom install)Avivo video converter software (included in the Custominstall)Install the softwareTo install or remove the drivers, you must have administrator rights or belogged on as a user with administrator rights.Make sure your monitor cable is properly connected before you begin.Note: The installation dialog displays in English if your operatingsystem’s language is not supported.1Insert the ATI installation CD into the computer.If Windows runs the CD automatically, proceed to step 3.2Double-click the CD, double-click ATISETUP, and then click OK.3Follow the on-screen instructions, and then select either Express orCustom Install.Note: Not all software components are installed using the Expressinstallation. Custom installation allows you to select individualsoftware components for installation.Tip! If the installer fails to install the driver or you have a softwareconflict, you can download the latest software from ati.amd.com andthen install it.
14
15ATI Catalyst Control CenterThe ATI Catalyst Control Center is software that provides access to thedisplay features of the graphics card. Use the ATI Catalyst ControlCenter to fine-tune your graphics settings, enable or disable connecteddisplay devices, and change the orientation of the desktop. Many featuresdisplay previews of the changes before they are applied.The ATI Catalyst Control Center offers two views: Basic View is a simplified view that includes wizards to get theinexperienced user up and running. Advanced View allows the experienced user to configure thecomplete feature set of the software.You can customize the ATI Catalyst Control Center for easy access tothe features you use most.
16Start ATI Catalyst Control CenterStart ATI Catalyst Control Center from one of the following accesspoints:Access PointInstructionsWindows Desktop1. Right-click the Windows desktop.Windows StartMenuFrom the Windows task bar, click Start, and then selectPrograms ATI Catalyst Control Center.Windows System Tray1. Right-click the ATI icon in the Windows System Tray.Desktop shortcutWhen you first installed the ATI Catalyst Control Center,the setup wizard provided you with the option of placing ashortcut on the desktop. If you chose this option, you can Double-click the ATI ATI Catalyst Control Centerdesktop shortcut.Predefined hotkeysPress the predefined combination of keys, Ctrl Alt C tolaunch ATI ATI Catalyst Control Center, or you candefine your own hot key sequence by using the ATICatalyst Control Center Hotkey Manager.2. Fom the short menu, select ATI Catalyst ControlCenter.2. Fom the short menu, select ATI Catalyst ControlCenter.HelpThe ATI Catalyst Control Center Help provides conceptual informationto help you understand the graphics technology implemented in thegraphics card, and detailed instructions on how to optimize your graphicsenvironment. You can also use the ATI Catalyst Control Center Helpfeature to access usage information, generate a problem report, and get thesoftware version information.Access helpRight-click the Windows desktop, select ATI Catalyst ControlCenter, choose Advanced, and then do either of the following: Press F1 at any time to get specific help on the feature or aspectdisplayed. From the ATI Catalyst Control Center Dashboard, click Help.
17Using TV Display and Capture FeaturesThese topics describe how to use the TV display and video capture featuresof your graphics card. Using a Monitor vs. Using TV Display on page 17. Connecting to a TV, VCR, or HDTV on page 18. Capturing Video on page 29. Avivo Video Converter on page 32.Viewing the PC’s Display on TV or HDTVThe graphics card has TV out capability. You can attach the graphics cardto a TV and a monitor at the same time. If your graphics card has videoinput capability, you can also connect it to a VCR and record the monitor’sdisplay.Warning! IMPORTANT INFORMATION for European Customers.Some PC monitors in Europe cannot be used simultaneously with TVdisplay. When you enable TV display in Europe, the refresh rate forthe monitor and TV is set to 50 Hz. Some monitors may not supportthis refresh rate and could be damaged.Check the documentation supplied with the monitor to see if themonitor supports a refresh rate of 50 Hz. If the monitor does notsupport 50 Hz (or if you are not sure), do not use your monitor as asecondary display.TV display is useful for giving presentations and watching movies, orplaying games on a screen larger than a typical monitor. The following tipswill help you get the most out of the TV out feature.Using a Monitor vs. Using TV DisplayUsing the TV as the primary computer display can be useful; however, thedisplay on the monitor may change or looked squashed. This distortionoccurs because the display adjusts to fit the dimensions of the TV. Tocorrect the monitor display, use the monitor control buttons to adjust itsdisplay size and position.Some single-frequency monitors may not work with TV display enabled. Ifyou experience problems when TV display is enabled, disable TV displayto restore the monitor’s display.
18Viewing Text on a TVA TV is designed primarily to show moving images. The large dot pitch ofa TV will yield poor quality static images. The small text sizes commonlyused for PC desktops can appear blurred or unclear on a TV. You cancompensate for this degradation by using larger fonts.Using a TV as the Only DisplayIf you plan to move the computer to a place where you are using TV displayonly, make sure that you have the TV display feature enabled prior todisconnecting the monitor.The maximum display resolution for TV is 1024 768. Choosing aresolution higher than this will cause the TV display to disappear if it is theonly display device.Using Games and ApplicationsSome older games and applications may instruct the graphics card to rununder a specific display mode. This may cause the TV display to turn offautomatically or become scrambled (the PC monitor or LCD display willnot be affected). The TV display will be restored once you exit the game orif you restart the computer.Connecting to a TV, VCR, or HDTVYou can connect the graphics card to a TV, HDTV, or VCR in severalways, depending on the inputs the TV supports. To ensure the highestquality graphics, choose the connection available that provides the bestsignal.Connections supported, in descending order of quality: HDMI (available on HDTV only) DVI (available on HDTV only) Component Composite S-VideoNote: If the TV has cable input only, connect the graphics card to theTV through a VCR or an RF modulator, which is available from mostelectronics stores.Note: Copy-protected DVDs restrict playback to 480i and 480pmodes.
19Note: For maximum performance when watching DVD movies orplaying computer games on the TV, find the mode and screenresolution that provide the best result, and use those settingsexclusively.This topic includes the following procedures: Connect to an HDMI HDTV (DVI-to-HDMI ) on page 19. Connect to an HDTV (DVI-to-DVI) on page 21. Connect to an HDTV or component video device (DVI-to-ComponentVideo using ATI DVI-to-HDTV adapter) on page 22. Connect to an HDTV or component video device (S-Video-toComponent Video using ATI 9-Pin HDTV Output Cable) on page 24. Connect to a composite video device (S-Video-to-S-Video orComposite Video) on page 26. Connect to a European video device (S-Video to SCART usingcomposite video adapter) on page 27.Connect to an HDMI HDTV (DVI-to-HDMI )Note: This option is available on graphics cards that supportHDMI .1Before connecting an HDMI HDTV, attach a monitor to thecomputer and install the video drivers.2Make sure the computer and monitor are off.
20HDMI -to-HDMI connectorsLegend1Computer2DVI connection on the graphics card3DVI-to-HDMI adapter4HDMI -to-HDMI cable5HDMI connection on the HDTV6HDMI HDTV3Connect the DVI-to-HDMI adapter to the DVI connection on thegraphics card.4Connect one end of the HDMI -to-HDMI cable to the DVI-toHDMI adapter. Connect the other end of the HDMI -to-HDMI cable to the HDMI connection on the HDMI HDTV.5If necessary, configure the HDTV for external audio. For moreinformation, see the documentation that came with the TV.6Power on the monitor and HDTV, and then power on the computer.The HDTV will not display anything until Windows starts.
217Configure the HDTV using the ATI Catalyst Control Center,Displays Manager and DTV(HDMI) .Connect to an HDTV (DVI-to-DVI)1Before connecting an HDTV, attach a monitor to the computer andinstall the video drivers.2Maker sure the computer and monitor are off.DVI-to-DVI connectorsLegend1DVI connection on the graphics card and the HDTV2HDTV3DVI-to-DVI cable4Computer3Connect one end of the DVI cable to the DVI connection on thegraphics card. Connect the other end of the DVI cable to the DVIconnection on the HDTV.4Connect one end of a sound cable to the computer sound card.Connect the other end of the cable to the sound input on the HDTV.5Configure the HDTV for external audio. For more information, seethe documentation that came with the HDTV.
226Power on the monitor and HDTV, and then power on the computer.The HDTV will not display anything until Windows starts.7Configure the HDTV using the ATI Catalyst Control Center,Displays Manager and DTV(DVI).Connect to an HDTV or component video device(DVI-to-Component Video using ATI DVI-to-HDTV adapter)1Before connecting an HDTV, attach a monitor to the computer andinstall the video drivers.2Make sure the computer and monitor are off.DVI to component video connectorsLegend1Computer2DVI connection on the graphics card3ATI DVI-to-HDTV adapter (standard dip-switch settings) .4RCA patch cables (available from consumer electronics dealer, not toexceed 50 feet or 15 meters.5Component video connection on the HDTV6HDTV (Set to YPbPr input. For information specific to the device, see theHDTV manual.)
233Set the ATI HDTV Component Video Adapter DIP switches.Configure the DIP switches to set the appropriate display mode andaspect ratio. This sets the modes which appear when you select Showall Modes in the ATI Control Panel.a) Set the display modeNote: DIP switch 3 is always off (540p is not supported).Note: Set all DIP switches on that correspond to the modes thecomponent input device supports; for further details, consult themanual for the component video input device.The six DIP switches on the ATI HDTV Component Video Adapterenable four, standard HDTV video modes: 480i, 480p, 720p,and1080i. The default setting is 480i or 480p, depending upon thecomponent input device. In the following example, 480i, 480p, and1080i are supported.Use a small, flat-head screwdriver to set the switches. The up positionis on and the down position if off. Set the switches on for all modesthat the HDTV or component input device supports.Display Mode Switch Settingsb) Set the Aspect Ratio.If the display supports 16:9 aspect ratio, set DIP switch 6 (16:9) on.This switch toggles between 4:3 and 16:9. Off is 4:3.Aspect Ratio Switch SettingsIn the previous examples, the component input display supports 480i,480p, 1080i, and 16:9.4Attach the ATI DVI-to-HDTV component video adapter to the DVIconnection on the graphics card.
245Matching the colors on the connections, connect one end of the RCApatch cables to the ATI DVI-to-HDTV component video adapter.Connect the other end of the RCA patch cables to the componentvideo connections on the HDTV.6Connect one end of a sound cable to the computer sound card.Connect the other end of the cable to the sound input on the HDTV.7If necessary, configure the HDTV for external audio. For moreinformation, see the documentation that came with the TV.8Power on the monitor and HDTV, and then power on the computer.The HDTV will not display anything until Windows starts.9Configure the HDTV using the ATI Catalyst Control Center,Displays Manager.Connect to an HDTV or component video device(S-Video-to-Component Video using ATI 9-Pin HDTV OutputCable)
Uninstall old graphics drivers (Windows Vista ) 1 With the current graphics card still in the computer, close all open applications. 2 From Control Panel, double-click Programs and Features, and then select the graphics card driver from the list of software programs. 3 Click Uninstall. 4 If the Programs and Features uninstall confirmation dialog