Transcription
Model FR700User’s Guide10 :08
THIS EQUIPMENT COMPLIES WITH FCC CLASS-B REQUIREMENTSPURSUANT SUBPART J OF PART-15This device complies with Part 15 of the FCC Rules. Operation is subject to the following twoconditions: (1) this device may not cause harmful interference, and (2) this device must acceptany interference received, including interference that may cause undesired operation.WARNING: Changes or modifications to this product not expressly approved by the party responsiblefor compliance could void the user’s authority to operate this equipment.NOTE:: This equipment has been tested and found to comply with the limits for a Class B digitaldevice, pursuant to Part 15 of the FCC Rules. These limits are designed to provide reasonable protectionagainst harmful interference in a residential installation. This equipment generates, uses, and can radiateradio frequency energy and, if not installed and used in accordance with the instructions, may causeharmful interference to radio communications. However, there is no guarantee that interference will notoccur in a particular installation. If this equipment does cause harmful interference to radio or televisionreception, which can be determined by turning the equipment off and on, the user is encouraged to tryto correct the interference by one or more of the following measures:- Reorient or relocate the receiving antenna.- Increase the separation between the equipment and receiver.- Connect the equipment into an outlet on a circuit different from that to which the receiver isconnected.- Consult the dealer or an experienced radio TV technician for help.This Class B digital apparatus complies with Canadian ICES-003.Cet appariel numerique de la classe B est conforme a la norme NMB-003 du Canada.Lathem Time Corporation200 Selig Drive, SWAtlanta, Georgia USA 30336(800) 241-4990(404) 691-0400www.lathem.comCopyright 2010 Lathem Time Corporation. All rights reserved.Revised 11-09-2010Document Number: USG0094
CONTENTSQUICK START STEPS . VWELCOME. 1PACKAGE CONTENTS . 6SYSTEM REQUIREMENTS . 7INSTALL THE FACEIN TERMINAL . 8FACEIN TERMINAL STARTUP. 10FACE ENROLLMENT GUIDE. 13ENROLLING EMPLOYEES AT THE TERMINAL . 15USING THE FACEIN TERMINAL . 20INSTALL THE PAYCLOCK SOFTWARE. 24SETTING UP A MULTI-USER SYSTEM. 28USING THE PAYCLOCK SOFTWARE. 29LOGGING INTO PAYCLOCK. 31SETTING UP PAYCLOCK. 34ADDITIONAL SOFTWARE SETUP. 37ADD THE FACEIN TERMINAL . 39ADD EMPLOYEES AND ASSIGN BADGES . 40EDITING TIMECARDS. 45GLOBAL SCHEDULING. 63REPORTS . 64SETTING UP YOUR TERMINAL. 66UPDATE THE TERMINAL. 71POLLING THE TERMINAL. 72AUTOMATIC POLLING. 73HARDWARE TROUBLESHOOTING . 74SOFTWARE TROUBLESHOOTING. 76APPENDIX A - EXPORTING PUNCHES TO A USB DRIVE . 77APPENDIX B - ADDING EMPLOYEES AT THE TERMINAL . 79
APPENDIX C - CONNECTING THE FACEIN DIRECTLY TO THECOMPUTER’S NIC . 84APPENDIX D - FACEIN WAN INSTALLATION . 87APPENDIX E - PAYCLOCK CLIENT SOFTWARE WANINSTALLATION. 89Copyright 2010 Lathem Time Corporation. All rights reserved. Reproduction of thisdocument in whole or in part is strictly prohibited. This document may containtypographical or copy errors. PayClock, Lathem, the Lathem logo, and all other Lathemproduct names mentioned in this document are registered trademarks of Lathem TimeCorporation. All other products, brand names, or company names mentioned in thisdocument are properties and trademarks or registered trademarks of their respectivecompanies.
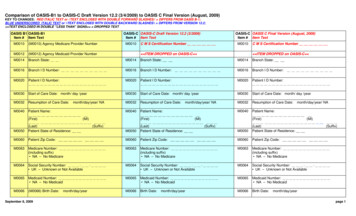
Quick Start StepsVerify the contents of your system. (For more detailedinformation turn to page 6.)Terminal Installation12Separate the mounting-platefrom the FaceIN terminal byremoving the Philips headscrews. Retain the screws forlater. (See page 8 for moredetails.)Install the mounting-plate to thewall using the supplied wallmount screws. Note: For bestvisibility mount the terminal forthe shortest employee, talleremployees can bend down.34Plug the RJ45 network cableinto the Ethernet port and thePower Adapter plug into thePower Adapter port which islocated in the compartment onback of the terminal.Align the FaceIN terminal withthe pins on the mounting-plateand secure the two together withthe 2 Philip head screws. Becareful not to pinch the AC cord.When finished, plug the PowerAdapter into an AC wall outlet.
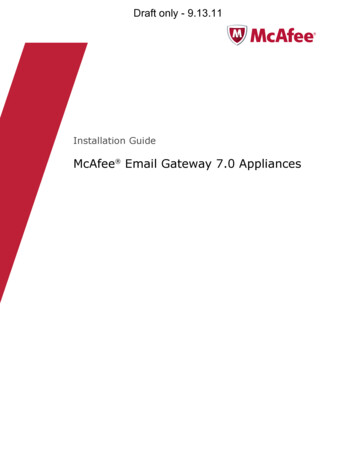
Terminal Startup5-Set up the network communications·Press the MENU key, the FunctionsMenu will open.·Press 4, the System Setting menu willopen.·From the System Setting menu, press 2 Set Network.·Enter the IP Address for the terminal andpress OK.·Enter the Mask Code and press OK.·Enter the Gateway Address and pressOK.·The terminal will automatically restart.(For more detailed information turn topage 10.)Note: You may have to contact yournetwork administrator if you are unsurehow to set up the networkcommunications.6-Set up the first Administrator·Press the MENU key, the FunctionsMenu will open.·Press 1, the Set Admin menu will open.·From the Set Admin menu, press 1 Admin 1.·Position your face and follow theprompts.(For more detailed information turn topage 11.)
Software Installation78-Verify System RequirementsVerify your computer meets theMinimum System Requirements listed inthis User Guide, turn to page 7.Install the PayClock Software. (For moredetailed instructions turn to page 24.)Important NotesMake sure your screen saver is notshowing before inserting the installationCD’s.Open and close the CD-ROM drawer if theCD is not recognized when inserted.910-Open PayClockOpen the PayClock software byclicking on the PayClock Icon. Thedefault password is lathem. (For moredetailed instructions turn to page 31.)-Configure the PayClock softwareClick Setup Now from the Get Startedwindow to configure PayClock. (Formore detailed instructions turn to page34.)
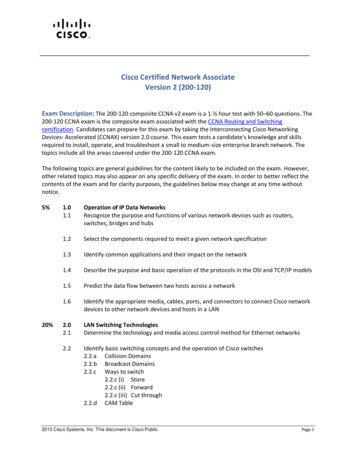
111213-Add the FaceIN terminalClick on the Terminal Manager taband add the FaceIN terminal.(For more detailed instructions turnto page 39).-Add the EmployeesAdd employees using theEmployees button under the Setuptab.To add a new employee, click Newand then enter the employee data.(For more detailed instructions turnto page 40).-Update the FaceIN terminalAfter adding the employees, updatethe FaceIN terminal.(For more detailed instructions turnto page 71).-Enroll Employee FacesAfter adding the employees in PayClock,register their faces at the terminal.14·Press the MENU key, and verify theadministrator’s face.·After verification the Functions Menu will open.·Press 2, the User Management menu will open.·Press 2, the Modify User screen will open.·Using the numeric keypad enter the desiredemployee’s badge number and press OK.·The employee’s name will display, press OK.·Select the verification method, have theemployee position their face and follow theprompts. (See page 61 for details.)·Press ESC at the “Permit Open Door?” Prompt.·Press OK at the “Permit Attendance?” Prompt.·Press ESC, ESC and ESC when finished.(For more detailed instructions turn to page 15.)
P A Y C L O C K&F A C E I NU S E R ’ SG U I D EWelcomePurpose of this User’s GuideThe purpose of this user’s guide is not meant to be a completemanual for the product. It is a quick reference to get you started.Please refer to the PayClock Help for detailed product information,setup guidance, and operation information.Product OverviewReliability, functionality and ease of use are trademarks of thePayClock software and terminals. The terminal utilizes an “embeddedfacial recognition” system, meaning that employees will punch in andout by presenting their face in front of the terminal’s “Dual CameraSystem” .The FaceIN terminal connects to your network (LAN - PayClocksoftware and FaceIN terminal have to be on the same subnet) forcommunications with the PayClock software. The PayClock softwareand FaceIN terminals are the ideal solution for businesses that wantto track employee time and automate payroll.The FaceIN terminal offers a large color LCD display that displaysemployee information along with an audio prompt. Upon asuccessful validation, the display will show the employee’s name, timeof punch and an audio prompt identifying a successful punch. Whenyou’re ready, you simply poll the terminal to add the punches to thedatabase.1
P A Y C L O C K&F A C E I NU S E R ’ SG U I D EIMPORTANTThe FaceIN terminal operates independently from the computerwhere the PayClock software resides. The employee punches areretained in the terminal’s memory and when you are ready simply pollthe terminal.Features and Specifications Embedded facial recognition system - Advanced DSPtechnology keeps the image processing and matching on theterminal.Accurate and fast identification - The industries leading“Dual Sensor” facial recognition technology.Reliable performance under different light environments The terminal can work in different light conditions even inthe dark. Over one year of market testing.Flexible I/O interfaces - Internet Protocol (TCP/IP) enablescommunications over the LAN. USB allows for employeedata upload or punch download using a USB flash drive.User friendly design - 3.5 inch color LCD screen for facepositioning with voice prompt. No-touch authentication forthe ultimate in hygiene.Easy-to-use PayClock software automatically calculatesworked hours including overtime, tracks sick and vacationtime and provides dozens of standard time and labor reports.Export hours directly from the PayClock software to mostmajor payroll providers including ADP and Paychex.2
P A Y C L O C K &F A C E I NU S E R ’ SG U I D EPayClock software offers seamless integration with theQuickBooks accounting products for a complete “punch-topaycheck” solution.Comprehensive support agreements minimize technicaldifficulties.Numerous Accessory options further enhance thefunctionality of your PayClock and FaceIN system.Note: The USB Flash Drive Port is located on the bottom of theterminal and the Ethernet Network Port is located on the back of theterminal.UpgradesIf you find that you need to accommodate more employees in yoursystem or if you would like enhanced software capabilities, considerpurchasing a software upgrade for your system. A number ofaccessories are offered to further enhance your PayClock system. Increased employee capacity Customized export options Customized reporting options Multi-user capabilitiesUpgrading is as easy as visiting http://shop.lathem.com or openPayClock and click on the PayClock orb in the upper left corner andselect Upgrade PayClock. Then select the options you would like topurchase and download your software upgrade. Options are instantlyactivated upon receipt of online payment.AccessoriesA number of accessories are offered to further enhance yourPayClock system. Visit http://shop.lathem.com to purchaseadditional accessories like the ones listed below.Getting HelpThe purpose of this user’s guide is not meant to be a completemanual for the product. It is a quick reference to get you started.Please refer to the PayClock Help for detailed product information,setup guidance, and operation information.3
P A Y C L O C K&F A C E I NU S E R ’ SG U I D EYou can access the help desk and answers to your issues in a numberof different ways. In addition to resources within the PayClocksoftware, assistance may be accessed online, via email, via telephone,or through your dealer. Don’t forget annual support contracts arealso offered.PayClock HelpThe PayClock Help allows you to search through an index of helptopics to locate the answer you need. To launch the Help, click theHelp button on the ribbon bar.TroubleshootingFor answers to Frequently Asked Questions, refer to theTroubleshooting sections of this User Guide on page 74 and 76.Online and Email SupportLathem.com provides access to numerous support resources that willallow you maximize your use of PayClock. Help may be accessed byvisiting the following link:http://support.lathem.comOn the Support page, you may also submit a question through ouronline knowledgebase and one of our technicians will respond toyour inquiry within 24 hours. Email support is free to all registeredusers.Telephone SupportThe help desk is av
data upload or punch download using a USB flash drive. User friendly design - 3.5 inch color LCD screen for face positioning with voice prompt. No-touch authentication for the ultimate in hygiene. Easy-to-use PayClock software automatically calculates worked hours including overtime, tracks sick and vacation time and provides dozens of standard time and labor reports. Export hours .