Transcription
Dual Energy X-ray Absorptiometry(DXA) Procedures ManualJanuary 2007
TABLE OF CONTENTSChapter12PageOVERVIEW OF DXA .1-11.11.21.3Overview of Dual Energy X-Ray Absorptiometry .Personnel.Flow of DXA Exam.1-11-21-2EQUIPMENT/SUPPLIES/MATERIALS .2-12.1Description of Equipment for DXA.2-12.1.12.1.22.1.32.1.4Hologic QDR 4500A.QDR System Operations .Supplies.Radiation Badges .2-12-32-32-3Maintenance/Repair of Equipment for DXA .2-42.2.1DXA Bone Densitometer Service Report .2-4Calibration of Equipment for DXA .2-5PROTOCOL .3-13.13.23.3Introduction to the Examination .Explanation of DXA .QDR 4500A System Operation .3-13-13-33.3.13.3.23.3.3Startup Procedures for Hologic QDR (Start of Session).End of Session Shutdown Procedures for QDR.End of Day Shutdown Procedures for QDR .3-33-43-4Examinee Preparation for DXA.3-53.4.1Measurement of Weight.3-5AP Spine Scan 2.333.43.5Selecting an SP.Selecting the Type of Scan.Positioning the SP .Positioning the C-Arm .Scanning.iii
TABLE OF CONTENTS (continued)PageChapter3.63.7456Proximal Femur Scan.3-153.6.13.6.23.6.33.6.43.6.5Selecting the Type of Scan.Positioning the SP .Positioning the C-Arm .Scanning.Panniculus (Belly Fat Pad).3-153-163-173-193-21DXA Scan Data .3-21DATA ENTRY -174-19Shared Exclusion Questions .Weight Entry Screen.Safety Exclusion Questions .DXA AP Spine Scan Data Capture Screens .DXA Proximal Femur Data Capture Screens .DXA Component Status .Close Exam .REFERRALS AND REPORT OF FINDINGS .5-15.15.2Observation Referrals .Report of Findings for DXA .5-15-35.2.1Sample Preliminary Report of Findings.5-4QUALITY CONTROL.6-16.1Equipment and Room Set-Up Checks .6-16.1.16.1.26.1.36.1.4Start of Stand.Daily.Weekly .End of Stand.6-16-26-26-2Procedures for Completing QC Scans .6-26.2.16.2.26.2.36.2.46-26-86-116-156.2Hologic Anthropomorphic Spine Phantom (HASP) .Step Phantom .Hologic Femur/Hip Phantom (Weekly Scan) .Circulating Hologic Spine Phantom (HSP Q-96) .iv
TABLE OF CONTENTS (continued)PageChapter6.2.5Circulating Block Phantom (Hologic BlockPhantom NH #1) .Using Auto Scan at Start of Stand.6-166-17QC Scan Checklists .6-196.3.16.3.26-196.2.66.3Instructions for Completing Weekly QC Scan Checklist.Instructions for Completing Start of Stand QC ScanChecklist.Instructions for Accessing Blank QC Checklist Forms.6-196-20Data Entry Screens for QC on 36-246-256.3.36.4Start of Stand QC Checks .Daily QC Checks.Weekly QC Checks .End of Stand QC Checks.Incomplete QC Checks .List of AppendixesAppendixADXA Scripts.A-1BSet-up and Tear-down Procedures for DXA Room .B-1CDXA Bone Densitometer Report .C-1DDXA Scanner Reporting Procedures .D-1EStart of Stand QC Scan Checklist .E-1FWeekly QC Scan Checklist.F-1GProcedure for Securing the QDR 4500A for Travel .G-1HProcedure for Setting Up QDR 4500A for Operations .H-1IPower Failure Procedures for DXA.I-1v
TABLE OF CONTENTS (continued)List of TablesPageTable1-1Age groups and gender for DXA .1-21-2Pregnancy status information for DXA by age and gender .1-2List of FiguresFigure2-1Hologic Densitometer QDR4500A.2-12-2Instrument Control Panel on the QDR 4500A .2-22-3Laser warning label.2-22-4Laser locator label.2-3List of ExhibitsExhibit3-1Hologic power module right side panel .3-33-2Instrument control panel .3-63-3Scan table mattress (top view) .3-73-4Selecting “Perform Exam”.3-83-5Patient selection screen .3-83-6Operator field for initials .3-93-7AP Lumbar Spine Scan selection screen .3-93-8AP Lumbar Spine Scan Parameters screen .3-103-9C-arm positioning for AP spine scan .3-113-10Spine Scan window.3-12vi
TABLE OF CONTENTS (continued)List of Exhibits (continued)PageExhibit3-11Properly positioned AP spine.3-133-12Exit Exam/New Scan window box .3-143-13Left Hip Scan Selection screen .3-153-14Scan Selection screen for proximal femur scan .3-163-15SP positioning for femur scan.3-163-16Foot placement against hip scan positioning fixture.3-173-17Starting point and reposition mark for femur scan .3-183-18Hip scan window .3-193-19Repositioning the femur.3-203-20Properly aligned and rotated femur scan .3-203-21Data displayed after analysis .3-224-1Shared Exclusion Questions .4-14-2Exclusion from another component .4-24-3Shared Exclusion Questions (pregnancy exclusion).4-34-4Shared Exclusion Questions (No to pregnancy question).4-34-5Exclusion due to weight.4-44-6End of component status (weight limit).4-54-7Weight data entry screen.4-54-8Safety Exclusion Questions .4-64-9Safety Exclusion Questions (contrast radiography).4-8vii
TABLE OF CONTENTS (continued)List of Exhibits (continued)PageExhibit4-10DXA Component Status (Data Effect) .4-94-11Safety exclusion questions (nuclear medicine studies).4-104-12Safety exclusion questions (femur scan questions).4-114-12aSafety Exclusion Questions (right hip only) .4-114-13Safety Exclusion Questions (AP spine) .4-124-14DXA data capture (AP spine scan) (1) .4-134-15DXA data capture (AP spine scan) (2) .4-144-16DXA data capture (AP spine scan) (3) .4-154-17DXA data capture (femur scan) (1) .4-154-18DXA data capture (femur scan) (2) .4-164-19DXA data capture (femur scan) (3) .4-174-20DXA component status (required comments).4-184-21DXA component status .4-184-22Close exam.4-205-1Menu to select observation referral.5-15-2Pick list of SPs in current session .5-25-3Observation referral in DXA .5-25-4Observation referral from another component in physician’s referralreview box.5-35-5Sample Report of Findings for DXA .5-46-1QDR main window .6-3viii
TABLE OF CONTENTS (continued)List of Exhibits (continued)PageExhibit6-2Daily QC Setup box.6-36-3System self-test .6-46-4System test passed .6-46-5Spine Phantom QC image.6-56-6Auto QC passed .6-56-7Spine Phantom QC – plot for BMD.6-66-8Spine Phantom QC – plot for BMC.6-76-9Step Phantom Setup window .6-86-10Step Phantom scan .6-96-11Step Phantom Evaluation completed successfully.6-106-12Step Phantom QC completed, press “Continue”.6-106-13Selecting Hologic Femur/Hip Phantom from patient menu.6-116-14Operator box for initials.6-126-15Selecting Right Hip in the Scan Selection Screen .6-126-16Hologic Femur/Hip Phantom Scan Parameters screen .6-136-17Machine scanning Femur/Hip phantom.6-146-18Exit exam/new scan window box .6-156-19Selecting Auto Scan from QDR main menu.6-176-20Number of times to run scan.6-186-21Quality Control reminder message box .6-20ix
TABLE OF CONTENTS (continued)List of Exhibits (continued)PageExhibit6-22Utilities menu to select quality control .6-216-23Quality Control log-on.6-216-24Quality Control Start of Stand Checks (1) .6-226-25Quality Control Start of Stand Checks (2) .6-226-26Quality Control Daily Checks.6-236-27Quality Control Weekly Checks .6-246-28Quality Control End of Stand Checks.6-246-29Quality Control Incomplete Checks entry .6-25x
1. OVERVIEW OF DXABone health will be evaluated in the current National Health and Nutrition ExaminationSurvey (NHANES) by dual energy X-ray absorptiometry (DXA) scans of the femur and anterior-posterior(AP) spine. This method will be used to (1) monitor secular trends in overweight prevalence; (2) describethe prevalence of obesity; and (3) examine the relationship between overweight and obesity and otherexamination measures, including blood pressure, glucose intolerance, and a battery of indicators forcardiovascular disease.1.1Overview of Dual Energy X-Ray AbsorptiometryDXA will be used to assess overall skeletal changes that often occur with age by measuringbone mineral content (BMC) and bone mineral density (BMD). DXA measurements can also be used toprovide information on early gender and ethnic changes in the rate of bone accretion and to determine theage when skeletal accretion ceases and when peak bone mass occurs. This information can be used toimplement effective and timely measures with the objective of maximizing peak bone mass. Suchmeasures may include calcium supplementation, dietary fortification, or programs promoting dairyproducts and other calcium and vitamin D rich foods. This information can also be used to assess theimpact of factors such as diet or lifestyle on measures of bone status in various minority populations.The femur and AP spine scans were added to the NHANES in 2005; the whole body scanwas removed in 2006. Data obtained from both the femur and AP spine scans are considered goldstandards for diagnosing osteoporosis. Collection of data from the DXA femur scan will be used toprovide estimates of the prevalence of osteoporosis in the United States. Additionally, these data will becompared to the NHANES III femur data to track progress toward the Healthy People 2010 Objective 2.9,to reduce the overall numbers of people with osteoporosis. Collection of data from the AP spine scan willprovide a more complete evaluation of skeletal health.The DXA femur and AP scans will be completed on all individuals 8 years old and above(see Table 1-1). Pregnancy status will be assessed on all females aged 12 through 59 and menstruating 8to 11-year-olds. If the result of the pregnancy test is positive, the sampled participant (SP) will beexcluded from the entire exam. If a pregnancy test for an SP who is 8 through 17 years old comes back1-1
positive, a second test will be done for confirmation. In addition, women aged 12 through 59 years will beasked to self-report their pregnancy status and will be excluded if they respond “Yes,” even if thepregnancy test was negative. Self-report on pregnancy status for 12- through 17-year-old females will beasked in the Physician’s Exam. Females aged 8 through 11 years will not be asked about pregnancy status(see Table 1-2).Table 1-1.Age groups and gender for DXAComponentAgeGenderDXA (AP Spine)8 and aboveMales & FemalesDXA (Femur)8 and aboveMales & FemalesTable 1-2.Pregnancy status information for DXA by age and genderPregnancy StatusAgeGenderPregnancy Status – Urine Test12-59 yearsFemalesPregnancy Status – Urine TestMenstruating 8-11 yearsFemalesPregnancy Status – Self Report12-59 yearsFemalesPregnancy Status – Self Report(Asked in Physician’s Exam)12-17 yearsMenstruating 8-11 yearsFemalesPregnancy Status – Self Report(Asked in DXA Exam)18-59 yearsFemales1.2PersonnelThe health technologist who is a certified radiology technologist will conduct all DXAscans.1.3Flow of DXA ExamThe DXA exam will begin with the AP spine scan followed by the femur scan. Participantsshould receive no more than two total DXA scans. If a problem occurs during the scans, it should bedocumented in the ISIS Data Capture screen and/or an Unusual Field Occurrence (UFO) form, ifnecessary.1-2
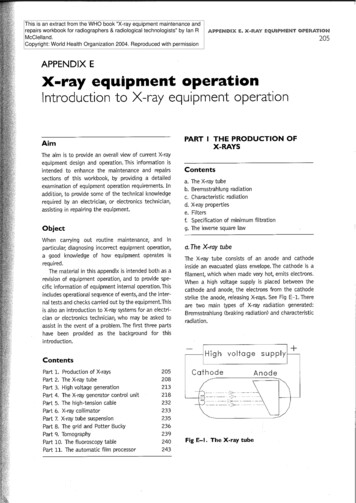
2. EQUIPMENT/SUPPLIES/MATERIALS2.1Description of Equipment for DXA2.1.1Hologic QDR 4500AThe Hologic QDR 4500A (Figure 2-1) is a fan beam X-ray bone densitometer, which usestwo different energy levels produced by an energy tube to estimate bone mineral content (BMC) and bonemineral density (BMD). The QDR uses a low level of X-rays.Figure 2-1. Hologic Densitometer QDR4500AThe densitometer produces ionizing radiation in the form of X-rays and uses laser radiationto position scans; however, the radiation exposure is so low that no shielding of the room or of healthtechnologists is required. The radiation from a DXA scan is less than one would receive during a roundtrip cross-country airplane flight or normal background radiation in a day.The X-ray ON indicator is an amber light located in the lower right corner of the instrumentcontrol panel (see Figure 2-2). When the X-ray lamp is lit, X-rays are being produced.2-1
The Emergency Stop Button is a round red button at the right end of the instrument controlpanel that is used for emergencies. When this button is pressed, the X-rays and the table are disabled andscanning stops immediately. Pulling on the button resumes normal operation. Press down on the button to stop the scan; and Pull up on the button to resume normal operation.Figure 2-2. Instrument Control Panel on the QDR 4500ALaser Positioning. The Laser-On Lamp is an amber light above the Laser switch on theInstrument Control Panel. It alerts the user that the laser position indicator is active. The laser positionindicator unit produces 1 mW laser emission. The examinee and technologist should avoid lookingdirectly into the beam, or placing reflective objects in the path of the beam.The QDR 4500 Elite includes a laser safety feature that turns the laser off if the distancebetween the top (right side) of the table is less than approximately 15.5 inches from the laser light spot.This feature exists to help prevent shining the laser light in the examinee’s eyes. Figure 2-3 shows thelaser warning label located on the scanner arm.Figure 2-3. Laser warning label2-2
Arrows marked Laser Aperture mounted on the scanner arm note the location of the laserbeam. Figure 2-4 shows the laser locator label.Figure 2-4. Laser locator label2.1.2QDR System OperationsSee Section 3.3 in Chapter 3 for Start-up and Shut-down Procedures for the QDR System.See Appendix I for Power Failure Procedures.2.1.3SuppliesCompletion of the AP spine and femur scans will require three pieces of accessoryequipment. The large square cushion is used for positioning the SP for the AP spine scan.(See Section 3.5 for detailed procedures.) The radiolucent pillow is placed under the head before the APspine scan. (See Section 3.5.3 for detailed procedures). The Hologic hip positioning device is used forpositioning the SP for the femur scan. (See Section 3.6 for detailed procedures.)2.1.4Radiation BadgesHealth technologists operating the densitometers are required to wear radiation badges fordosimetry processing. A control badge is placed in the room on the computer cart beside the densitometer.2-3
2.2Maintenance/Repair of Equipment for DXAIf the chief technologist needs to contact Hologic for repair, the contact number and otherimportant information are listed below: Call Hologic customer support at 1-800-321-4659; You will need the model number and the serial number for your machine; Model number for all mobile examination centers (MECs) is QDR 4500; Serial number for MEC 1 is 45575; Serial number for MEC 2 is 45678; and Serial number for MEC 3 is 45700;See Appendix D for detailed instructions of equipment repair notification.2.2.1DXA Bone Densitometer Service ReportWhen the Hologic densitometer is serviced or repaired: The chief technologist will complete a DXA Bone Densitometer Report(see Appendix C); Send/Scan copy of the report to the home office. See Appendix D for specificinstructions about names and numbers. The home office will send this to the QualityControl Reading Laboratory; Send a copy of the service report completed by the service engineer to the home officewhen the repair or service is made; Put a copy of the service engineer’s report and a copy of the DXA Bone DensitometerReport in the service report binder kept in the DXA room. This binder is used to storethe Hologic Customer Service Reports and the DXA Bone Densitometer ServiceReport forms; and Blank DXA Bone Densitometer Service Report forms are stored electronically in theISIS system. Open Word, select File/Open, look in the directory for Mecstaff/Blankforms/DXA serv.doc.2-4
2.3Calibration of Equipment for DXARefer to Chapter 6 for complete instructions regarding calibration and quality controlscanning procedures.2-5
3. PROTOCOL3.1Introduction to the ExaminationThe technologist should briefly explain the examination when the SP is brought into theroom. The exam should be explained in more detail as each scan is being completed. The objective is toinform the SP about the exam and to position the SP as quickly as possible. Below is a suggestedintroductory script, but the technologist should use his or her own words for this explanation. This is anexplanation, not a standard script, so the technologist may adjust the explanation to the level ofunderstanding of the examinee.Suggested Introduction to Component (English Version):In this room, I’m going to take two scans of your body with this machine. These scanscan tell us how strong your bones are. I will explain each exam in more detail as I goalong.Suggested Introduction to Component (Spanish Version):En este cuarto, voy a tomar dos escáneres de su cuerpo con esta máquina. Estosescáneres pueden decirnos qué tan fuertes están sus huesos. Explicaré cada examencon más detalles mientras los hago.3.2Explanation of DXAThe technologist is scanning the ID wrist band of the examinee during this explanation. Thisshould be used as a guideline only and the technologist should adjust the explanation to the level ofunderstanding of the SP. The script used for an 8-year-old will be different from the script used for a 60 year-old. The scripts below provide suggested explanations of the DXA exam, as well as each individualscan.Suggested Explanation of DXA Scans (English Version):It will take a few minutes to position you correctly for each scan and another fewminutes to take the scans. The scan of your hip and spine will tell us how strong yourbones are compared to other people like you. I will explain each scan in more detail asI position you for the scan. At this time, please remove all objects from your pockets3-1
and place them in this container. I am going to ask you a few questions before I startthe exam (SHARED AND safety exclusion questions are asked).Suggested Explanation of DXA Scans (Spanish Version):Tomará unos pocos minutos ponerle en la posición correcta para cada escáner y otrospocos minutos para tomar los escáneres. El escáner de su cadera y de su columna nosdirán qué tan fuertes están sus huesos comparados con los de otras personas comousted. Le explicaré cada escáner con más detalles mientras le posiciono para elescáner. En este momento, por favor saque todos los objetos que tiene en los bolsillosy póngalos en este recipiente. Le voy a hacer algunas preguntas antes de empezar elexamen (SHARED AND safety exclusion questions are asked).Suggested Explanation of AP Spine Scan (English Version):For the spine scan, you will lie flat on the table. I’m going to place a pillow underyour head. Then I am going to bend your legs at a 90-degree angle at the hip and kneeby placing them on this large, soft, cube-shaped pillow. You will not feel anythingduring this scan. Please be as still as possible and do not talk during the scan.Suggested Explanation of AP Spine Scan (Spanish Version):Para el escáner de la columna vertebral, usted tendrá que acostarse extendido sobre lamesa. Le voy a poner una almohada debajo de la cabeza. Después, le voy a doblar laspiernas en un ángulo de 90 grados en la cadera y las rodillas poniéndolas en estaalmohada grande y suave en forma de cubo. Usted no sentirá nada durante esteescáner. Por favor quédese lo más quieto(a) posible y no hable durante el escáner.Suggested Explanation of Femur Scan (English Version):The next scan will be of your hip. For this scan, please continue to lie still with yourlegs flat against the table. I will rotate your left leg inward slightly and then keep it inplace using this foot brace. Please place your arms across your chest. You will not feelanything during the scan. Please be as still as possible and do not talk during the scan.Suggested Explanation of Femur Scan (Spanish Version):El siguiente escáner será para su cadera. Para este escáner, por favor continúeacostado/a sin moverse con las piernas extendidas sobre la mesa. Voy a moverle lapierna izquierda un poco hacia adentro y después la mantendré en esa posición usandoestas bandas para los pies. Por favor cruce los brazos sobre el pecho. Usted no sentiránada durante este escáner. Por favor quédese lo más quieto(a) posible y no habledurante el escáner.3-2
3.3QDR 4500A System OperationThe QDR 4500 system should be turned on at the beginning of the day and off at the end ofeach session for that day. See Appendix H for setting up the QDR 4500 for operations. Rout
TABLE OF CONTENTS Chapter Page 1 OVERVIEW OF DXA . 1-1 1.1 Overview of Dual Energy X-Ray Absorptiometry .
![[AWS Black Belt Online Seminar] AWS X-Ray](/img/17/20200526-blackbelt-x-ray.jpg)