Transcription
Memor X3Mobile Computerwww.datalogic.com 2013-2018 Datalogic S.p.A. and/or its affiliates All rights reserved. Datalogic and the Datalogic logo are registered trademarks ofDatalogic S.p.A. in many countries, including the U.S.A. and the E.U.Datalogic S.r.l.Via S. Vitalino, 1340012 Calderara di RenoBologna - ItalyTelephone: ( 39) 051-3147011Fax: ( 39) 051-3147205User’s Manual822001591(Rev. A)January 2018
Datalogic S.r.l.Via San Vitalino 1340012 Calderara di Reno (BO)ItalyTel. 39 051 3147011Fax 39 051 3147205 2013-2018 Datalogic S.p.A. and/or its affiliates. All rights reserved. Without limiting the rights under copyright, no part of thisdocumentation may be reproduced, stored in or introduced into a retrieval system, ortransmitted in any form or by any means, or for any purpose, without the express writtenpermission of Datalogic S.p.A. and/or its affiliates. Owners of Datalogic products are herebygranted a non-exclusive, revocable license to reproduce and transmit this documentation forthe purchaser's own internal business purposes. Purchaser shall not remove or alter anyproprietary notices, including copyright notices, contained in this documentation and shallensure that all notices appear on any reproductions of the documentation. Should futurerevisions of this manual be published, you can acquire printed versions by contacting yourDatalogic representative. Electronic versions may either be downloadable from the Datalogicwebsite (www.datalogic.com) or provided on appropriate media. If you visit our website andwould like to make comments or suggestions about this or other Datalogic publications,please let us know via the "Contact Datalogic" page.DisclaimerDatalogic has taken reasonable measures to provide information in this manual that iscomplete and accurate, however, Datalogic reserves the right to change any specification atany time without prior notice. Datalogic and the Datalogic logo are registered trademarks ofDatalogic S.p.A. in many countries, including the U.S.A. and the E.U.Memor is a trademark of Datalogic S.p.A. and/or its affiliates. All other brand and productnames may be trademarks of their respective owners.PatentsSee www.patents.datalogic.com for patent list.
CONTENTSREFERENCES . VIConventions .viReference Documentation .viSupport Through the Website .viWarranty Terms and Conditions .viGENERAL VIEW . VII11.11.21.31.41.51.6INTRODUCTION . 1Memor X3 Description. 1Available Models . 3Package Contents . 4Inserting a MicroSD Card . 5Removing the MicroSD Card . 8Accessories. 922.12.22.3BATTERIES AND MAINTENANCE . 10Charging the Battery Pack . 10Replacing the Battery Pack . 12Cleaning the Mobile Computer. 1633.13.23.33.43.53.63.7CONNECTIONS . 17USB Connection . 17Connection to USB Peripherals . 19RS232 Connection . 21WLAN Connection . 22WPAN Connections . 24Connection Cables . 25Wireless and Radio Frequencies Warnings . 4.54.5.14.5.2USE AND FUNCTIONING . 28Startup . 28Using the Stylus . 30Data Capture. 31Laser Data Capture . 32Imager Data Capture. 33Linear Imager Data Capture. 35Description of the Keyboards . 37Resetting the Memor X3 . 40Status Indicators . 42LED Status . 42Taskbar . 43Control Panel . 44Data Capture Configuration . 45Configure . 46iii
.10.44.10.54.114.124.12.1Capture . 48DL Buttons . 49Registry . 55Files Admin . 56Wireless Communications. 59Stylus Calibration . 64Audio Settings . 67Connecting to Other Computers . 69Windows Mobile Device Center. 69Bluetooth Manager Device Setup . 71FTP Server Setup . 79Backup Directory File Management . 80Datalogic Firmware Utility . 81Retrieving a Firmware Image Update . 81Installing DFU on the Host PC . 82Updating the Firmware . 83Datalogic Configuration Utility . 84Datalogic Desktop Utility . 85Administrative Options (Admin tab). 86Locked Web Browser Options (LockedWeb tab) . 89Status Icons Options (Status Tab) . 94Windows Controls . 95AppSelector Options (AppSelect tab). 97AppSelector (Application Selector) . 100Locked Web Browser . 101Locked Web Browser Special Metatags . 10355.15.2TECHNICAL FEATURES . 107Technical Data . 107Reading Diagrams . 1126TEST CODES . 115REGULATORY INFORMATION . 119General Safety Rules . 119Power Supply . 119Laser Safety . 120LED Class . 126Canadian Statement . 126Marking and European Economic Area (EEA) . 127Statement of Compliance . 127Statement of Compliance . 127Frequency Ranges . 130FCC Compliance . 131Industry Canada Compliance . 133SAR Compliance . 134WEEE Compliance . 135iv
GLOSSARY . 137INDEX . 141v
1REFERENCESCONVENTIONSThis manual uses the following conventions:“User” refers to anyone using a Memor X3 mobile computer.“mobile computer” and "Memor X3" refer to Memor X3 mobile computer.“You” refers to the System Administrator or Technical Support person using thismanual to install, configure, operate, maintain or troubleshoot a Memor X3 mobilecomputer.“Single Dock” refers to the Memor X3 Single Slot Dock.The label artworks may be only a draft. Refer to the product labels for more preciseinformation.REFERENCE DOCUMENTATIONFor further information regarding Memor X3 refer to the SDK Help on-Line.SUPPORT THROUGH THE WEBSITEDatalogic provides several services as well as technical support through its website.Log on to www.datalogic.com and click on the SUPPORT link which gives youaccess to:Downloads by selecting your product model from the dropdown list in the Search byProduct field for specific Data Sheets, Manuals, Software & Utilities, and Drawings;Repair Program for On-Line Return Material Authorizations (RMAs) plus RepairCenter contact information;Customer Service containing details about Maintenance Agreements;Technical Support through email or phone.WARRANTY TERMS AND CONDITIONSThe warranty period is 1 year for the device and 90 days for consumables (e.g.battery, power supply, cable etc.) from date of purchase at our company.vi
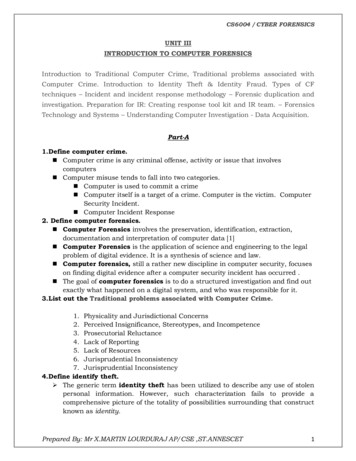
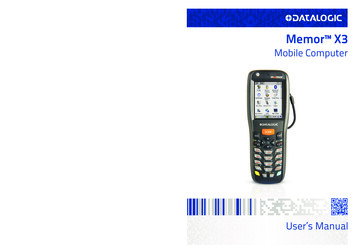
GENERAL VIEWBCDMIAJKELFGHA)B)C)D)E)F)G)QVGA 64K Color DisplayON/OFF Power KeySpeakerLEDsScan KeyKeyboardGuitar Pick Stylus*N) QVGA 64K Color DisplayO) Good Read or UserProgrammable LEDP) Charging Status LEDH)I)J)K)L)M)MicrophoneLaser Safety LabelRear SpeakerProduct Label (under battery)Battery CoverSide scan key (on both sides ofthe mobile computer)T) MicrophoneU) Strap with Stylus HolderV) Laser Safety LabelW) Rear Speaker*vii
1Q) SpeakerR) Scan KeyS) KeyboardviiiX) ON/OFF Power KeyY) Product Label (under battery)Z) Battery Cover
NO*N) Data Capture WindowO) DC Charger ConnectorPQP) Communication/Charger Connector(through cradle)Q) Micro USB CommunicationConnector (through cable)*Remove protective film cover before useix
1x
INTRODUCTION11.11INTRODUCTIONMEMOR X3 DESCRIPTIONFollowing the Datalogic Memor in the compact segment of Portable Data Terminals,the Memor X3 mobile computer is Datalogic’s ultimate solution offering ease of use,power and durability in a pocketable form factor.The Memor X3 features a bigger and crisper display (2.4”) and longer-lastingbatteries (1430 and 2300 mAh) in a form factor that has the same shape (only 3mmlonger) and the same weight as its predecessor. In addition to the models with Laserand with 2D Imager, its offer of scan engines now includes a CCD Linear Imager, soas to address the needs of a wider range of customer applications.The Memor X3 is built on the microprocessor XScale PXA310, working with a clock**speed of 806 MHz . The RAM and Flash Memory have been increased to 256 Mband 512 Mb in order to offer more space for running simultaneous applications, formanaging large databases, or for use with asynchronous/thick clients when off-lineautonomy is required. Moreover, the memory storage capacity can be furtherincreased through the user accessible Micro SD Card Slot.The Memor X3 computer architecture is paired with Microsoft Windows CE 6.0operating system, offered in 2 different versions: (1) Windows CE 6.0 Pro, bundledwith Microsoft WordPad and Internet Explorer; (2) Windows CE 6.0 Core, bundled ina lighter package without browser and with a lighter set of features (e.g. no RDP, noWordPad, no AYGShell).The software development kit (SDK) for Memor X3 enables to create applicationsunder Windows CE (both Pro and Core) or under multi-platform environments suchas .NET.The Memor X3 offers enhanced WiFi connectivity IEEE 802.11abgn, able to work inboth the bands 2.4GHz and 5.2GHz. Complemented by a CCX v4 securitycertification from Cisco, the Datalogic Memor X3 provides infrastructure compatibilityfocused on enterprise requirements for encrypted communication and seamlessroaming. In addition to that, the Bluetooth Wireless Technology v2.1 with EnhancedData Rate (EDR) connects headsets, printers and other peripherals while eliminatingcumbersome wires and costly replacement of damaged cables.Durability ratings protect the computing investment against accidental drops andoccasional exposure to liquids and dust. A Gorilla Glass 2 makes the scan window infront of the laser engines resistant to accidental scratching and damage.*except for models with CCD scan engine, featuring a 624 MHz clock speed and 128-Mb RAM1
11 MEMOR X3The Wavelink maintenance and management tools make the Datalogic Memor X3a simple device to both deploy and maintain. Datalogic Firmware, Desktop andConfiguration Utilities, as well as a new Locked Web Browser complete the packagewith unprecedented ability to customize device configuration to the different useenvironments and processes.2
INTRODUCTION1.21AVAILABLE MODELSThe Memor is available in different models depending on the options it is equippedwith. All options are listed below: communication options: WiFi IEEE 802.11abgn Bluetooth , Batch data capture options: laser, 2D imager, CCD linear imager operating system: Windows CE 6.0 Pro, Windows CE 6.0 CoreFor further details about the Memor models refer to the web site:http://www.datalogic.com.For further information regarding Windows CE refer to the he currently available models are: 944250001Memor X3, Batch, 128 MB RAM/512 MB Flash, 624 MHz, 25key Numeric, Linear Imager with Green Spot, Windows CE Core 6.0 944250002Memor X3, 802.11 a/b/g/n CCX V4, Bluetooth , 128 MBRAM/512 MB Flash, 624 MHz, 25-key Numeric, Linear Imager with Green Spot,Windows CE Core 6.0 944250003Memor X3, Batch, 256 MB RAM/512 MB Flash, 806 MHz, 25key Numeric, Laser with Green Spot, Windows CE Pro 6.0 944250004Memor X3, 802.11 a/b/g/n CCX V4, Bluetooth , 256 MBRAM/512 MB Flash, 806 MHz, 25-key Numeric, Laser with Green Spot,Windows CE Pro 6.0 944250005Memor X3, 802.11 a/b/g/n CCX V4, Bluetooth , 256 MBRAM/512 MB Flash, 806 MHz, 25-key Numeric, 2D Imager with Green Spot,Windows CE Pro 6.03
1 MEMOR X311.3PACKAGE CONTENTSThe Memor X3 package contains: 1 Memor X3 mobile computer 1 AC/DC power supply 1 plug kit 1 standard Micro USB cable 1 hand strap with stylus holder (Windows CE Pro models only) 1 extensible stylus (Windows CE Pro models only) 1 guitar pick cord 1 Quick Start Guide 1 Safety and Regulatory Addendum 1 Wavelink Avalanche Insert 1 End User License Agreement (EULA) SheetRemove all the components from their packaging; check their integrity and comparethem with the packing documents.Keep the original packaging for use when sending products to thetechnical assistance center. Damage caused by improperpackaging is not covered under the warranty.CAUTIONRechargeable battery packs are not initially fully charged. Thereforethe first operation to perform is to charge them. See section 2.1.NOTE4
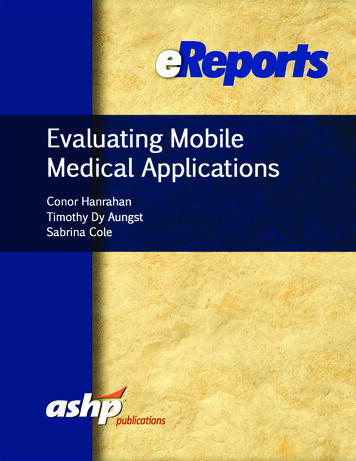
INTRODUCTION1.41INSERTING A MICROSD CARDThe Memor X3 supports microSD memory cards. To access the microSD card slotand insert the card, proceed as follows:1.Turn off the Memor X3.2.Press the latch release button and pull the latch down; then remove the coverand the battery pack:3.Open the microSD card slot by lifting up the locking plate:5
11 MEMOR X34.Shift the cardholder upwards and then pull it up:5.Insert the microSD card with the written part upward:6.Lock the card into place by pushing the cardholder down and then shifting itdownwards; push the locking plate down:6
INTRODUCTION7.1Reinsert the battery cover. First insert first the upper side and then press thelatch release button and pull the latch down to insert the bottom. Push theknurled section of the latch upward to close the cover.7
1 MEMOR X311.5REMOVING THE MICROSD CARDTo remove the microSD card, follow the steps above to access the SD area, andremove it from its slot.Follow proper ESD precautions to avoid damagingmicroprocessors in the Memor X3 or the microSD card itself.CAUTIONtheProper ESD precautions include, but are not limited to, working onan ESD mat and ensuring that the operator is properly grounded.Do not force the card. If you feel resistance, remove the card, checkthe orientation, and reinsert it.Do not use the microSD card slot for any other accessories.8
INTRODUCTION1.6 1ACCESSORIESCradles94A150058 DOCK, SINGLE SLOT, MEMORX3 w AUX. SLOT94A150059 DOCK, ETHERNET SINGLE SLOT, MEMORX394A150060 CHARGER, 4 SLOT DOCK, MEMORX3 Batteries94ACC0083 MEMOR X3 STANDARD BATTERY94ACC0084 MEMOR X3 LARGE CAPACITY BATTER Power Supply94ACC1324 PG5-30P35 AC/DC POWER SUPPLY EU/USA PLUG94ACC1334 PG5-30P35 AUS. PLUG ADAPTER94ACC1335 PG5-30P35 UK PLUG ADAPTER94ACC1339 PG5-30P35 EU. PLUG ADAPTER Cables94A051020 CAB-427 RS232 NULL MODEM CABLE94A051022 WIN-NET Serial CAB (HRS ST40x-18S-CV)94A051024 USB A (4 pin F) to Mini A (5 pin M)94A051968 Cable, Micro USB, Client94A051969 Cable, Micro USB, HostUse only Datalogic approved power supply and cables. Use of analternative power supply will invalidate any approval given to thisdevice and may be dangerous.NOTE9
1 MEMOR X322BATTERIES AND MAINTENANCEBy default, the main battery pack is disconnected at the factory toavoid damage due to excessive draining.NOTEAnnual replacement of rechargeable battery pack avoids possiblerisks or abnormalities and ensures maximum performance.CAUTION2.1CHARGING THE BATTERY PACKMemor X3 battery pack is not initially fully charged. After installing the battery, chargeit with the power supply or with the single dock. Moreover recharging is possible byUSB Direct connection with the host computer, but with longer charging times andonly if the mobile computer off.The battery pack autonomy varies according to many factors, suchas the frequency of barcode scanning, RF usage, battery life,storage, environmental conditions, etc.NOTEThe battery icon on the Taskbar indicates when the battery pack is low.During the charging process the LED positioned at the right side of the display glowsred constantly. Once the charging process has been completed this LED glows greenconstantly (see par. 4.4).The stand alone battery pack may be charged using the spare battery charging sloton the back of the single slot dock or the multi battery charger.Do not use the Memor X3 until batteries are charged for minimum 4hours.CAUTION10
BATTERIES AND MAINTENANCE2Risk of explosion if battery is replaced by an incorrect type.Dispose of used batteries according to the instructions.CAUTIONIl y a risque d’explosion si la batterie est remplacée par une batteriede type incorrect.CAUTIONMettre au rebut les batteris usagées confor mément aux instructions.Avoid storing batteries for long periods in a state of full charge or verylow charge.CAUTIONWe recommend charging the battery pack every two to three monthsto keep its charge at a moderate level to maximize battery life.Even if the storage temperature range is wider, in order to achievethe longest battery life, store the terminal and the spare batteriesbetween 20 to 30º C (68 to 86º F).NOTEMemor X3 (including spare battery) should be charged at an ambienttemperature between 0 to 40 C ( 32 to 104 F) to achieve themaximum charging rate. Never charge the main device or sparebatteries in a closed space where excessive heat can build up.The battery level may display incorrectly for several minutes after theMemor X3 is disconnected from its charger if the charging cycle isnot completed.NOTEThe Memor X3 may get warm during charging; this is normal anddoes not mean a malfunction.NOTEUse only a USB-IF compliant USB port as a charging source.NOTE11
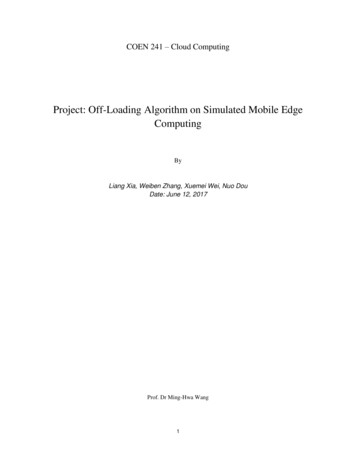
1 MEMOR X322.2REPLACING THE BATTERY PACKTo correctly replace the battery pack, proceed as follows.1.Turn off the Memor X3 .2.Press the latch release button and pull the latch down; then remove the batterycover:3.Install the new battery pack, first insert the upper side (contacts), then thebottom side of the battery pack into the slot:12
BATTERIES AND MAINTENANCE4.2Reinsert the cover. First insert the upper side and then press the latch releasebutton and pull the latch down to insert the bottom. Push the knurled section ofthe latch upward to close the cover:Installing, charging and/or any other action should be done byauthorized personnel and following this manual.WARNINGThe battery pack may get hot, explode, ignite, and/or cause seriousinjury if exposed to abusive conditions.If the battery pack is replaced with an improper type, there is risk ofexplosion and/or fire.Do not place the battery pack in or near a fire or other heat source;do not place the battery pack in direct sunlight, or use or store thebattery pack inside unventilated areas in hot weather; do not placethe battery pack in microwave ovens, in clothes dryers, in highpressure containers, on induction cook surfaces or similar devices.Doing so may cause the battery pack to generate heat, explode orignite. Using the battery pack in this manner may also result in a lossof performance and a shortened life expectancy.Use only a Datalogic approved power supply. The use of analternative power supply will void the product warranty, may causeproduct damage and may cause heat, an explosion, or fire.The area in which the units are charged should be clear of debrisand combustible materials or chemicals.Do not use the battery pack of this terminal to power devices otherthan this mobile computer.Immediately discontinue use of the battery pack if, while using,charging or storing the battery pack, the battery pack emits anunusual smell, feels hot, changes colour or shape, or appearsabnormal in any other way.13
1 MEMOR X32WARNINGDo not short-circuit the battery pack contacts connecting the positiveterminal and negative terminal. This might happen, for example,when you carry a spare battery pack in your pocket or purse;accidental short–circuiting can occur when a metallic object such asa coin, clip, or pen causes direct connection of the contacts of thebattery pack (these look like metal strips on the battery pack). Short–circuiting the terminals may damage the battery pack or theconnecting object.Do not apply voltages to the battery pack contacts.Do not pierce the battery pack with nails, strike it with a hammer,step on it or otherwise subject it to strong impacts, pressures, orshocks.Do not disassemble or modify (i.e. bend, crush or deform) the batterypack. The battery pack contains safety and protection devices,which, if damaged, may cause the battery pack to generate heat,explode or ignite.In case of leakage of liquid from the battery, avoid contact with liquidthe skin or eyes. If the contact occurs, immediately wash the affectedarea with water and consult a doctor.Do not solder directly onto the battery pack.Do not expose the battery pack to liquids.Avoid any knocks or excessive vibrations. If the device or the batteryis dropped, especially on a hard surface, you should take it to thenearest Authorised Repair Centre for inspection before continuing touse it.If your device stops working for any reason, do not use its battery onother electronic devices without a prior check and approval by anauthorized repair center.Do not replace the battery pack when the device is turned on.Do not remove or damage the battery pack’s label.Do not use the battery pack if it is damaged in any part.Battery pack usage by children should be supervised.Collect and recycle waste batteries separately from the device incompliance with European Directive 2006/66/EC, 2011/65,2002/96/EC and subsequent modifications, with US and Chinaregulatory laws and regulations about the environment.14
BATTERIES AND MAINTENANCENOTE2To maximize operating autonomy, the Memor X3 checks itsbattery level at all times. If the battery is not sufficiently charged,the Memor X3 will not turn on when the ON/OFF Power button ispressed. In this case, either substitute a sufficiently chargedbattery, insert the Memor X3 into a powered cradle, or plug it intoa wall charger.To maximize battery life, turn off radios when they are notneeded.NOTE15
1 MEMOR X322.3CLEANING THE MOBILE COMPUTERPeriodically clean the Memor X3 with a slightly dampened cloth.Do not use alcohol, corrosive products or solvents.16
CONNECTIONS33CONNECTIONS3.1USB CONNECTIONYou can use any standard micro USB cable to directly connect the Memor X3 to ahost computer to transfer data through the USB interface.ACBKey:AHost computerBStandard Micro USB cableCMemor X3Connection through the cable is compliant to 2.0 USB standard.NOTE17
1 MEMOR X33The Single Dock can be connected to the host computer by any standard mini USBcable.Once the host computer has been turned on, insert the Memor X3 mobile computerinto the cradle.ACBDKey:AHost computerCSingle Slot DockBStandard mini USB cableDPower SupplyConnection through the cradle complies to USB 2.0 standard.NOTEThe actual data transfer speed can be appreciably lower than themaximum theoretical speed.NOTE18
CONNECTIONS3.23CONNECTION TO USB PERIPHERALSYou can connect the Memor X3 to a standard USB keyboard or to a standard USBflash memory device. Connect the terminal to a standard A (4 pin female) to micro A(5 pin male) USB cable. For all these devices maximum current draw must be lessthan 100mA.BACKey:AKeyboard with USB interfaceBMemor X3C94A051024 (Standard A to Micro A USBcable)BACKey:AUSB hard drive/ externalmemory sourceBMemor X3C94A051024 (Standard A to Micro A USBcable)Connect first the USB peripheral to the cable, and then the cable tothe Memor X3.NOTE19
1 MEMOR X33Memor X3 works with most of the mentioned USB peripherals.Datalogic cannot guarantee the interoperability of Memor X3 with alldevices on the market.NOTEConnection is compliant to USB 1.1 standard.NOTEThe actual data transfer speed can be appreciably lower than themaximum theoretical speed.NOTE20
CONNECTIONS3.33RS232 CONNECTIONYou can use a cable to directly connect the Memor X3 to a host computer to transferdata through the RS232 interface:ACBKey:AHost computerB94A051022 WIN-NET(HRS ST40X-18S-CV)CMemor X3The Single Slot Dock can be connected to the Host by means of a standard nullmodem cable such as Datalogic 94A051020 CAB-427 for 9-pin connections.Once the host computer has been turned on, insert the Memor X3 mobile computerinto the dock.ABCDKey:AHost ComputerCSingle Slot DockB94A051020 CAB-427RS232 Null Modem CableDPower Supply (only necessary for batterycharging) In this case the p
certification from Cisco, the Datalogic Memor X3 provides infrastructure compatibility focused on enterprise requirements for encrypted communication and seamless . front of the laser engines resistant to accidental scratching and damage. * except for models with CCD scan engine, featuring a 624 MHz clock speed and 12-8Mb RAM. 1: