Transcription
Configuring the Clearswift Secure Email Gatewayto Work with Microsoft Office 365Version 3.2December 2021
Copyright Terms and ConditionsCopyright Help/Systems LLC and its group of companies.The content in this document is protected by the Copyright Laws of the United States ofAmerica and other countries worldwide. The unauthorized use and/or duplication of thismaterial without express and written permission from HelpSystems is strictly prohibited.Excerpts and links may be used, provided that full and clear credit is given to HelpSystemswith appropriate and specific direction to the original content. HelpSystems and itstrademarks are properties of the HelpSystems group of companies. All other marks areproperty of their respective owners.Page 2 of 31
ContentsIntroduction . 4Configure the SEG to Scan Inbound Email Before Routing to Office 365 . 5Configure the SEG to Scan Outbound Email from Office 365 . 7Configure the SEG to Detect Spam in an Office 365 Environment . 10Configure the SEG to Detect Malicious URLs in an Office 365 Environment . 11Configure the SEG to Only Send and Receive Messages from Valid Email Addresses in yourDomain . 13Configure the SEG to Prevent Relaying Spoofed Email from Office 365 . 14Configure an Office 365 Connector to Route Outgoing Email to the SEG . 16Configure an Office 365 Rule to Route Outgoing Email to the SEG . 20Configure Office 365 Connector to Accept Incoming Email from the SEG . 22Configure the SEG to Scan Internal Office 365 Email . 26Configure Office 365 to Route Internal Email via the SEG . 29Further Information. 31Page 3 of 31
IntroductionThis document explains how to integrate the Clearswift Secure Email Gateway (SEG) withMicrosoft Office 365 in order to provide enhanced Adaptive Data Loss Prevention (A-DLP)defenses and complement the Office 365 hygiene components.There are numerous Office 365 packages suited to different customer requirements. Thisdocument is based on the Office 365 Enterprise E3 package which is Microsoft’s targetplatform for mid and larger sized enterprises.This document assumes that you are familiar with how to configure the SEG. If you wouldlike more information on basic configuration of the SEG, please refer to the online help.Scheduled classroom and webinar training courses are also available rt/training-coursesYou will need to ensure that any SPF, DKIM, DMARC, etc. records that you have publishedby your DNS provider will need to be updated to include details of your SEG(s). If yourdomain is managed by Microsoft, you may need to contact Microsoft directly to get yourDNS records updated.It is recommended that you install a valid TLS certificate on your SEG, as this will allow youto configure a TLS connection between your Office 365 instance and SEG, where you canvalidate the TLS certificate used by the SEG. You can learn more about configuring TLS onthe SEG in this document.The process for configuring the Clearswift SEG to work with Microsoft Office 365 can bebroken down into a number of steps: Configure the SEG to scan inbound email before routing to Office 365Configure the SEG to scan outbound email from Office 365Configure the SEG to detect spam in an Office 365 environmentConfigure the SEG to detect malicious URLs in an Office 365 environmentConfigure the SEG to only send and receive messages from valid email addresses inyour domainConfigure the SEG to prevent relaying spoofed email from Office 365Configure an Office 365 connector to route outgoing email to the SEGConfigure an Office 365 rule to route outgoing email to the SEGConfigure an Office 365 connector to accept incoming email from the SEGConfigure the SEG to scan internal Office 365 emailConfigure Office 365 to route internal email via the SEGPlease note that it is recommended that you perform all of the steps detailed in thisdocument. If you do not implement one of the steps, you may experience disruption to youremail flow.Page 4 of 31
Configure the SEG to Scan Inbound Email Before Routing toOffice 365In this scenario your organization should ensure that your DNS MX records are directed toyour SEG server(s).The SEG(s) will then process emails according to policy and valid messages will be routed toyour organization’s Office 365 deployment.To configure the SEG to accept messages for your organization’s domain and route traffic toyour Office 365 instance:1. In the Clearswift Secure Email Gateway user interface, click on the System SMTPSettings Mail Domains and Routing.2. In the Hosted Domains tab, click on New.3. In the New Hosted Domain dialog, enter your organization’s email domain (e.g.aneesya.com) into the Domain field and click on Add.4. In the Email Routing tab, click on New.Page 5 of 31
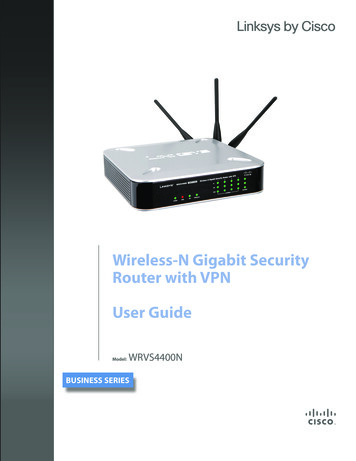
5. In the Add Email Route dialog:a. Enter your organization’s email domain (e.g. aneesya.com) into the Domainfield.b. Select the To a server radio button.c. Enter the Host Name for your organization’s Office 365 deployment (this canbe obtained from your Office 365 portal, under Domains and the DomainSettings for the relevant domain, e.g. aneesyacom.mail.protection.outlook.com) in the Server field.d. The value in the Port field should be 25.e. Ensure that the TLS drop down is set to none (you can enable mandatoryTLS later if you wish, please refer to the Help documentation).i. It is recommended that you enable opportunistic TLS under System Encryption TLS Configuration as a minimum whencommunicating between Office 365 and your SEG(s).f. Ensure that the Authentication drop down is set to None.g. Click on Add.Page 6 of 31
Configure the SEG to Scan Outbound Email from Office 365You now need to configure your SEG to allow Office 365 to send messages through yourSEG. You can do this by adding *.outbound.protection.outlook.com as a Client Host underyour Internal Email Servers Connection. This then treats any servers that have hostnamesending with outbound.protection.outlook.com as an internal email server. This is necessary,because your emails originating from Office 365 can be sent from any of thousands of mailservers.To do this:1. In the Clearswift Secure Email Gateway user interface, click on the System SMTPSettings Connections.2. Select the Internal Email Servers entry and then click on Edit.3. In the Client Hosts tab, click on New.4. In the New Client Host dialog:a. Enter the following in the Host field: *.outbound.protection.outlook.comb. Click on Add.It is recommended that you configure mandatory TLS between the SEG and Office 365.To do this:1. In the Clearswift Secure Email Gateway user interface, click on the System SMTPSettings Connections.2. Select the Internal Email Servers entry and then click on Edit.3. Click on the TLS Settings tab.Page 7 of 31
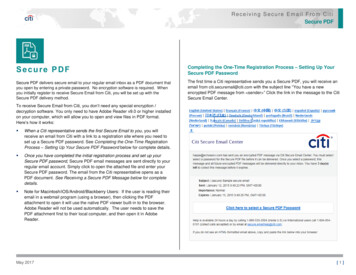
4. Configure the Outbound (When Acting as a Client) section as follows:a. Select the Use Mandatory TLS for this connection profile check box.b. Select the Use global settings (TLS 1.2) check box.c. Select the Use global settings (Medium) check box.d. Ensure the No validation radio button is selected.e. Click on Save.5. Configure the Inbound (When Acting as a Server) section as follows:a. Select the Require valid client certificate check box.b. Click on Save.6. Click on the System SMTP Settings Mail Domains and Routing.7. Click on the Email Routing tab.8. Use the check box to select the entry for your organization’s email domain that youcreated earlier and then click on Edit.Page 8 of 31
9. In the Edit Email Route dialog:a. Use the TLS drop down to select: Internal Email Serversb. Click on Update.Please note that for security reasons, Office 365 certificates do change from time to time, soyou should consult Microsoft documentation to obtain the current certificate ure-email-connectionsPage 9 of 31
Configure the SEG to Detect Spam in an Office 365EnvironmentBy default, comprehensive Spam detection is enabled using the Global spam rule. There aremany component parts that can be enabled/disabled/adjusted as necessary.For more information on configuring Spam detection, please see the Online Help.Page 10 of 31
Configure the SEG to Detect Malicious URLs in an Office 365EnvironmentAs well as detecting Malware and Spam, the SEG can also be configured to detect and blockmessages that contain malicious URLs.To do this:1. In the Clearswift Secure Email Gateway user interface, click on the Policy Manage Policy Definition Mail Policy Routes.2. Select route 2, which should be Anyone to My Company.3. Click on Edit which will open the Modify Policy Route page.4. In the Unless One of These Content Rules Triggers panel, click on New.5. In the Add a Content Rule dialog, click on Create New and select SanitizeMessage and then select Close.6. This will have created a Sanitize Message content rule at the bottom of the list ofrules.7. Select this new rule and press Edit.8. In the What To Look For panel, click on Click here to change these settings.9. In the URLs and Hyperlinks:a. Select Message subjects.b. Select Message bodies.c. Select Only the URLs defined in the selected lists.d. Select both Sophos and MailShell URL list.e. Click Save.10. In the What To Do panel, click on Click here to change these settings.11. In the Disposal Action, change the Perform no action to Hold in Virus areaand click Save.Page 11 of 31
12. Once again, from the Policy Manage Policy Definition Mail Policy Routes,select the route and click Edit to display the Modify Policy Route page.13. In the Modify Policy Route page, select the Sanitize Message content rule(currently at the bottom of the list) and click the up arrow until the rule is at position2 in the list.Page 12 of 31
Configure the SEG to Only Send and Receive Messages fromValid Email Addresses in your DomainTo limit the ability of third parties to use Office 365 accounts to relay spoofed messagesthrough your SEG it is recommended that you replace the standard My Company address liston the SEG with one that contains only valid email addresses within your organization.To do this:1. In the Clearswift Secure Email Gateway user interface, click on the Policy PolicyReferences Email Addresses.2. Create a My Company (Valid Addresses) address list by performing one of thefollowing:a. Edit the My Company address list to contain all of your organization’s validemail addresses and remove any wildcarded entries (e.g. *@aneesya.com).b. Create a new LDAP Synchronized Address List that will query yourdirectory server for all of the valid email addresses in your organization.3. Click on the Policy Mail Policy Routes.4. Replace all instances of the My Company address list with the newly created MyCompany (Valid Addresses) list.You have now limited the ability of third parties to relay emails through your SEG(s) frominside Office 365.Page 13 of 31
Configure the SEG to Prevent Relaying Spoofed Email fromOffice 365To further limit the ability of third parties to use Office 365 accounts to relay spoofedmessages through your SEG it is recommended that you configure Office 365 to add an XHeader to all of the emails that originate from your domains. You can then configure yourSEG to only deliver messages that appear to originate from your email domains and containthe appropriate X-Header value. This will help to address any attempts by third parties touse their own Office 365 account to spoof messages so that they appear to originate fromone of your email domains.The “Configure an Office 365 Rule to Route Outgoing Email to the SEG” section of this guidewill take you through the steps to configure Office 365 to add an X-Header containing aspecific value to any emails originating from one of your domains. Please note that youshould not apply this policy change to your SEG(s) until you have completed the steps in the“Configure an Office 365 Rule to Route Outgoing Email to the SEG” section.In this step, you will configure the SEG to scan for that X-Header and the correct value.To do this:1. In the Clearswift Secure Email Gateway user interface, click on the System MailDomains and Routing.2. Select your own domains.3. Click on Configure Microsoft 365 Access Tokens.4. In the Configure Microsoft 365 Access Tokens dialog, select the Add a newaccess token to the selected domains check box.5. In the Access token field, you can enter an alphanumeric string or press theGenerate button to generate a GUID value.6. In the Comment field, you can enter an optional description.7. Click on OK.Page 14 of 31
The X-header is not preserved in the message once it has been received and processed bythe SEG, this is for security purposes.Note that it is possible to define multiple Access Tokens per domain.Page 15 of 31
Configure an Office 365 Connector to Route Outgoing Email tothe SEGThe next step is to reconfigure your organization’s Office 365 portal to redirect all outboundemail to the SEG server(s). You should begin by creating a new connector to route emailsfrom your Office 365 deployment to the SEG server(s).To do this:1.2.3.4.5.In your organization’s Office 365 instance, click on Admin centers, Exchange.Click on mail flow.Click on connectors.In the connectors section, click on .In the Select your mail flow scenario dialog:a. Use the From drop down to select Office 365.b. Use the To drop down to select Partner organization.c. Click on Next.6. In the New connector dialog:a. Enter a name for the connector.b. Enter a description.c. Ensure that the Turn it on check box is selected.d. Click on Next.Page 16 of 31
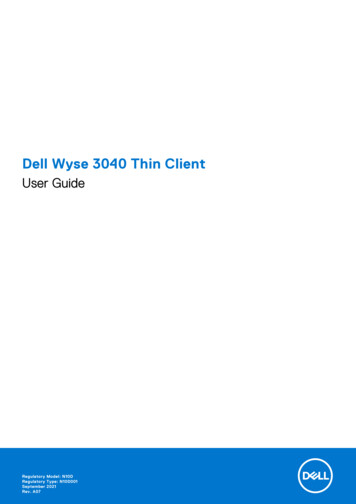
7. In the When do you want to use this connector? dialog:a. Select the Only when I have a transport rule set up that redirectsmessages to this connector radio button.b. Click on Next.8. In the How do you want to route email messages? dialog:a. Select the Route email through these smart hosts radio button.b. Select .c. In the add smart host dialog, enter the IP address/hostname of the SEG andthen click on Save.d. Repeat for any additional SEGs.e. Click on Next.Page 17 of 31
9. In the How should Office 365 connect to your partner organization’s email server?dialog:a. Specify if a mandatory TLS connection should be used and the appropriatesettings (it is recommended to at least use the default settings and youshould consider validating against the certificate used by the SEG).b. Click on Next.Page 18 of 31
10. In the Confirm your settings dialog, click on Next.11. In the Validate this connector dialog, enter one or more email addresses to send thevalidation message to and then click on Validate.12. Click on Close.13. Click on Save.You now have a connector configured to route messages from Office 365 via the SecureEmail Gateway.Page 19 of 31
Configure an Office 365 Rule to Route Outgoing Email to theSEGThe next step is to configure your organization’s Office 365 portal to route emails to the SEGserver(s) for scanning.To do this:1.2.3.4.5.In your organization’s Office 365 instance, click on Admin centers, Exchange.Click on mail flow.Click on rules.In the rules section, click on , Create a new rule In the new rule dialog:a. Enter a name for the rule.b. Click on More options c. Use the Apply this rule if drop down to select The sender , isexternal/internal.d. In the select sender location dialog:i. Use the drop down to select Inside the organization.ii. Click on OK.e. Click on add condition.f. Use the Apply this rule if and drop down to select The recipient , isexternal/internal.g. In the select recipient location dialog:i. Use the drop down to select Outside the organization.ii. Click on OK.h. Use the Do the following drop down to select Modify the messageproperties , set a message header.i. Click on the Set the message header *Enter text link.j. In the message header dialog:i. Enter an appropriate name for the message header (e.g. XClearswift-M365).ii. Click on OK.k. Click on the to the value *Enter text link.l. In the header value dialog:i. Enter the Access Token for the message header that was used inConfigure the SEG to Prevent Relaying Spoofed Email fromOffice 365 (e.g. 69fb81b6-a633-423d-ba6d-57150973cfb8). Itis recommended that you select a value with a random element tomake it hard to guess.ii. Click on OK.m. Click on add action.n. Use the Do the following and drop down to select Redirect the messageto , the following connector.o. In the select connector dialog:i. Use the Connector drop down to select the outbound Office 365 topartner organization connector that you created earlier (e.g. Office365 to Azure SEG).ii. Click on OK.p. Click on Save.Page 20 of 31
You should now be able to send messages from Office 365 via the Secure Email Gateway.Page 21 of 31
Configure Office 365 Connector to Accept Incoming Email fromthe SEGThe next step is to reconfigure your organization’s Office 365 portal to accept inbound emailfrom the SEG server(s). This is strictly only necessary if you wish to enforce TLS on thisconnection.To do this:1.2.3.4.5.In your organization’s Office 365 instance, click on Admin centers, Exchange.Click on mail flow.Click on connectors.In the connectors section, click on .In the Select your mail flow scenario dialog:a. Use the From drop down to select Partner organization.b. Use the To drop down to select Office 365.c. Click on Next.6. In the New connector dialog:a. Enter a name for the connector.b. Enter a description.c. Ensure that the Turn it on check box is selected.d. Click on Next.Page 22 of 31
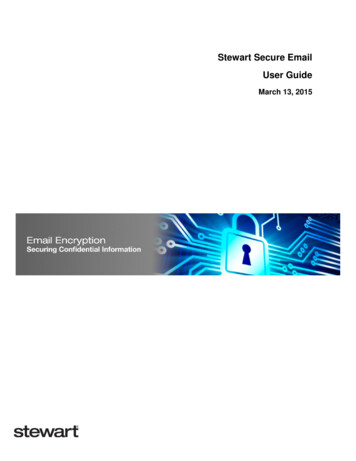
7. In the How do you want to identify the partner organization? dialog:a. Select the Use the sender’s IP address radio button.b. Click on Next.8. In the What sender IP addresses do you want to use to identify your partner? dialog:a. Select .b. In the add ip address dialog, enter the IP address of the SEG and then clickon OK.c. Repeat for any additional SEGs.d. Click on Next.Page 23 of 31
9. In the What security restrictions do you want to apply? dialog:a. Specify if a mandatory TLS connection should be used and the appropriatesettings (it is recommended to at least use the default settings and youshould consider validating against the certificate used by the SEG).b. Click on Next.Page 24 of 31
10. In the Confirm your settings dialog, click on Next.You should now be able to receive messages securely in Office 365 via the Secure EmailGateway.Page 25 of 31
Configure the SEG to Scan Internal Office 365 EmailIt is possible to route your internal Office 365 emails via the SEG in order to enforce aninternal email security and A-DLP policy.If you wish to do this, the first step is to configure your SEG to allow Office 365 to sendinternal emails through your SEG. You will need to create an internal My Company (ValidAddresses) to My Company (Valid Addresses) policy route.To do this:1. In the Clearswift Secure Email Gateway user interface, click on the Policy Manage Policy Definition Mail Policy Routes.2. Click on New.3. In the For Mail Sent section, click on New.4. In the Add Route Selector dialog:a. In the From section, select the My Company (Valid Addresses) checkbox.b. In the To section, select the My Company (Valid Addresses) check box.c. Click on Add.5. Ensure that the By Default Perform This Disposal Action section is set to:Deliver the messagePage 26 of 31
6. Use the Unless One Of These Content Rules Triggers section to add the contentchecks that you wish to apply to your internal email traffic.Page 27 of 31
7. Click on the Policy Manage Policy Definition Mail Policy Routes.8. Select the My Company (Valid Addresses) to My Company (Valid Addresses)policy route and move it to the top of the policy route table.You have now configured your SEG to scan internal Office 365 emails in order to enforce asecurity and A-DLP policy on them. You can create a more granular policy for incoming,outgoing and internal emails by creating additional policy routes as required.Page 28 of 31
Configure Office 365 to Route Internal Email via the SEGThe next step is to reconfigure your organization’s Office 365 portal to route internal emailsto the SEG server(s) for scanning.To do this:1.2.3.4.In your organization’s Office 365 instance, click on Admin centers, Exchange.Click on mail flow.Click on rules.Select the outbound Office 365 rule that you created earlier (e.g. SEG Interceptor)and then click on the Edit button (the pencil icon).Page 29 of 31
5. In the Rule dialog:a. Use x to delete the The recipient is located Outside the organizationcondition.b. Click on Save.You have now configured Office 365 to route internal emails via the SEG in order to enforcean internal email security and A-DLP policy. If you wish to exempt certain internal emailsfrom being routed via the SEG, then you can use the add exception button in the rule thatyou just amended to exempt the appropriate emails from the rule.Page 30 of 31
Further InformationThis document explained how to integrate the Clearswift Secure Email Gateway (SEG) withMicrosoft Office 365 in order to provide enhanced Adaptive Data Loss Prevention defensesand complement the Office 365 hygiene components.If you require further assistance, you can refer to the: Online Help:Available through the Clearswift Secure Email Gateway user interface as well as theHelpSystems Community PortalClearswift Support Portal and lsClearswift Professional Services rt/professional-servicesScheduled classroom and webinar training pport/training-coursesPage 31 of 31
1. In the Clearswift Secure Email Gateway user interface, click on the System SMTP Settings Mail Domains and Routing. 2. In the Hosted Domains tab, click on New. 3. In the New Hosted Domain dialog, enter your organization's email domain (e.g. aneesya.com) into the Domain field and click on Add. 4. In the Email Routing tab, click on New.