Transcription
Available applications and services are subject to change at any time.
Table of ContentsIntroduction1Before You Begin1Operating Environment (Compatible OSs)1Package Contents2SSID and Security Key2Additional Information3Contacting Sprint Customer Service3Trademarks and Copyright3Get Started4Parts and Function4SIM Card5Handling a SIM Card5Insert the SIM Card6Remove the SIM Card7Battery Use8Insert the Battery8Remove the Battery9Charge the Battery9Turn Your Device On and Off11Control Your Device Using the Power Button12Sleep Mode12Connect with WiFi (WLAN)Connect to the Mobile Hotspot WiFi Network1313Find and Select the Mobile Hotspot WiFi Network13Connect Through WPS13Guest WiFi Network15Turn the Guest WiFi Network On and Off15Guest WiFi Password15Connect with the Micro-USB Cable17Making a Tethered Connection17TRU-Install18LCD InterfaceLCD Home Screen2020i
Signal Strength Icon21Battery Icon21Alerts21LCD Information Screens22Alerts Screen22Device Info Screen22Settings24Mobile Hotspot Manager Overview24Mobile Hotspot Manager Home Page24Data Usage26My Account26Alerts27Status (Connection Details)27WiFi Page28Connect Tab28WiFi Options Tab29Show or Hide the Main WiFi Network Name and Password on LCD Home Screen32Change the WiFi Network Name33Set the Maximum Number of WiFi Devices33Change the WiFi Security33Turn WiFi On or Off When Tethered34Change the WiFi Channel35MAC Filter Tab35Manage the Block List (MAC Filtering)36Settings Page38General Device Settings38Change the Mobile Hotspot Manager Password40Set the Sleep (Inactivity) Timer40Set the Language40Set the LCD Timeout41Set the LCD Brightness41Software and Reset Tab42Export Settings43Import Settings43Update the Mobile Hotspot Software and Firmware43Download Software Updates44Reset Your Device44ii
System Logs46Network Preferences46Access Point Name (APN)47SIM Security48Network Status Details49Router Basic Settings50DMZ51Enable VPN Passthrough52Enable UPnP (Universal Plug and Play)53DHCP53Port Forwarding54Port Filtering56About PageView Network Activation InformationAppendix586061Frequently Asked Questions61Tips62Extending Battery Life62Mobile Hotspot Location63Improving Signal Strength63Improving WiFi Performance64Security Tips65Find the MAC Address65Find the IP Address66Troubleshooting66General Tips66LCD Is Dark67Insufficient Signal Strength67Cannot Connect to WiFi67Cannot Connect Through USB68Cannot Display the Home Page68Cannot Connect to the Mobile Broadband Network69Cannot Check for Updates70Technical Specifications70Radio Frequency and Electrical Specifications70Software Specifications71Environmental Specifications72iii
Mechanical SpecificationsLegal7272Patents72Licenses72GNU General Public License (Version 2)73GNU General Public License (Version 3)78GNU Lesser General Public License (Version 2.1)89GNU Lesser General Public License (Version 3)96fontconfig License99libxml2 License99locapi License101pimd License102shadow License102ISC License103OpenSSL License103Original SSLeay License104Copyright106Limitation of Liability106Additional Information and Updates106Safety Information107Important Notice107Safety and Hazards107Proper Battery Use and Disposal107Regulatory Notices108Index110iv
IntroductionThe following topics describe the basics of using this guide and your new mobile broadband device.Before You BeginThank you for purchasing your new NETGEAR Fuse Mobile Hotspot. The following topics explainhow best to use this guide to get the most out of your mobile broadband device.Before Using Your DeviceRead Safety Information thoroughly for proper usage.Accessible services may be limited by subscription contract conditions.Guide Usage NotesNote that most descriptions in this guide are based on your device's default settings at the time ofpurchase.Screenshots and Key LabelsScreenshots and Key labels are provided for reference only. Actual windows, menus, etc. may differin appearance.Other NotationsIn the user guide, the NETGEAR Fuse Mobile Hotspot may be referred to either as "mobilebroadband device," "hotspot," "device," or "WiFi router."Operating Environment (Compatible OSs)The table below outlines the compatible operating environments for your device. Use outside theseenvironments may affect performance. Additional factors (hardware, connected peripherals,installed applications, etc.) may also affect performance.nnFor computer support, OS version upgrade information, etc., see the correspondingmanufacturer's product support documentation.The information for operating environment (compatible OSs) listed below is the currentinformation for your device sold as of May 2015.Introduction1
ItemCompatible Operating Systems (OSs)DescriptionWindows 8 (x86), Windows 7, Windows Vista ,Windows XP SP3, or Mac OS X (version 10.5 orlater)Mac OS 10.6–10.8, iOS4, Android 2.1, Blackberry 5.0Additional RequirementsOne or more computers that support WiFi(802.11b/g/n).If you’ll be connecting your device through USB, a USB2.0 slotAvailable Hard Disk CapacityN/ACompatible BrowsersInternet Explorer (version 8.0 or later)Mozilla Firefox (version 4.0 or later)Google Chrome (version 17 or later)Apple Safari (version 5.0 or later)Apple Safari Mobile (version iOS 4.0)Android Browser (Android OS 2.2 or later)Package ContentsSee below for details on everything you will find in the box for your NETGEAR Fuse Mobile Hotspot.nNETGEAR Fuse Mobile HotspotnBattery covernRechargeable batterynAC charger with type-A USB portnMicro-USB cablenMicro-SIM (preinstalled)nGet Started guidenRecycling envelopeSSID and Security KeyBefore connecting WiFi devices to your NETGEAR Fuse Mobile Hotspot, you will need to confirmthe SSID (network name) and security key (WiFi password).nThis information displays on the LCD home screen when you power on your device.Introduction2
Additional InformationThe following list describes additional information useful to know before you begin using yourNETGEAR Fuse Mobile Hotspot.nnnYour mobile broadband device accommodates software updates. Always use the latestsoftware.Note that connection speeds may drop or connections may be disabled depending on line trafficor connection environments.When using WLAN overseas, change the settings according to the laws of those countries.Contacting Sprint Customer ServiceYou can reach Sprint Customer Service online or by calling toll-free.nLog in to your account at sprint.com/mysprint.nCall us toll-free at 1-888-788-4727 (business use) or 1-888-211-4727 (personal use).Trademarks and CopyrightnNETGEAR and the NETGEAR logo are trademarks of NETGEAR, Inc.nWindows is a registered trademark of Microsoft Corporation.nMac and Mac OS are trademarks of Apple Inc., registered in the U.S. and other countries.nLinux is the registered trademark of Linus Torvalds in the U.S. and other countries.nWiFi, WPA, and WPA2 are registered marks of the WiFi Alliance.nQUALCOMM is a registered trademark of QUALCOMM Incorporated.nOther trademarks are the property of the respective owners. 2015 Sprint. All rights reserved. No reproduction in whole or in part without prior written approval.Introduction3
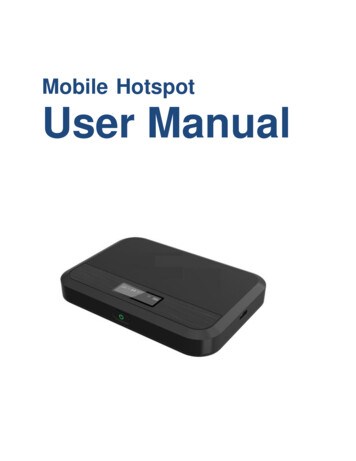
Get StartedThe following topics give you all the information you need to set up your mobile device the first time.Parts and FunctionLearn your device's primary external features and buttons.Front ViewBack View (Battery Cover Removed)Get Started4
Interior (Battery Removed)PartDescriptionLCD ScreenView device status. (See LCD Interface.)Power buttonToggle power on or off.External antenna ports (2)RF antenna connectors for advanced users (slide open toaccess).Micro-USB PortConnect the micro-USB cable for charging or a tetheredconnection.Battery CoverRemove the battery cover to remove or insert the battery orSIM card.SIM Card SlotThe SIM card is preinstalled.SIM CardThe SIM card is an IC card containing your device's phone number and other customer information.Note: Your SIM card is preinstalled.Handling a SIM CardKeep the following in mind when handling a SIM card.nThe customer is responsible for any damage caused by inserting the SIM card in another-brandIC card reader, etc. The company is not responsible in such case.nAlways keep the IC chip clean.nWipe clean with a dry, soft cloth.Get Started5
nAvoid applying labels. May damage the SIM card.nSee instructions included with the SIM card for handling.nThe SIM card is the property of the company.nThe SIM card is replaceable (at cost) in case of loss/damage.nReturn the SIM card to the company when cancelling subscription.nReturned SIM cards are recycled for environmental purposes.nNote that SIM card specifications and performance may change without notice.nnnNETGEAR recommends that you keep a separate copy of information that is stored on the SIMcard. NETGEAR is not responsible for damages from stored information that is lost.Always follow emergency procedures to suspend service if your SIM card or device (SIM cardinserted) is lost or stolen. For details, contact Customer Service.Always power off the mobile broadband device before inserting or removing the SIM card.Insert the SIM CardFollow these instructions to insert a SIM card. Remember to power off your device before inserting aSIM card.Note: Your device's SIM card is preinstalled. These instructions are for reference only.1. Remove the battery cover.2. Remove the battery.3. Open the SIM card cover.4. Insert the SIM card.lInsert gently with gold IC chip facing downward.Get Started6
5. Close the SIM card cover.6. Insert the battery.lMake sure that the battery contact points align with those inside the battery compartment.7. Attach the battery cover.Remove the SIM CardFollow these instructions to remove the device's SIM card.Note: Only remove the SIM card if instructed by Sprint customer service personnel.1. Press and hold the Power button to turn off the device before removing the SIM card.2. Remove the battery cover.3. Remove the battery.4. Open the SIM card cover.5. Remove the SIM card.6. Close the SIM card cover.7. Insert the battery.lMake sure that the battery contact points align with those inside the battery compartment.8. Attach the battery cover.Get Started7
Battery UseThe following topics explain how to insert and remove your device's battery.Battery CautionsStorage: Avoid storing or leaving battery with no charge remaining. Saved information and settingsmay become lost or changed, or battery may become unusable. Charge once every six monthsbefore storing or leaving unused for a long period.Bulges: Depending on use, bulges may appear near end of battery life. This does not affect safety.Replacing Battery: The battery is a consumable item. It needs to be replaced if operating timeshortens noticeably. Purchase a new battery.Cleaning: Clean soiled terminals between battery and device with a clean, dry cotton swab. Soiledterminals can result in a poor connection and prevent charging, etc.Insert the BatteryBefore you use your device, install the battery.1. At the antenna connector shown below, lift the raised edge of the battery cover to remove it.2. Insert the battery into your device, contacts end first.lMake sure that the battery contact points align with those inside the battery compartment.Get Started8
3. Replace the battery cover.Remove the BatteryFollow these instructions to remove your device's battery. Always power the device off beforeremoving the battery.1. At the antenna connector shown below, lift the raised edge of the battery cover to remove it.2. Remove the battery.3. Replace the battery cover.Charge the BatteryYou need to recharge your device’s battery periodically. You can continue using your device while itis charging.The faster method is to connect your device to the AC charger. Alternatively, you can connect yourdevice to your computer, although this charges more slowly.Charge Using the AC Adapter1. Insert the larger (Type A) end of the micro-USB cable into the AC charger.Get Started9
2. Insert the other end of the cable into the micro-USB port on the side of your device.3. Insert the AC charger into an electrical outlet. (If the battery is already partially charged when thecharger is plugged into the outlet, your device will power on automatically.)While your device is charging, the percentage charge that the battery has displays on the LCD (andthe Mobile Hotspot Manager home page, if your device is on).When your device is fully charged, the full battery icon and message display on the LCD (and theMobile Hotspot Manager home page, if your device is on).Charge Using a USB to Computer ConnectionNote: If you will be using the USB connection to connect to the Internet (and not just for chargingyour device), you must install the device driver. (See TRU-Install.)Note: If you are using Mac OS X 10.4.x, after you connect your device, you may see a warningmessage that your computer is running on the UPS backup battery and that you should prevent acomputer shutdown. You can continue with your work. To prevent this message from beingdisplayed, install the device driver.1. Make sure that your computer is turned on.2. Insert the larger (Type A) end of the micro-USB cable into your computer.3. Insert the other end of the cable into the micro-USB port on the side of your device.Get Started10
While your device is charging, the percentage charge that the battery has displays on the LCD (andthe Mobile Hotspot Manager home page, if your device is on).When your device is fully charged, the full battery icon and message display on the LCD (and theMobile Hotspot Manager home page, if your device is on).Turn Your Device On and OffUse the Power button to turn your device on and off.Turning Your Device On1. Make sure that:lYour device has a charged battery inserted.– or –lYour device is connected to the AC charger or a computer (through the micro-USB cable).2. If the LCD is blank, press and hold the Power button until the screen lights up.Turning Your Device OffnPress and hold the Power button until the Shut Down message appears.Get Started11
Control Your Device Using the Power ButtonThe Power button is used to turn the NETGEAR Fuse Mobile Hotspot on or off and to choose whichinformation screen to display on the LCD.Desired resultActionTurn mobilehotspot onPress and hold Power button for 3-4 secondsTurn mobilehotspot offPress and hold the Power button for 3-4 secondsWake up WiFisignal and devicescreenPress and release the Power button.Cycle throughscreensPress and release the Power button.Sleep ModeIf there have been no transmissions or operation of your device, or if the battery has not beencharged, your device automatically enters sleep mode to save power.In sleep mode, WLAN is disabled.nPress the Power button to turn the display on and exit sleep mode.lWLAN function is enabled and WiFi devices can reconnect to the hotspot.The time required to recover the network connection varies by environment, settings, etc.Get Started12
Connect with WiFi (WLAN)You can connect to the NETGEAR Fuse Mobile Hotspot WiFi networks from computers and WiFidevices.Connect to the Mobile Hotspot WiFi NetworkYou can find and select the WiFi network or you can use WiFi Protected Setup (WPS) to connect tothe WiFi network.Find and Select the Mobile Hotspot WiFi NetworkTip: The WiFi network name and password are displayed on the LCD home screen of theNETGEAR Fuse Mobile Hotspot. (See LCD Home Screen.)To connect to WiFi:1. Do one of the following, depending on your operating system.lllWindows 7: Click the WiFi iconin the system tray.Windows Vista: Click Control Panel Network and Internet Network and SharingCenter Connect to a network.Windows XP: Click Control Panel Network Connections Wireless NetworkConnections View available wireless networks.lMac: Click the AirPort iconlLinux: See the user documentation of the Linux distribution.l(in the upper right corner of your screen).Other operating systems: See the user documentation for your operating system orcomputer.2. Select the WiFi network provided by the NETGEAR Fuse Mobile Hotspot and connect to it. (Ifprompted for a network key/security key/password, enter the WiFi password.)Connect Through WPSWiFi Protected Setup (WPS) provides a fast, simple, and secure way to connect WPS-enableddevices to your WiFi network. You don’t have to give the name (SSID) and WiFi password of yourMain or Guest network to other users.The WPS feature is available on certain cameras, printers, smartphones, and laptops. Thesedevices have either a hardware button or a WPS-related option in the software. Please consult theuser documentation of your device.WPS is always available for the Main and Guest WiFi networks as long as the WiFi radio is on(device is not asleep due to the sleep [standby] option, or off while the device is tethered).Connect with WiFi (WLAN)13
WPS is not available in any of these situations:nWiFi radio is off while your device is sleeping due to inactivity.nWiFi radio is off while your device is tethered. (See Turn WiFi On or Off When Tethered.)nnnThe WiFi security option is WPA Personal, WEP, or WEP-related (for example, WEP 64 BitOpen). (Note: WPS is available if the WiFi security option is WPA/WPA2 Personal.) (SeeChange the WiFi Security.)The broadcast network name is not enabled. (See WiFi Options Tab.)MAC Filter Mode is "White list (Allow only those in list)", but no computers have been added tothe list. (See Manage the Block List (MAC Filtering).)If the maximum number of connected devices on the chosen network (Main or Guest) has alreadybeen met, an error message indicating that the maximum number of devices has been reached isdisplayed when you attempt WPS. Disconnect one of the connected devices and then retry.Use the LCD to Connect with WPS1. Press the Power button on the Mobile Hotspot.The LCD displays.2. Press the Power button again to cycle through the LCD screens and display the WiFi ProtectedSetup screen.3. Press and hold the Power button until the activation bar fills up on the WiFi Protected Setupscreen.For 2 minutes the Mobile Hotspot scans for computers or WiFi devices that are using WPS toestablish a WiFi connection.4. Within 2 minutes, press the WPS button on the computer or WiFi device you want to connect orselect the WPS-related option in your device’s software.The computer or WiFi device connects to the Mobile Hotspot WiFi network.Use the Mobile Hotspot Manager (http://MyHotSpot) to Connect with WPS1. Log in to the home page. (See Log In to the Mobile Hotspot Manager.)2. Click WiFi.3. Below the Main WiFi or Guest WiFi section, click WPS.4. Perform one of the following procedures, depending on whether the WiFi device you are addingto your WiFi network supports the PBC (Push Button Configuration) method or the PIN(Personal Information Number) method.If the WiFi device supports the PBC (Push Button Configuration) method:Connect with WiFi (WLAN)14
1. Click WPS button pairing.2. Within 2 minutes, press the WPS button on the wireless device you want to connect or select theWPS-related option in your device’s software.– or –If the WiFi device has a PIN associated with it:1. Find out the PIN for the WiFi device you are adding. To do this, use the PIN option in yourdevice’s software. Alternatively, use the WiFi Protected Setup Wizard that may be available,depending on the manufacturer of your device.2. In the Web page, click Enter WPS PIN.3. Enter your device’s PIN.4. Click Submit.Your NETGEAR Fuse Mobile Hotspot and the wireless device will communicate and establish theconnection. If no problems are encountered, the message “The device can now access yourhotspot” displays. If your device does not connect, the message “No devices were connected ”displays. Try to connect it manually. (See Find and Select the Mobile Hotspot WiFi Network.)Note: If you want to stop the pairing process, click Cancel.Guest WiFi NetworkYour NETGEAR Fuse Mobile Hotspot lets you create a separate Guest WiFi network that you canshare with temporary users.Devices on the Guest WiFi network:nCannot access devices that are on the Main WiFi network (such as printers or other computers).nCannot use the Mobile Hotspot Manager to change any device settings.Turn the Guest WiFi Network On and OffYou can turn on the Guest WiFi network from the Mobile Hotspot Manager’s WiFi page.1. Log in to the home page. (See Log In to the Mobile Hotspot Manager.)2. Click WiFi.3. In the Guest WiFi area, click Turn On or Turn Off.Guest WiFi PasswordYou can set the hotspot to use the same Guest WiFi password all the time, or for greater security,you can have it generate a random password each time the Guest WiFi network is turned on.Connect with WiFi (WLAN)15
Change the Guest WiFi PasswordYou can change the Guest WiFi password manually.Note: The password changes only when Guest WiFi is turned on—for example, if Guest WiFi wason when your device was restarted, the password doesn’t change because the Guest WiFi is still on.1. Log in to the home page. (See Log In to the Mobile Hotspot Manager.)2. Click WiFi Options.3. In the Guest WiFi section, enter a new WiFi password.4. Click Submit.Tip: To generate a new random password manually, with the above settings active, turn the GuestWiFi off and then back on again. (See Turn the Guest WiFi Network On and Off.)Randomize the Guest WiFi PasswordYou can randomize the guest WiFi password.1. Log in to the home page. (See Log In to the Mobile Hotspot Manager.)2. Click WiFi Options.3. In the Guest WiFi section, select Generate a new password each time I turn on the GuestWiFi.4. Click Submit.Connect with WiFi (WLAN)16
Connect with the Micro-USB CableThe following topics describe how to share your device's Internet connection with a computer usinga direct USB connection.Making a Tethered ConnectionYour device supports a direct connection through a USB cable to a Windows or Mac computer. (Thisis commonly referred to as a “tethered” connection.)To connect your device to your computer:1. Insert the larger (Type A) end of the micro-USB cable into your computer.2. Insert the other end of the cable into the micro-USB port on the side of your device.Note: If you’ll be using USB to connect to the Internet (and not just for charging your device), youmust install the device driver.Use the micro-USB cable when:nnnYou want to charge your device, but you don’t want to use the AC charger, or the AC charger isnot available.Your computer does not have WiFi.You want to prevent any other devices from using the hotspot. (See Turn WiFi On or Off WhenTethered.)Note: You can also block individual devices. See Manage the Block List (MAC Filtering).Note: If you’re having problems, see Cannot Connect Through USB.Note: If you’ll be using USB for data transfer (and not just for charging your device), you must installthe device driver. (See “Windows” or “Mac” below.) No Installation CD is required—your devicesupports the TRU-Install feature.Connect with the Micro-USB Cable17
Note: If you’re using Mac OS X 10.4.x, after you connect your device you may see a warningmessage that your computer is running on the UPS backup battery and that you should perform acomputer shutdown. You can continue with your work. To prevent this message from beingdisplayed, install the device driver (see “Mac” below).Windows Device DriverTo install the device driver on Windows:1. Make sure that your device is turned on.2. Connect your device to your computer through the micro-USB cable.3. If the TRU-Install window is not displayed, in Windows Explorer, browse to the TRU-Install entry(under My Computer), and then browse to the Win folder and run Setup.exe.– or –If the AutoPlay window opens, click Run setup.exe.4. In the TRU-Install window, click OK.5. Follow the onscreen instructions.Mac Device DriverTo install the device driver on Mac:1. Make sure that your device is turned on.2. Connect your device to your computer through the micro-USB cable.3. In the window that appears, double-click the .pkg file.4. Follow the onscreen instructions.5. When prompted for your password, enter your Mac password.TRU-InstallTRU-Install is a feature that installs the necessary drivers the first time you connect your device toyour Windows or Mac computer through the micro-USB cable. (For details, see Making a TetheredConnection.) An installation CD is not required.TRU-Install is enabled by default.To change the setting:1. In the address bar of your Web browser, type one of the ect with the Micro-USB Cable18
2. In the Sign In field, enter the Mobile Hotspot Manager administrator password (1-31 letters,numbers, and symbols). (The default password is "password.")3. Click Settings General Software and Reset.4. Select (to enable TRU-Install) or clear (to disable TRU-Install) the check box labeled “Installdriver when connecting to Windows or MAC computers with a USB cable."Connect with the Micro-USB Cable19
LCD InterfaceAccess your device and connection information, and configure device settings from the LCDinterface.If the LCD is not lit, see Turn Your Device On and Off.LCD Home ScreenThe LCD home screen shows icons and text that reflect the status of your device and yourconnection, and screen elements that link to other configuration screens.ItemDescription1Signal strength2Network type (LTE)3Network carrier name4Alerts – Indicates number of alerts to be read. Only appears when at least one alert isactive.(See Alerts Screen.)5Battery status(See Battery Icon.)6WiFi Status – Indicates whether WiFi is active (solid) or sleeping (outlined) and thenumber of WiFi connections.7Main WiFi network name and password.8Data usage – Indicates the amount of data remaining.Tip: Information on the LCD can also be viewed and configured in the Mobile Hotspot Managerinterface. See Mobile Hotspot Manager Home Page and General Device Settings.LCD Interface20
Signal Strength IconThe signal strength icon appears on your device’s home screen and in the Mobile Hotspot ManagerStatus panel.If your device is not connected (dropped signal, outside of service area, etc.) the alerts icon (appears on the LCD.Signal Strength Icon)StatusNo signalVery weak signalExcellent signalBattery IconThe battery icon indicates the state of the battery of your device.The text next to the icon indicates the remaining charge. The battery icon displays on your device’shome screen and in the Mobile Hotspot Manager Status panel.The battery’s life is affected by the following conditions, some of which can be adjusted from yourdevice and from the Mobile Hotspot Manager:nStandby time (See Set the Sleep (Inactivity) Timer.)nData throughputnNetwork signal strength (the better the signal, the longer the battery life)AlertsAlerts notify you about situations that require your attention and suggest the actions you need to taketo resolve them.Some of the alerts you may encounter include:nSoftware Update AvailablenMax WiFi devices reachednMobile Broadband disconnectednWiFi is offLCD Interface21
nHotspot is not activatednSIM errorsLCD Information ScreensThe LCD home screen links to several screens used to configure your device.nAlerts – Show network and device messages. See Alerts Screen for details.nWPS – Use WiFi Protected Setup to connect to the WiFi network.nDevice Info – View information about the mobile hotspot.nAbout – View device details.Tip: Information on the LCD can also be viewed and configured in the Mobile Hotspot Managerinterface. See Mobile Hotspot Manager Home Page and General Device Settings.To move between these screens:nPress the Power button once to move between screens.nOn the Alerts and About screens, press and hold the Power button to see additional pages.Alerts ScreenThe Alerts screen shows network or device alerts for situations that require your attention.To read more alerts:nIf there is more than one alert to read, press and hold the Power button to view the next alert.To exit the Alerts screen:nPress the Power button once.Device Info ScreenThe Device Info screen shows detailed information about your mobile hotspot and account.To exit the Device Info screen:nPress the Power button once.LCD Interface22
The Device Info screen shows the following information.ItemDescriptionMEIDThe MEID of your hotspot (displayed on the packaging and inside the batterycompartment).My #The hotspot’s telephone number.ICCIDThe serial number of the SIM.FWThe hotspot’s firmware version.FW Build DateThe date the firmware version was created.ActivationstatusThe hotspot’s activation status (Activated / Deactivated) and the date and timethe status changed.AdminThe URL to access the Mobile Hotspot Manager.PasswordThe password to log in to the Mobile Hotspot Manager.LCD Interface23
SettingsThe following topics address your device's settings.Mobile Hotspot Manager OverviewUse a Web browser to access your device and connection information, and configure device settingsfrom the Mobile Hotspot Manager.Log In to the Mobile Hotspot ManagerLogging in to the home page allows you to view more detailed information about your device, and tomanage its settings, broadband network connection, and WiFi networks.Note: To log in to the home page, your computer must be tethered to your device, or connected toyour device’s Main WiFi network. You cannot log in over the Guest WiFi network.Note: If you access the Mobile Hotspot Manager but you don’t log in, you can only view the currentnetwork connection status and a list of devices connected to the Main and Guest WiFi networks.1. In the address bar of your Web browser, type one of the following:lhttp://MyHotSpotlhttp://192.168.1.12. In the Sign In field on the Home screen, enter the password (1–31 letters, numbers, andsymbols).Note: The default password is “password”. NETGEAR recommends that you change thepassword, if you haven’t already. (See Change the Mobile Hotspot Manager Password.)3. Click Sign In.After a period of inactivity, you will be automatically logged off (timeout
GetStarted 6 n Avoid applying labels. May damage the SIM card. n See instructions included with the SIM card for handling. n The SIM card is the property of the company. n The SIM card is replaceable (at cost) in case of loss/damage. n Return the SIM card to the company when cancelling subscription. n Returned SIM cards are recycled for environmental purposes.