Transcription
Metered CommercialInstallation/OperationFrontload WashersFLW1546C SVGOriginal InstructionsKeep These Instructions for Future Reference.(If this machine changes ownership, this manual must accompany machine.)www.alliancelaundry.comPart No. 805988December 2014
Front MatterFront MatterWARNINGFailure to install, maintain, and/or operate this machine according to the manufacturer's instructionsmay result in conditions which can produce bodilyinjury and/or property damage.W030WARNINGFor your safety and to reduce the risk of fire or anexplosion, do not store or use gasoline or otherflammable vapors and liquids in the vicinity of this orany other appliance.W022NOTE: The WARNING and IMPORTANT instructions appearing in this manual are not meant to cover all possible conditions and situations that may occur. It mustbe understood that common sense, caution, and carefulness are factors which cannot be built into thesewashers. These factors MUST BE supplied by the person(s) installing, maintaining, or operating the washer.Always contact the distributor, service agent, or the manufacturerabout any problems or conditions you do not understand.Read all instructions before using washer.This product uses FreeRTOS V7.2.0 (www.freertos.org).Part No. 805988 Copyright, Alliance Laundry Systems LLC - DO NOT COPY or TRANSMIT3
Table of ContentsSafety Information.6Explanation of Safety Messages. 6Important Safety Instructions. 6Dimensions and Specifications. 8Installation. 10Before You Start.10Tools.10Order of Installation Steps.10Position Unit Near Installation Area. 10Remove Shipping Materials. 10Connect Fill Hoses.11Water Supply Requirements. 11Connecting Hoses.12Risers. 13Non-Gravity Drain Models - Connect Drain Hose to Drain Receptacle. 13Standpipe Installation. 14Position and Level the Washer. 14Wipe Out Inside of Wash Drum. 15Plug In the Washer.15Electrical Requirements. 15Earth/Ground Instructions. 16Check Installation. 16Operation. 17Operation Instructions for MDC Washers.17Load Laundry. 17Close Loading Door.17Add Laundry Supplies. 17Set Fabric Selector and Wash Temperature. 18Start Washer. 18Indicator Lights.18Maintenance. 19User-Maintenance Instructions. 19Lubrication. 19Cold Weather Care. 19Care of Your Washer. 19Cleaning Glass Sealing Area. 19 Copyright2014, Alliance Laundry Systems LLCAll rights reserved. No part of the contents of this book may be reproduced or transmitted in any form or by any means without the expressedwritten consent of the publisher.Part No. 805988 Copyright, Alliance Laundry Systems LLC - DO NOT COPY or TRANSMIT4
Replacing Hoses.19Filter Screens. 19Extended Non-Use. 19Cleaning Foreign Object Trap.19Reinstallation of Shipping Materials.19Troubleshooting.21Contact Information. 23Installer Checklist.24Part No. 805988 Copyright, Alliance Laundry Systems LLC - DO NOT COPY or TRANSMIT5
Safety InformationSafety InformationExplanation of Safety MessagesWARNINGPrecautionary statements (“DANGER,” “WARNING,” and“CAUTION”), followed by specific instructions, are found in thismanual and on machine decals. These precautions are intendedfor the personal safety of the operator, user, servicer, and thosemaintaining the machine.To reduce the risk of fire, electric shock, serious injury or death to persons when using your washer,follow these basic precautions:W023DANGER Indicates an imminently hazardous situation that, ifnot avoided, will cause severe personal injury ordeath.WARNINGIndicates a hazardous situation that, if not avoided,could cause severe personal injury or death. CAUTIONIndicates a hazardous situation that, if not avoided,may cause minor or moderate personal injury orproperty damage. Additional precautionary statements (“IMPORTANT” and“NOTE”) are followed by specific instructions.IMPORTANT: The word “IMPORTANT” is used to inform the reader of specific procedures where minormachine damage will occur if the procedure is not followed.NOTE: The word “NOTE” is used to communicate installation, operation, maintenance or servicing information that is important but not hazard related. Important Safety InstructionsSave These Instructions Part No. 805988Read all instructions before using the washer.Install the washer according to the INSTALLATION INSTRUCTIONS. Refer to the EARTH/GROUND INSTRUCTIONS in the INSTALLATION manual for the proper earth/ground connection of the washer. All connections for water,drain, electrical power and earth/ground must comply with local codes and be made by licensed personnel when required.Do not do it yourself.Do not install or store the washer where it will be exposed towater and/or weather.Do not add the following substances or textiles containingtraces of the following substances to the wash water: gasoline,kerosene, waxes, cooking oils, vegetable oils, machine oils,dry-cleaning solvents, flammable chemicals, thinners or otherflammable or explosive substances. These substances give offvapors that could ignite, explode or cause the fabric to catchon fire by itself.Under certain conditions, hydrogen gas may be produced in ahot water system that has not been used for two weeks ormore. HYDROGEN GAS IS EXPLOSIVE. If the hot watersystem has not been used for such a period, before using awashing machine or combination washer-dryer, turn on all hotwater faucets and let the water flow from each for several minutes. This will release any accumulated hydrogen gas. THEGAS IS FLAMMABLE, DO NOT SMOKE OR USE ANOPEN FLAME DURING THIS TIME.To reduce the risk of an electric shock or fire, DO NOT usean extension cord or an adapter to connect the washer to theelectrical power source.Do not allow children to play on or in the washer. Close supervision of children is necessary when the washer is usednear children. This appliance is not intended for use by persons (including children) with reduced physical, sensory ormental capabilities, or lack of experience and knowledge, unless they have been given supervision or instruction concerning the use of the appliance by a person responsible for theirsafety. This is a safety rule for all appliances.Cleaning and user maintenance shall not be made by childrenwithout supervision.Children less than three years should be kept away unlesscontinuously supervised.Do not reach into the washer if the washtub or agitator, if applicable, is moving. Copyright, Alliance Laundry Systems LLC - DO NOT COPY or TRANSMIT6
Safety Information Never operate the washer with any guards, panels and/or partsremoved or broken. DO NOT tamper with the controls or bypass any safety devices.DO NOT operate individual units if they have been separatedfrom a stack unit.Use your washer only for its intended purpose, washingclothes. Always follow the fabric care instructions suppliedby the garment manufacturer.Always read and follow manufacturer’s instructions on packages of laundry and cleaning aids. To reduce the risk of poisoning or chemical burns, keep them out of the reach of children at all times (preferably in a locked cabinet). Heed allwarnings or precautions.Do not use fabric softeners or products to eliminate static unless recommended by the manufacturer of the fabric softeneror product.Loading door MUST BE CLOSED any time the washer is tofill, tumble or spin. DO NOT bypass the loading door switchby permitting the washer to operate with the loading dooropen.Be sure water connections have a shut-off valve and that fillhose connections are tight. CLOSE the shut-off valves at theend of each wash day.Keep your washer in good condition. Bumping or droppingthe washer can damage safety features. If this occurs, haveyour washer checked by a qualified service person.Do not repair or replace any part of the washer, or attempt anyservicing unless specifically recommended in the user-maintenance instructions or in published user-repair instructionsthat you understand and have the skills to carry out. ALWAYS disconnect the washer from electrical supply beforeattempting any service.Disconnect the power cord by grasping the plug, not the cord.If the supply cord is damaged, it must be replaced by the manufacturer, its service agent or similarly qualified persons inorder to avoid a hazard.Before the washer is removed from service or discarded, remove the lid or door to the washing compartment.Failure to install, maintain, and/or operate this washer according to the manufacturer’s instructions may result in conditionswhich can produce bodily injury and/or property damage.NOTE: The WARNING and IMPORTANT SAFETY INSTRUCTIONS appearing in this manual are not meantto cover all possible conditions and situations that mayoccur. Common sense, caution and care must be exercised when installing, maintaining, or operating thewasher.Always contact your dealer, distributor, service agent or the manufacturer about any problems or conditions you do not understand.Part No. 805988 Copyright, Alliance Laundry Systems LLC - DO NOT COPY or TRANSMIT7
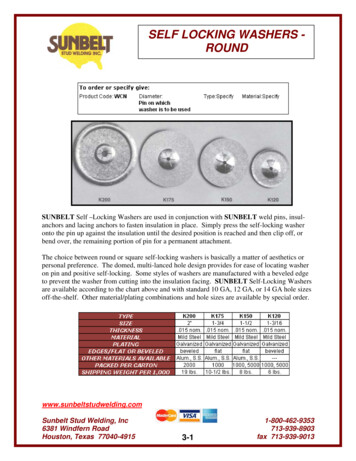
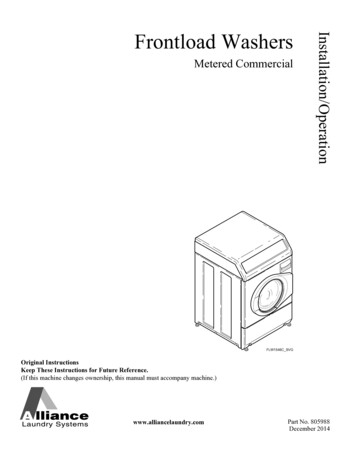
Dimensions and SpecificationsDimensions and SpecificationsModels Equipped With Drain HoseADBCJEHIGFFLW2382N SVGA611 mm [24.06 in.]B1027 mm [40.42 in.]C813 mm [32 in.]D1006 mm [39.61 in.]E371 mm [14.6 in.]F683 mm [26.875 in.]G52 mm [2.04 in.]H704 mm [27.73 in.]I40 mm [1.59 in.]J333 mm [13.1 in.]Part No. 805988 Copyright, Alliance Laundry Systems LLC - DO NOT COPY or TRANSMIT8
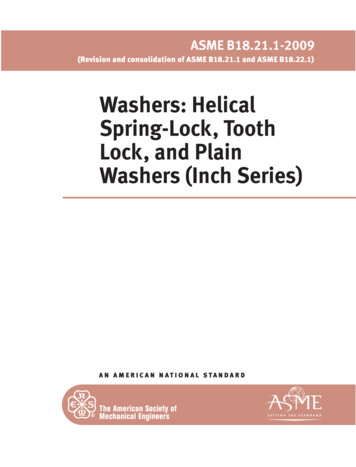
Dimensions and SpecificationsModels With Gravity Drain1ADBCLEJKIFHGFLW2383N SVG1. 38 mm [1.5 in.] Inside Diameter; 47 mm [1.86 in.] Outside DiameterA611 mm [24.06 in.]B1027 mm [40.42 in.]C813 mm [32 in.]D1006 mm [39.61 in.]E371 mm [14.6 in.]F683 mm [26.875 in.]G107 mm [4.2 in.]H104 mm [4.1 in.]I52 mm [2.04 in.]J704 mm [27.73 in.]K40 mm [1.59 in.]L333 mm [13.1 in.]Part No. 805988 Copyright, Alliance Laundry Systems LLC - DO NOT COPY or TRANSMIT9
InstallationInstallationNOTE: This appliance is suitable for use in countrieshaving a warm, damp climate.Before You StartToolsOrder of Installation StepsFor most installations, the basic tools you will need are:12435"169/678The proper order of steps must be followed to ensure correct installation. Refer to the list below when installing your unit.1. Position washer near the installation area.2. Remove the shipping materials.3. Connect the fill hoses.4. For non-gravity drain models, connect the drain hose to thedrain receptacle.5. For gravity drain models, connect the drain outlet to the drainsystem.6. Position and level the washer.7. Wipe out inside of the washer.8. Plug in the washer.9. Check installation.Position Unit Near Installation AreaMove unit so that it is within 1.2
your washer checked by a qualified service person. Do not repair or replace any part of the washer, or attempt any servicing unless specifically recommended in the user-main-tenance instructions or in published user-repair instructions that you understand and have the skills to carry out. AL-WAYS disconnect the washer from electrical supply .