Transcription
Maintenance & Service GuideHP EliteDesk 800 G1 Desktop MiniHP ProDesk 600 G1 Desktop Mini
Copyright 2014 Hewlett-PackardDevelopment Company, L.P. The informationcontained herein is subject to changewithout notice.Microsoft and Windows are U.S. registeredtrademarks of the Microsoft group ofcompanies.The only warranties for HP products andservices are set forth in the express warrantystatements accompanying such products andservices. Nothing herein should beconstrued as constituting an additionalwarranty. HP shall not be liable for technicalor editorial errors or omissions containedherein.This document contains proprietaryinformation that is protected by copyright.No part of this document may bephotocopied, reproduced, or translated toanother language without the prior writtenconsent of Hewlett-Packard Company.Maintenance & Service GuideFirst Edition (April 2014)Document Part Number: 756964-001Product noticeThis guide describes features that arecommon to most models. Some features maynot be available on your computer.Not all features are available on all editionsof Windows 8. This computer may requireupgraded and/or separately purchasedhardware, drivers, and/or software to takefull advantage of Windows 8 functionality.See http://www.microsoft.com for details.This computer may require upgraded and/or separately purchased hardware and/or aDVD drive to install the Windows 7 softwareand take full advantage of Windows 7functionality. -know-windows-7 for details.
Safety warning noticeWARNING! To reduce the possibility of heat-related injuries or of overheating the device, do notplace the device directly on your lap or obstruct the device air vents. Use the device only on a hard, flatsurface. Do not allow another hard surface, such as an adjoining optional printer, or a soft surface,such as pillows or rugs or clothing, to block airflow. Also, do not allow the AC adapter to contact theskin or a soft surface, such as pillows or rugs or clothing, during operation. The device and the ACadapter comply with the user-accessible surface temperature limits defined by the InternationalStandard for Safety of Information Technology Equipment (IEC 60950).iii
ivSafety warning notice
Table of contents1 Product features . 1Standard configuration features . 1Front panel components . 2Rear panel components (EliteDesk 800) . 3Rear panel components (ProDesk 600) . 4Serial number location . 52 Activating and Customizing the Software . 6Activating and customizing the software in Windows 7 . 6Activating the Windows operating system . 6Downloading Windows 7 updates . 7Installing or upgrading device drivers . 7Customizing the monitor display . 7Activating and customizing the software in Windows 8 . 7Activating the Windows Operating System . 7Downloading Windows 8 updates . 8Customizing the monitor display . 83 Routine care, SATA drive guidelines, and disassembly preparation . 9Electrostatic discharge information . 9Generating static . 10Preventing electrostatic damage to equipment . 10Personal grounding methods and equipment . 11Grounding the work area . 11Recommended materials and equipment . 11Operating guidelines . 12Routine care . 13General cleaning safety precautions . 13Cleaning the Computer Case . 13Cleaning the keyboard . 13Cleaning the monitor . 14v
Cleaning the mouse . 14Service considerations . 14Tools and software Requirements . 14Screws . 15Cables and connectors . 15Hard Drives . 15Lithium coin cell battery . 16SATA hard drives . 16SATA hard drive cables . 17SATA data cable . 17SMART ATA drives . 17Cable management . 174 Illustrated parts catalog . 18Misc parts . 20Cables . 21Drives . 22Sequential Part Number Listing . 225 Removal and Replacement Procedures . . 25Preparing to disassemble the computer . 25Access panel . 26Changing from desktop to tower configuration . 27Hard drive . 28Speaker . 32Front bezel . 34Memory . 35SODIMMs . 35DDR3-SDRAM SODIMMs . 35Populating SODIMM sockets . 36Installing SODIMMs . 37Replacing the battery . 40Heat sink . 43Processor . 44Fan . 46Drive cage . 47WLAN module . 49M.2 Solid-State Drive . 51External connection antennas (select models only) . 53System board . 57WLAN antennas . 60vi
6 Computer Setup (F10) Utility . 64Computer Setup (F10) Utilities . 64Using Computer Setup (F10) Utilities . 65Computer Setup—File . 66Computer Setup—Storage . 67Computer Setup—Security . 69Computer Setup—Power . 73Computer Setup—Advanced . 74Recovering the Configuration Settings . 777 HP PC Hardware Diagnostics . 78Why run HP PC Hardware Diagnostics – UEFI . 78How to access and run HP PC Hardware Diagnostics - UEFI . 78Downloading HP PC Hardware Diagnostics to a USB device . 798 Troubleshooting Without Diagnostics . 80Safety and Comfort . 80Before You Call for Technical Support . 80Helpful Hints . 81Solving General Problems . 83Solving Power Problems . 87Solving Hard Drive Problems . 89Solving Media Card Reader Problems . 92Solving Display Problems . 94Solving Audio Problems . 99Solving Printer Problems . 101Solving Keyboard and Mouse Problems . 103Solving Hardware Installation Problems . 105Solving Network Problems . 107Solving Memory Problems . 111Solving Processor Problems . 113Solving CD-ROM and DVD Problems . 114Solving USB Flash Drive Problems . 116Solving Front Panel Component Problems . 117Solving Internet Access Problems . 118Solving Software Problems . 119Contacting Customer Support . 121vii
9 Backup and Recovery . 122Restoring and recovering in Windows 7 . 122System Restore . 122System Recovery . 123System Recovery when Windows is responding . 123System Recovery when Windows is not responding . 124System recovery using recovery media . 124Creating recovery media . 125Using recovery media . 126Backup and recovery in Windows 8 . 127Backing up your information . 127Performing a system recovery . 128Using the Windows recovery tools . 128Using f11 recovery tools . 129Using Windows 8 operating system media (purchased separately) . 12910 POST Error Messages . 131POST Numeric Codes and Text Messages . 132Interpreting POST diagnostic front panel LEDs . 14011 Password Security and Resetting CMOS . 143Establishing a Setup or Power-on password . 144Resetting the Setup and Power-on password . 145Clearing and resetting the CMOS . 146Appendix A Power Cord Set Requirements . 148General requirements . 148Japanese Power Cord Requirements . 148Country-specific requirements . 149Appendix B Statement of Volatility–HP EliteDesk 800 G1 . 150Appendix C Statement of Volatility–HP ProDesk 600 G1 . 152Appendix D Specifications . 154Index . 156viii
1Product featuresStandard configuration featuresFeatures may vary depending on the model. For a complete listing of the hardware and softwareinstalled in the computer, run the diagnostic utility (included on some computer models only).NOTE: This computer model can be used in a tower orientation or a desktop orientation. The towerstand is sold separately.Standard configuration features1
Front panel componentsDrive configuration may vary by model. Some models have a bezel blank covering one or more drivebays.1Dual-State Power Button4USB 3.0 Port - Charging2Hard Drive Activity Light5Microphone/Headphone Connector3USB 3.0 Port6Headphone ConnectorNOTE: The USB 3.0 Port - Charging also provides current to charge a device such as a Smart Phone. Thecharging current is available whenever the power cord is plugged into the system, even when the system is off.NOTE: When a device is plugged into the Microphone/Headphone Connector, a dialog box will pop up asking ifyou want to use the connector for a microphone Line-In device or a headphone. You can reconfigure the connectorat any time by double-clicking the Audio Manager icon in the Windows taskbar.NOTE: The Power On Light is normally white when the power is on. If it is flashing red, there is a problem with thecomputer and it is displaying a diagnostic code. Refer to theInterpreting POST diagnostic front panel LEDson page 140 to interpret the code.2Chapter 1 Product features
Rear panel components (EliteDesk 800)1DisplayPort Monitor Connectors4USB 3.0 Ports (blue)2VGA Monitor Connector5RJ-45 Network Connector3Line-Out Connector for powered audio devices(green)6Power Cord ConnectorRear panel components (EliteDesk 800)3
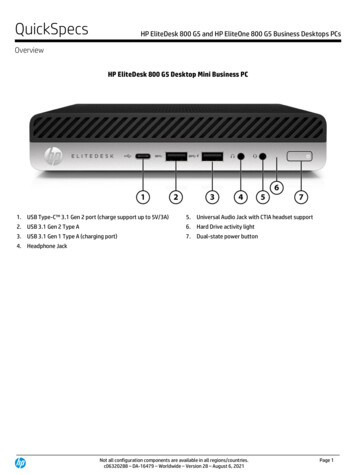
Rear panel components (ProDesk 600)41DisplayPort Monitor Connectors5USB 3.0 Ports (blue)2VGA Monitor Connector6RJ-45 Network Connector3Line-Out Connector for powered audio devices(green)7Power Cord Connector4USB 2.0 Ports (black)Chapter 1 Product features
Serial number locationEach computer has a unique serial number and a product ID number that are located on the exterior ofthe computer. Keep these numbers available for use when contacting customer service for assistance.Serial number location5
2Activating and Customizing theSoftwareNOTE: This chapter provides information for both Windows 7 and Windows 8.Activating and customizing the software inWindows 7If your computer was not shipped with a Windows operating system, some portions of thisdocumentation do not apply. Additional information is available in online help after you activate theoperating system.CAUTION: Do not add optional hardware or third-party devices to the computer until the operatingsystem is successfully activated. Doing so may cause errors and prevent the operating system frominstalling properly.NOTE: Be sure there is a 10.2 cm (4 inch) clearance at the back of the unit and above the monitor topermit the required airflow.Activating the Windows operating systemThe first time you turn on the computer, the operating system is set up and activated automatically. Thisprocess takes about 5 to 10 minutes. Carefully read and follow the instructions on the screen tocomplete the activation.We recommend that you register your computer with HP during operating system setup so you canreceive important software updates, facilitate support questions, and sign up for special offers.CAUTION: After the activation process has begun, DO NOT TURN OFF THE COMPUTER UNTIL THEPROCESS IS COMPLETE. Turning off the computer during the activation process may damage thesoftware that runs the computer or prevent its proper installation.NOTE: If the computer shipped with more than one operating system language on the hard drive, theactivation process could take up to 60 minutes.6Chapter 2 Activating and Customizing the Software
Downloading Windows 7 updatesMicrosoft may release updates to the operating system. To help keep the computer running optimally,HP recommends checking for the latest updates during the initial installation and periodicallythroughout the life of the computer.1.To set up your Internet connection, click Start Internet Explorer and follow the instructionson the screen.2.After an Internet connection has been established, click the Start All Programs WindowsUpdate.3.Run Windows Update monthly thereafter.Installing or upgrading device driversWhen installing optional hardware devices after the operating system installation is complete, you mustalso install the drivers for each of the devices.In Windows 7, if prompted for the i386 directory, replace the path specification with C:\i386, or usethe Browse button in the dialog box to locate the i386 folder. This action points the operating systemto the appropriate drivers.Obtain the latest support software, including support software for the operating system, fromhttp://www.hp.com/support. Select your country and language, select Download drivers andsoftware (and firmware), enter the model number of the computer, and press Enter.Customizing the monitor displayIf you wish, you can select or change the monitor refresh rates, screen resolution, color settings, fontsizes, and power management settings.For more information, refer to the online documentation provided with the graphics controller utility orthe documentation that came with your monitor.Right-click on the Windows desktop, then click Personalize to change display settings.Activating and customizing the software inWindows 8Additional information is available in online help after you activate the operating system.NOTE: Be sure there is a 10.2 cm (4 inch) clearance at the back of the unit and above the monitor topermit the required airflow.Activating the Windows Operating SystemThe first time you turn on the computer, the operating system is set up and activated automatically. Thisprocess takes about 5 to 10 minutes. Carefully read and follow the instructions on the screen tocomplete the activation.Activating and customizing the software in Windows 87
We recommend that you register your computer with HP during operating system set up so you canreceive important software updates, facilitate support questions, and sign up for special offers. You canalso register your computer with HP using the Register with HP app on the Start screen.CAUTION: After the activation process has begun, DO NOT TURN OFF THE COMPUTER UNTIL THEPROCESS IS COMPLETE. Turning off the computer during the activation process may damage thesoftware that runs the computer or prevent its proper installation.Downloading Windows 8 updatesMicrosoft may release updates to the operating system. To help keep the computer running optimally,HP recommends checking for the latest updates during the initial installation and periodicallythroughout the life of the computer.Run Windows Update as soon as possible after you set up your computer.1.Point to the upper-right or lower-right corner of the Start screen to display the charms.2.Click Settings Change PC Settings Windows Update.3.Run Windows Update monthly thereafter.Customizing the monitor displayYou can customize display settings for Windows 8 separately for the Start screen and the Desktop.To customize the Start screen:1.Point to the upper-right or lower-right corner of the Start screen to display the charms.2.Click Settings Change PC Settings.3.Click Personalize to change the display settings.To customize the Desktop:81.Click the Desktop app on the Start screen.2.Right-click on the desktop, and then click Personalize to change display settings.Chapter 2 Activating and Customizing the Software
3Routine care, SATA driveguidelines, and disassemblypreparationThis chapter provides general service information for the computer. Adherence to the procedures andprecautions described in this chapter is essential for proper service.CAUTION: When the computer is plugged into an AC power source, voltage is always applied tothe system board. You must disconnect the power cord from the power source before opening thecomputer to prevent system board or component damage.Electrostatic discharge informationA sudden discharge of static electricity from your finger or other conductor can destroy static-sensitivedevices or microcircuitry. Often the spark is neither felt nor heard, but damage occurs. An electronicdevice exposed to electrostatic discharge (ESD) may not appear to be affected at all and can workperfectly throughout a normal cycle. The device may function normally for a while, but it has beendegraded in the internal layers, reducing its life expectancy.Networks built into many integrated circuits provide some protection, but in many cases, the dischargecontains enough power to alter device parameters or melt silicon junctions.Electrostatic discharge information9
Generating staticThe following table shows that: Different activities generate different amounts of static electricity. Static electricity increases as humidity decreases.Relative HumidityEvent55%40%10%Walking across carpet7,500 V15,000 V35,000 VWalking across vinyl floor3,000 V5,000 V12,000 VMotions of bench worker400 V800 V6,000 VRemoving DIPs from plastic tube400 V700 V2,000 VRemoving DIPs from vinyl tray2,000 V4,000 V11,500 VRemoving DIPs from Styrofoam3,500 V5,000 V14,500 VRemoving bubble pack from PCB7,000 V20,000 V26,500 VPacking PCBs in foam-lined box5,000 V11,000 V21,000 VThese are then multi-packaged inside plastic tubes, trays, or Styrofoam.NOTE: 700 volts can degrade a product.Preventing electrostatic damage to equipmentMany electronic components are sensitive to ESD. Circuitry design and structure determine the degreeof sensitivity. The following packaging and grounding precautions are necessary to prevent damage toelectric components and accessories.10 To avoid hand contact, transport products in static-safe containers such as tubes, bags, or boxes. Protect all electrostatic parts and assemblies with conductive or approved containers orpackaging. Keep electrostatic sensitive parts in their containers until they arrive at static-free stations. Place items on a grounded surface before removing them from their container. Always be properly grounded when touching a sensitive component or assembly. Avoid contact with pins, leads, or circuitry. Place reusable electrostatic-sensitive parts from assemblies in protective packaging or conductivefoam.Chapter 3 Routine care, SATA drive guidelines, and disassembly preparation
Personal grounding methods and equipmentUse the following equipment to prevent static electricity damage to equipment: Wrist straps are flexible straps with a maximum of one-megohm 10% resistance in the groundcords. To provide proper ground, a strap must be worn snug against bare skin. The ground cordmust be connected and fit snugly into the banana plug connector on the grounding mat orworkstation. Heel straps/Toe straps/Boot straps can be used at standing workstations and arecompatible with most types of shoes or boots. On conductive floors or dissipative floor mats, usethem on both feet with a maximum of one-megohm 10% resistance between the operator andground.Static Shielding Protection LevelsMethodVoltageAntistatic plastic1,500Carbon-loaded plastic7,500Metallized laminate15,000Grounding the work areaTo prevent static damage at the work area, use the following precautions: Cover the work surface with approved static-dissipative material. Provide
Rear panel components (ProDesk 600) 1 DisplayPort Monitor Connectors 5 USB 3.0 Ports (blue) 2 VGA Monitor Connector 6 RJ-45 Network Connector 3 Line-Out Connector for powered audio devices (green) 7 Power Cord Connector 4 USB 2.0 Ports (black) 4 Chapter 1 Product features