Transcription
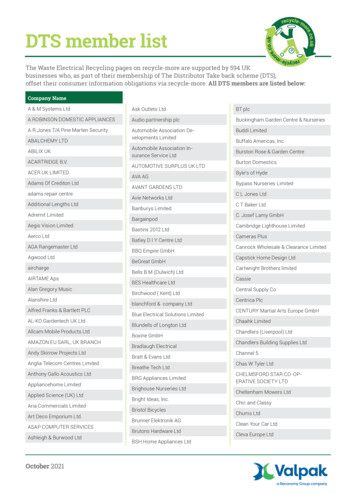
VINVISION TECHNOLOGY CO., LTDEvo E10 Daisy player User ManualEvo E10 Daisy player overviewButton DescriptionDesign Highlights:All buttons processed with tactile marks for better touch feelingSD card slotFront panel speaker layoutHigh contrast color designRecording button (upper right corner of front panel)On/Off button (upper left corner of front panel)Up arrow button (In the middle between recording and On/Off button)Left arrow button (down below On/Off button)1
VINVISION TECHNOLOGY CO., LTDConfirm button(on the right of left arrow button)Right arrow button (on the right of confirmation button)Down arrow button (down below confirmation button)Exit Button (down below Right arrow button)Menu button (Down below left arrow button)Volume down button(down below Menu button)Volume up button (down below exit button)Information button (In the middle between volume up and volume down button)Music button(down below volume down button), it is used as hotkey1 buttonRadio button (down below information button), it is also be used as hotkey2 buttonBookmark button(down below volume up button)Earphone interface iconMic interface iconUSB port iconIMPORTANT NOTICE! Evo E10 player resetTo power on Evo E10, please press and hold power button for 3 seconds. To force a reset onEvo E10, please press and hold power button and exit button together. We do not recommendto reset Evo E10 frequently if no machine crash happens.After Power on Evo E10, please do not insert and remove SD card, which may incur datalosing or damage on hardware.Useful tips on Buttons:Menu button:Tip 1. Press menu button access to menu settingTip 2. Press menu button twice access to file managementTip 3. During file playing, press menu button set playing parametersOK button: Access selected option or save settingExit Button: return to previous menu or cancel settingNot on working status, press power button once access to "automatic power off" setting menu2
VINVISION TECHNOLOGY CO., LTDdirectly.Record button: When listen to FM radio, press record button to start recording FM radiostation, press any other button except OK button to stop recording, recording file saved atRecord folder.Power off Evo E10 then power on it again, resume play from place where you power off.Network Time Synchronization (Automatic time and date adjustment provided WIFIconnected )1. Please make sure Evo E10 connected to WIFI router or hotspot.2. Please make sure select your local time zone correctly, if time zone not correct, even thoughnetwork time synchronization enabled, local time and date may not be correct.Operation guidance: Power on Evo E10---Press Menu button----Press up or down arrowbutton until hear "Time settings" announcement----Press OK button---Press up or downarrow button until hear "Time zone" announcement---press OK button---Press up or downarrow button select local time zone---Press OK button save settings and hear "setting done"announcement and "time zone" announcement.3. Please set "Network time synchronization" to be enable.Operation guidance: Power on Evo E10---Press Menu button----Press up or down arrowbutton until hear "Time settings" announcement----Press OK button---Press up or downarrow button until hear "Network time synchronization" announcement---press OK button--Press left or right arrow button until hear "Network time synchronization enable"announcement ---press OK button to save settings and hear "setting done" announcement and"Network time synchronization" announcement.Daylight saving timeIf there is Daylight time zone in your region or country, please set "Daylight saving time"accordingly.Operation guidance: Power on Evo E10---Press Menu button----Press up or down arrowbutton until hear "Time settings" announcement----Press OK button---Press up or downarrow button until hear "Daylight saving time" announcement---press OK button---Press leftor right arrow button set "Daylight saving time" to be enable or disable---Press OK button tosave settings and hear "setting done" announcement and "Daylight saving time"announcement.Getting startedInserting and Removing SD cardPlease follow below instruction to insert and remove SD card Hold Evo E10 facing you, SD card slot is on top edge of Evo E10 player One corner of SD card is cut at a 45 degree angle.The cut corner part should be at the bottom right corner when you insert SD card into card slot. IfSD card is not oriented correctly it will resist insertion.3
VINVISION TECHNOLOGY CO., LTD Gently push SD card down into player SD card slot until it clicks into place. To remove SD card out, please push down on top edge of SD card to release it, then take it out.Power On/Off Evo E10To Power on Evo E10 Daisy player press and hold power button for 3 seconds.To Power off Evo E10 Daisy player press and hold power button for 5 seconds.Note: You may use computer to recharge battery while continuing to use player:To connect one end of USB cable to Evo E10 and the other end of USB cable to PC, Evo E10be identified as mass storage device by PC, meanwhile charge Evo E10 battery. If want to useEvo E10 player, please choose to safety remove device from PC but do not disconnect USBcable between Evo E10 and PC.Value Added FeaturesHigh quality recorderTalking calculatorTalking compassTalking timerVoice ReminderVoice MemoTalking alarm clock with Vibration reminding modeTime and date speakingFM Radio receiverFM radio recordingOTG functionInternet Radio, support internet radio recordingInternet Podcast, support internet podcast episode recordingvideo file playbackVoice bookmarkNote: When play E-book and music, you want to add voice bookmark, please press bookmarkbutton then you will hear add bookmark announcement then press and hold record button toadd voice bookmark, the moment you release record button, 3-4 seconds later you will hear"voice bookmark added" announcement.Key Lock FunctionTo lock keys, please press Power button first then press Music button to lock keys.To unlock keys, please follow the key lock procedure to unlock keys.Note: Once you lock keys, you will hear "keyboard locked, press power switch then musickey to unlock" announcement. If keys locked, press information button, you will hear"keyboard locked, press power switch then music key to unlock" announcement and remindyou how to unlock keys. If keys locked, press any other button except information button, youwill hear DI DI beep sound reminding, which means buttons are locked. If you want toactivate key function please follow key lock procedure to unlock keys. Once you hear4
VINVISION TECHNOLOGY CO., LTD"keyboard unlocked" announcement, means you can operate Evo E10 normally.Inserting and removing SD CardLocate the long rectangular slot on the top of Evo E10 Daisy player.To insert SD card, please make sure SD card 45 degree cutting edge is on down right corner, meansSD card with logo surface side towards rear panel, please do not use excessive force to insert SDcard.To remove SD card, please push SD card inwards then SD card will pop out from card slot.File type Supported by Evo E10Daisy format: Daisy 2.0.2, Daisy 3.0Text format: txt, doc/docx, HTML, HTM, EPUB, PDF. MOBI, RTFAudio format: MP3, WMA, WAV, FLAC, APE, ACC, OGG, RA, M4A, etc.Video format: RM, RMVB, AVI, MP4, 3GP, MOV, WMV, FLV, MPG, MPEG, DAT, etc.Daisy Online ProtocolBookshare API Protocol(Optional to specific market or region)Home MenuWhen power on Evo E10 Daisy player, press Menu button then press up or down arrow button,you will hear "Network", "Version Information", "Device Information", "Time Settings", "SystemVoice", "Alarms", "Resume Play Settings", "Hotkey Settings", "Recording Settings", "Startupsound and vibration", "Tools", "Language(player with multiple languages TTS voices)", "Checkfor update" and "Default Factory Settings" accordingly.Note: Sub menus are designed with loop round, after press menu button then press up or downarrow button again and again, sub menus announcement repeated one by one by loop round.Access and Navigate MenuNote: Select one sub menu, for example, when you hear "resume play settings"announcement then press OK button access to it.Some sub menu items include different setting options, to set each setting option, when hearsuch "setting option" announcement then press Ok button save setting and you will hear"setting done" announcement .Sub menu setting options designed by loop round as well.Version Information:After power on Evo E10, press menu button then press up or down arrow button again and againuntil you hear "Version Information" announcement then press OK button access to "VersionInformation" menu, you will hear serial number, software version, its release date and time5
VINVISION TECHNOLOGY CO., LTDannouncement accordingly. Press Exit button return to previous menu.Device InformationAfter power on Evo E10, press menu button then press up or down arrow button again and againuntil you hear "Device Information" announcement then press OK button access to "DeviceInformation" menu, you will hear total internal memory and remaining internal memory capacityannouncement, total SD card memory and remaining SD card memory capacity announcement ifSD card inserted. Press Exit button return to previous menu.Time SettingsAfter power on Evo E10, press menu button then press up or down arrow button again and againuntil you hear "Time Settings" announcement then press OK button access to "Time Settings"menu, which includes "Idle power off", "automatic power off", "set time and date", "automaticpower on", "automatic time announcement", "time format", "network time synchronization", "timezone" and "daylight saving time" settings. Press up or down arrow button select one setting menuand press OK button access to it, once setting done, press OK button to save setting, you will hear"setting done" announcement and return to previous menu and you will hear menu announcementaccordingly.Note: These settings are announced by loop round if press up or down arrow button again andagain.Each setting menu be announced when selected, press OK button access to setting menu,press up or down arrow button or press left or right arrow button set your favorite option.Press OK button save setting and you will hear "setting done" announcement. Press Exitbutton return to previous menu and you will menu announcement accordingly.Before press OK button to save settings, press Exit button to cancel setting and you will hear"setting cancelled" announcement, press Exit button again return to previous menu and youwill hear menu announcement accordingly.System VoiceAfter power on Evo E10, press menu button then press up or down arrow button again and againuntil you hear "System Voice" announcement then press OK button access to "System Voice" menu,which includes "Voice", "speed" and "pitch" settings. Press up or down arrow button select onesetting menu then press left or right arrow button set your favorite option, press OK button savesetting and you will hear "setting done" announcement and return to previous menu and you willhear menu announcement accordingly.Note: Before press OK button to save setting, press Exit button to cancel setting, you willhear "setting cancelled" announcement and return to previous menu and you will hear menuannouncement accordingly.6
VINVISION TECHNOLOGY CO., LTDAlarmsAfter power on Evo E10, press menu button then press up or down arrow button again and againuntil you hear "Alarms" announcement then press OK button access to "Alarms" menu, whichincludes 5 sets of Alarms: Alarm 1, Alarm 2, Alarm 3, Alarm 4 and Alarm 5. Press up or downarrow button select one of alarms, press Ok button access to it then press up or down arrow buttonagain and again you will hear "hour", "minute", "disable/enable", "recurrent", "alarm signal","alarm reminding mode" announcement by loop round. select one setting menu for example, whenhear "recurrent" announcement then press left or right arrow button to set your favorite option andpress OK button save your settings, you will hear "setting done" announcement and return toprevious menu and you will hear menu announcement accordingly.Note: i. During alarm reminding, press any button except Exit button stop alarm remindingand go to snooze mode, 10 minutes later, alarm reminds again.ii. During alarm reminding, press Exit button stop alarm reminding.Resume Play SettingsAfter power on Evo E10, press menu button then press up or down arrow button again and againuntil you hear "Resume Play Settings" announcement then press OK button access to "ResumePlay Settings" menu, which includes "Ebook Resume play", "Music Resume play" and "DaisyResume play" settings. Press up or down arrow button select one item, for example, when hear"Ebook Resume play" announcement then press left or right arrow button set your favorite option,resume play enable or disable, press OK button save your settings, you will hear "setting done"announcement and return to previous menu and you will hear menu announcement accordingly.Note: For example, if accessed to "Ebook resume play" menu, press Exit button will cancel settingand you will hear "setting cancelled" announcement and return to previous menu and you will hearmenu announcement accordingly.Hotkey SettingsAfter power on Evo E10, press menu button then press up or down arrow button again and againuntil you hear "Hotkey Settings" announcement then press OK button access to "Hotkey Settings"menu, which includes "Hotkey 1" and "Hotkey 2" settings, default Hotkey 1 function is Music,default Hotkey 2 function is FM radio. Press left or right arrow button again and again, you willhear "Music", "Radio", "Wireless switch", "Automatic power off", "Alarms", "Voice memo","Voice reminder", "Internet radio" and "Podcast" announcement accordingly, select one functionto define it as default function then press OK button save your settings, you will hear "setting done"announcement and return to previous menu and you will hear menu announcement accordingly.Recording SettingsAfter power on Evo E10, press menu button then press up or down arrow button again and againuntil you hear "Recording Settings" announcement then press OK button access to "RecordingSettings" menu, which includes "Recording file position", "Recording volume", "Recording fileformat selection:MP3 16Khz 32kbps, MP3 22.5Khz 64kpbs, MP3 44.1Khz 128kbps, PCM 16Khz,PCM 22.5Khz, PCM 44.1Khz", "External recording settings: external microphone, line in"and7
VINVISION TECHNOLOGY CO., LTD"Noise cancellation: enable, disable" settings. Press up or down arrow button select one item thenpress left or right arrow button set your favorite option then press Ok button save your settings,you will hear "setting done" announcement and return to previous menu and you will hear menuannouncement accordingly.Startup sound and vibrationAfter power on Evo E10, press menu button then press up or down arrow button again and againuntil you hear "startup sound and vibration" announcement, press OK button access to "startupsound and vibration" setting menu, which includes "both", "sound only" and "vibration only"settings, press left or right arrow button to set your favorite option, press OK button save yoursetting, you will hear "setting" done announcement and return to previous menu and you will hearmenu announcement accordingly.ToolsAfter power on Evo E10, press menu button then press up or down arrow button again and againuntil you hear "Tools" announcement then press OK button access to "Tools" menu, which includes"Voice reminder", "Voice Memo", "Calculator", "Calcuagraph(Timer)", "Compass", "Diskmanagement" and "Radio" apps. Press up or down arrow button select one app then press OKbutton access to this app. If accessed to one app, press Exit button return to previous menu and youwill hear menu announcement accordingly.LanguageOnly when Evo E10 integrated with more than two languages TTS then Language menu beavailable.Note: If Evo E10 default language is not English TTS, please press menu button even thoughyou do not know what announcement meaning is then press up arrow button three timesthen press OK button access to Language menu then press left or right arrow button selectyour default language then press OK button save your settings and you will hear "language"announcement accordingly.Check for update:After power on Evo E10, press menu button then press up or down arrow button again and againuntil you hear “Check for update” announcement then press OK button access to "Check forupdate" menu.Note: 1. If WIFI disconnected, you will hear "checking for update, connecting failed"announcement.2. If WIFI connected and no latest software released, you will hear "checking forupdate, please wait, no update available at this time" announcement.3. If WIFI connected and there is a latest upgrade software available, you will hear"version x.x.x available, do you want to update the device?" announcement, press OK buttonupgrade Evo E10 to latest software version.4. Once software upgrade is finished and you check for update again, you will hear"no update available at this time" announcement unless there is a new version software8
VINVISION TECHNOLOGY CO., LTDavailable then you could upgrade Evo E10 again.Default Factory SettingsAfter power on Evo E10, press menu button then press up or down arrow button again and againuntil you hear "Default Factory Settings" announcement then press OK button access to "DefaultFactory Settings" and you will hear "Restore default factory settings?" announcement, tone withquestion, press OK button restore to default factory settings.NetworkAfter power on Evo E10, press menu button then press up or down arrow button again and againuntil you hear "Network" announcement then press OK button access to "Network" setting menu,which includes "wireless settings". Once accessed to "wireless settings", press OK button, youeither hear "wireless active" or "wireless inactive" announcement, if you hear "wireless active"announcement, player will search available WIFI router automatically, once searching finished,you will hear "scanning completed" announcement then press up or down arrow button to locatetarget WIFI router. For example, your WIFI router name is "ABC", when you hear "ABC"announcement, press OK button then you will be asked to input WIFI password. There are twoways to input password. if you choose input password manually, once manually input is done,please OK button start connecting to WIFI network. If connection successful you will hear "it hasbeen connected to "ABC".Note: 1. WIFI router security protocol supported includes: WAP/WAP2, WEPPreparation before using Evo E10Setting time and date manually Power on Evo E10 then press Menu button access to main menu Press up or down arrow button again and again until you hear "Time Settings" announcementthen press OK button access to it Press up or down arrow button until hear "Set time and date" announcement then press OKbutton Press up or down arrow button again and again until hear "year", "month", "day", "hour","minute" announcement accordingly, for example, you hear "year" announcement press left orright arrow button to set your favorite option.Note: 1. Please do not forget press OK button to save your settings and you will hear "settingdone" announcement accordingly.2. When you want to hear current time and date announcement, please pressInformation button twice.Network Settings: Connect Evo E10 to WIFI routerManually input WIFI password one by one Power on Evo E10, press menu button then press up or down arrow button until hear "Network"9
VINVISION TECHNOLOGY CO., LTDannouncement then press OK button access to "wireless settings" and you will hear "wirelesssettings" announcement.Press OK button then press left or right button, you will either hear "wireless active" or"wireless inactive" announcement, in order to connect to WIFI router, please select "wirelessactive", then Evo E10 search available WIFI routers, when searching finished, you will hear"scanning completed" announcement. Press up or down arrow button, when you hear target WIFI router announcement, press OKbutton, you will hear "please input password" announcement, password may contain digitnumber, capital letter, small letter and symbols, bookmark button is used to switch charactertype among them, for example, default first character is digit number "0", but password firstcharacter is capital letter "Y", press bookmark button again and again until hear "Capital letterA" announcement access to Capital letter input mode, press up or down arrow button until hear"Y" announcement. Likewise, if password first character is symbol, for example symbol "#",press bookmark button again and again until hear "Symbol space" announcement access tosymbol input mode, press up or down arrow button again and again until hear "pout sign"announcement. For example, WIFI router password is "Yr18#", after you hear "please input password"announcement, necessary to input the first character "Y", press bookmark button switch toCapital letter input then press up or down arrow button again and again select capital letter "Y"then press right arrow button move to next character input, in this case, second character is r,press bookmark button switch to small letter input then press up or down arrow button againand again until hear "small letter r" announcement, following the same input logic, once allother characters input finished, in this case, "Yr18#" input done, press OK button for WIFIconnection.Note: If password character input not correct and already moved to next character input menu,press left arrow button cancel current character input and return to previous character inputthen input correct character accordingly. For example, WIFI password is "123", "1" inputcorrect, when input "2", you input "5" by mistake and already press right arrow button preparefor next character input, in this case, press left arrow button return to previous character inputand input it correctly.Import WIFI password for WIFI connectionNotice: Connect Evo E10 to PC via USB cable. Evo E10 be identified as mass storage device,there is one file, file name ".wifi password.txt " saved at Evo E10 internal memory. this".wifi password.txt " file is used to save WIFI router/s password.For example, two WIFI routers available with different password, open ".wifi password.txt" file via PC, input one WIFI router's password at first row and input another WIFI router'spassword at second row, likewise if more than two WIFI routers and all with differentpassword, each password should be at different row , finally save the file and safety removeEvo E10 from PC. press menu button then press up or down arrow button again and again until hear "Network"announcement then press OK button access to "wireless settings" and you will hear "wirelesssettings" announcement.Press OK button then press left or right button, you will either hear "wireless active" or10
VINVISION TECHNOLOGY CO., LTD"wireless inactive" announcement, in order to connect to WIFI router, please select "wirelessactive" then Evo E10 search available WIFI routers, when search finished, you will hear"scanning completed" announcement. Press up or down arrow button, again and again when you hear target WIFI routerannouncement, press OK button, you will hear "please input password" announcement then pressmenu button to import password and you will hear "select password" announcement and passwordbe announced accordingly, if the password not the one against target WIFI router, press up or downarrow button again and again until hear the password announcement against the target WIFI routerthen press OK button connect Evo E10 to WIFI, if connection succeed, you will hear "it has beenconnected to xxx" announcement.Please enjoy WIFI related apps including internet radio, internet podcast, DODP and network timesynchronization!Network time synchronization for time and date setting Make sure WIFI connected Power on Evo E10, press menu button then press up/down arrow button again and again untilhear "Time settings" announcement, press OK button then press up or down arrow button again andagain until hear "Time zone" announcement then press OK button access to "Time zone" settingmenu and press up or down arrow button again and again select local time zone and press OK buttonsave setting and you will hear "setting done" announcement and "Time zone" announcement. continue to press up or down button again and again until hear "Network time synchronization"announcement then press OK button, press left or right arrow button set "Network timesynchronization" to be enable, press OK button save setting, you will hear "setting done"announcement and "Network time synchronization " announcement. System date and time will be updated automatically.Setting preferred Voice role, speed and pitch Power on Evo E10 then press Menu button then press up or down arrow button again and againuntil hear "System voice " announcement then press OK button access to "System voice" settingmenu. You will hear default "Voice role" announcement then press left or right arrow button set preferredvoice role, at this moment, please not press OK button. Continue to press up or down arrow button, you will hear default speed value announcement thenpress left or right arrow button again and again set preferred voice speed, still please not press OKbutton at this moment. Continue to press up or down arrow button, you will hear default pitch value announcement thenpress left or right arrow button again and again set preferred voice pitch, press OK button savesetting and you will hear "setting done" announcement and hear "System voice" menuannouncement.Note: 1. Voice speed ranges from minus 10 to plus 20, default speed is speed 0.2. Reading speed set here is for system menu reading speed instead of book readingspeed, tone or pitch3. Once menu reading speed is set, when power on Evo E10 again, setting is still valid.11
VINVISION TECHNOLOGY CO., LTDSetting volumePress volume up or volume down button to adjust volume levelNote: 1. Volume ranges from volume 0 to volume 162. When insert headphone we recommend you set volume level at a lower level3. When Evo E10 do not play, press volume down or volume up button, you will hear volumelevel announcement.4. When listen to text files, audio files, radio, internet radio and podcast episode, press volumedown or volume up button will not have volume level announcement for sake ofsmooth reading.Setting recording parameters Power on Evo E10, press Menu button then press up or down arrow button again and again untilhear "recording settings" announcement then press OK button access to "recording settings" menu. Press up or down arrow button you will hear "recording file position", "recording volume","recording file format", "external recording setting" and "noise cancellation" announcementaccordingly. For example, when you hear "recording file position" announcement, press left or right arrowbutton you will hear "recording file position: SD card" or "recording file position: Internalmemory" announcement accordingly, set your favorite option, press OK button save settingand you will hear "setting done" announcement and return to previous menu and you will hearmenu announcement. Set other recording features, please follow above example to finish setting.Tip: 1. We recommend you set Noise cancellation to be enable for sake of better recordingquality.2. We recommend you set all recording features together then press OK button save alltogether, for example, when you hear "recording file position: SD card"announcement, if it is your favorite option, then press up or down arrow button againmove to next recording feature, you will hear feature announcement accordingly,press left or right arrow button set your favorite option, when all features setting donethen press OK button save all settings and return to previous menu and you will hearmenu announcement accordingly.Basic FunctionsInternet Radio Power on Evo E10, at main folder, there is a folder named as “Internet Radio”, to select it bypressing up or down arrow button again and again until hear "internet radio" announcementthen press OK button access to it.Note: Before enjoy internet radio app, it is necessary to create .m3u file which includes internetradio station streaming link address and radio station channel(For example, BBC world12
VINVISION TECHNOLOGY CO., LTDservice), once .m3u file created, please save this .m3u file at Evo E10 "internet radio" foldervia PC.To create .m3u file, it is necessary to rely on a .m3u file creating software, please refer toAppendix guidance, where you will find download link page to get this .m3u file creatingsoftware. Please use this software to edit and manage your radio stations. You can create sub folder inside “internet radio” folder to categorize radio stations such as Sports,News, Music and so on. You can use .m3u file creating software to edit, add, delete and categorize radio stations,including rename .m3u file. " Internet Radio" managementAfter access to "Internet Radio" app, press left or right arrow button again and again, you willhear "My stations" or "Pre-stored stations" announcement accordingly. All radio stations besaved at "pre-stored stations" folder by default. Favorite stations be saved at "My stations".Tips:Add favorite station to "My Stations":When you hear "internet radio " announcement, press OK button then press up or down arrow buttonselect one station, for example, "BBC World Service", you will hear "BBC World Service"announcement. If this is your favorite station, press menu button, you will hear "add to my stations"announcement then press OK button, you will hear "do you want to add station to my stations?"announcement, press OK button, you will hear "station has been added to my stations" and you willhear "BBC World Service" announcem
To Power off Evo E10 Daisy player press and hold power button for 5 seconds. Note: You may use computer to recharge battery while continuing to use player: To connect one end of USB cable to Evo E10 and the other end of USB cable to PC, Evo E10 be identified as mass storage device by PC, meanwhile charge Evo E10 battery.