Transcription
Office of Administrative HearingsRules DivisionTemplate DocumentationThe Rules Division within the Office of Administrative Hearings has created a Microsoft Word MacroEnabled Template that Rule Making Coordinators can use to facilitate the rule making process. The OAHAgency Rules Template contains formatting styles and various utilities that will assist the coordinators asthey draft and modify rules. The Template was developed using Microsoft Word 2016 and should functionproperty in Microsoft Word 2010 or higher.The template was developed to assist the Rule Making Coordinators create a document that adheres to therequirements set out in 26 NCAC 02C .0108 General Format Instructions. Within the template, there areutilities that allow the coordinator to: pull a rule from the OAH website and insert it directly into yourdocument; apply various formatting styles to the text within a document; insert auto text for the variousIntroductory Statements required for the submission of a rule; and various other functionality to make theprocess simpler.DOWNLOADING THE OAH AGENCY RULES TEMPLATEThe OAH Agency Rules Template can be downloaded from the Rulemaking Coordinator Section in theRules Division area of the OAH website (http://www.oah.state.nc.us/rules/). To download the Template,you click on the “Rule Template” link.May 15, 20181
After clicking the “Rule Template” link, Internet Explorer will prompt the user with the Open, Save, SaveAs Dialog box. (Testing was done using Internet Explorer, other Browsers may have slightly differentprompts.)In the testing performed during the development of the Template, the easiest implementation of theTemplate was to save the template to the operator’s Desktop. This can be accomplished by clicking the“Save As” option and then select Desktop and press the Save Button. It is imperative that you leave theTemplate named “OAH Agency Rules Template.dotm”. Various functionality within the Templaterequires the standardized naming.Once the Template has been saved to the Desktop, the operator should open the Template by RightClicking on the Template Icon and selecting Open. The first time the template is opened, theoperator will be prompted to Enable the Template. Once the Enable button has been pressed, theoperator can close the Template.It is also possible to store the OAH Agency Rules Template in either the default Word User or Workgrouptemplate locations. This subject is not covered in this documentation but additional information abouttemplate locations is discussed in this blog posting which is applicable for Microsoft Word 2010 andhigher: d-2013-templates-location-and-filenew/.The instructions in this document assume that the template is stored on the operator’s desktop.May 15, 20182
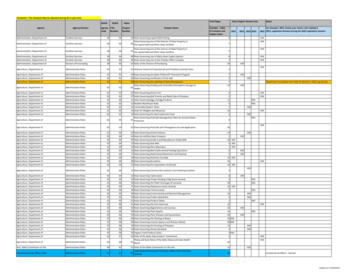
CREATING A DOCUMENT BASED ON THE OAH AGENCY RULES TEMPLATETo use the template, the operator should double click on the Template Icon on the Desktop. A newdocument based on the template will be created. An OAH tab will be added to the Microsoft Word Ribbonas can be seen below:The OAH Tab contains a number of groups. In order to allow commonly used Word functionality to beperformed without the operator having to select another Microsoft Office Ribbon tab, several standardMicrosoft Office Groups have been included on this tab. They are: Clipboard Font EditingThe buttons in these groups perform in exactly the same way as the buttons on the Standard Word Ribbonand will not be discussed further here except to mention that changes to existing rules should be madeusing the Underline and strikethrough font attributes – which are available in the Font Group. Languageadded should be underlined and language removed from an existing rule should be struck through.FORMATTING GROUPOAH Rule Formatting MenuMay 15, 20183
The OAH Rule Formatting dropdown menu presents the operator with a visual display of the formattingoptions for each acceptable Rule Format. The Menu is divided to categorize various Rule formattingoptions. For each line of the menu, the Style name is displayed in the left column and a description of theappropriate language or enumeration is displayed in the right column. As you can see, the first threesections of the menu contain standard Rule options. The forth section represents the various options to beincluded in the History Note Section and lastly there is a section that groups the less frequently used styles.To select the appropriate formatting, the operator should click the appropriate menu item. The textcurrently selected in the document will be formatted according to the menu selection. No text will betyped; this menu only applies formatting to the selected paragraph.Clear Formatting ButtonWith many formatting options available in word it is sometimes helpful to “reset” the text and start over.The Clear Formatting options will remove all formatting from the selected text.Style Selector Combo BoxAs the operator becomes more familiar with the Rule Making formatting styles, it may be more efficientfor the operator to select a paragraph style directly from the Style Selector Combo Box. The operator maychange the style of the currently selected text by clicking the drop down arrow and selecting the desirestyle.The dropdown shows the available Rule Making formatting styles. In order for the styles to be correctlyapplied to the text, the operator should use only the two methods of applying styles provided on theOAH tab. The Word styling functionality available on the "Home Tab" may result in underlined,stricken, bolded or italicized formatting being lost when a style is applied.May 15, 20184
Paragraph Center ButtonThis menu item simply centers the selected text.AUTO FORMAT GROUPWhen drafting new Rules, or making significant changes to existing Rules, the operator may find it helpfulto use the features of the Auto Format Group to apply the appropriate formatting to text. The right andleft arrow buttons change the style of the paragraph containing the cursor to the next or previous styleappropriate for the option selected. For Example, if the operator is drafting a new Listing Style Rule, theytype the first paragraph of the rule and press enter. This creates a new paragraph with the “Paragraph”format. This may be appropriate, but the operator may want to follow the paragraph with enumerateditems.Instead of selecting the Item Style using options available in the Formatting Group, the operator mayselect the right arrow on the Listing line and the style will be changed.Additionally, they can use the right arrow again to format the text as a SubItem level.When the operator has finished with the SubItems, they can press the left arrow button on the listing lineto return to the Item formatting style.May 15, 20185
TEXT GROUPThe Text Group provides functionality that will automatically insert language into the Rule document.Currently the Group offers menu choices that allow the operator to insert introductory language into adocument or Insert the entirety of a Rule from the OAH website into the document.Proposed Intros and Permanent Intros Drop Down MenusThe Proposed Intros and the Permanent Intros Drop Down menu items operator in exactly the same way.When the operator selects the appropriate menu time from the dropdown list, the introductory text willautomatically be inserted at the top of the open document. A blank paragraph is also inserted after theintroductory language. Both paragraphs will be styled according to the Rule Making Formattingguidelines.May 15, 20186
Insert Rule MenuCopy and Paste often behaves unexpectedly in a Word document. Styles may also complicate how thecopy and paste function works and how it impacts the document. For this reason, it is suggested that theoperator always use the Insert Rule functions, when possible, and avoid the complications caused by copyand paste.The Insert Rule Menu currently has two options. The Insert Rule from Code option will retrieve the Rule(s)from the OAH website and insert it into the document. The Insert Rule from File will allow the operatorto select a file stored on their computer or network and insert that document.Insert Rule from CodeThe Upon pressing the Insert Rule from Code Button, the operator will be presented with the Insert OAHRule dialog box.The Insert Rule from Code window allows you to insert an individual rule, all rules contained in aSubChapter or all rules contained in a Chapter. The operator should type a valid Title, Chapter,SubChapter and Rule number and press the Retrieve Button. To insert a specific Rule, the Title, Chapter,SubChapter (if applicable) and Rule number should be entered. To insert a Chapter, the Title and Chapterinformation must be entered. To insert a SubChapter, the Title, Chapter and SubChapter fields must befilled. If the document exists, the text of the currently published rule(s) in the NC Administrative Codestored on the OAH website will be inserted into the document. The Operator should note that Title andChapter numbers that are only one digit, must be preceded by a zero.IMPORTANT:May 15, 2018The operator must be aware of any ongoing Rule Making that is in process for theRule being amended. The Insert Rule function inserts the text currently published inthe NC Administrative Code. If the Rule in a modified format is pending RulesReview Commission action or Legislative Review, the text of that version of the rulewill not be inserted.7
Insert Rule from FileThe Upon pressing the Insert Rule from File Button, the operator will be presented with the Insert Filedialog box. The operator may then navigate to the appropriate location and the selected file will beinserted.UTILITIES GROUPOAH Rule Making guidelines do not allow agencies to submit Rules that contain Auto Numberedenumerated lists or Microsoft Word Revision Marks (Tracking). While we understand that these featurescan be beneficial during the Rule Drafting process, they should be removed prior to submitting your Ruleto OAH.Remove AutoNumber ButtonMicrosoft Words Auto Number feature automatically alters the indention level and the wrapping structureof the underlining text. For this reason, when a document is created or opened linked to the OAH AgencyRules Template, the AutoNumber feature in Word is disabled. Rules that were already in the Rule Makingprocess prior to the introduction of the OAH Agency Rules Template may contain AutoNumbered lists.For this reason, a feature has been included on the tollbar that will convert AutoNumbered list to standardenumerated text. Once this option has been selected, there is not a utility to revert the text back to anAutoNumber format.Tracking To Text ButtonMicrosoft Words Revision tools can be very useful during the agency Rule Drafting process. UsingRevision Marks (“Tracking”) can enable staff within the agency to coordinate on the modifications to theRule and review when changes were made and by whom. They do make editorial changes more difficultas documents from various agencies are pulled together by the OAH Rules Division. For this reason, theOAH Rules do not allow “Tracking” to be included in submitted documents.May 15, 20188
Having realized the advantages that “Tracking” may provide for agencies, a feature has been providedthat will convert “Tracking” to Underlining and Strikethrough font attributes in the document. Please notethat once “Tracking” has been converted to text the editorial information regarding when changes weremade and by whom will be lost from the document.NOTE: There can be a great deal of complexity in documents containing “Tracking”, therefore, it isrecommended that after running this utility the agency staff carefully review the document toensure that the revisions are accurately represented.Text to Tracking ButtonWhen Rules are returned to the agency by OAH, revision marks will be shown as underlining andstrikethrough. The Text to Tracking Button will convert the underlining and strikethrough in a documentback into Microsoft Word Revision Marks (“Tracking”). Please keep in mind that the revision dataassociated with the changes will be that of the operator at the time the Text to Tracking Button is pressed.MISC GROUPThe Misc Group provides useful features that may be helpful to the operator during the Rule Draftingprocess. This functionality is discussed below:Draft View ButtonThe Draft View button displays the document in Draft View. Draft view shows text formatting butsimplifies the layout of the page so that you can type and edit quickly. In draft view, some page elementsdo not appear, such as the boundaries between pages, headers and footers, backgrounds, and pictures.Draft View is most useful when working with styles because the style associated with each paragraph isshown on the left hand side of the document.Print Layout ButtonThe Print Layout button displays the document in print layout view. This allows the operator to see thedocument as it appears on the printed page. Print layout view is the default view when you open a newdocument.May 15, 20189
Split Rule ButtonIt is often helpful to work on several rules in one document. OAH requires that Rules be filed with OAHas individual Rule documents. The Split Rule Button divides the currently displayed document intoindividual Rules. The utility uses the History Note or Authority line to determine where a Rule ends. Ituses the Rule Citation to name the individual Rule document. Rule range documents will be created ifthere are multiple rule citations with only one history note (as is often the case for repealed rules). Theoriginal document must be saved before you click the Split Rule button and the document must containmore than one Rule. The original document is not modified.Show/Hide (Paragraph Mark) ButtonPressing the Show/Hide button allows the non-printing characters to be revealed or shown in yourdocument. "Nonprinting characters" is Word's term for anything that takes up space or has a formattingfunction but does not appear on the printed page, including spaces, tabs, page or paragraph breaks, etc.Showing the “Nonprinting characters” It is primarily used to be able to identify formatting or spacingissues in word processing documents. This button allows the operator to quickly show or hide thesecharacters.WORKING WITH DOCUMENTS CREATED BEFORE THE TEMPLATE WAS AVAILABLETo take advantage of the features available in the OAH Agency Rules Template for documents that werein the Rule Making Process prior to the implementation of the OAH Agency Rules Template, you mustcreate a new document based on the Template and insert your existing document into the newly createddocument. Although copy and paste will work, we recommend that you use the insert feature to includethe contents of existing documents into your documents.Create a New Document based on the OAH Agency Rules TemplateDouble click on the Template Icon on the Desktop. A new document based on the template will be created.Insert existing DocumentUse the Insert Rule from File function described previously in this document to navigate to the locationof your existing Rule document and insert that document into your newly created Template baseddocument.May 15, 201810
Appendix AAttaching the OAH Agency Rules Template to an Existing DocumentThe OAH Agency Rules Template documentation suggests storing the OAH template on your desktop. This works great in asingle user environment. However, many Rule Making Coordinators work in a collaborative environment. Each agency hastheir own recommendations and computer configurations. That makes it difficult to recommend a solution that will work forall agencies. The ideal setup in a multiuser environment would be to utilize Microsoft Words “WorkGroup” template feature.This requires that all user workstations have a single location specified as their “workgroup template location” and the OAHtemplate be stored there. This requires access to a common drive by all users and configuration of each user’s installation ofMicrosoft Word. This may not be possible for all agencies.The biggest challenge in a multiuser environment is that when a document is opened, Word may not be able to correctly locatethe OAH template since the template in not located consistently. This is most common when Rule Making documents areemailed among users. When a document created with the OAH template is emailed, the template will not be attached when itreaches the Recipient.To Work around this issue, we are suggesting the following possible approaches. You can create a new document using the OAH template stored on your computer and insert the contents of thedocument you received into new document. Save that document and begin working. If you would prefer not to create a new document, we have documented two options that you can utilize to attach theOAH Agency Rules Template to your document.o You can Attach the OAH template to your document using the Word Menu.o You can create a Macro and add the Macro to your Quick Access Toolbar.These two options are described below.NOTE: The OAH Agency Rules Template should only be used on documents that you know wereoriginally created using the OAH Agency Rules Template. Attaching the template to a document thatwas not created using the OAH Agency Template will most likely result in repeated errors being displayedwhile attempting to work on the document.Attaching the OAH Template to your Document using the Word MenuEnable the Developer Tab on the Word RibbonYou must first enable the Developer tab on the Word Ribbon before you can access the Template menu item inMicrosoft Word. The following steps only have to be performed once. After you have enable the Developer Tab, youcan go straight to the Attach Template instructions below. Enabling the Developer Tab is accomplished as follows:1.Click on File on the Word RibbonClick FileMay 15, 201811
2.The File Menu will be displayed. Select Options.Click Options3.The Word Options Menu will be displayed. Click Customize Ribbon.ClickCheck Mark in Developer Box4.The Customize “The Ribbon and Keyboard Shortcuts window” will be displayed. Put a Checkmark in theDeveloper box in the right hand list box and click OK. You will now have the Developer Tab on your WordToolbar.May 15, 201812
Attach the OAH Agency Rule Template to your Document1.After you have access to the Developer Tab, attaching the OAH template is fairly straight forward. You click on theDeveloper tab and click the Document Template Button.Click2.After you have access to the Developer Tab, attaching the OAH template is fairly straight forward. You click on theDeveloper tab and click the Document Template Button. The “Templates and Add-ins” window will be displayed.On that window, click the Attach Button.Click3.The “Attach Template” window will be displayed. Navigate to the location on your computer where the documentis stored and select the OAH Agency Rules Template. Click Open.SelectClick4.Click on the OK button when the “Templates and Add-Ins” window is displayed. The OAH template is nowattached to your document and you should see the OAH tab on the Microsoft Word window.May 15, 201813
Creating a Macro to Attach the OAH Template to your Document1.2.3.4.Open Word with a Blank DocumentClick on the View TabClick on the Macros ButtonClick on the View Macros Menu ItemView TabView Macros5.After Clicking the View Macros Menu Item, the Macros window will be displayed.a. Type AttachTemplate in the Macro name filed (No spaces)b. Click the Create ButtonType HereCreate Button6.After Clicking the Create Button the New Macros Window will be displayed:Click X to close MacroWindowType or Paste Macro Text Here7.Copy or Type the following text into the macro as show above:ActiveDocument.AttachedTemplate "YOUR FILE LOCATION" & "OAH Agency Rules Template.dotm"Replace YOUR FILE LOCATION with the file location where you stored the template. For example,S:\Template\You must have a backslash at the end of the file location.8.Click the X to Close the New Macros Window. You have now created the macro that will attach the OAH templateto your document.May 15, 201814
9.The next step is to add the macro to Words Quick Access Toolbar so that it will be easily available to you. Click onthe Customize Quick Access Toolbar Drop Down arrow on the right side of your Quick Access Toolbar:Quick Access ToolbarClick10. The Customize Quick Access Toolbar menu will be displayed. Click More Commands.Click11. The Word Options Menu will be displayed:a. Click the More Commands Drop Down and Select Macrosb. Click on the Attached Template Macro in the left hand list box and click the Add Button. The macro willbe added to the right hand list box. Click the OK button to close the Word Options Window.Use Dropdown to select MacrosSelectMacro12. The Macro will now be displayed on your Quick access toolbar. If you do not see the OAH tab on your WordToolbar, you can click the Macro Icon on your tool bar and the OAH template will be attached and the toolbar willbe visible.May 15, 201815
An OAH tab will be added to the Microsoft Word Ribbon as can be seen below: The OAH Tab contains a number of groups. In order to allow commonly used Word functionality to be performed without the operator having to select another Microsoft Office Ribbon tab, several standard Microsoft Office Groups have been included on this tab. They are: