Transcription
Avid MediaCentral Production Management Virtualization Best Practices with NutanixImportant InformationAvid recommends that you read all the information in this ReadMe thoroughly before installing orusing the software described in this document.As this guide is subject to change, Avid recommends that you check the Avid Knowledge Base forupdates before you begin reading this document. For the latest versions of this and otherdocumentation related to Avid MediaCentral Production Management, see:https://avid.secure.force.com/pkb/articles/en x-DocumentationContentsUsing This Guide. . . . . . . . . . . . . . . . . . . . . . . . . . . . . . . . . . . . . . . . . . . . . . . . . . . . . . . . . . . . . . . . . . . 2Nutanix Infrastructure . . . . . . . . . . . . . . . . . . . . . . . . . . . . . . . . . . . . . . . . . . . . . . . . . . . . . . . . . . . . . . . 4Provisioning Resources . . . . . . . . . . . . . . . . . . . . . . . . . . . . . . . . . . . . . . . . . . . . . . . . . . . . . . . . . . . . . . 6Deployment in Nutanix Prism . . . . . . . . . . . . . . . . . . . . . . . . . . . . . . . . . . . . . . . . . . . . . . . . . . . . . . . . 10Revision History . . . . . . . . . . . . . . . . . . . . . . . . . . . . . . . . . . . . . . . . . . . . . . . . . . . . . . . . . . . . . . . . . . 18Legal Notices. . . . . . . . . . . . . . . . . . . . . . . . . . . . . . . . . . . . . . . . . . . . . . . . . . . . . . . . . . . . . . . . . . . . . 18
Using This GuideUsing This GuideThis document provides guidelines for deploying Avid MediaCentral Production Management in avirtual environment using hyperconverged infrastructure and the Nutanix Acropolis Hypervisor(AHV). It provides details to help you identify your infrastructure requirements and information onhow to configure virtual machines for use with Avid applications. This guide is intended for systemadministrators and other personnel who are familiar with general IT architecture design,virtualization technology, and using Nutanix Prism.Information regarding virtualization best practices for Avid MediaCentral Cloud UX, AvidMediaCentral Asset Management, Avid MediaCentral Newsroom Management, and Avid MediaComposer can be found on the Avid Knowledge Base in separate guides dedicated to those products.OverviewSince 2015, Avid has supported the deployment of Production Management in three-tier virtualenvironments with VMware ESXi. In April 2020, Avid completed the testing and qualification ofProduction Management on the Nutanix hyperconverged platform. This document covers the basicsof the Nutanix test environment, as well as Avid’s general approach and best practices whendesigning the infrastructure for your Production Management solution.Additional Technical Notes Testing with the Nutanix HCI platform was completed using MediaCentral ProductionManagement v2019.6.x operating under Windows Server 2016. Avid does not support Production Management Engines or MediaCentral Archive ProductionEngines using Microsoft clustering in a Nutanix environment.Definition of TermsTermDefinitionNutanix AOSAcropolis Operating System: Nutanix Acropolis is the foundationthat transforms the HCI infrastructure in to an Enterprise Cloud OS.the main components are the Distributed Storage Fabric (DSF), theAcropolis Hypervisor (AHV), Storage Services to manage SMB andNFS protocols, object and block storage and advanced virtualnetworking.Nutanix AHVAcropolis Hypervisor: Based on Linux KVM/QEMU virtualization.Nutanix PrismNutanix Prism provides a single management plane to easily manageyour infrastructure environment end to end. Prism combinesmultiple aspects of Enterprise Cloud management into a singleconsumer-grade product that lets IT administrators manageinfrastructure and virtualization, access operational insights,troubleshoot and fix problems.Nutanix BlockA Nutanix Block is a rack-mountable chassis containing up to fournodes.2
Using This GuideTermDefinitionNutanix NodeA Nutanix Node is the foundational unit for the cluster. You need aminimum of three nodes to create a cluster. Each node in the clusterruns a standard hypervisor and contains processors, memory, andlocal storage (SSDs and HDDs).IPMIThe Nutanix IPMI interface is the Intelligent Platform ManagementInterface. Each node has an IPMI port to assign an IP address to so itcan be accessed over the network. Once the IPMI interface isaccessible on the network it can be accessed by a Web-console orCLI to help with any configuring, monitoring and troubleshootingserver hardware.Virtual Machine (VM)A virtual machine or VM is the compute resource object that mimicsa traditional physical workstation or server in a virtualized computerenvironment. It is comprised of processing cores, RAM, storage, andan operating system. The virtual machine is usually deployed usinga small portion of a larger pool of the compute resources.vCPUA virtual CPU (vCPU) is a physical central processing unit (CPU)that plugs in to a socket on the host motherboard. With computevirtualization a vCPU is assigned to a virtual machine.CoresCores are the multiple, duplicate sets of CPU components that shareone common physical CPU and socket.Physical vs Logical CoresPhysical cores are a complete set of actual hardware componentswithin a CPU. Logical cores are the number of physical cores timesthe number of threads that can run on each core via hyperthreading.Example: A processor that can run two threads per core has 10physical cores would present itself as having 20 logical cores.Memory/RAMRAM (Random Access Memory) is the hardware in a computingdevice where the operating system (OS), application programs anddata in current use are kept so they can be quickly reached by thedevice’s processor.Nutanix CVMThe Nutanix CVM or Controller Virtual Machine is a VM that runson each Nutanix host node. The CMV enables the pooling ofcompute resources from all nodes in the cluster, Acropolis dataplane functions as well as the Prism Management web interface andfunctions.3
Nutanix InfrastructureNutanix InfrastructureQualified Nutanix AOSThe minimum supported version of the Nutanix Acropolis Operating System for use with ProductionManagement is version AOS 5.10Nutanix Validation InfrastructureThe Nutanix hypervisor comes pre-installed when you purchase a Nutanix hardware appliance.Nutanix software is generally hardware agnostic. Nutanix software is qualified to run on HPEProLiant series servers (DL/DX), Dell, Cisco Lenovo, and other third-party server vendors. Refer tothe Nutanix website for the most up to date, qualified, and certified hardware platforms.Hardware configurations are available to fit any workload by scaling the primary resources (CPU,RAM, or Storage) within each node. All nodes include flash memory to optimize storageperformance, and all-flash nodes are available to deliver maximum I/O throughput with minimumlatency.The following table lists the hardware specifications used for Avid’s internal test and nix BlockNX-3060-G7Number of Blocks1 (2-RU)Number of Nodes4CPUIntel(R) Xeon(R) Gold 5220 CPU @ 2.20GHzNumber of Sockets2 physical processor sockets per nodeNumber of Cores36 per nodeMemory512 GB per nodeStorage36 TB total across 4 nodesNetworkIntel X550T2 10GbAOS Version5.10 and 5.11.2.1NCC Version3.9.4.1LCM Version2.3.0Prism LicensePrism ProAvid NEXIS StorageAvid NEXIS E2, NEXIS 2019.10.xNetwork SwitchDell S4810P4
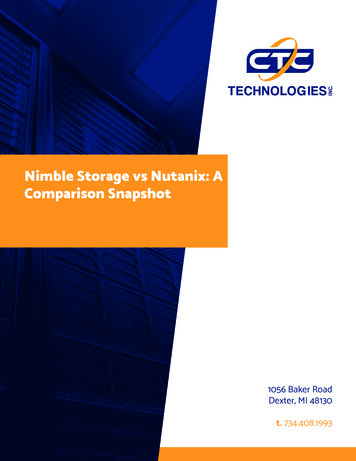
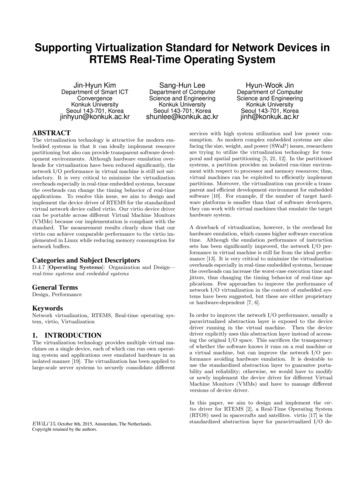
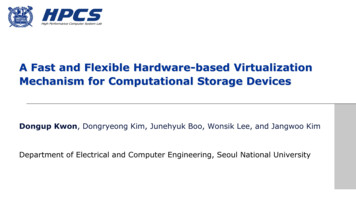
Nutanix InfrastructureInfrastructure DiagramNetwork DesignWhen designing the network for the deployment of your solution, Avid recommends that you consultwith a certified network engineer who is familiar with virtualization and hyperconverged platforms.nTo maximize performance Avid recommends that you create a separate vlan for the controller VM’sto communicate over.CablingLogical rules for cabling apply. If you need to limit single points of failure, you should design yoursystem to “dual connect” each component.5
Provisioning ResourcesHostnames and IP AddressesAs part of your pre-flight planning you should gather and document all of the logistical informationyou will need to configure the system. Some of the first parameters you need to enter are hostnamesand IP addresses. Reserve/assign one IP address for Nutanix Prism (system management web interface) Reserve/assign three IP addresses for each compute node:-One for the node-One for the IPMI-One for the Controller VM Create a hostname for each node Create a hostname for each Controller VMProvisioning ResourcesCalculating and Provisioning Virtual Compute ResourcesCompute resources such as CPU sockets, cores, memory, and virtual disks are provisioned for eachvirtual machine when the VM is created or modified. The cores, memory, and disk space needed foreach Avid virtual machine can depend on a number of factors. For example: What host operating system will the VM run? What services and applications will the VM be running? What will be the workload and impact on the VM? -How many clients will connect to the services running on the VM?-How many VM files or assets will the services running on the VM need to track?Will the VM’s disk space requirements increase over time?-Is it hosting a database?-Does it store any log files that could consume significant space?Will users connect to and perform federated searches across multiple databases?Federated searches require increased core count for the Production Engine. Is the workload of the VM more compute intensive, network intensive, or both?Physical servers often have more (unused) resources than are needed without showing any negativeeffects. However the opposite is often for virtual machines, where allocating more cores cannegatively impact performance. Avid recommends that you be conservative when initially allocatingresources to the VM, and increase the resources as needed. This means that you should first allocatefewer cores to the VM, closely monitor the VM, and increase the core count later if necessary.System administrators should create alerts and properly monitor the resource utilization of their hostsand virtual machines, continually making adjustments as needed. Keep in mind that you still need toplan for using additional compute resources beyond what you may initially allocate. So be sure totake this into account when deciding what the hardware configuration will be for your host nodes.6
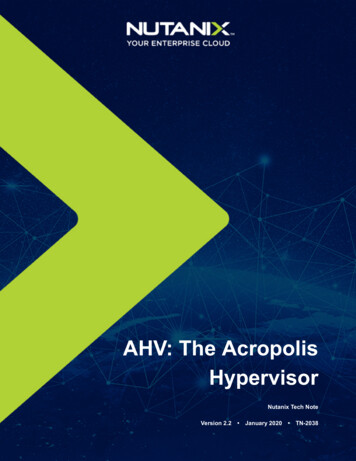
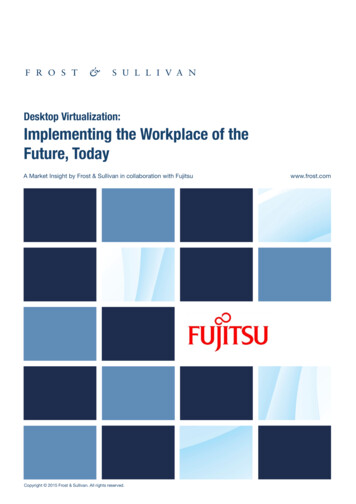
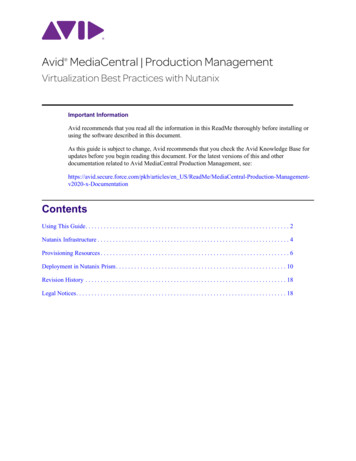
Provisioning ResourcesSockets and CoresIn most cases the cores assigned to a VM will not exceed the number of physical cores per physicalCPU socket in the host. Therefore, you should provision your VM with all cores assigned to a singlesocket (CPU).In the following example illustration, the physical host node has two CPU sockets. Each CPU sockethas an Intel Gold 5220 CPU with 18 cores. Therefore, the host has a total of 36 physical cores.As long as no single VM requires more than 18 cores, each VM can be provisioned with one CPUand their required number of cores.7
Provisioning ResourcesMemory AllocationWhen allocating memory to a virtual machine, note the following: You should not over provision the total amount of physical memory in a host or resource pool tovirtual machines that will be running at the same time. The hypervisor cannot manage memoryin the same way it can dynamically manage over-provisioning of cores with CPU scheduling. Over allocating memory to a virtual machine does not have a negative impact on performancelike over allocating cores. If you allocate 32GB of memory, but for the majority of time the VMdoes not use more than 20GB, there is not any negative performance impact. Applications and services might consume whatever memory is made available to them by theoperating system. Therefore allocating additional memory might not increase performance orresolve what appears to be a lack of available system memory. The Production Management Engine and Archive Production Engine can both see increasedperformance with proper memory allocation. Certain attributes of the database are used todetermine the memory it requires for optimal performance. For more information aboutProduction Management database memory requirements, see “Determining Interplay DatabaseScalability” in the Avid Interplay Production Best Practices Guide. Starting with Production Management v3.6, the Media Indexer performance and scalabilitybecome more directly tied to the amount of available memory. For more information aboutallocating compute resource requirements and Media Indexer performance, see “Working withInterplay Media Indexers” in the Avid Interplay Production Best Practices Guide.Provisioning Virtual Disks for VMsNearly all the VM’s in a Production Management environment can be deployed with a single virtualdisk to host both the operating system and all installed applications. However, there are two virtualmachines that should be deployed with two disks — the Production Management Engine and theArchive Production Engine.The Production Management Engine contains the Production Management database. Avidrecommends that you store this database on a second virtual disk to isolate it from the operatingsystem and applications. The size of this disk depends on two factors: The expected size of the Production Management database Plans to use this disk to create and store backup copies of the databaseThe same rules apply to the Archive Production Engine. However, the archive database by nature willlikely continue to grow and require more disk space. Therefore, you should plan for this and startwith a larger allocation of disk space to accommodate the database’s initial size and for futuregrowth.General Compute Resource GuidelinesThe following table can be used as a reference for sizing Production Management virtual machines.In some cases, Avid supports combining more than one application or service on a single virtualmachine. However doing so might require you to allocate additional cores and/or memory to the VM.The following recommendations are based on an environment with 30 or fewer client connections. Ifyou exceed this number of connections, you might be required to add additional cores and/ormemory to your virtual machines.8
Provisioning ResourcesApplicationCoresMemoryDisk Size GBProduction Management Enginea232C: 80GBD: 200 GBArchive Production Enginea232C: 80GBD: 500 GBMedia Indexerb432C: 200GBProduction Services Engine212C:80GBTranscode Service (2 Instances)c416C: 80GBTranscode Service (4 Instances)c824C: 80GBSTP Encode Service416C: 80GBCopy Service212C: 80GBMove Service212C: 80GBDelivery Service212C: 80GBArchive/Restore Service212C: 80GBMediaCentral Capture with Router Control212C: 80GBProduction Management Web Services212C: 80GBNutanix CVMd8-1232a. For more information, see “Determining Interplay Database Scalability” in the Interplay Production Best PracticesGuide.b. For information on calculating memory allocation, see “Working With Interplay Media Indexers” in the latestInterplay Production Best Practices Guide.c. Transcode performs best when 2 cores are allocated for each running instance of the service.d. Every node in a Nutanix cluster requires a Controller VM (CVM). Please reference the Nutanix Support Portal tofind the recommended CVM configuring for your infrastructure.When calculating the size of the virtual hard disk for a virtual machine consider: A clean install of Windows Server 2016 takes approximately 20 GB of disk space. Windows updates download packages can consume a considerable amount of disk space. Avid software is often deployed from installer packages that are downloaded to the localmachine. These packages can often consume 15-20 GB of space on the target machine. Whileyou can often delete these packages following the installation, you must have enough space tohost the packages for the initial deployment. Some applications generate log files that accumulate over time and should be monitored andmoved or purged if necessary.Before making any purchasing decisions, Avid recommends that you contact your Avid Salesrepresentative to arrange a consultation to help with designing a solution that meets your specifictechnical requirements.9
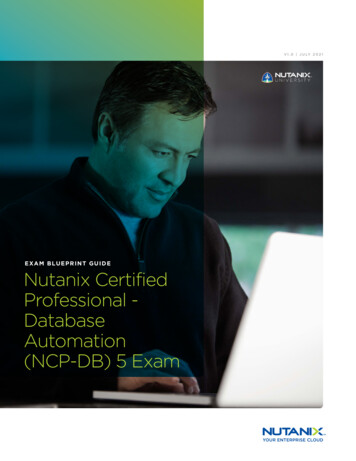
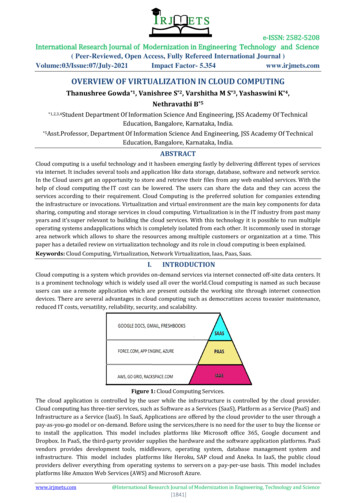
Deployment in Nutanix PrismDeployment in Nutanix PrismThis section provides detailed instructions for deploying a virtual machine in Nutanix Prism.Prior to deploying your virtual machines, Avid highly recommends that you organize andappropriately document all required pre-flight data, such as hostnames, IP addresses, passwords, orother. Avid also recommends that you pre-configure all Computer Objects, Group Policies, andOrganizational Units in Active Directory.Deploying a Windows Virtual Machine in Nutanix PrismTo deploy a Windows virtual machine:1. Log into Nutanix Prism.2. Choose VM from the Dashboard pull-down menu.3. In the VM Dashboard, click the Create VM option.4. Configure the following parameters in the Create VM window:General Configuration-Name: custom-Description (optional): custom-Timezone: custom-Use this VM as an agent VM: deselected10
Deployment in Nutanix PrismCompute Details-VCPU(S): 1-Cores: depends on VM application role and workload-Memory: depends on VM application role and workloadDisks-There will be one CD-ROM by default.5. Click the pencil icon to edit the default CD-ROM and for the image choose the Windows OS ISOimage.-Type: CD ROM-Operation: Clone from Image Service-Bus Type: IDE-Image: Choose the Windows ISO6. Click Update11
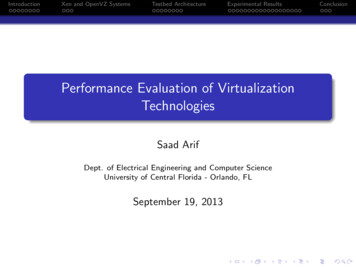
Deployment in Nutanix Prism7. Create a second CD-ROM using the same setting but for the image choose the VirtIO ISO imagethis time.8. Create one DISK for the Windows Operating System installation.-Type: DISK to host the Windows Operating System-Operation: Allocate on Storage Container-Bus Type: SCSI-Storage Container: Default-Size: 80 GB-Index: Next AvailableAfter you click Add for the OS Disk and return to the Create VM window, scroll down to theDisks pane and select the CD-ROM with the Windows OS ISO as your boot device.9. Scroll Down and click Add New NIC.12
Deployment in Nutanix Prism10. Complete the following parameters in the Create NIC window:-VLAN Name: custom-Network Connection State: Connected-Network Address/Prefix: None11. Scroll through the Create VM window to verify that your settings are correct, and then clickSave.12. Select your new VM in the Table view of the VM Dashboard, and click Power On.The circle icon to the left of the VM name will change from red to green when it is powered on.13
Deployment in Nutanix Prism13. Click the Launch Console menu.The VM Console window should appear in a separate browser window and present you with theWindows Setup screen as the VM has booted from the Windows OS ISO image.14. Proceed with the Windows OS installation process.a.Enter your Windows Product Keyb. Choose Windows Server 2016 (Desktop Experience)c.Accept the License Termsd. Choose Custom Install15. At the prompt “Where do you want to Install Windows?” prompt, there are no target disks listed.Click the Load driver option.16. Browse to the VirtIO drivers ISO.14
Deployment in Nutanix Prism17. Navigate to the Windows Server 2016\amd64 folder and click OK.18. Use the Shift key to select all three drivers and click Next.15
Deployment in Nutanix Prism19. A progress bar processes several times and then the Windows Setup window will return whereyou can now select the VM disk you created to install the operating system onto.20. Click Next and the Windows installation process will begin. The virtual machine appears toreboot a few times.21. When the installation process completes you are presented with a window to set the localAdministrator password. Take extra care in recording the password in a safe place.22. After entering the password, you are presented with the standard Windows OS login screen.23. Use the Control Alt Delete (CAD) icon at the top of your Console Window so you can enter yourpassword and login into the virtual machine.24. Use your preferred method to perform the following.a.Set the Computer hostnameb. Enable Remote Desktopc.Set the Time zoned. Configured the TCP/IP and DNS Settings25. Shut the VM down.26. Select the VM in Prism and choose Update.27. Navigate to the Disk section.28. Change the Boot Device to be the DISK.29. Eject the ISO images from both CD-ROM drives.30. Delete one of the CD-ROM drives.16
Deployment in Nutanix Prism31. Install Nutanix Guest Toolsa.Select the VM in Prism and click Manage Guest Tools.b. Select the option to Enable NGT.c.Select the option to Mount NGT.d. Click Submit.32. Remotely access the VM and navigate to the CD drive and double-click the Nutanix icon.33. Agree to the license terms, step through the installer and restart the VM when the install iscomplete.34. Confirm the Computer Object for this VM is added to the correct folder in Active Directory.35. Join the VM to the domain.36. Restart the virtual machine.With the VM now joined to the domain and Remote Desktop enabled you should be able toremotely access the machine using your preferred method (or continue to use the Nutanixconsole) and save the login credentials for quick access gong forward.37. Login with the domain user that will be the standard operational login.38. Verify Group Policies have been applied.39. Verify Windows Updates are current. If they are not, install updates using your preferred method.40. (Optional) Create a Snapshot to preserve a Windows OS baseline image that you can return to ifanything should go wrong while installing and configuring additional software on the virtualmachine. Once the configuration is complete and verify everything is working properly youshould delete any snapshots that you created.Production Management Software DeploymentAfter all your VM’s are deployed and baselined at their operating system level you can use thestandard installation guides for each Avid product to proceed with the software installation andconfiguration.17
Revision HistoryRevision HistoryDateDescriptionJune, 2020Initial ReleaseLegal NoticesProduct specifications are subject to change without notice and do not represent a commitment on the part of Avid Technology, Inc.This product is subject to the terms and conditions of a software license agreement provided with the software. The product may only beused in accordance with the license agreement.This product may be protected by one or more U.S. and non-U.S patents. Details are available at www.avid.com/patents.No part of this document may be reproduced or transmitted in any form or by any means, electronic or mechanical, including photocopyingand recording, for any purpose without the express written permission of Avid Technology, Inc.Copyright 2020 Avid Technology, Inc. and its licensors. All rights reserved.Portions Copyright 2003-2007 of MOG Solutions.Attn. Government User(s). Restricted Rights LegendU.S. GOVERNMENT RESTRICTED RIGHTS. This Software and its documentation are “commercial computer software” or “commercialcomputer software documentation.” In the event that such Software or documentation is acquired by or on behalf of a unit or agency of theU.S. Government, all rights with respect to this Software and documentation are subject to the terms of the License Agreement, pursuantto FAR §12.212(a) and/or DFARS §227.7202-1(a), as applicable.TrademarksAvid, the Avid Logo, Avid Everywhere, Avid DNXHD, Avid DNXHR, Avid NEXIS, Avid NEXIS Cloudspaces, AirSpeed, Eleven, EUCON,Interplay, iNEWS, ISIS, Mbox, MediaCentral, Media Composer, NewsCutter, Pro Tools, ProSet and RealSet, Maestro, PlayMaker, Sibelius,Symphony, and all related product names and logos, are registered or unregistered trademarks of Avid Technology, Inc. in the UnitedStates and/or other countries. The Interplay name is used with the permission of the Interplay Entertainment Corp. which bears noresponsibility for Avid products. All other trademarks are the property of their respective owners. For a full list of Avid trademarks, s/trademarks.Avid MediaCentral Production Management Virtualization Best Practices with Nutanix. Revised June 18, 2020 Thisdocument is distributed by Avid in online (electronic) form only, and is not available for purchase in printed form.18
Nutanix Node A Nutanix Node is the foundational unit for the cluster. You need a minimum of three nodes to create a cluster. Each node in the cluster runs a standard hypervisor and contains processors, memory, and local storage (SSDs and HDDs). IPMI The Nutanix IPMI interface is the Intelligent Platform Management Interface.