Transcription
Enabling Legendary Discovery Enabling Legendary Discovery LEGENDplex LEGENDplex Mul -Analyte Flow Assay KitMul -Analyte Flow Assay KitCat. No. 740984, Human Proinflammatory Chemokine Panel 1(13-plex) with Filter PlateCat. No. 740985, Human Proinflammatory Chemokine Panel 1(13-plex) with V-bottom PlateCat. No. 741080, Human Proinflammatory Chemokine Panel 1(12-plex) with Filter PlateCat. No. 741081, Human Proinflammatory Chemokine Panel 1(12-plex) with V-bottom PlateCat.741082, QuantificationHuman ProinflammatoryChemokinePanelForNo.Accurateof MultipleHumanTh1(1-plex) with Filter Plate(T helper Cell) Cytokines from Cell Culture Supernatant,Cat. No. 741083, Human Proinflammatory Chemokine Panel 1Serum, Plasma and Other Biological Samples(1-plex) with V-bottom PlatePlease readPleaseread unningthetheassayassay.BioLegend.comBioLegend.com
It is highly recommended that this manual be read in itsentirety before using this product. Do not use this kit beyondthe expiration date.For Research Purposes Only. Not for use in diagnostic or therapeutic procedures. Purchase doesnot include or carry the right to resell or transfer this product either as a stand-alone productor as a component of another product. Any use of this product other than the permitted usewithout the express written authorization of BioLegend is strictly prohibited.
LEGENDplex Human Proinflammatory Chemokine Panel 1Table of ContentsPageChapter 1: KIT DESCRIPTION. 3Introduction . 3Principle of the Assay . . . . 4Beads Usage. . . 4Storage Information . . 6Materials Supplied . . 6Materials to be Provided by the End-User . . 8Precautions. . 9Chapter 2: ASSAY PREPARATION. 10Sample Collection and Handling . 10Reagent Preparation . . 10Standard Preparation . 11Sample Dilution . . 12Chapter 3: ASSAY PROCEDURE. 13Performing the Assay Using a Filter Plate . 13Performing the Assay Using a V-bottom Plate . 16Chapter 4: FLOW CYTOMETER SETUP. 19Chapter 5: DATA ACQUISITION AND ANALYSIS.19Data Acquisition. 19Data Analysis. 20Chapter 6: ASSAY CHARACTERIZATION.21Representative Standard Curve .21Assay Sensitivity. . . 21Cross-Reactivity . 22Accuracy. 22Linearity of Dilution . 23biolegend.com1
LEGENDplex Human Proinflammatory Chemokine Panel 12Intra-Assay Precision .24Inter-Assay Precision .25Biological Samples . .26TROUBLESHOOTING. .28PLATE MAP.33Tel: 858-768-5800
LEGENDplex Human Proinflammatory Chemokine Panel 1Chapter 1: KIT DESCRIPTIONIntroductionChemotactic cytokines or chemokines play pivotal roles in various processessuch as immune surveillance, organ development, angiogenesis, and immuneresponses. Expression profiling of chemokines, especially those involved ininflammation and immune disorders, is important in achieving a deeper understanding of disease states.The Human Proinflammatory Chemokine Panel 1 is a multiplex bead-based assay panel, using fluorescence–encoded beads suitable for use on various flowcytometers. This panel allows simultaneous quantification of 13 human chemokines, including MCP-1 (CCL2), RANTES (CCL5), IP-10 (CXCL10), Eotaxin (CCL11),TARC (CCL17), MIP-1α (CCL3), MIP-1β (CCL4), MIG (CXCL9), MIP-3α (CCL20),ENA-78 (CXCL5), GROα (CXCL1), I-TAC (CXCL11) and IL-8 (CXCL8). This assaypanel provides higher detection sensitivities and broader dynamic ranges thantraditional ELISA methods. The panel has been validated by detecting expectedchanges in biological samples.The LEGENDplex Human Proinflammatory Chemokine Panel 1 (13-plex) is designed to allow flexible customization within the panel. It can also be divided intosubpanels. The table below shows the panel configuration and sample diltuionrequirement.Cat #740984,740985741080,741081741082,741083Plex SizeTargetsSample TypeDilution Factor13-plexCCL2, CCL5, CXCL10,CCL11, CCL17, CCL3,CCL4, CXCL9, CCL20,CXCL5, CXCL1,CXCL11, CXCL8Tissue CultureVaries12-plexCCL2, CXCL10, CCL11,CCL17, CCL3, CCL4,CXCL9, CCL20, CXCL5,CXCL1, CXCL11, CXCL8Tissue CultureVariesSerum/Plasma2xTissue CultureVariesSerum Plasma50x1-plexCCL5Please visit www.biolegend.com/legendplex for more information on how tomix and match within the panel.biolegend.com3
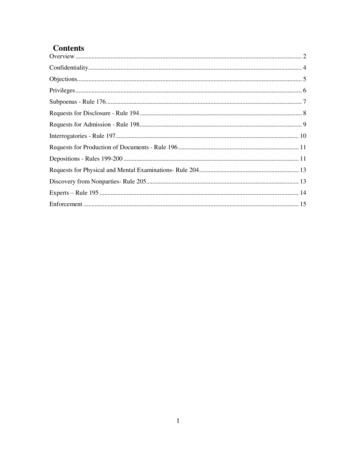
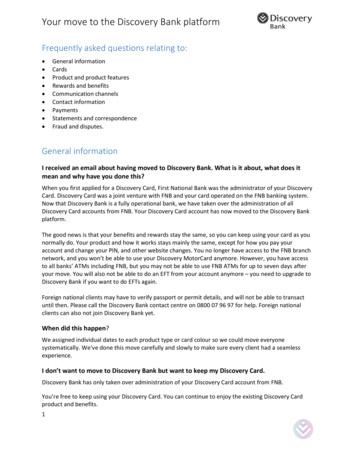
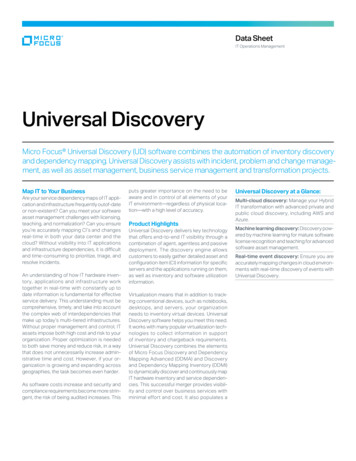
LEGENDplex Human Proinflammatory Chemokine Panel 1Principle of the AssayBioLegend’s LEGENDplexTM assays are bead-based immunoassays using thesame basic principle as sandwich immunoassays.Beads are differentiated by size and internal fluorescence intensities. Each beadset is conjugated with a specific antibody on its surface and serves as the capture beads for that particular analyte. When a selected panel of capture beadsis mixed and incubated with a sample containing target analytes specific to thecapture antibodies, each analyte will bind to its specific capture beads. Afterwashing, a biotinylated detection antibody cocktail is added, and each detection antibody in the cocktail will bind to its specific analyte bound on the capture beads, thus forming capture bead-analyte-detection antibody sandwiches.Streptavidin-phycoerythrin (SA-PE) is subsequently added, which will bind tothe biotinylated detection antibodies, providing fluorescent signal intensities inproportion to the amount of bound analytes.Since the beads are differentiated by size and internal fluorescence intensityon a flow cytometer, analyte-specific populations can be segregated and PEfluorescent signal quantified. The concentration of a particular analyte is determined using a standard curve generated in the same assay.Beads UsageThe Human Proinflammatory Chemokine Panel 1 uses two sets of beads. Eachset has a unique size that can be identified based on their forward scatter (FSC)and side scatter (SSC) profiles (Beads A and Beads B, Figure 1). Each bead setcan be further resolved based on their internal fluorescence intensities. Theinternal dye can be detected using FL3, FL4, or APC channel, depending on thetype of flow cytometer used. The smaller Beads A consists of 6 bead populations and the larger Beads B consists of 7 bead populations (Figure 2-3).Using a total of 13 bead populations distinguished by size and internal fluorescent dye, the Human Proinflammatory Chemokine Panel 1 allows simultaneousdetection of 13 chemokines in a single sample. Each analyte is associated with aparticular bead set as indicated (Figures 2-3 and Table 1).Figure 1. Beads Differentiated by SizeBeads A smaller beadsBeads B larger beads4Tel: 858-768-5800
LEGENDplex Human Proinflammatory Chemokine Panel 1Figure 2. Beads A Classification by FL4A10A5A6A7 A8A4Figure 3. Beads B Classification by FL4B9B6B3B4B2B7B5For Beads usage in the panel, please refer to Table 1 below:Table 1. Panel Targets, Bead ID and Top Standard 3IL-8A4 IP-10A5 EotaxinA6 TARCA7 MCP-1A8 RANTESA10 MIP-1αB2 MIGB3 ENA-78B4 MIP-3αB5 GROαB6 I-TACB7 MIP-1βB9 Top Standard ConcentrationNote: The topstandard concentrations ofanalytes in thispanel were setat various concentrations, butmay be subject tochange from lotto lot (please visitbiolegend.com/en-us/legendplexto download a lotspecific certificateof analysis ).*Bead ID is used to associate a bead population to a particular analyte whenbiolegend.com5
LEGENDplex Human Proinflammatory Chemokine Panel 1using the LEGENDplex data analysis software program. For further informationregarding the use of the program please visit biolegend.com/en-us/legendplexStorage InformationRecommended storage for all original kit components is between 2 C and 8 C.DO NOT FREEZE Beads, Detection Antibodies or SA-PE. Once the standards have been reconstituted, immediately transfer contents into polypropylene vials. DO NOT STORE RECONSTITUTED STANDARDS IN GLASS VIALS. Upon reconstitution, leftover standard and Matrix B should be stored at -70 C for use within one month. Avoid multiple ( 2) freeze-thaw cycles.Discard any leftover diluted standards.Materials SuppliedThe LEGENDplexTM kit contains reagents for 100 tests, listed in the table below.When assayed in duplicate, this is enough for an 8-point standard curve and 40samples.QuantityVolumePart #Setup Beads 1: FITC BeadsKit Components1 vial1 mL77840Setup Beads 2: PE Beads1 vial1 mL77842Setup Beads 3: Raw Beads1 vial2 mL77844Capture Beads*variesvariesvaries1 bottle3.5 mLvaries1 viallyophilizedvaries1 bottle3.5 mL777431 viallyophilized77549Human Proinflammatory Chemokine Panel 1 Detection Antibodies*Human Proinflammatory Chemokine Panel 1 Standard Cocktail,Lyophilized*LEGENDplexTM SA-PELEGENDplexTMMatrix B, LyophilizedLEGENDplexTMAssay Buffer1 bottle25 mL77562LEGENDplexTM Wash Buffer, 20X1 bottle25 mL77564Filter plate** or V-bottom plate***1 plate76187 or76883Plate Sealers4 sheets78101*Full Panel and subpanel contents may differ as listed in the following tables6Tel: 858-768-5800
LEGENDplex Human Proinflammatory Chemokine Panel 1**for kit with filter plate *** for kit with V-bottom plate. Only one plate is provided for each kit.Kit-Specific Components for 13-plex Panel:Kit ComponentsQuantityVolumePart #Human Proinflammatory ChemokinePanel 1 (12-plex) Pre-mixed Beads1 bottle3.5 mL750001081Human CCL5 (RANTES) Capture BeadA10, 13x1 vial270 μL750002207Human Proinflammatory ChemokinePanel 1 Detection Antibodies1 bottle3.5 mL750001077Human Proinflammatory ChemokinePanel 1 Standard Cocktail, Lyophilized1 viallyophilized750001079Kit-Specific Components for 12-plex Panel:Kit ComponentsQuantityVolumePart #Human Proinflammatory ChemokinePanel 1 (12-plex) Pre-mixed Beads1 bottle3.5 mL750001081Human Proinflammatory ChemokinePanel 1 Detection Antibodies1 bottle3.5 mL750001077Human Proinflammatory ChemokinePanel 1 Standard Cocktail, Lyophilized1 viallyophilized750001079Kit-Specific Components for 1-plex Panel:Kit ComponentsQuantityVolumePart #Human CCL5 (RANTES) Capture BeadA10, 13x1 vial270 μL740992Human Proinflammatory ChemokinePanel 1 Detection Antibodies1 bottle3.5 mL740986Human Proinflammatory ChemokinePanel 1 Standard Cocktail, Lyophilized1 viallyophilized740987biolegend.com7
LEGENDplex Human Proinflammatory Chemokine Panel 1Materials to be Provided by the End-User A flow cytometer equipped with two lasers (e.g., a 488 nm blue laser or532 nm green laser and a 633-635 nm red laser) capable of distinguishing575 nm and 660 nm or a flow cytometer equipped with one laser (e.g., 488nm blue laser) capable of distinguishing 575 nm and 670 nm.Partial list of compatible flow cytometers:FlowCytometerReporter Channel Classification Channel CompensaChannel EmissionChannelEmission tion needed?BD FACSCaliburTM(single laser)FL2575 nmFL3670 nmYesBD FACSCaliburTM(dual laser)FL2575 nmFL4660 nmNo*BD Accuri C6TMFL2585 nmFL4675 nmNo*BD FACSCantoTMBD FACSCantoTM IIPE575 nmAPC660 nmNo*BDTM LSR, LSR IIBD LSRFortessaTMPE575 nmAPC660 nmNo*BD FACSAriaTMPE575 nmAPC660 nmNo*Beckman CoulterCytoFLEXPE585 nmAPC660 nmNo*GalliosPE575 nmAPC660 nmNo*NovoCytePE572 nmAPC660 nmNo**Compensation is not required for the specified flow cytometers whenset up properly.For setting up various flow cytometers, please visit: www.biolegend.com/legendplex and click on the Instrument Setup tab. Multichannel pipettes capable of dispensing 5 μL to 200 μL Reagent reservoirs for multichannel pipette Polypropylene microfuge tubes (1.5 mL) Laboratory vortex mixer Sonicator bath (e.g., Branson Ultrasonic Cleaner model #B200, or equivalent) Aluminum foil Absorbent pads or paper towels Plate shaker (e.g., Lab-Line Instruments model #4625, or equivalent)8Tel: 858-768-5800
LEGENDplex Human Proinflammatory Chemokine Panel 1 Tabletop centrifuges (e.g., Eppendorf centrifuge 5415 C, or equivalent) 1.1 mL polypropylene micro FACS tubes, in 96-tube rack (e.g., NationalScientific Supply Co, catalog # TN0946-01R, or equivalent).If the assay is performed in a filter plate; A vacuum filtration unit (Millipore MultiScreen HTS Vacuum Manifold,cat# MSVMHTS00 or equivalent). Instructions on how to use the vacuummanifold can be found at the supplier’s website. A vacuum source (mini vacuum pump or line vacuum, e.g., MilliporeVacuum Pump, catalog # WP6111560, or equivalent) If needed, additional Filter plate can be ordered from BioLegend (Cat#740377 or 740378).If the assay is performed in a V-bottom plate; Centrifuge with a swinging bucket adaptor for microtiter plates (e.g., Beckman Coulter AllegraTM 6R Centrifuge with MICROPLUS CARRIER adaptor forGH3.8 and JS4.3 Rotors) . If needed, additional V-bottom plate can be ordered from BioLegend (Cat#740379).Precautions All blood components and biological materials should be handled as potentially hazardous. Follow universal precautions as established by the Centerfor Disease Control and Prevention and by the Occupational Safety andHealth Administration when handling and disposing of infectious agents. Sodium azide has been added to some reagents as a preservative. Although the concentrations are low, sodium azide may react with lead andcopper plumbing to form highly explosive metal azides. On disposal, flushwith a large volume of water to prevent azide build-up. Matrix B for LEGENDplexTM kits contains components of human origin andshould be handled as potentially hazardous. The raw material has beenscreened for infectious diseases and is negative for HIV, HBV and HCV usingFDA-approved test methods. Do not mix or substitute reagents from different kits or lots. Reagents fromdifferent manufacturers should not be used with this kit. Do not use this kit beyond its expiration date. SA-PE and Premixed Beads are light-sensitive. Minimize light exposure.biolegend.com9
LEGENDplex Human Proinflammatory Chemokine Panel 1Chapter 2: ASSAY PREPARATIONSample Collection and HandlingPreparation of Serum Samples: Allow the blood to clot for at least 30 minutes and centrifuge for 20 minutes at 1,000 x g. Remove serum and assay immediately or aliquot and store samples at -20 C. Avoid multiple ( 2) freeze/thaw cycles. When using frozen samples, it is recommended that samples are thawedcompletely, mixed and centrifuged to remove particulates prior to use.Preparation of Plasma Samples: Plasma collection using EDTA as an anti-coagulant is recommended. Centrifuge for 10 minutes at 1,000 x g within 30 minutes of blood collection. Remove plasma and assay immediately, or aliquot and store samples at -20 C. Avoid multiple ( 2) freeze/thaw cycles. When using frozen samples, it is recommended that samples are thawedcompletely, mixed well and centrifuged to remove particulates.Preparation of Tissue Culture Supernatant: Centrifuge the sample to remove debris and assay immediately. If not possible, aliquot and store samples at -20 C. Avoid multiple ( 2) freeze/thawcycles.Reagent PreparationPreparation of Antibody-Immobilized BeadsFor the 13-plex kit, sonicate 12-plex pre-mixed Beads bottle and RANTESCapture Beads (13x) for 1 minute in a sonicator bath and then vortexfor 30 seconds prior to use. If no sonicator bath is available, increase thevortexing time to 1 minute to completely resuspend the beads. Onceresuspended, directly add all 270 µL of RANTES Capture Beads into 12 plexbottle to create 13-plex pre-mixed capture beads.For the 12-plex kit, sonicate 12-plex pre-mixed Beads bottle Beads for 1minute in a sonicator bath and then vortex for 30 seconds prior to use. Ifno sonicator bath is available, increase the vortexing time to 1 minute tocompletely resuspend the beads.10Tel: 858-768-5800
LEGENDplex Human Proinflammatory Chemokine Panel 1For the 1-plex kit, sonicate RANTES Capture Beads (13x) for 1 minute in asonicator bath and then vortex for 30 seconds prior to use. If no sonicatorbath is available, increase the vortexing time to 1 minute to completelyresuspend the beads. Dilute the beads to 1x with assay buffer before use.Preparation of Wash Buffer Bring the 20X Wash Buffer to room temperature and mix to bring all saltsinto solution. Dilute 25 mL of 20X Wash Buffer with 475 mL deionized water. Store unused portions between 2 C and 8 C for up to one month.Preparation of Matrix B (for Serum Samples Only) Add 5.0 mL LEGENDplexTM Assay Buffer to the bottle containing lyophilizedMatrix B. Allow at least 15 minutes for complete reconstitution. Vortex tomix well. Leftover reconstituted Matrix B should be stored at -70 C forup to one month.Standard Preparation1. Prior to use, reconstitute the lyophilized Human Proinflammatory Chemokine Panel 1 Standard Cocktail with 250 µL Assay Buffer.2. Mix and allow the vial to sit at room temperature for 10 minutes, andthen transfer the standard to an appropriately labeled polypropylenemicrofuge tube. This will be used as the top standard C7.Note: The top standard concentrations of analytes in this panel were setat various concentrations, but may be subject to change from lot to lot(please visit biolegend.com/en-us/legendplex to download a lot-specificcertificate of analysis ).3. Label 6 polypropylene microfuge tubes as C6, C5, C4, C3, C2 and C1,respectively.4. Add 75 µL of Assay Buffer to each of the six tubes. Prepare 1:4 dilution ofthe top standard by transferring 25 µL of the top standard C7 to the C6tube and mix well. This will be the C6 standard.5. In the same manner, perform serial 1:4 dilutions to obtain C5, C4, C3, C2and C1 standards (see the table below using 10ng/mL of top standardconcentration as an example). Assay Buffer will be used as the 0 pg/mLstandard (C0).biolegend.com11
LEGENDplex Human Proinflammatory Chemokine Panel 1Tube/StandardIDSerialDilutionAssay Bufferto add (µL)Standard toaddFinal Conc.(pg/mL)C7------10,000C61:47525 µL of C72,500C51:167525 µL of C6625C41:647525 µL of C5156.3C31:2567525 µL of C439.1C21:10247525 µL of C39.8C11:40967525 µL of C22.4C0--75--0Sample Dilution For measuring serum or plasma samples using the 12-plex kit, the samplesneed to be diluted 2-fold with Assay Buffer before being tested (e.g. dilute50 µL of sample with 50 µL of Assay Buffer). If furthe sample dilution isneeded, the samples should be diuted with Matrix B provided in the kit. For measuring serum or plasma samples uisng the 1-plex RANTES kit, a 50fold dilution using Assay Buffer is recommended due to the high concentration of RANTES in samples. If furthe sample dilution is needed, the samplesshould be diuted with Assay Buffer provided in the kit.Adding serum or plasma samples without dilution will result in low assayaccuracy and possibly, clogging of the filter plate. For cell culture supernatant samples, the levels of analyte can vary greatlyfrom sample to sample. While the sample can be tested without dilutions,a preliminary experiment may be required to determine the appropriatedilution factor for samples.If sample dilution is desired, dilution should be done with correspondingfresh cell culture medium or Assay Buffer to ensure accurate measurement.12Tel: 858-768-5800
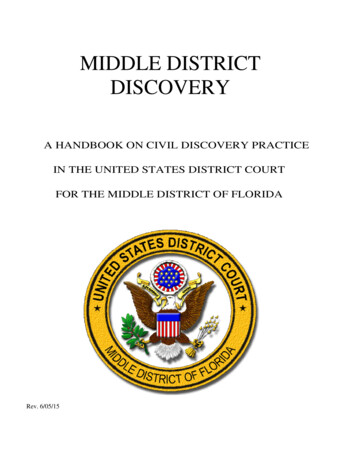
LEGENDplex Human Proinflammatory Chemokine Panel 1Chapter 3: ASSAY PROCEDUREThe LEGENDplexTM assay can be performed in a filter plate or in a V-bottom plate. The in-filter plate assay procedure requires a vacuum filtration unit for washing (see Materials to be Provided by the End-User, page 8). If the in-filter plate assay procedure is not possible or if you prefer, the assaycan be performed in a V-bottom plate.Performing the Assay Using a Filter Plate Allow all reagents to warm to room temperature (20-25 C) before use. Set the filter plate on an inverted plate cover at all times during assay setupand incubation steps, so that the bottom of the plate does not touch anysurface. Touching a surface may cause leakage. Keep the plate upright during the entire assay procedure, including thewashing steps, to avoid losing beads. The plate should be placed in the dark or wrapped with aluminum foil for allincubation steps. Standards and samples should be run in duplicate and arranged on theplate in a vertical configuration convenient for data acquisition and analysis (as shown in attached PLATE MAP, page 33). Be sure to load standardsin the first two columns. If an automation device is used for reading, theorientation and reading sequence should be carefully planned.1.Pre-wet the plate by adding 100 μL of 1X Wash Buffer to each well and let itsit for 1 minute at room temperature. To remove the excess volume, placethe plate on the vacuum manifold and apply vacuum. Do not exceed 10” Hgof vacuum. Vacuum until wells are drained (5-10 seconds). Blot excess WashBuffer from the bottom of the plate by pressing the plate on a stack of cleanpaper towels. Place the plate on top of the inverted plate cover.For measuring cell culture supernatant samples, load the plate as shownin the table below (in the order from left to right):Assay BufferMatrix BStandardSample*Standard Wells25 µL---25 µL---Sample wells25 µL------25 µLFor measuring serum/plasma samples using the 12-plex kit, load the plateas shown in the table below (in the order from left to right):Assay BufferMatrix BStandardbiolegend.comSample*13
LEGENDplex Human Proinflammatory Chemokine Panel 1Standard Wells---25 µL25 µL---Sample wells25 µL------25 µLFor measuring serum/plasma samples using the 1-plex RANTES kit, loadthe plate as shown in the table below (in the order from left to right):Assay BufferMatrix BStandardSample*Standard Wells25 µL---25 µL---Sample wells25 µL------25 µL*See Sample Dilution2.Vortex mixed beads bottle for 30 seconds. Add 25 μL of mixed beads toeach well. The volume should be 75 μL in each well after beads addition.(Note: During addition of the beads, shake mixed beads bottle intermittently to avoid bead settling).3.Seal the plate with a plate sealer. To avoid plate leaking, do not apply positive pressure to the sealer when sealing the plate. Wrap the entire plate,including the inverted plate cover, with aluminum foil. Place the plate ona plate shaker, secure it with a rubber band and shake at approximate 500rpm for 2 hours at room temperature.4.Do not invert the plate! Place the plate on the vacuum manifold and applyvacuum as before in Step 1. Add 200 µL of 1X Wash Buffer to each well.Remove Wash Buffer by vacuum filtration. Blot excess Wash Buffer fromthe bottom of the plate with an absorbent pad or paper towels. Repeat thiswashing step once more.5.Add 25 µL of Detection Antibodies to each well.6.Seal the plate with a fresh plate sealer. Wrap the entire plate, including theinverted plate cover, with aluminum foil. Place the plate on a plate shakerand shake at approximately 500 rpm for 1 hour at room temperature.7.Do not vacuum! Add 25 µL of SA-PE to each well directly.8.Seal the plate with a fresh plate sealer. Wrap the entire plate, including theinverted plate cover, with aluminum foil. Place the plate on a plate shakerand shake at approximate 500 rpm for 30 minutes at room temperature.9.Repeat step 4 above.10. Add 150 µL of 1X Wash Buffer to each well. Resuspend the beads on a plateshaker for 1 minute.11. Read samples on a flow cytometer, preferably within the same day of the14Tel: 858-768-5800
LEGENDplex Human Proinflammatory Chemokine Panel 1assay (Note: Prolonged sample storage can lead to reduced signal).If the flow cytometer is equipped with an autosampler, read the plate directly using the autosampler. Please be sure to program the autosamplerto resuspend beads in the well immediately before taking samples. Theprobe height may need to be adjusted when using an autosampler.If an autosampler is not available, the samples can be transferred from thefilter plate to micro FACS (or FACS) tubes and read manually.Assay Procedure Summary for Filter PlateAdd 100 μL 1X Wash Buffer to filter plate wellsVacuum to remove excess bufferCapture beadsAnalytesACBAdd to the plate:25 μL Assay Buffer or Matrix to standard wells(Refer to Assay Procedure)25 μL Assay Buffer to sample wells25 μL diluted standard to standard wells25 μL sample to sample wells25 μL mixed beads to all wellsIncubate 2 hours, RT, shakingACBWash 2 times using vacuum filtration unitAdd 25 μL Detection AntibodiesIncubate 1 hr, RT, shakingBiotinylated Detection AntibodyBCAWithout washing, add 25 μL SA-PEIncubate 30 min, RT, shakingWash 2 times using vacuum filtration unitAdd 150 µL of 1x Wash BufferRead on a flow cytometerbiolegend.com15
LEGENDplex Human Proinflammatory Chemokine Panel 1Performing the Assay Using a V-bottom Plate Allow all reagents to warm to room temperature (20-25 C) before use. Keep the plate upright during the entire assay procedure, including thewashing steps, to avoid losing beads. The plate should be placed in the dark or wrapped with aluminum foil forall incubation steps. Standards and samples should be run in duplicate and arranged on theplate in a vertical configuration convenient for data acquisition and analysis(as shown in attached PLATE MAP, page 33). Be sure to load standards inthe first two columns. If an automation device is used for reading, the orientation and reading sequence should be carefully planned.1.For measuring cell culture supernatant samples, load the plate as shownin the table below (in the order from left to right):Assay BufferMatrix BStandardSample*Standard Wells25 µL---25 µL---Sample wells25 µL------25 µLFor measuring serum/plasma samples using the 12-plex kit, load the plateas shown in the table below (in the order from left to right):Assay BufferMatrix BStandardSample*Standard Wells---25 µL25 µL---Sample wells25 µL------25 µLFor measuring serum/plasma samples using the 1-plex RANTES kit, loadthe plate as shown in the table below (in the order from left to right):Assay BufferMatrix BStandardSample*Standard Wells25 µL---25 µL---Sample wells25 µL------25 µL*See Sample Dilution2.Vortex mixed beads for 30 seconds. Add 25 μL of mixed beads to each well.The total volume should be 75 μL in each well after beads addition. (Note:During beads addition, shake mixed beads bottle intermittently to avoidbead settling).3.Seal the plate with a plate sealer. Cover the entire plate with aluminumfoil to protect the plate from light. Shake at 800 rpm on a plate shaker for16Tel: 858-768-5800
LEGENDplex Human Proinflammatory Chemokine Panel 12 hours at room temperature (Depending on the shaker, the speed mayneed to be adjusted. The optimal speed is one that is high enough to keepbeads in suspension during incubation, but not too high so it causes spillfrom the wells).4.Centrifuge the plate at 1050 rpm ( 250 g) for 5 minutes, using a swingingbucket rotor (G.H 3.8) with microplate adaptor (Please refer to Materialsto be Provided by the End-User, page 8). Do not use excessive centrifugation speed as it may make it harder to resuspend beads in later steps. Makesure the timer of the centrifuge works properly and standby to make surethe centrifuge reaches preset speed.5.Immediately after centrifugation, dump the supernatant into a sink byquickly inverting and flicking the plate in one continuous and forceful motion. Do not worry about losing beads even if the pellet is not visible. Thebeads will stay in the tip of the well nicely. Blot the plate on a stack of cleanpaper towel and drain the remaining liquid from the well as much as possible. Be careful not to disturb the bead pellet.Alternatively, removal of the supernatant may be completed using amultichannel pipette set at 75 µL. Try to remove as much liquid as possiblewithout removing any beads. Be sure to change pipette tips between eachrow or column.6.Wash the plate by dispensing 200 μL of 1X Wash Buffer into each well andincubate for one minute. Repeat step 4 and 5 above. A second wash isoptional , but may help reduce background.7.Add 25 µL of Detection Antibodies to each well.8.Seal the plate with a new plate sealer. Cover the entire plate with aluminum foil to protect the plate from light. Shake at 800 rpm on a plate shakerfor 1 hour at room temperature.9.Do not wash the plate! Add 25 µL of SA-PE to each well directly.10. Seal the plate with a new plate sealer. Wrap the entire plate with aluminumfoil and shake the plate on a plate shaker at approximate 800 rpm for 30minutes at room temperature.11. Repeat step 4, and 5.12. Wash the plate by dispensing 200 μL of 1X Wash Buffer into each well andincubate for one minute. Repeat step 4 and 5 above. This washing step isoptional but helps to reduce the background.13. Add 150 µL of 1X Wash Buffer to each well. Resuspend the beads by pipetting.14. Read samples on a flow cytometer, preferably within the same day of thebiolegend.com17
LEGENDplex Human Proinflammatory Chemokine Panel 1assay (Note: Prolonged sample storage can lead to reduced signal).If the flow cytometer is equipped with an autosampler, the samples can beread directly. Please be sure to program the autosampler to resuspendbeads in the well immediately before taking samples. The probe heightmay need t
A flow cytometer equipped with two lasers (e.g., a 488 nm blue laser or 532 nm green laser and a 633-635 nm red laser) capable of distinguishing 575 nm and 660 nm or a flow cytometer equipped with one laser (e.g., 488 nm blue laser) capable of distinguishing 575 nm and 670 nm. Partial list of compatible flow cytometers: Flow Cytometer Reporter