Transcription
IntegritiUser Guide
Inner Range Pty LtdWWW.INNERRANGE.COMTable of ContentsInTEGRITI SOFTWAREArea lists1Software Applications15Introduction to area lists2LOGIN Window15The area lists menu2Integriti Servers16Creating a new area list16Adding/removing an area from an area listSOFTWARE NAVIGATION3USER INTERFACEALERTS3Ribbon17INTRODUCTION TO ALERTS4Review Panel17USING AN ALERT4Actions Panel17ALERT CREATION4NAVIGATION Panel17READING ALERT INFORMATION4Editor Window19Claiming alertsUser Programming19Actioning alerts19Finalizing alerts20The alert lifespan6Creating a user6USER EDITOR WINDOW7Introduction to PermissionsSCHEMATIC MAPS7Permission Groups21Introduction to Schematic maps7Creating a Permission Group21Opening Schematic maps7Permission Group EDITOR WINDOW21TOOLBAR & NAVIGATION8Permission Structure22Map Elements9Assigning User permissions22Element Types10User Properties23Element STATUS10Assigning Cards to UsersNAVIGATION PANELDoor lists29Introduction to the navigation panel13Introduction to Door lists29MODULE STATUS13The door lists menu29Site options14Creating a new door list31SUB-SITE options14Adding/removing a door from a door list31CONTROLLER options34LAN Module optionsINTEGRITI USER GUIDEPAGE iWWW.INNERRANGE.COM
Inner Range Pty LtdWWW.INNERRANGE.COMTable of ContentsUser commands (Gatekeeper)REVIEW3552INTRODUCTION TO REVIEW52Review Filters53Right click options54Exporting ReviewIntroduction to User commandsUser commands (System Designer)36Introduction to User commandsCCTV37Introduction to CCTV integration37VIEWING CCTV FOOTAGE FROM A CAMERA38VIEWING historical footage38Controlling the playback of footage40Controlling a ptz camera41Viewing multiple camerasOperators42Introduction to Operators42Operator Editor Window43ASSIGNING USERS TO OPERATORS43Active directory usersOperator types44Introduction to Operators Type44Creating an operator typeCustom fields49Introduction to Custom fields49Creating a custom field50Custom field exampleBuilt in reports51INTRODUCTION TO BUILT IN REPORTS51Running a user built in report51Running a Door built in report51Built in reports WindowINTEGRITI USER GUIDEPAGE iiWWW.INNERRANGE.COM
Inner Range Pty LtdWWW.INNERRANGE.COMInTEGRITI SOFTWARESoftware ApplicationsThe Integriti software suite includes two applications: Integriti System Designer for system programming and configuration. Integriti GateKeeper for everyday control and monitoring.Integriti SYSTEM DESIGNERIntegriti System Designer is commonly used to configure and administer your site; this application contains setting and options thatif changed can affect the overall functionality of the site. In most cases System Designer is used by your Installer to commission thesystem or to perform maintenance. Your site administrator may need access to Integriti System Designer to make programmingchanges.Integriti GATEKEEPERIntegriti GateKeeper provides you with a simplified version of System Designer, which only shows items commonly used to monitoryour site. GateKeeper does not allow you to access options that if changed would affect the overall security of the site. GateKeeperis commonly used to monitor and change the state of areas or doors and programme users.INTEGRITI USER GUIDEPAGE 1WWW.INNERRANGE.COM
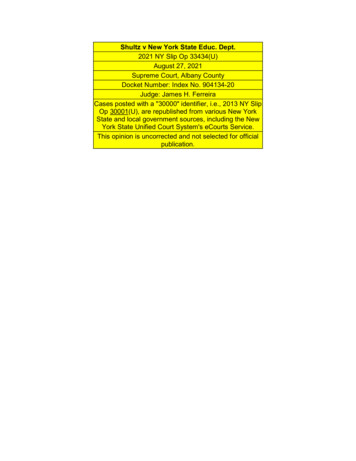
Inner Range Pty LtdWWW.INNERRANGE.COMLOGIN WindowTo launch System Designer or GateKeeper, navigate to the Start Menu All Programs Inner Range folder and click the applicationsicon. Once an application is launched a login window will appear, this window is identical for System Designer and GateKeeper. Tolog into the application, enter your operator name and password then click the Login button.The Login window contains the following options:1.The Software Version number identifies whichversion of the software you have installed.2.The default method for logging into SystemDesigner and GateKeeper is Use These LoginCredentials. This method allows you to login byentering your user name and password. If yoursoftware has been configured to use the CurrentWindows User option, you can login withoutneeding to enter a user name and password. Thislogin option is configured by your installer andrequires additional licenses.123.Enter your User Name in this field.4.Enter your Password in this field.5.Do not change the Integriti Server settings unlessinstructed to do so by your Installer.6.The Server Icons show the status of the servers thatare required for the software to operate.34567Integriti ServersThe Integriti servers are required for System Designer and GateKeeper to run, connect tocontrollers and CCTV systems.Before you login to System Designer or GateKeeper make sure the Integriti servers arestarted, this is indicated by a green dot. If they have not started, right-click the ServersIcon and click Start.If the integriti servers are not visible you may be on a client workstation or theapplication was not launched with administrator privileges.The table below shows all the possible states for the Integriti servers.StoppedStoppingStartingStartedIntegriti Application ServerIntegriti Controller ServerIntegriti Integration ServerINTEGRITI USER GUIDEPAGE 2WWW.INNERRANGE.COM
Inner Range Pty LtdWWW.INNERRANGE.COMSOFTWARE NAVIGATIONUSER INTERFACEThe default layout for System Designer and GateKeeper share common elements. Below is a breakdown of the System Designerinterface.Quick Access Tool-barRibbonWorkspaceReview PanelNavigation PanelActions PanelRibbonThe Ribbon is designed to help you quickly find the items you need to programme or monitor the system. Items are organized intological groups, which are collected under tabs. Each tab relates to a type of function, such as Intruder or Access Control tabs.TabsGroupsIconsThe tabs arrange all the items bycategory. The Home Tab has themost commonly used items.Each tab is divided into smallergroups based on their functionEach icon relates to a specific systemitem that can be programmed ormonitored.Quick Access ToolbarThe Quick Access Toolbar provides a location that you can save commonlyused items so that they can be opened without navigating through theribbon. Right-click on any icon and select the Add to Quick Access Toolbaroption to display the item in the Quick Access Toolbar.INTEGRITI USER GUIDEPAGE 3WWW.INNERRANGE.COM
Inner Range Pty LtdWWW.INNERRANGE.COMReview PanelThe Review panel is located at the bottom left of the Integriti System Designer window by default. Review is a historical log of theevents that have occurred on the security controller or within the software.Actions PanelThe Actions panel displays actions that are performed by an operator from thesoftware. The action list will display if the action was successful or failed.NAVIGATION PanelThe Navigation panel displays the sites, sub-sites, controllers and hardwaremodules on the system. This display can be used to view the state of controllersand modules or to trigger commands such as connecting or disconnecting acontroller.Editor WindowWhen an item such as a user, area or door is edited, all the options and properties appear in an Editor Window. There are somecommon elements between editor windows for different items.Tool BarProperties / OptionsContext-based HelpMost of the toolbar icons appear onevery editor window.The main part of the editor windowdisplays all the properties for theitem you are editing.The help displayed will change basedon the selected property or option.INTEGRITI USER GUIDEPAGE 4WWW.INNERRANGE.COM
Inner Range Pty LtdWWW.INNERRANGE.COMEditor Window Tool BARThe toolbar contains the following buttons:123456789.11.10.121.The Save button will save the item that is currentlydisplayed in the editor window.7.The Last Item button will move forward to the last itemin the list.2.The Undo button will revert the last change since theeditor window was opened.8.The Create New button will make a new blank item.3.The First Item button will move backwards to the firstitem in the list.9.The Delete button will remove the currently selecteditem.4.The Previous Item button will move backwards one item.5.The Item Number field displays what number thatcurrent item is in the series. You can type in a number tojump to a particular item.6.The Next Item button will move forward one item.10. The Show Cross References button will open a windowthat shows the other system items that relate to thecurrently displayed item.11. The Show Item History will open a window that showsthe entire history of the item.12. The Item Specific Commands will change based on theitem you have open.You can toggle the automatic save feature by clicking the Save button drop-down and selecting theAuto Save option. The Save icon will change to a green icon when the automatic save feature isactive. When you make a programming change to an item and close the window or navigate to thenext item, your changes will automatically be saved.INTEGRITI USER GUIDEPAGE 5WWW.INNERRANGE.COM
Inner Range Pty LtdWWW.INNERRANGE.COMUser ProgrammingCreating a userA user is any person that will interact with the Integriti system via a keypad or card reader. The User Editor window allows you toassign the user a PIN number, access card, user permissions or even a photo.To create a new user from System Designer, navigate to the Home tab then click the Users icon, this will open the Users List. Clickthe Add button to open the User Editor window containing a blank user record.To create a new user from GateKeeper, navigate to the Users tab then click the Users icon, this will open the Users List. Click the Addbutton to open the User Editor window containing a blank user record.USER EDITOR WINDOWThe top left section of the User Editor window contains the basic user information.12341.5The Site field is used to associate a user with a site orsub-site, this will not have any impact on the user. Theuser will only be visible in the software if the operatorlogged in has permission to view users from that sub-site.INTEGRITI USER GUIDE2.3.PAGE 6The ID field is a unique number that you can use to identifythe users. Each time you add a new user, the user will begiven the next available number. The ID field is just a numberthat has no effect on the user.The First & Second Name fields are where you enter theuser’s first and last name.WWW.INNERRANGE.COM
Inner Range Pty Ltd4.The Security PIN is required for a user to interact withthe Integriti system via a keypad. If the user needs to beable to arm or disarm areas from the keypad, you willneed to assign the user a security PIN and a menu group.There is no minimum or maximum length for a SecurityPIN by default; however your system may have beenconfigured to have a fixed PIN code length. If you entera Security PIN that is either too long or too short thefollowing error will occur.5.WWW.INNERRANGE.COMThe Qualify PIN can be used instead of the Security PINwhen entering a door that requires the user to enter aPIN to unlock. The qualify PIN is used so that the PINnumber that is used for keypad access can be different tothe PIN number used for door access. Please check withyour installer if you are unsure if you need to use thequalify PIN.Introduction to PermissionsIt is important to understand how user permissions are structured before assigning permissions to a user. A permission is an itemthat you assign to a user to allow or deny that user the ability to interact with the item. Permissions include doors, areas, floors, liftcars and menu groups. In most cases more than one door or area is assigned to a user. It is recommended that you use a list of itemssuch as area lists, door lists or floor lists when assigning permissions for many of the same item.Permission GroupsA permission group is a collection of permissions that can be assigned to one or more users. Many organizations have an internalstructure where users share similar roles, for example, Warehouse Staff. It is easier to assign a single permission group to all of theWarehouse Staff rather than adding individual areas, doors or menu groups to each user. In most cases, the permission groups willclosely match the roles within the company. Permission groups make it easier for you to add a single door to a group of users as itonly requires the change to be made to a permission group and it will affect all users assigned that permission group.Creating a Permission GroupPermission groups can only be created or edited from System Designer. To create a new permission group, navigate to the Home taband click the Permission Group icon. Click the Add New button to open the Permission Group Editor window.Permission Group EDITOR WINDOWThe Permission Group Editor window only contains a Name field and it is primarily used to add or remove permissions. To add apermission to a permission group click the Add button.INTEGRITI USER GUIDEPAGE 7WWW.INNERRANGE.COM
Inner Range Pty LtdWWW.INNERRANGE.COMThe Search for What window will open, this window has two sections:11.2The List Filter allows you to filter all the available itemsthat can be assigned to a user as a permission based onthe item type.2.The Filtered Item list allows you to choose one or moreitems to assign to the user. To select more than one itemat a time, hold down the CTRL button and click multipleitems.Permission StructureOnce you have selected an item from the Search for What window click the OK button to add it to the permission group.The item is then displayed in the Permission Group editor window and has the following options:123451 : Allow or DenyThis column determines if the permission is allowing or denying access to the item. Please note that ifyou deny an item that has already been allowed within the permission group, the deny will override theallow.INTEGRITI USER GUIDEPAGE 8WWW.INNERRANGE.COM
Inner Range Pty LtdWWW.INNERRANGE.COM2 : WhatThe What column is used to determine which item the permission refers to. Clicking the ellipsis, (buttonwith three dots) will open the Search for What window allowing you to select a different item.3 : OptionsThe Options column is used to determine how the user can interact with the assigned item. This allowsyou to assign a user permissions only to arm a particular area and not disarm it. Alternatively, you canassign the user permissions to only enter or exit a door.4 : WhenThe When column is used to provide conditional permission to an item. This is most commonly used toassign a user with permission to an item but restrict its access to certain times of the day. For example,you may have a user that is only allowed to access a door during working hours. This can be achieved byadding the Working Hours time period to the When column.5 : IsThe Is column is used to reverse the condition that is used in the When column. If you only wanted auser to have access to a door after working hours you could put the Working Hours time period time inthe When column and set the IS column to invalid. This is easier than creating a new time period calledNon-Working Hours.Assigning User permissionsThe Permissions for this User window is divided into two sections,the Primary Permission Group and the Extra Permissions. It isimportant to understand the structure of permissions beforeassigning permissions to a user121 : Primary Permission GroupThe Primary Permission Group option is where a user’s permissions are usually assigned. This field only allows you to assign a singlepermission group, in most cases a user will be assigned a primary permission group based on their role in the company.2 : Extra PermissionsThe Extra Permissions section lets you allow or deny permissions for items independent of the primary permission group.This feature is commonly used to reduce the number of permission groups within the Integriti system.If two users have similar roles, for example Warehouse Staff and Warehouse Manager, they can both be assigned the same primarypermission group. You would then add extra permissions for the additional doors and areas that the Warehouse Manager needs.The extra permissions use the same What & When structure as in the permission group programming.INTEGRITI USER GUIDEPAGE 9WWW.INNERRANGE.COM
Inner Range Pty LtdWWW.INNERRANGE.COMUser PropertiesThere are many settings found in the Properties section of the User Editor window, most of these options are rarely used and shouldnot be edited unless instructed to do so by your installer.Below are three more commonly used options:1 : User CanceledIf flagged, the user’s permissions will be disabled. The userwill not be able to interact with the Integriti system via akeypad or an access control door.2 : Start Date TimeThe Start Date Time option prevents the user from interactingwith the Integriti system until the date and time specified.3 : Expiry Date TimeThe Expiry Date Time option prevents the user frominteracting with the Integriti system past the date and timespecified.1The Start Date Time and the Expiry Date Time can be usedseparately or combined. For example, a visitor that attends asite for a set duration of time between two dates. The StartDate Time will ensure that visitor will not be able to accessthe site early and the Expiry Date Time will ensure that thecard can not be used past the end of the visit.23Assigning Cards to UsersOnce a user has been created and programmed, the next step is to assign them a card. There are numerous card formats and cardtypes in Integriti, therefore, there is more than one way for you to assign a card to a user.The following methods for assigning cards will depend on the types of cards you currently use on-site. Check with your installer toconfirm which method is correct for you.Direct EntryDirect Entry is a method of using the raw informationthat is read from a card by a reader. Integriti does notinterpret the raw information. Direct Entry cards can not bepreprogrammed in Integriti as every card needs to be badgedto read its information.To assign a direct entry card to a user, click the Acquire Cardbutton found in the Cards section of the User Editor window.The Acquire Card window provides you three methods toacquire a card.INTEGRITI USER GUIDEPAGE 10WWW.INNERRANGE.COM
Inner Range Pty Ltd11.2.2WWW.INNERRANGE.COM3Review: Selecting this option will scan for reviewmessages of card badges at any reader on the site.Simply badge the card you want to assign to a user ata reader, once it appears in the list double click it toassign it to the user.Wiegand Console Reader: If many direct entry cardsare going to be assigned, it may be easier to usea Wiegand Console Reader method. The WiegandConsole Reader method uses the enrollment stationthat attaches to the PC via a serial port. To assign acard to a user, badge a card at the enrollment stationand double-click the most recent card information.3.SIFER Enrollment Station: If SIFER Cards and readersare being used, the SIFER enrollment station canbe attached to a PC via a USB port to make theenrollment of many SIFER cards easier.Once the card has been double clicked the card will appear inthe Cards section of the user programming.Site Coded CardsSite Coded cards unlike Direct Entry cards can be preprogrammed on the Integriti System and do not require youto badge the card to assign it to a user. In some cases, thenumber will be printed on the card itself.If your system has been configured by your installer for sitecode, you will be able to enter the card number rather thanbadging the card to assign it to a user.To assign a Site Coded card to a user, click the Enter Numberbutton in the Cards section, this will open the Manual CardEntry window.INTEGRITI USER GUIDEPAGE 11WWW.INNERRANGE.COM
Inner Range Pty LtdWWW.INNERRANGE.COMThe Manual Card Entry window contains two fields that arerequired to assign a card to a user.1.2.The Card Template is used to define what type of cardyou are assigning. In some cases there may be more thanone template, this usually occurs when a combination ofnew and old cards are being used on a site.12The Card Number field is were you enter the unique cardnumber. In some cases the number will be printed on thecard, if it is not printed you may need to badge a card at areader to view the card details.Below is a review message that contains the card information. The card number is 00027417.Existing CardWhen users that have cards assigned to them are deletedfrom the Integriti System, the card remains behind with anunallocated status.This unallocated card can be assigned to a new user.To assign an existing card to a user, click the Existing Cardbutton in the Cards section.This will open the Find Entity window that displays all theunallocated cards. Select a card from the Available Cards listand click the OK button to assign it to the user.INTEGRITI USER GUIDEPAGE 12WWW.INNERRANGE.COM
Inner Range Pty LtdWWW.INNERRANGE.COMDoor listsIntroduction to Door listsA door list is a collection of doors that can be used for user permissions, door control or automation. When assigning multiple doorsto a user, it is easier to assign a single door list.An operator can lock or unlock a door list, instead of having to control doors one at a time. The Integriti controller can be configuredto automatically lock or unlock a door list.The door lists menuTo program a door list, navigate to the Home tab and click the Door Lists icon.The Door Lists menu will open; this list contains all the currently programmed door lists.1234561.The Add New button will create a new blank door list.4.The Delete button will delete the selected door list(s).2.The Edit button will open the selected door list forprogramming changes.5.The Export button saves the selected door list(s) as anIR-Entities file.3.The Duplicate button will create a new door list that isidentical to the selected door list.6.The Print/Export CSV button provides a printable versionof the contents of the Door Lists window.INTEGRITI USER GUIDEPAGE 13WWW.INNERRANGE.COM
Inner Range Pty LtdWWW.INNERRANGE.COMCreating a new door listClick the Add New button to open the Door Lists Editor window.4123561.The Site field determines which site this door list will beassociated with.4.The Unlock and Lock buttons will control all of the doorsassigned to the door list.2.The ID field displays the unique identification code foreach door list, this ID cannot be changed.5.The In List section displays all doors that are assigned tothe door list.3.The Name field is where a name can be assigned to thedoor list.6.The Not In List section displays all of the doors that arenot assigned to the door list.Adding/removing a door from a door listAdding a doorRemoving a Door1.Select one or more doors from the Not In List section.1.Select one or more doors from the In List section .2.Click the Add button to add the door(s) to the door list.2.3.The door will move from the Not In List section to the Inlist Section.Click the Remove button to remove the door(s) from thedoor list.3.The door will move from the In List section to the Not Inlist Section.INTEGRITI USER GUIDEPAGE 14WWW.INNERRANGE.COM
Inner Range Pty LtdWWW.INNERRANGE.COMArea listsIntroduction to area listsAn area list is a collection of areas that can be used for user permissions, area control or automation. When assigning multiple areasto a user, it is easier to assign a single area list.An operator can arm or disarm an area list instead of having to control areas one at a time. The Integriti controller can be configuredto automatically arm or disarm an area list.The area lists menuTo program an area list, navigate to the Home tab and click the Area Lists icon.The Area Lists menu will open; this list contains all the currently programmed area lists.1234561.The Add New button will create a new blank area list.4.The Delete button will delete the selected area list(s).2.The Edit button will open the selected area list forprogramming changes.5.The Export button saves the selected area list(s) as anIR-Entities file.3.The Duplicate button will create a new area list that isidentical to the selected area list.6.The Print/Export CSV button provides a printable versionof the contents of the Area Lists window.INTEGRITI USER GUIDEPAGE 15WWW.INNERRANGE.COM
Inner Range Pty LtdWWW.INNERRANGE.COMCreating a new area listClicking the Add New button will open the Area Lists Editor window.4123561.The Site field determines which site this area list will beassociated with.4.The Arm and Disarm buttons will control all the areasassigned to the area list.2.The ID field displays the unique identification code foreach area list - this cannot be changed.5.The In List section displays all the areas that are assignedto the areas list.3.The Name field is where a name can be assigned to thearea list.6.The Not In List section displays all the areas that are notassigned to the area list.Adding/removing an area from an area listAdding an areaRemoving an area1.Select one or more areas from the Not In List section.1.Select one or more areas from the In List section .2.Click the Add button to add the area(s) to the area list.2.3.The area will move from the Not In List section to the Inlist Section.Click the Remove button to remove the area(s) to the arealist.3.The door will move from the In List section to the Not Inlist section.INTEGRITI USER GUIDEPAGE 16WWW.INNERRANGE.COM
Inner Range Pty LtdWWW.INNERRANGE.COMALERTSINTRODUCTION TO ALERTSAn alert is a notification that draws an operator’s attention to an event or alarm.For example, when a duress panic/duress button is pressed by a user it will require a guard to respond in person. Without an alertthe event may be completely missed or actioned too late.Alerts are viewed and actioned from Integriti GateKeeper. The alert will remain in the software until it is finalized by an operator.USING AN ALERTAlerts are usually configured by your installer, as an end user you will interact with alerts from an Alert View window. An alert viewis a collection of different types of alerts, in some cases the alerts that you are able to see and respond to may differ from otheroperators.Alert views are only visible in Integriti GateKeeper and are part of the default layout. If the alert views are not visible, navigate to theHome tab and then click the Alert Views icon.ALERT CREATIONWhen the event that triggers an alert occurs, the alert is created and appears in the Alert View window. The appearance of the alertis determined by how it is configured. Alerts can be configured to have different foreground and background colors, this allows theyou to easily identify the type of event that has occurred.READING ALERT INFORMATIONThe Alert window has multiple columns that contain information to help you identify the alert priority, what triggered the alert andwhen the alert was generated. These columns can be used to filter the currently displayed alerts.1234561 : Date / time updatedThis displays the most recent occurrence of the event that triggered the alarm.This field can be searched by a specific date or a range of dates, such as last hour.By selecting the Show All check-box, it will display all un-finalized alerts.INTEGRITI USER GUIDEPAGE 17WWW.INNERRANGE.COM
Inner Range Pty LtdWWW.INNERRANGE.COM2 : MessageThis provides a summary of the event(s) that have occurred to trigger the alert.The Message field is a basic text-based filter that you can use to filterthe displayed alerts by typing the name of an item, for example: office.This would filter the alerts to only display the ones that contain theword office in the Message field.3 : ACTIVATIONSAlerts can be grouped by the input, area or review message that created them. The Activations column provides a count of howmany times the event has occurred, rather than having individual alerts for each event.This column can also be filtered by entering a number into the search field.4 : PriorityAn alert can be configured to have a priority; you can use this priority to determine which event to action first. The priority scale isfrom 1 (high) to 16 (low).The Priority column can be filtered by selecting one or more of the check boxes.You can view all alerts by checking the (Select All) check box.5 : StateThe state of an alert will either be Unclaimed, Claimed or Finalized; this allows you to identify which alert to action in order to avoidtwo operators dealing with the same alert.The State column can be searched by selecting one or more of the check boxes.You can view all alerts by checking the (Select All) check box.6 : OperatorOnce an alert has been claimed by an operator, the operator’s name will appear in the Operator column.The Operator column has a basic text-based search field; you can filter the alerts by typing the name of anoperator, for example, David.INTEGRITI USER GUIDEPAGE 18WWW.INNERRANGE.COM
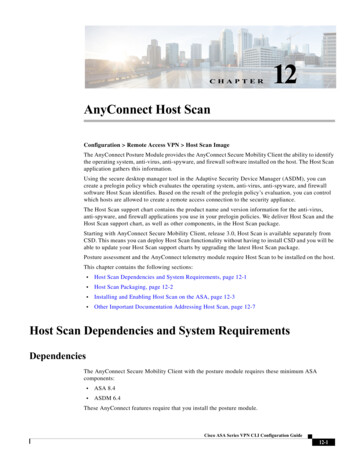
Inner Range Pty LtdWWW.INNERRANGE.COMClaiming alertsIntegriti GateKeeper can have multiple operators logged in who can view and action alerts at the same time. Claiming alerts is a wayto identify who is dealing with an alert, this prevents two operators both actioning on the same alert.Claiming alertsUnclaiming alertsThe Claim button is used to assign the alert to yourself;this will change the state from unclaimed to claimed.Once an alert is claimed, the Claim button will change toan Un Claim buttonAdditionally your operator name will appear in theOperator column in the alert view. Once claimed, onlythat operator can action and finalize the alert.If you have claimed an alert and needed another operatorto action it, you can unclaim the alert by clicking theUnclaim button in the alert view.Note: Claiming an alert will only work if each operator logs in with a unique operator name.Actioning alertsOnce an alert has been claimed, the next step is to action it. The Action button opens the Finalize Response window.The Finalize Response window is used to enter asummary of how you responded to the alert and thealerts outcome.False alarm on Duress point.Finalizing alertsThe last step in actioning an alert is to finalize the alert; this r
EG E GE WWWEAGE.COM WWWEAGE.COM PAGE 2 I Pt td LOGIN Window To launch System Designer or GateKeeper, navigate to the Start Menu All Programs Inner Range folder and click the applications icon. Once an application is launched a login window will appear, this window is identical for System Designer and GateKeeper.