Transcription
Release NoteRM Unify AD Sync v4 forWindows Server networksContentsAbout this Release Note . 3About RM Unify AD Sync . 3What it does . 3Components . 3RM Unify AD Sync Service . 3RM Unify Password Filter . 3Example installations . 4Some important considerations . 5Data protection . 5Initial password synchronisation . 5Requirements . 6RM Unify AD Sync Service requirements . 6RM Unify Password Filter requirements . 6Installation scenarios for new installs and upgrades . 7Pre-installation tasks . 7A.Reboot your domain controllers . 7B.Choose your AD Sync server . 7C.Ensure prerequisite software is installed . 7D.Back up your servers . 7E.Create AD security groups for users and admins . 7F.Gather the required network information . 9Installing RM Unify AD Sync . 101.Install the RM Unify AD Sync Service . 102.Run the configuration tool for the first time . 123.Register your school network with RM Unify . 134.Configure an establishment . 165. Install RM Unify Password Filter . 226. Force a password change at next logon . 23Changing your AD Sync configuration . 25Appendix I: Identifying your current version of RM Unify AD Sync . 27Appendix II: Identifying 32- and 64-bit Windows servers . 28Windows Server 2008 . 28Windows Server 2008 Server Core Edition . 28Windows Server 2012 and later . 28Appendix III: Upgrading from RM Unify AD Sync v2 or v3. . 29Appendix IV: Installing prerequisites . 32Installing .NET Framework version 3.5 SP1 . 32Windows Server (WS) 2008 R2 . 32Windows Server (WS) 2012 incl. R2 and later . 32Installing Microsoft Visual C 2010 Redistributable . 33
32-bit operating systems (WS 2008 32-bit) . 3364-bit operating systems (WS 2008 R2 / WS 2012 / WS 2016 / WS 2019) . 33Appendix V: Choosing mapping types . 35Profile Path . 35Organisational Unit . 352
RM Unify AD Sync for Windows Server networksAbout this Release NoteThis Release Note is written for network administrators who areinstalling and setting up RM Unify AD Sync v4 on Windows Server networks, either for the first time or as an upgrade from RM Unify ADSync version 2 or version 3.Do not use this Release Note if you want to install or upgrade RMUnify AD Sync on a network with Community Connect 4 (CC4) orConnect on Prem (COP) management tools – use Release Note: RMUnify AD Sync for CC4 instead.About RM Unify AD SyncWhat it doesRM Unify is a single sign-on system, application library and management system forCloud services.RM Unify AD Sync synchronises your local school network user accounts with RM Unify,so that students and school staff can access ‘cloud’ services with the same usernameand password that they use on the local school computers.The RM Unify AD Sync Service monitors changes in the local Microsoft ActiveDirectory (AD), including password changes. When students, teachers or other users joinyour school, their network accounts can be automatically synchronised to RM Unify. Ifspecific attributes in a network account change, for example a member of staff changestheir surname, these changes will be synchronised to RM Unify via RM Unify AD Sync.When the time comes to delete user accounts, these will automatically be removed fromRM Unify.In order to use RM Unify AD Sync, your school must have an appropriate licence, e.g. anRM Unify Premium licence, or an RM SafetyNet User-Based Filtering subscription.ComponentsYou need to install two components to the product. These can beinstalled in different ways.RM Unify AD Sync ServiceThis service is installed on just one server and scans the AD for changes to useraccounts. This information, together with any password changes, is used to update itsuser database, which is synchronised to RM Unify.RM Unify Password FilterThis must be installed on all domain controllers (DCs) on the network, tocapture any changes in users’ passwords.3
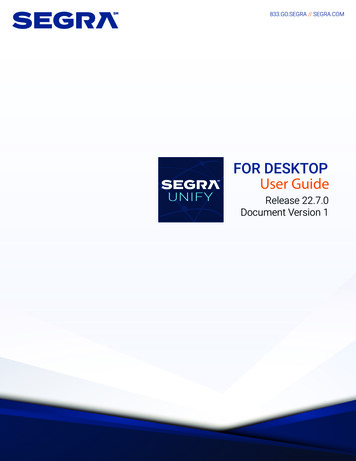
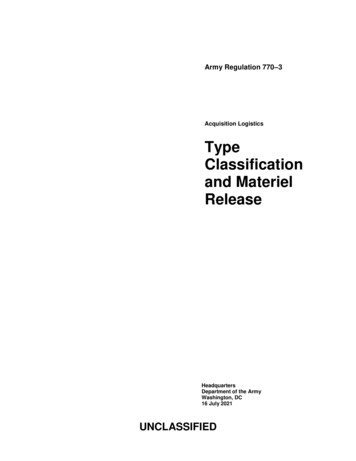
Release NoteExample installationsSingle-server network:All components are installed on the server.Two DCs (recommended installation):PasswordchangeRM UnifyPassword FilterDomain ControllerPasswordchangesRM UnifyAD Sync ServiceUser accountchangesSync changesRM UnifyPassword FilterDomain ControllerTwo DCs (alternative installation using a member server):PasswordchangeRM UnifyPassword FilterDomain controllerUser accountchangesAccountchangesPasswordchangesRM UnifyAD Sync ServiceSync changesMember serverWe generally recommend that you install the RM Unify AD Sync Serviceon a domain controller, to minimise network traffic. However, it can alsobe installed on a member server.4
RM Unify AD Sync for Windows Server networksSome important considerationsData protectionThe RM Unify AD Sync Service will connect to RM Unify from your localnetwork and will transfer the following identity information to RM Unify: Active Directory objectGUID User credentials (Username and RSA-encrypted password) Name details (First name, Surname and Display Name) Role (Student, Teacher, Non-Teacher, Governor, Other) User account statusOptionally, the following identity information can be transferred toRM Unify: Year of entry Email addressRM Unify is hosted in the European Economic Area (EEA).Please ensure that this data transfer is agreed with your local schoolData Controller (usually the Headteacher).Initial password synchronisationTo ensure that your users have synchronised passwords between thelocal network and RM Unify, after the installation you will need to forceall your users to change their network passwords. This can be done bysetting all user accounts to require a password change at the nextlogon.This is because RM Unify AD Sync Service can only detect a user’spassword when it is changed, as Microsoft Active Directory stores allpasswords in a non-reversible encrypted form. A user will not be able tolog onto RM Unify until they have changed their password on the localnetwork and this has been automatically synchronised to RM Unify.If you are upgrading RM Unify AD Sync, it is not necessary toforce users to change their passwords.5
Release NoteRequirementsBoth components of RM Unify AD Sync have several important prerequisites. Although many servers will already meet theserequirements, you must verify that all these are present before installingor upgrading RM Unify AD Sync.For instructions, see ‘Appendix IV: Installing prerequisites’.Note If you do need to install prerequisites, please note that some ofthem require a server reboot. Please allow adequate time!RM Unify AD Sync Service requirementsRM Unify AD Sync Service can be installed on a server that meets thefollowing requirements: Operating system: Windows Server 2012 R2, WS 2016 orWS 2019.Note Installation of the RM Unify AD Sync Service is not supportedon any version of Windows Server Core. .NET Framework v3.5 SP1For instructions to check for its presence or install it, see ‘Installing .NETFramework version 3.5 SP1’. To reduce network traffic, we recommend that you install the RMUnify AD Sync Service on a domain controller.RM Unify Password Filter requirementsRM Unify Password Filter should be installed on all AD domaincontrollers in your network. Each DC must meet the followingrequirements: Operating system: Windows Server (WS) 2008 R2, WS 2008 R2Server Core, WS 2012, WS 2012 R2, WS 2012 Server Core, WS2016 or WS 2019. .NET Framework v3.5 SP1For instructions to check for its presence or install it, see Installing .NETFramework version 3.5 SP1’. Microsoft Visual C 2010 Redistributable Package(x64).For instructions to check for its presence or install it, see ‘AppendixIV: Installing prerequisites’.6
RM Unify AD Sync for Windows Server networksInstallation scenarios for new installs and upgradesThe steps required to prepare for and complete the installation of RMUnify AD Sync v4 depend on whether you need to: Install RM Unify AD Sync for a new RM Unify establishment.Please continue with the rest of this document. Upgrade from RM Unify AD Sync v2 or v3.There is no in-place upgrade from v2 or v3 to v4.Please see ‘Appendix III: Upgrading from RM Unify AD Sync v2 or v3.’If you aren’t sure what version of RM Unify AD Sync is currentlyinstalled, see ‘Appendix I: Identifying your current version of RMUnify AD Sync’ for instructions.Pre-installation tasksCheck which of the following tasks apply to you and complete them insequence.A. Reboot your domain controllersWe strongly recommend that you reboot your domain controllers first.This will ensure that any pending software updates and configurationchanges take place before you install RM Unify AD Sync, avoidingsimultaneous updates that could interfere with the installation.B. Choose your AD Sync serverWhen choosing a server for hosting RM Unify AD Sync, bear in mindthe need to balance traffic across your network. We recommendchoosing a DC. You can also install it on a server that is not a DC, forexample a member server, but this will increase the network trafficrequired for communication with Active Directory.C. Ensure prerequisite software is installedFind out in advance whether your servers meet all the‘Requirements’ on page 6 before the day of installation and refer tothe appropriate instructions to see whether a server reboot isrequired and get an idea of the time required. Ensure all theprerequisite software is installed before you install or upgrade RMUnify AD Sync.D. Back up your serversRM Unify AD Sync will make changes to your server and ActiveDirectory. Ensure that before installing this software, you have an upto-date backup of all your network servers, including System State.E. Create AD security groups for users and adminsFollow the instructions below if you want to create Active Directory(AD) groups to control which users get access to RM Unify. These7
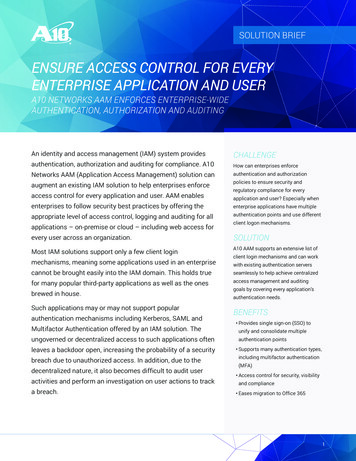
Release Notewill provide useful filters if the Organisational Unit (OU) containers inyour AD contain different types of user, or users from differentestablishments.For a single-site installation, create an RM Unify Users group and anRM Unify Admins group. For a multi-site installation, create twogroups for each school (e.g. for a school with site code ABC, ‘RMUnify Users- ABC’ and ‘RM Unify Admins-ABC’).1. At a server where the Active Directory Users and Computers snap-inis installed, log on as a local administrator.2. From the Start menu choose (Administrative Tools), Active DirectoryUsers and Computers.3. In the left-hand pane, browse to your Users container.4. Right-click the Users container and choose New, Group.5. Enter the name RM Unify Users.6. In the ‘New Object – Group’ window: For ‘Group scope’, select Global.8
RM Unify AD Sync for Windows Server networks For ‘Group Type’, select Security.7. Click OK.8. Repeat steps 2–7 to create a group called RM Unify Admins.F. Gather the required network informationIf you are making a fresh installation of RM Unify AD Sync, you willneed to have information about your network, either to entermanually or to confirm values that have been detected automatically.Make a note of the following:9 The Active Directory Organisational Unit (OU) that will be the basefor all user searches (user changes outside of this structure will beignored). This will be the OU to which you have deployed all yourusers. The AD Domain Controller server name that will be used foridentifying user changes. Where RM Unify AD Sync isbeing installed on a DC, use the local server name. Your proxy server or ISA server address and port number (ifapplicable).
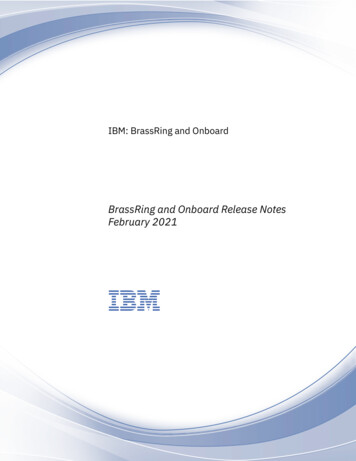
Release NoteNote If your proxy server requires authentication (for example, aMicrosoft ISA server), you will need to add an exception toensure that your RM Unify AD Sync server is able to accesshttps://api.platform.rmunify.com/ anonymously. Forinstructions, please refer to the supplier’s documentation foryour proxy server. The name of the AD group or groups that will be used to controlaccess to RM Unify, created in task E above (‘RM Unify Users’). If you have a multi-site network that includes more than oneestablishment, you will need to provide details of the ADOrganisational Units on which user searches will be based.Installing RM Unify AD SyncIf you are upgrading from AD Sync v2 or v3, do not follow this sectionon installing the RM Unify AD Sync service. Please use the instructionsin ‘Appendix III: Upgrading from RM Unify AD Sync v2 or v3.’.1. Install the RM Unify AD Sync ServicePlease ensure that you have completed all the ‘Pre-installation tasks’that apply to you.1. At the server you have chosen as the RM Unify AD Sync server; logon as a user who is a member of the Domain Admins and builtinAdministrators groups.2. Browse to the location where you extracted the files from theRM Unify AD Sync v4.zip download file. If the extracted files arenot on this server, copy them to a convenient local folder.3. Double-click the file RM Unify AD Sync.msi to launch the RM UnifySync Service InstallShield Wizard.4. At the Welcome screen, click Next.5. Accept the License Agreement and click Next.10
RM Unify AD Sync for Windows Server networks6. Click Install.7. At the ‘IMPORTANT INSTALLATION CHECK’ screen, read the message to confirm itdoes not apply to your installation and click OK.8. The Configuration Editor window is displayed.9. You need to enter the base Organisational Unit that includes all theschool network users who need accounts in RM Unify. If your usersare spread across OUs which are non-hierarchical, you can selectone of the OUs at this stage in order to proceed. It will be possible to11
Release Noteconfigure the AD Sync filters at a later stage in order to include allyour user OUs. Click Browse and then select the appropriate OU:10. Click Select and then Save.11. When the installation is complete, click Finish.The RM Unify AD Sync Service has now been installed and theidentitysyncservice user account is present in AD.2. Run the configuration tool for the first timeWhen you run the configuration tool for the first time, it will createthe RM Unify AD Sync database and start the RM Unify AD SyncService.1. From the Windows Start menu, choose RM, RM Unify AD Syncand RM Unify AD Sync Configuration Tool.An RM Unify AD Sync Configuration Editor window is displayed.2. In the ‘Initial configuration’ window, enter your proxy server details ifrequired.12
RM Unify AD Sync for Windows Server networksNote If you use a transparent proxy (such as SmoothWall ), it mayneed to be configured so that a non-transparent version isavailable for use with the RM Unify AD Sync Service. Forinstructions, please refer to your proxy documentation.3. Click OK to start the RM Unify AD Sync Service.A message is displayed while it configures the database (thisnormally takes up a minute).Note If the database configuration is taking excessive time, checkthe log files (in the LogFiles folder under the installationfolder) for any error messages.When the database configuration is complete, the RM Unify AD SyncConfiguration Tool is displayed.The next task is to register your RM Unify AD Sync Service withRM Unify. Leave the configuration tool open while you do this.3. Register your school network with RM UnifyRM Unify provides a registration process that allows you toconnect your instance of RM Unify AD Sync to the RM UnifyProvisioning service.To register your RM Unify AD Sync service with the RM Unify service13
Release Note1. Log on to RM Unify as an RM Unify Administrator user.Note If you are configuring AD Sync for a multi-site AD (whereseveral school establishments share the same AD), log onas the RM Unify Administrator for the parent establishment.Your parent establishment will have been created by RM andis used to administer your cluster of schools. We will adviseyou of the parent establishment when we send you the sign incredentials for all of your RM Unify establishments. Pleasecontact RM Cloud Support if you are not sure which yourparent establishment is.2. In the top menu, select Management Console.3. In the left pane, click ‘Sync users from AD’.4. Click Generate registration code.A registration code is displayed, with the formatXXXXX-XXXXX-XXXXX-XXXXXwhere X is a letter or number.5. You will need to enter this organization code and your registrationcode in the AD Sync Configuration Tool, as follows. Leave thiswindow open, so you can copy and paste the values.Alternatively, make a note of both codes.14
RM Unify AD Sync for Windows Server networks6. Log on to your RM Unify AD Sync server as a domainAdministrator.7. Return to the RM Unify AD Sync Configuration Tool.In the left-hand pane of the configuration tool, select ‘RM Unifyregistrations’, right-click and choose ‘New registration’.8. Enter the required values for registration: Enter a ‘Display name’ to identify this registration. We recommend usingthe organisation’s display name.Enter your ‘Organisation code’ and the ‘Registration code’ includingdashes. You can copy and paste these from RM Unify if the window isstill open.Note If you have a multi-site installation where several schoolestablishments share the same AD, you only need to registeronce, using the parent establishment. Once that has beensuccessfully registered, this tool will automatically display allchild schools with Premium subscriptions that are linked tothe parent.9. Ensure the Enabled box is ticked; then click Save and thenRegister.10. At the ‘successful registration’ message, click OK.(If registration was not successful, check the log files for any errormessages. You can find these in LogFiles under the installationfolder).When the registration process is complete, your establishment isdisplayed (and any child schools if applicable) in the tree under the newRM Unify registration.The next task is to configure your establishment(s).15
Release Note4. Configure an establishmentThere are three configuration settings for your establishment: AD filters - each establishment can configure one or more ADfilters, to specify which users should be uploaded to RM Unify.You may find it helpful to start with two filters, one for RMUnify Users and one for RM Unify Admins.Each filter consists of a container in the Active Directory and anoptional group.oIf no group is specified, all users in the container will beuploaded to RM Unify.oIf a group is specified – e.g. RM Unify Users, if you areregistering a single site – only those users which arein both the container and the group will be uploaded.Note As well as individual users, you can also add groups ofusers to the control group. Role mappings - each establishment also needs a set ofrole mappings, to specify the role of each user in RMUnify. If a user is not assigned any role in RM Unify, theywill not be uploaded. Year of Entry - If the ‘Year of Entry’ used by your establishmentis not the year that the student entered the education system asa Year 1 student, this can cause third-party applications toassign users to the wrong year group. RM Unify AD Sync letsyou apply a ‘Year of Entry’ offset to avoid such issues.These settings are configured in the RM Unify AD Sync ConfigurationTool.To configure an establishment1. In the left-hand tree, select the establishment you want to configure.2. In the right-hand pane, confirm that the Enabled box is ticked and clickSave.3. In the left-hand tree, right-click the establishment and choose ‘NewAD filter’.16
RM Unify AD Sync for Windows Server networks4. Configure the values as follows, to specify a set of required users:oEnter a ‘Display name’ to identify this AD filter.oUnder ‘Select the Active Directory container’, enter thedistinguished name of the AD OU that contains the users.Alternatively, click the Browse button to locate and select thecontainer you require.oUnder ‘Select group’, click Browse to locate and select the groupthat contains the users, e.g. RM Unify Users.You created this group in pre-installation task E (see page 7).If no group is required, leave the group text box blank.oRM Unify can be linked to a cloud email service, as with Office365 or Google Apps.If you want to manage your user email addresses in your AD,then under ‘Select email attribute’, select or enter the name ofthe source attribute (e.g. ‘mail’).Note By configuring the ‘Select mail attribute’ value in theConfiguration Tool, you are instructing RM Unify to use theemail address stored in that attribute. If your AD contains anincorrect email address for a user, that user will not be able tolog on to their Office 365 or Google Apps cloud email service.If you don’t want to configure the ‘Select mail attribute’ setting,leave it blank. RM Unify will then provision your cloud emailaddress using the format AD account name @ cloud email domain .oIf these users should be admin users in RM Unify, tick the‘Admin users’ box.Note All admin users must also be assigned to a role, using rolemappings.17
Release Note5. When you have finished, click Save.6. Repeat steps 3–5 to add additional AD filters as required, to specify all the users thatmust be uploaded. A user may match more than one AD filter (see the followingNote).7. Verify that your AD filters are listed in the appropriate order.Note Users are uploaded using the first AD filter they match(provided they have been mapped to an RM Unify role in theestablishment). Filters are applied in their list order. The listorder is applied across the establishment.If you need to change the order of any AD filters, click the AD Filtersnode of the establishment and use the up/down buttons to re-orderthe filters as required.The next step is to configure appropriate User Role Mapping rules foryour network. You can enable a set of default mapping rules and alsoadd, edit and delete mapping rules as required.About User Role MappingsRM Unify supports five user roles for automated provisioning: Students Teaching Staff Non-Teaching Staff Governor OtherWhen importing users to RM Unify, you need to specify the mappingsof Active Directory accounts to the roles above.Some networks support additional user types, for example SystemAdministrators and Associates. You can map multiple local roles to asingle RM Unify role. For example, you might choose to map Associateuser types to the RM Unify Non-Teaching Staff role.RM Unify AD Sync provides three alternative methods of mapping useraccounts in your network to these RM Unify user roles: Profile Path,Organisational Unit and Group Membership.See ‘Appendix V: Choosing mapping types’ for information to help youchoose the best method for your network.8. To add a mapping rule, select the establishment in the left-hand tree, right-click andchoose ‘New role mapping’.18
RM Unify AD Sync for Windows Server networksConfigure the mapping rule as follows:oDisplay name: Enter a name to identify this mapping.oMapping type: From the drop-down list, choose themapping method to use (see ‘Appendix V: Choosingmapping types’).oRM Unify role: From the drop-down list, choose the roleyou are mapping to.oSupply any additional information required for your chosenMapping type. For Profile Path, enter the Profile Path sharename to search for (e.g., ‘StudentProfiles’).When you have finished, click Save.Note Users are uploaded automatically the next time the AD ischecked. By default, this happens every 15 minutes.The initial upload can take up 45 minutes (based on 1500users). Subsequent updates are faster, with passwordupdates being sent every minute.9. Repeat step 8 to add additional user role mapping rules as required. A user maymatch more than one mapping rule (see the Note below).10. Verify that your mapping rules are listed in the appropriate order.Note Users are mapped by the first mapping rule they match.Mapping rules are applied in their list order. The list order isapplied across the establishment.If you need to change the order of any mapping rules, click the ‘Rolemappings’ node of the establishment and use the up/down buttonsto re-order the rules as required.19
Release NoteIf you need to edit a mapping, select it in the left-hand tree and thenedit the settings as required in the right-hand pane. This can includechanging the type of mapping, if required.11. If you have other establishments to configure, repeat steps1–10 asrequired.The final step is to optionally configure appropriate ‘Year of Entry’mappings for your network. If you want to upload ‘Year of Entry’ data toRM Unify, our recommendation is for you to use RM Unify MIS Sync. Itwill extract ‘Year of Entry’ from your MIS and enrich your RM Unify userswith year, class and registration group information. It works in tandemwith, or instead of, RM Unify AD Sync. Please see this article here le.asp?cref TEC5427652If you are not ready to use RM Unify MIS Sync and still want to upload‘Year of Entry’ data using RM Unify Sync then:12. To add a ‘Year of Entry’ mapping, select the establishment in the lefthand tree, right-click and choose ‘New YOE mapping’.13. Configure the mapping rule as follows:oDisplay name: Enter a name to identify this mapping.oYear of entry: Select the ‘Year of entry’ value that is usedby your establishment for this group of students.oSelect the group: Click Browse and locate and select thegroup you require. Click OK.When you have finished, click Save.The final step in configuring your establishment is to apply a ‘Year ofEntry’ offset, if required.20
RM Unify AD Sync for Windows Server networksYou can use the ‘Year of Entry’ property to specify a year-appropriateLaunch Pad and RM Unify Apps selection for student users. However,different schools start at different points in a student’s educationalcareer – Year 1, Year 5, Year 7, Year 12, etc. If the ‘Year of Entry’ usedby your establishment is not the year that the student entered theeducation system, you can apply an offset to correct for this, as follows:14. From the Service menu, choose Settings. The RM Unify AD Sync ServiceConfiguration window is displayed.15. Under RM Unify Uploads, click the ‘For the stu
Browse to the location where you extracted the files from the RM_Unify_AD_Sync_v4.zip download file. If the extracted files are not on this server, copy them to a convenient local folder. Double-click the file RM Unify AD Sync.msi to launch the RM Unify Sync Service InstallShield Wizard. At the Welcome screen, click Next.