Transcription
PRI Gateway Quick Installation Guidewww.allo.comVersion 2.01
PRI Gateway Quick Installation GuideCopy RightCopyright 2014 Allo. All rights reserved.No part of this publication may be copied, distributed, transmitted, transcribed, stored in aretrieval system, or translated into any human or computer language without the prior writtenpermission of Allo.com. This document has been prepared for use by professional and properlytrained personnel, and the customer assumes full responsibility when using it.Proprietary RightsThe information in this document is Confidential to Allo and is legally privileged. The informationand this document are intended solely for the addressee. Use of this document by anyone else forany other purpose is unauthorized. If you are not the intended recipient, any disclosure, copying,or distribution of this information is prohibited and unlawful.DisclaimerInformation in this document is subject to change without notice and should not be construed as acommitment on the part of allo.com. And does not assume any responsibility or make anywarranty against errors. It may appear in this document and disclaims any implied warranty ofmerchantability or fitness for a particular purpose.www.allo.comVersion 2.02
PRI Gateway Quick Installation GuideAbout this manualThis manual describes the Allo product application and explains how to work and use it majorfeatures. It serves as a means to describe the user interface and how to use it to accomplishcommon tasks. This manual also describes the underlying assumptions and users make theunderlying data model.Document ConventionsIn this manual, certain words are represented in different fonts, typefaces, sizes, and weights.This highlighting is systematic; different words are represented in the same style to indicate theirinclusion in a specific category. Additionally, this document has different strategies to draw Userattention to certain pieces of information. In order of how critical the information is to yoursystem, these items are marked as a note, tip, important, caution, or warning.IconPurposeNoteTip/Best PracticeImportantCautionWarning Bold indicates the name of the menu items, options, dialog boxes, windows and functions. The color blue with underline is used to indicate cross-references and hyperlinks. Numbered Paragraphs - Numbered paragraphs are used to indicate tasks that need to becarried out. Text in paragraphs without numbering represents ordinary information. The Courier font indicates a command sequence, file type, URL, Folder/File name e.g. www.allo.comSupport InformationEvery effort has been made to ensure the accuracy of the document. If you have comments,questions, or ideas regarding the document contact online support: http://support.allo.comwww.allo.comVersion 2.03
PRI Gateway Quick Installation GuideTable of ContentsAbout this manual . 3Document Conventions . 3Support Information. 31.Hardware Setup . 52. Accessing the WEB GUI . 62.1 Notification LEDs (On the Front Panel of the Gateway) . 73. Creating SIP Trunks . 84. Creating PRI Trunks . 85. Call Routing Rules . 8www.allo.comVersion 2.04
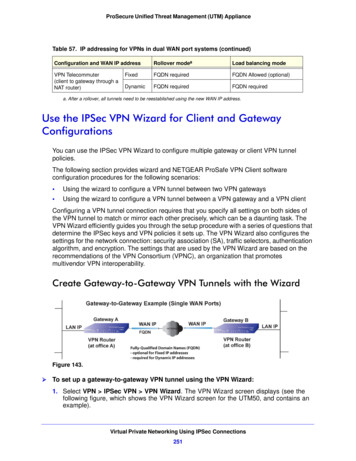
PRI Gateway Quick Installation Guide1. Hardware SetupFigure 1: Hardware Setup1. Unpack the items from the box2. Plug one end of the RJ45 Ethernet cable to your PC & other end into the ManagementPort (LAN) of the PRI Gateway.3. Plug one end of the RJ45 Ethernet cable into your Network Switch & other end into theWAN port of the PRI Gateway.Use Straight-through Ethernet cable to connect between the unit & Router/Switch/PC4. Plug one end of the RJ45 cable into the PRI 1 port of the PRI Gateway & other end tothe E1/T1 service provider socket.For the PRI cross over cable pin out please leID 1695. Plug the power cable to the PRI Gateway; wait until the Gateway boot up completely.Ready LED (LED 2) goes blue indicating that Gateway is boot up completely.Configure your PRI Gateway according to the instructions below.www.allo.comVersion 2.05
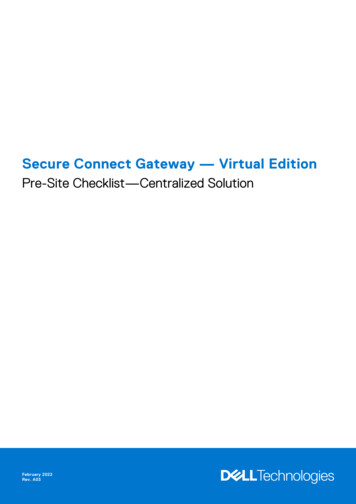
PRI Gateway Quick Installation Guide2. Accessing the WEB GUIPRI Gateway WEB GUI can be accessed either through WAN or Management Interface (LAN)1) Make the setup as described in Hardware setup section, Lets access the WebGUI throughManagement Interface (LAN)2) Change the Network setting of the PC in manual mode (i.e. Static IP mode). Assign the IPaddress to the PC in the range of 192.168.113.xxx (E.g:192.168.113.10), net mask as255.255.255.0 and gateway & DNS as192.168.113.1.3) Launch the web browser and enter the URL http://192.168.113.2 which is the default IPaddress of the Management interface (LAN) of the PRI Gateway.Figure 2: Login page4) Login using the default username & password (Default: Username: admin; Password:admin). Successful login takes you to the Dashboard page. Observe the WAN IP address onthe dashboard, this will be used to access the GUI from the WAN interface.5) If your network is not enabled with DHCP server, configure the WAN port IP addressmanually in the SETTINGS Network Settings section as per your requirement.www.allo.comVersion 2.06
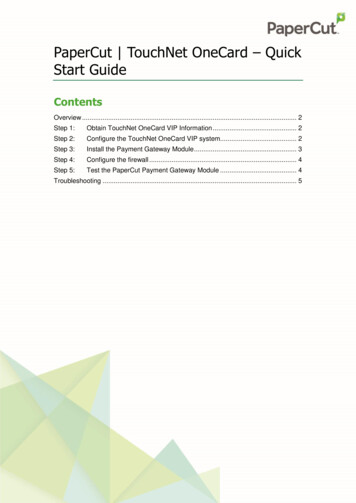
PRI Gateway Quick Installation GuideIn 4.0.0 onwards, Media IP Address needs to be configured manually and it should be inthe same network segment of WAN IP address. This IP address is used for Voice MediaConfiguration.For E.g.: If the WAN IP address is 192.168.0.145 and media IP address should be in the sameNetwork Segment (available IP address) side. 192.168.0.3If the media IP address not configured, there won’t be voice path in the calls.Recommended Web Browser to access GUI is Mozilla Firefox.Figure 3: Dashboard2.1 Notification LEDs (On the Front Panel of the Gateway)www.allo.comVersion 2.07
PRI Gateway Quick Installation Guide3. Creating SIP TrunksThis will allow you to make calls using your VoIP Account.1) Click Add a SIP Trunk2) Create a SIP account with the preferred registration mode.Registration Mode: None: IP peer trunking From Gateway: Gateway is registering to PBX or VoIP service provider. To Gateway: Endpoint registering to Gateway.3) Enter the PBX or VoIP service provider IP address for registration modes “ From Gatewayor None”4) Click authentication, if it is required5) Click registration and add registrar address6) Click on “Create” to save the settings.4. Creating PRI TrunksThis will allow you to make calls using your PRI line.1) Connect your ISDN PRI line to the PRI 1 port of the PRI Gateway2) Click on the SETUP ISDN PRI Trunks link in the GUI, then select Create PRI Trunks3) Enter Name your Trunk (Office Line 1 for example), Outbound Caller ID and Click CREATE4) You have a live PRI line plugged to your PRI Gateway.5) Click on “Create” to save the settings.5. Call Routing RulesDepending on the number you dial, the PRI gateway will select the configured PRI/SIP Trunk.1) Click Add Call Routing Rule to add an incoming or outgoing routing rule for ISDN andVoIP call.2) Select “Incoming type” and required trunk name under “Incoming from”.3) Enter the Dial Pattern to match the expected number. Following are the characterssupported in the Dial Pattern.X matches any digit from 0-9 Z matches any digit from 1-9 waywww.allo.comVersion 2.08
PRI Gateway Quick Installation GuideN matches any digit from 2-9[1237-9] matches any digit or letter in the brackets (in this example, 1, 2, 3, 7, 8, and 9)[a-z] matches any lower case letter[A-Z] matches any UPPER case letter. Wildcard, matches one or more characters! Wildcard matches zero or more characters immediately.4) Trim Digits: Allows the user to specify the number of digits that will be stripped from thedialed number. For Ex: If you configure the pattern as 9X. And you want to strip 9, and thenthe count of the digits stripped is 1, which must be placed in Trim Digits field.5) Prepend Digits: Allows the user to specify the digits which are prepended before placingthe call via trunk. For Ex: If dialed number is 8789763010 and if you want to prepend 44 asa country code then place 44 in prepend digits field.6) Add Outbound Call Route: Select proper SIP trunk or PRI trunk or Time route Group, wherethe call as to be routed to.7) Click on “Create” to save the settings.Click on “Save All” to apply all the changes to the call Manager.THE FULL VERSION MANUAL WILL PROVIDE YOU DETAILED INSTRUCTIONS ABOUT THE FULLFEATURE SET OF THE ALLO PRI GATEWAY.THANK YOU!www.allo.comVersion 2.09
PRI Gateway Quick Installation Guidewww.allo.comVersion 2.010
Depending on the number you dial, the PRI gateway will select the configured PRI/SIP Trunk. 1) Click . Add Call Routing Rule. to add an incoming or outgoing routing rule for ISDN and VoIP call. 2) Select "Incoming type" and required trunk name under "Incoming from".