Transcription
VantageApplication NoteBacking up and Restoringa Lightspeed OS ImageVThis App Noteapplies toVantageLightspeedServersOverview .2Requirements.2Hardware Requirements .2Operating System and Software Requirements.3Other Prerequisites.3Booting the Server from the Acronis ISO.4Obtain the Lightspeed Server IPMI Address.4Log into the Lightspeed Server via IPMI .5Backing up a Lightspeed Server Image .13Restoring a Lightspeed Server Image.16Copyright and Trademark Notice .21Note: This guide is written for video professionals who are familiar with using Vantage. Toimplement applications in Vantage, you should know how to create workflows and submit jobs. Ifyou aren’t familiar with Vantage, we suggest that you review the Vantage User’s Guide and VantageDomain Management Guide as needed.May 2019 2019 Telestream, LLC276527
2Backing up and Restoring a Lightspeed OS ImageOverviewOverviewHaving a factory Operating System image available for Lightspeed Servers can be alifesaver if the Lightspeed C-drive crashes or becomes corrupted. Using this note and acomplete set of OS images for all Lightspeed Server types available from TelestreamManufacturing, Telestream Support Engineers and technically capable customers canrestore a Lightspeed Server to its original factory setup.RequirementsBefore you can perform backups and recoveries on Lightspeed Servers as described inthis note, you will need the prerequisites described below.Hardware RequirementsThe following topics list the hardware versions and systems needed.Lightspeed Server VersionsThis note applies to all versions of the Lightspeed Server, including the originalLightspeed Server, K20, K40, K80, G5, G6, Lightspeed Live Capture, and all othervariations.Preloaded Lightspeed Image DriveA set of OS image files for each type of Lightspeed Server is available for use byTelestream Support. These images can be copied to an external hard drive, flash drive,or network storage for use in the field or over the Internet as needed to restorecustomer operating systems.Networked PC WorkstationYou will need a network-connected PC workstation with an Internet browser, such asGoogle Chrome for remotely accessing IPMI software on the target Lightspeed server.Vantage
Backing up and Restoring a Lightspeed OS ImageRequirementsOperating System and Software RequirementsPlease note the following software requirements.Acronis Backup SoftwareThis note describes doing OS, file, and complete drive backups and restores usingAcronis backup software, which must be purchased separately.The Acronis backup and restore software works independently of Telestream’s Vantagesoftware and any other software.IPMI SoftwareIPMI remote network server management software comes installed on all LightspeedServers and is required for remote server management over an Ethernet LAN or adedicated IPMI LAN. In the following procedures, you will log into IPMI to manage theLightspeed Server.Chrome BrowserA recent version of the Chrome browser is required in order to connect to theLightspeed Server via IPMI. Internet Explorer does not work well for this purpose.Other PrerequisitesAlso observe these additional requirements: Make sure NIC 1 (LAN 1) on the target Lightspeed Server and your remote workstation both have network connectivity so they can communicate. Mount the Acronis .iso on the remote PC workstation you will use to access theLightspeed Server. Ensure that the preloaded Lightspeed image drive is plugged into the Lightspeedserver being imaged.Vantage3
4Backing up and Restoring a Lightspeed OS ImageBooting the Server from the Acronis ISOBooting the Server from the Acronis ISOThe following procedures explain how to remotely connect to the Lightspeed Servervia IPMI and reboot the server from the Acronis backup and recovery software ISO.Once you are running Acronis, you can take one of two branches in the instructions: Backing up a Lightspeed Server Image Restoring a Lightspeed Server ImageFollow the procedures below to log into the server via IPMI and boot the server fromthe Acronis ISO. Then perform a backup or recover as described later in this note.Obtain the Lightspeed Server IPMI AddressBefore you can access the Lightspeed Server via IPMI, you must know the IPMI addressof the target Lightspeed Server.Note: The IPMI address is not the same as the network IP address but a specialaddress (formatted like an IP address) assigned by IPMI.To discover the IPMI address of the Lightspeed Server, follow these steps:1. Connect a monitor, keyboard, and mouse to the Lightspeed Server if it is operatingin headless mode.2. Reboot the Lightspeed Server and press the Delete key repeatedly during boot upto get to the BIOS. On newer K80 servers the BIOS is presented at boot up.3. In the BIOS, navigate to the IPMI tab.4. Arrow down to the BMC Network Configuration and press enter.5. You will see the Station IP Address. If you don’t see a Station IP Address, select Y toupdate, and select Static for Configuration Address Source. You can then add an IPaddress. Make sure that the IP address is on the same network as the workstationthat you will use for a remote connection to IPMI on the Lightspeed Server.6. Note the IP address for use in the following procedure.Vantage
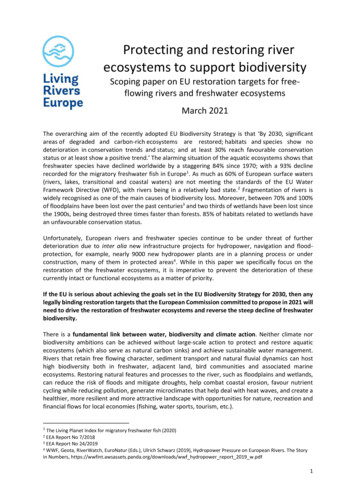
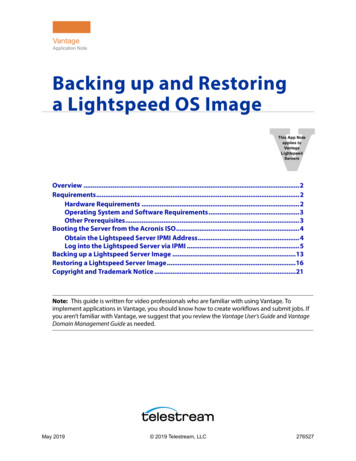
Backing up and Restoring a Lightspeed OS ImageBooting the Server from the Acronis ISOLog into the Lightspeed Server via IPMIFollow these steps to remotely log onto a Lightspeed Server via IPMI.1. On a remote PC workstation, open a browser, such as Google Chrome, and enterthe Lightspeed Server’s IPMI address in the browser’s address field. Note: this is notthe same as the network IP address but a special address assigned by IPMI.2. Ignore the "Not secure" message, and enter ADMIN in all capitals as the user nameand password at the login prompt. The SuperMicro IPMI program opens.3. Click the center of the Remote Console Preview image. You can tell you have theright spot to click when the cursor turns into a pointer finger.ClickhereVantage5
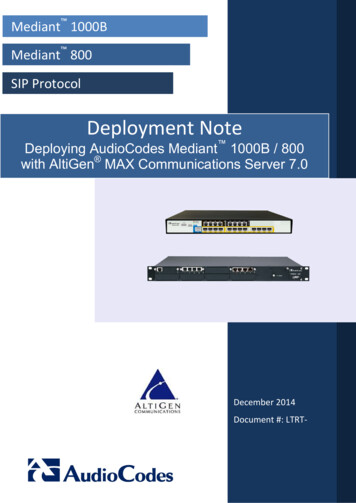
6Backing up and Restoring a Lightspeed OS ImageBooting the Server from the Acronis ISO4. A java runtime file downloads, and a dialog in the lower left corner asks youwhether to Keep or Discard the file. Ignore the security warning, and click Keep.Click KeepVantage
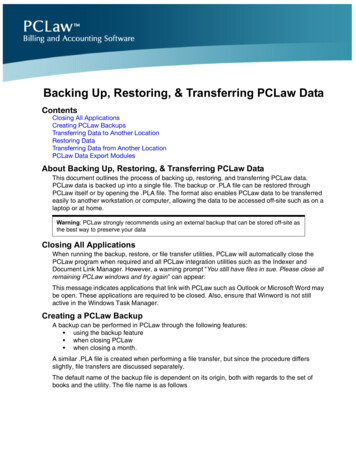
Backing up and Restoring a Lightspeed OS ImageBooting the Server from the Acronis ISO5. A Launch button appears in the lower left corner. Click Launch to launch a Java Viewer.Click Launch6. Click Continue followed by Run to run the Java app.Resolving Java Error Messages:If Java is not installed, if it is outdated, if the Java .jnlp file type is not associated withthe Java app, or if there is a security issue, you may get an error message.– If Java is not installed, you can obtain it from https://www.Java.com/en/download.– If Java is outdated, click the link in the message to update it (or you may be ableto cancel the update, and the Java version you have will still work).– If the .jnlp file type is not associated with a program, click Start, search for DefaultPrograms, click Associate a file type or protocol with a specific program, andassociate the .jnlp type with Java.– If there is a security issue, the error message will tell you which port is notaccessible. Assign that port to the Java program.Vantage7
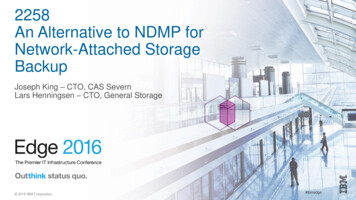
8Backing up and Restoring a Lightspeed OS ImageBooting the Server from the Acronis ISO7. Click Virtual media, and select Virtual Storage to open the Virtual Storage page.8. Click the Logical Drive Type drop down menu and select ISO File.9. Select Open Image and browse to the .iso file on the host server.Vantage
Backing up and Restoring a Lightspeed OS ImageBooting the Server from the Acronis ISO10. After selecting the image, click Plug In to mount the .iso. If done correctly, you willsee Device1 :VM Plug-in OK!!11. Click OK.12. In the Java Viewer app, select the Power Control menu and Set Power Reset. Thiswill start a reboot of the server.Vantage9
10Backing up and Restoring a Lightspeed OS ImageBooting the Server from the Acronis ISO13. While the server is booting up, press F11 repeatedly until you see the boot drivemenu (Please select boot device).Vantage
Backing up and Restoring a Lightspeed OS ImageBooting the Server from the Acronis ISO14. Use the arrow key to scroll to the name of the external boot drive containing thefactory disk images. This will be the ATEN Virtual CDROM in the preceding figure. Ifyou do not see the ATEN Virtual CDROM, the .iso has not been mounted.CAUTION: DO NOT SELECT any UEFI versions or the drive will have to be removed andreformatted. All data will be lost.15. Click Enter to boot from the image drive. After the server restarts and reboots fromthe external image drive, the Acronis backup software launch window opens.Vantage11
12Backing up and Restoring a Lightspeed OS ImageBooting the Server from the Acronis ISO.16. Click the highlighted (default) version of Acronis to launch it, or just press Enter. TheAcronis software opens to the main page where you can select Backup or Restore.Note: If you do not select this promptly, it will reboot itself to windows and you willneed to start from the boot window again.17. Click Backup or Restore, depending on whether you want to make a new backupimage of your server, or you want to restore your server to the factory boot image.18. Continue with either the backing up or restoring procedure, depending on whichoperation you chose in the previous step: Backing up a Lightspeed Server Image Restoring a Lightspeed Server ImageVantage
Backing up and Restoring a Lightspeed OS ImageBacking up a Lightspeed Server ImageBacking up a Lightspeed Server ImageAfter booting up your server from the external drive and starting Acronis as explainedin Booting the Server from the Acronis ISO, you are ready to create a backup image of theserver:1. Select Backup, and select Disk and Partition Backup.Note: You may notice that the mouse cursor splits into two arrows. The yellow arrowworks inside the Acronis app, and the white arrow works on programs outside theAcronis app. If you plan to work only in Acronis, you can select Options Preference Input Single Mouse, and click OK to eliminate the white arrow. Note that if you dothis, you won’t be able to work outside of Acronis unless you use Ctrl-Alt-Delete TaskManager End Task to kill the Java app that Acronis runs in.Vantage13
14Backing up and Restoring a Lightspeed OS ImageBacking up a Lightspeed Server Image2. Select (check) the disk to back up (C:), and click Next.3. Select Create new backup archive, browse to the location where you want to storethe backup, and click Next.Note: Be sure to store the back up on a drive other than the one being backed up.Vantage
Backing up and Restoring a Lightspeed OS ImageBacking up a Lightspeed Server Image4. Enter a file name, or click Generate Name, and click OK and Next until you arrive atthe Backup Wizard Summary window.5. Click Proceed to begin the processing of creating a backup image.6. When you get a completion window indicating that the backup is finished, restartthe server and let it boot from the C-drive to resume normal operation.Vantage15
16Backing up and Restoring a Lightspeed OS ImageRestoring a Lightspeed Server ImageRestoring a Lightspeed Server ImageAfter booting up your server from the external drive and starting Acronis as explainedin Booting the Server from the Acronis ISO, you are ready to restore the server from abackup image:1. Select the Recovery top menu, and then select Disk and Partition Recovery.Note: You may notice that the mouse cursor splits into two arrows. The yellow arrowworks inside the Acronis app, and the white arrow works on programs outside theAcronis app. If you plan to work only in Acronis, you can select Options Preference Input Single Mouse, and click OK to eliminate the white arrow. Note that if you dothis, you won’t be able to work outside of Acronis unless you use Ctrl-Alt-Delete TaskManager End Task to kill the Java app that Acronis runs in.Vantage
Backing up and Restoring a Lightspeed OS ImageRestoring a Lightspeed Server Image2. Select Browse for location to find the drive containing the backup images, and clickOK.3. Select the backup image you wish to use, and click Next.Vantage17
18Backing up and Restoring a Lightspeed OS ImageRestoring a Lightspeed Server Image4. Select Recover Whole Disks and Partitions, and click Next.5. Select the items to recover, and click Next.CAUTION: You are about to erase your C-drive containing the server operatingsystem and replace it with a factory OS image. Any data on the drive will be lost.Vantage
Backing up and Restoring a Lightspeed OS ImageRestoring a Lightspeed Server Image6. Select the destination disk for the recovery.Vantage19
20Backing up and Restoring a Lightspeed OS ImageRestoring a Lightspeed Server Image7. Examine the Summary display to make sure you are restoring the correct disk drivewith the correct factory image. Then select Proceed.As soon as you click Proceed, the recovery will begin. When it finishes, a completionmessage appears.8. Select Restart the computer after the operation is completed.9. Go to Virtual Media, select Virtual Storage, and Plug Out the .iso so that when theimage completes, the Lightspeed Server will reboot from Windows, not the .iso.Vantage
Backing up and Restoring a Lightspeed OS ImageCopyright and Trademark NoticeCopyright and Trademark Notice 2019 Telestream , LLC. All rights reserved. No part of this publication may bereproduced, transmitted, transcribed, altered, or translated into any languages withoutwritten permission of Telestream, Inc. Information and specifications in this documentare subject to change without notice and do not represent a commitment on the partof Telestream.Telestream, CaptionMaker, Episode, Flip4Mac, FlipFactory, Flip Player, Gameshow,GraphicsFactory, Lightspeed, MetaFlip, Post Producer, ScreenFlow, Split-and-Stitch,Switch, Tempo, TrafficManager, Vantage, VOD Producer and Wirecast, are registeredtrademarks and Cricket, e-Captioning, iQ, iVMS, iVMS ASM, Inspector, MacCaption,Pipeline, Vantage Cloud Port, Vidchecker, and Surveyor are trademarks of Telestream,LLC. All other trademarks are the property of their respective owners.All other brand, product, and company names are the property of their respectiveowners and are used only for identification purposes.Vantage21
22Backing up and Restoring a Lightspeed OS ImageCopyright and Trademark NoticeVantage
the Lightspeed Server's IPMI address in the browser's address field. Note: this is not the same as the network IP address but a special address assigned by IPMI. 2. Ignore the "Not secure" message, and enter ADMIN in all capitals as the user name and password at the login prompt. The SuperMicro IPMI program opens. 3.