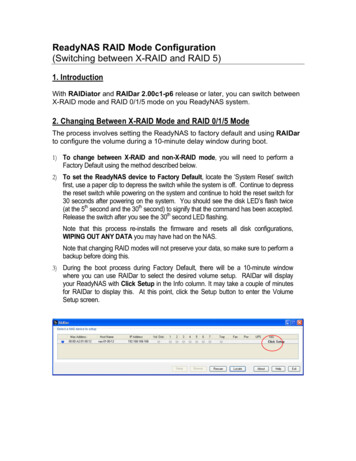
Transcription
X9SCM-IIFX9SCL-IIFUSER’S MANUALRevision 1.0
The information in this User’s Manual has been carefully reviewed and is believed to be accurate.The vendor assumes no responsibility for any inaccuracies that may be contained in this document,makes no commitment to update or to keep current the information in this manual, or to notify anyperson or organization of the updates. Please Note: For the most up-to-date version of thismanual, please see our web site at www.supermicro.com.Super Micro Computer, Inc. ("Supermicro") reserves the right to make changes to the productdescribed in this manual at any time and without notice. This product, including software and documentation, is the property of Supermicro and/or its licensors, and is supplied only under a license.Any use or reproduction of this product is not allowed, except as expressly permitted by the termsof said license.IN NO EVENT WILL SUPER MICRO COMPUTER, INC. BE LIABLE FOR DIRECT, INDIRECT,SPECIAL, INCIDENTAL, SPECULATIVE OR CONSEQUENTIAL DAMAGES ARISING FROM THEUSE OR INABILITY TO USE THIS PRODUCT OR DOCUMENTATION, EVEN IF ADVISED OFTHE POSSIBILITY OF SUCH DAMAGES. IN PARTICULAR, SUPER MICRO COMPUTER, INC.SHALL NOT HAVE LIABILITY FOR ANY HARDWARE, SOFTWARE, OR DATA STORED OR USEDWITH THE PRODUCT, INCLUDING THE COSTS OF REPAIRING, REPLACING, INTEGRATING,INSTALLING OR RECOVERING SUCH HARDWARE, SOFTWARE, OR DATA.Any disputes arising between manufacturer and customer shall be governed by the laws of SantaClara County in the State of California, USA. The State of California, County of Santa Clara shallbe the exclusive venue for the resolution of any such disputes. Supermicro's total liability for allclaims will not exceed the price paid for the hardware product.FCC Statement: This equipment has been tested and found to comply with the limits for a Class Bdigital device pursuant to Part 15 of the FCC Rules. These limits are designed to provide reasonable protection against harmful interference in a residential installation. This equipment generates,uses, and can radiate radio frequency energy and, if not installed and used in accordance with themanufacturer’s instruction manual, may cause interference with radio communications. However,there is no guarantee that interference will not occur in a particular installation. If this equipmentdoes cause harmful interference to radio or television reception, which can be determined by turning the equipment off and on, you are encouraged to try to correct the interference by one or moreof the following measures: Reorient or relocate the receiving antenna. Increase the separation between the equipment and the receiver. Connect the equipment into an outlet on a circuit different from that to which thereceiver is connected. Consult the dealer or an experienced radio/television technician for help.California Best Management Practices Regulations for Perchlorate Materials: This Perchlorate warning applies only to products containing CR (Manganese Dioxide) Lithium coin cells. “PerchlorateMaterial-special handling may apply. See ING: Handling of lead solder materials used in this product may expose you to lead, a chemical known to the State ofCalifornia to cause birth defects and other reproductive harm.Manual Revision 1.0Release Date: April 24, 2012Unless you request and receive written permission from Super Micro Computer, Inc., you may notcopy any part of this document. Information in this document is subject to change without notice.Other products and companies referred to herein are trademarks or registered trademarks of theirrespective companies or mark holders.Copyright 2012 by Super Micro Computer, Inc. All rights reserved.Printed in the United States of America
PrefacePrefaceThis manual is written for system integrators, PC technicians andknowledgeable PC users. It provides information for the installation and use of theX9SCM-IIF/X9SCL-IIF motherboard series.About This MotherboardTheX9SCM-IIF/X9SCL-IIF motherboard supports a single Intel E3-1200v2 family series, 2nd generation Intel Core i3, Pentium , Celeron processorin an LGA 1155 socket. With the Intel C202/C204 Express chipset built in, theX9SCM-IIF/X9SCL-IIF motherboard offers substantial enhancement in systemperformance and storage capability for entry-level to mid-range servers in a sleekpackage. Please refer to our website (http://www.supermicro.com/products/) forprocessor and memory support updates. This product is intended to be installedand serviced by professional technicians.Manual OrganizationChapter 1 describes the features, specifications and performance of the motherboard, and provides detailed information about the Intel Cougar Point chipset.Chapter 2 provides hardware installation instructions. Read this chapter when installing the processor, memory modules and other hardware components into thesystem. If you encounter any problems, see Chapter 3, which describes troubleshooting procedures for video, memory and system setup stored in the CMOS.Chapter 4 includes an introduction to the BIOS, and provides detailed informationon running the CMOS Setup utility.Appendix A provides BIOS Error Beep Codes.Appendix B lists software program installation instructions.Appendix C contains BIOS Recovery instructions.iii
X9SCM-IIF/X9SCL-IIF Series User’s ManualConventions Used in This ManualPay special attention to the following symbols for proper motherboard installationand to prevent damage to the system or injury to yourself:Danger/Caution: Instructions to be strictly followed to prevent catastrophicsystem failure or to avoid bodily injury,Warning: Important information given to ensure proper system installationor to prevent damage to the components,Note: Additional information given to differentiate between various modelsor to provide information for correct system setup.iv
Contacting SupermicroContacting SupermicroHeadquartersAddress:Super Micro Computer, Inc.980 Rock Ave.San Jose, CA 95131 U.S.A.Tel: 1 (408) 503-8000Fax: 1 (408) 503-8008Email:marketing@supermicro.com (General Information)support@supermicro.com (Technical Support)Web Site:www.supermicro.comEuropeAddress:Super Micro Computer B.V.Het Sterrenbeeld 28, 5215 ML's-Hertogenbosch, The NetherlandsTel: 31 (0) 73-6400390Fax: 31 (0) 73-6416525Email:sales@supermicro.nl (General Information)support@supermicro.nl (Technical Support)rma@supermicro.nl (Customer Support)Asia-PacificAddress:Super Micro Computer, Inc.4F, No. 232-1, Liancheng Rd.Chung-Ho 235, Taipei CountyTaiwan, R.O.C.Tel: 886-(2) 8226-3990Fax: 886-(2) 8226-3991Web Site:www.supermicro.com.twTechnical 228-1366, ext.132 or 139v
X9SCM-IIF/X9SCL-IIF Series User’s ManualTable of ContentsPrefaceAbout This Motherboard. iiiManual Organization. iiiConventions Used in This Manual.ivContacting Supermicro.vChapter 1Introduction1-1Overview. 1-1Checklist. 1-1Motherboard Features. 1-71-2Chipset Overview . 1-10Intel C202/C204 Express Chipset Features. 1-101-3Special Features.1-11Recovery from AC Power Loss.1-111-4PC Health Monitoring.1-11Fan Status Monitor with Firmware Control .1-11Environmental Temperature Control.1-11System Resource Alert.1-111-5ACPI Features. 1-12Slow Blinking LED for Suspend-State Indicator. 1-121-6Power Supply. 1-121-7Super I/O. 1-131-8Advanced Power Management (for -F Models Only). 1-13Intel Intelligent Power Node Manager (NM). 1-13Manageability Engine (ME). 1-131-9Overview of the Nuvoton WPCM450 Controller. 1-14Chapter 2Installation2-1Static-Sensitive Devices. 2-1Precautions. 2-1Unpacking. 2-12-2Processor and Heatsink Installation. 2-2Installing the LGA1155 Processor . 2-2Installing a Passive CPU Heatsink. 2-5Removing the Heatsink. 2-6vi
Table of ContentsInstalling an Active Fan CPU Heatsink. 2-7Removing the Heatsink. 2-92-3Installing DDR3 Memory. 2-10DIMM Installation. 2-10Removing Memory Modules. 2-10Memory Support.2-11Memory Population Guidelines.2-112-4Motherboard Installation. 2-13Tools Needed. 2-13Location of Mounting Holes. 2-13Installing the Motherboard. 2-142-5Connectors/IO Ports. 2-15Back I/O Panel. 2-15ATX PS/2 Keyboard/Mouse Ports. 2-16Universal Serial Bus (USB). 2-17Ethernet Ports. 2-18Serial Ports. 2-19Video Connector. 2-20Front Control Panel. 2-21Front Control Panel Pin Definitions. 2-22Power LED . 2-22HDD LED. 2-22NIC1/NIC2 (LAN1/LAN2). 2-23Overheat (OH)/Fan Fail/Front. 2-23Reset Button . 2-24Power Button . 2-242-6Connecting Cables. 2-25ATX Main PWR & CPU PWR Connectors . 2-25Fan Headers. 2-26Chassis Intrusion . 2-26Internal Buzzer. 2-27Speaker. 2-27Onboard Power LED. 2-28Power Supply I2C Connector. 2-28T-SGPIO 1/2 Headers. 2-29TPM Header. 2-29DOM PWR Connector. 2-30Stand-by Power. 2-30vii
X9SCM-IIF/X9SCL-IIF Series User’s Manual2-7Jumper Settings. 2-31Explanation of Jumpers. 2-31LAN Port Enable/Disable. 2-31Clear CMOS. 2-32PCI Slot SMB Enable. 2-32VGA Enable. 2-33Watch Dog Enable. 2-33USB Wake-Up . 2-34BMC Enable. 2-34ME Recovery. 2-35BIOS Recovery. 2-352-8Onboard Indicators. 2-36LAN 1/LAN 2 LEDs. 2-36IPMI Dedicated LAN LEDs . 2-36Onboard Power LED . 2-37Unsupported Memory LED. 2-37Power Standby LED. 2-37IPMI Heartbeat LED. 2-372-9SATA Connections. 2-38SATA Connections. 2-38Chapter 3Troubleshooting3-1Troubleshooting Procedures. 3-1Before Power On. 3-1No Power. 3-1No Video. 3-2Memory Errors . 3-2Losing the System’s Setup Configuration. 3-23-2Technical Support Procedures. 3-33-3Frequently Asked Questions. 3-43-4Battery Removal and Installation. 3-6Battery Removal. 3-6Proper Battery Disposal. 3-6Battery Installation. 3-63-5Returning Merchandise for Service. 3-7viii
Table of ContentsChapter 4BIOS4-1Introduction. 4-1Starting BIOS Setup Utility. 4-1How To Change the Configuration Data. 4-1How to Start the Setup Utility. 4-24-2Main Setup. 4-2System Overview: The following BIOS information will be displayed:. 4-3System Time/System Date . 4-3Processor. 4-3System Memory . 4-34-3Advanced Setup Configurations. 4-4 BOOT Feature. 4-4Quiet Boot. 4-4AddOn ROM Display Mode. 4-4Bootup Num-Lock. 4-4Wait For 'F1' If Error. 4-4INT19 Trap Response. 4-4Watch Dog Function. 4-5Power Button Function. 4-5Restore on AC Power Loss. 4-5DeepSx Power Policies. 4-5 Processor & Clock Options. 4-5Intel Hyper Threading Technology. 4-5Active Processor Cores. 4-5Execute-Disable Bit Capability. 4-6Intel Virtualization Technology. 4-6Hardware Prefetcher. 4-6Adjacent Cache Line Prefetch . 4-6Intel AES-NI. 4-6Power Technology. 4-6EIST. 4-6CPU C3 Report, CPU C6 Report, CPU 7 Report. 4-7C1E Support. 4-7Turbo Mode. 4-7 Chipset Configuration. 4-7 IDE/SATA Configuration. 4-9ix
X9SCM-IIF/X9SCL-IIF Series User’s ManualSATA Mode. 4-9IDE. 4-9SATA Port0 Port5. 4-9AHCI. 4-9Aggressive Link Power Management. 4-9SATA Port0 Port5. 4-9Hot Plug. 4-10Staggered Spin-Up. 4-10RAID. 4-10SATA Port0 Port5. 4-10Hot Plug. 4-10 PCIe/PCI/PnP Configuration . 4-10PCI Latency Timer. 4-10Above 4G Decoding. 4-10Onboard LAN Option ROM Select. 4-10Load Onboard LAN1 Option ROM/Load Onboard LAN2 Option ROM. 4-10 Super IO Device Configuration .4-11Serial Port 1 / Serial Port 2.4-11Serial Port1 Settings/ Serial Port2 Settings.4-11 Serial Port Console Redirection Configuration . 4-12COM0/COM1/SOL Console Redirection. 4-12Serial Port for Out-of-Band Management / Windows EmergencyManagement Services (EMS) Console Redirection. 4-12 ACPI Settings. 4-13High Precision Event Timer. 4-13ACPI Sleep State. 4-13WHEA Support. 4-134-4Event Logs. 4-14 Change Smbios Event Log Settings. 4-14Smbios Event Log. 4-14Erase Event Log. 4-14When Log is Full. 4-14Log System Boot Event. 4-14MECI. 4-14METW. 4-154-5IPMI Configuration. 4-16 System Event Log. 4-16Enabling/Disabling Options. 4-16x
Table of ContentsSEL Components. 4-16Erasing Settings. 4-16Erase SEL. 4-16When SEL is Full. 4-16 BMC Network Configuration. 4-17LAN Channel 1. 4-17Update IPMI LAN Configuration. 4-17Configuration Address Source. 4-17Current IP Address. 4-17Current Subnet Mask. 4-17Current MAC Address. 4-17Current Gateway IP Address. 4-174-6Boot Settings. 4-18Setup Prompt Timeout. 4-18Retry Boot Devices. 4-18Boot Option Filter. 4-18Boot Option Priorities. 4-18Network Device BBS Priorities, Hard Drive BBS Priorities. 4-18 Delete Boot Option. 4-194-7Security Settings. 4-20Administrator Password . 4-20User Password:. 4-204-8Save & Exit Options. 4-21Save Changes and Exit. 4-21Discard Changes and Exit . 4-21Discard Changes. 4-21Restore Defaults. 4-21Save As User Defaults. 4-22Restore User Defaults. 4-22Boot Override. 4-22xi
X9SCM-IIF/X9SCL-IIF Series User’s ManualAppendix ABIOS Error Beep CodesA-1BIOS Error Beep Codes.A-1Appendix BSoftware Installation InstructionsB-1B-2Installing Drivers.B-1Configuring SuperDoctor III.B-2Appendix CUEFI BIOS Recovery InstructionsAn Overview to the UEFI BIOS. 1How to Recover the UEFI BIOS Image (-the Main BIOS Block). 1To Recover the Main BIOS Block Using a USB-Attached Device. 1xii
Chapter 1: IntroductionChapter 1Introduction1-1OverviewChecklistCongratulations on purchasing your computer motherboard from an acknowledgedleader in the industry. Supermicro boards are designed with the utmost attention todetail to provide you with the highest standards in quality and performance.Please check that the following items have all been included wi
Contacting Supermicro Headquarters Address: Super Micro Computer, Inc. 980 Rock Ave. San Jose, CA 95131 U.S.A. Tel: 1 (408) 503-8000 Fax: 1 (408) 503-8008 Email: marketing@supermicro.com (General Information) support@supermicro.com (Technical Support) Web Site: www.supermicro.com Europe Address: Super Micro Computer B.V. Het Sterrenbeeld 28 .

