Transcription
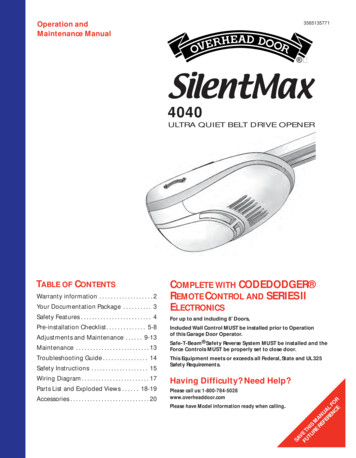
Operation andMaintenance Manual3565135771 4040ULTRA QUIET BELT DRIVE OPENERTABLE OF CONTENTSYour Documentation Package . . . . . . . . . . 3COMPLETE WITH CODEDODGER REMOTE CONTROL AND SERIES IIELECTRONICSSafety Features . . . . . . . . . . . . . . . . . . . . . . . . . 4For up to and including 8' Doors,Pre-installation Checklist. . . . . . . . . . . . . . 5-8Included Wall Control MUST be installed prior to Operationof this Garage Door Operator.Safe-T-Beam Safety Reverse System MUST be installed and theForce Controls MUST be properly set to close door.Adjustments and Maintenance . . . . . . 9-13Maintenance . . . . . . . . . . . . . . . . . . . . . . . . . . 13Troubleshooting Guide . . . . . . . . . . . . . . . . 14Safety Instructions . . . . . . . . . . . . . . . . . . . . 15This Equipment meets or exceeds all Federal, State and UL 325Safety Requirements.Wiring Diagram. . . . . . . . . . . . . . . . . . . . . . . . 17Having Difficulty? Need Help?Parts List and Exploded Views . . . . . . 18-19Please call us: 1-800-784-5028www.overheaddoor.comAccessories . . . . . . . . . . . . . . . . . . . . . . . . . . . . 20Please have Model information ready when calling.SAVFU E TTU HISRE MRE ANFE UARE LNC FOE RWarranty information . . . . . . . . . . . . . . . . . . . 2
THE OVERHEAD DOOR CORPORATION LIMITED WARRANTYWhat is covered?Any defect in material and product workmanship from personal, normalhousehold use in accordance with the Owner’s Manual.For how long?MODEL 4040L . . . Lifetime* on motor, 5 years on all other parts.*Lifetime For as long as you own your home.Who gets the warranty?This warranty is limited to the consumer who originally purchased theproduct.Geographic scope:This warranty applies only to units installed and operated within the country where they were purchased.Limitations:IMPLIED WARRANTIES, INCLUDING THOSE OF FITNESS FOR A PARTICULARPURPOSE AND MERCHANTABILITY (AN UNWRITTEN WARRANTY THAT THEPRODUCT IS FIT FOR ORDINARY USE), ARE LIMITED TO ONE YEAR FROM THEDATE OF PURCHASE. GENIE WILL NOT PAY FOR: LOSS OF TIME; INCONVENIENCE; LOSS OF USE OF YOUR GENIE PRODUCT OR PROPERTY DAMAGECAUSED BY YOUR GENIE PRODUCT OR ITS FAILURE TO WORK; ANY SPECIAL,INCIDENTAL OR CONSEQUENTIAL DAMAGES; OR ANY DAMAGES RESULTINGFROM MISUSE OR MODIFICATION OF YOUR GENIE PRODUCT.Some states and provinces do not allow limitations on how long an impliedwarranty lasts or the exclusion of incidental or consequential damages, sothe above limitations or exclusions may not apply to you.This warranty is the only one we will give on your Overhead Door product,and it sets forth all our responsibilities regarding your Overhead Door product.There are no other express warranties.State and province rights: This warranty gives you specific legal rights,andyou may also have other rights which vary from state to state and provinceto province.How to get warranty service:To obtain warranty service for your Overhead Door product, you must provide proof of the date and place of purchase of the product.tance in diagnosing the problem and arranging to supply you with therequired parts for do-it-yourself repairs. Trained service representativesare available Monday-Friday, 8:00 a.m. - 11:00 p.m., Eastern Time, and onSaturday, 10:00 a.m. to 8:00 p.m., Eastern Time (subject to holidays) Youmay also get the information you need at www.geniecompany.com.2. Service From Authorized Dealers.You also may obtain warranty service from Overhead Door authorizeddealers by calling the Overhead Door Consumer Connection at1.800.654.3643 or by visiting www.geniecompany.com before schedulingwarranty service. If warranty service is provided by an authorized dealer,Overhead Door will provide all required parts under warranty at nocharge to you, but the dealers are independent business people and mayrender a bench or service call charge for their services. Overhead Doorwill not reimburse you or otherwise be responsible for those charges.We suggest that you retain your original packing material in the event wechoose to repair or replaqce your Overhead Door Product and requestthat you ship it to us. Be sure to include your name, address, telephonenumber, proof of date and place of purchase and a description of theoperating problem. After repairing or replacing, your Overhead Doorproduct, we will ship it to your home at no cost to you for parts and labor,but you will have to pay a minimum of 5.00 for shipping and handlingcharges.Your choice of either one of the above-described service options is yourexclusive remedy under this warranty.What this warranty does not cover:This warranty does not cover batteries (which are considered replaceableparts), installation, commercial use, defects resulting from accidents, damage while in transit to our service location or damage resulting from alterations, misuse or abuse, lack of proper maintenance, unauthorized repair ormodification of the product,affixing of any attachment not provided withthe product, programming of the Remote Control Devices, Safe-T-Beam adjustment/cleaning, staples through wiring, pinched or broken wires,Carriage disengaged, Force Control adjustments, door out of balance, broken springs or cables, power outages, use of extension cords, missing ordamaged parts on discounted, clearanced, final sale or taped cartons,phantom operations (labor is not covered if Opener is functioning properly while technician is in garage),fire, flood, or acts of God, or other failure tofollow the Owner’s Manual.1. Do-It-Yourself-Service.Call the Overhead Door Consumer Connection toll free at 1.800.354.3643to speak in person to a trained Overhead Door representative for assis-Please note the following information,so it is available if youneed to call us.//Date PurchasedSerial NumberOperator ModelRemote Control ModelFOR ANSWERS: CALL 1.800.354.3643NOTEPlease keep original or photocopy of your salesreceipt with this manual for future referenceshould service ever be required.Dealer NameDealer AddressCityStateZipVisit Our Website at: www.overheaddoor.comSAVE THESE INSTRUCTIONS2For Help, call 1-800-784-5028 or visit www.overheaddoor.com
YOUR GARAGE DOOR OPENER DOCUMENTATION PACKAGEThe documentation provided with your opener has been carefully designed and organized to make the assembly, operation, and continuedmaintenance of your product as easy and safe as possible. This material consists of two main items.Operation and Maintenance ManualWhile it is recommended that all documents be retained for future reference, this manual should contain most of the information that youwill need over the lifetime of your product. The manual is designed in a “flip-flop” configuration with the english version in one half of thebook and the spanish / french version in the other half. The basic contents of this manual are:English LanguageDASMASpanish / FrenchLanguage DASMA· Warranty Information· Pre Installation Checklist to be reviewed prior to anyassembly or installation· Necessary AdjustmentsTri-LingualEntrapment label· Programming Remote Devices· Maintenance and Troubleshooting· Parts Explosions· Accessory Order Form· Door Opener Association Safety and Maintenance Brochure (DASMA)· Entrapment Warning Label - To be Adhered in close proximityto wall controlEnglish LanguageVersionSpanish / FrenchLanguage VersionAssembly and Installation PosterThis poster is intended to give a convenient lay flat media to be used at the site of assembly and installation. Color coding is used tohighlight steps and other information as clearly as possible. This poster is Tri-Lingual with english instructions highlighted with a bluebackground. The basic contents of this Poster are:Opener Installation· Quick Reference Poster· Pictorial and step by step opener assembly instructions· Pictorial and step by step opener installation instructionsQuick ReferenceDiagramOpener AssemblyIT IS CRITICAL THAT ALL SAFETY WARNINGS MARKED CLEARLY IN BOTHTHE MANUAL AND POSTER ARE READ, UNDERSTOOD AND FOLLOWED.Overhead Door Corporation is constantly striving to improve our products and the documentation that comes with them. If youhave any suggestions or ideas for improving this product and it’s documentation, please forward them to:Overhead Door Corp.22790 Lake Park Blvd.Alliance, Ohio 44601-3498For Help, call 1-800-784-5028 or visit www.overheaddoor.com3
Garage Doors are heavy objects that move with the help of springsunder high tension and electric motors. Since moving objects, springsunder tension, and electric motors can cause injuries, your safety and thesafety of others depend on you reading the information in this manual. If you have questions or do not understand the informationpresented, call your nearest service representative.In this section, and those that follow, the words Danger, Warning and Caution are used to emphasize important safety information.The word:DANGER: indicates an imminently hazardous situation which, if not avoided, will result in death or serious injury.WARNING: indicates a potentially hazardous situation which, if not avoided, could result in death or serious injury.CAUTION: indicates a potentially hazardous situation which, if not avoided, may result in injury and property damage.The word NOTE is used to indicate important steps to be followed or important information.WARNING:Can Cause SeriousInjury or DeathMOVING DOOR Keep people clear of opening while door is moving. Do Not allow children to play with the door operator. Do Not operate a door that jams or one that has a broken spring.WARNING:Can Cause SeriousInjury or Death Turn off power before removing operator cover. When replacing cover, make sure wires are not pinched or nearmoving parts. Operator must be properly grounded.WARNING:Can Cause SeriousInjury or Death Do Not try to remove, repair or adjust springs or anything towhich door spring parts are fastened, such as, wood blocks,steel brackets, cables or other like items. Repairs and adjustments must be made by a trained serviceperson using proper tools and instructions.ELECTRICAL SHOCKHIGH SPRING TENSIONIMPORTANT INSTALLATIONINSTRUCTIONSSafe-T-Beam (STB) Non-Contact Reversing SystemWARNING:TO REDUCE THE RISK OF SEVERE INJURY OR DEATH:123456784READ AND FOLLOW ALL SAFETY, INSTALLATION ANDOPERATION INSTRUCTIONS. If you have anyquestions or do not understand an instruction, callyour service representative.Do Not install operator on an improperly balanceddoor. An improperly balanced door could causesevere injury. Repairs and adjustments to cables,spring assembly, and other hardware must be madeby a trained service person using proper tools andinstructions.Remove all ropes, and disable all locks connected tothe door before installing operator.Install door operator 7 feet or more above the floor.Mount the emergency release knob 6 feet abovethe floor.Do Not connect the operator to the source of poweruntil instructed to do so.Locate the control button: Within sight of door. At a minimum height of 5 feet, so small childrencannot reach it. Away from all moving parts of the door.Install the entrapment WARNING label next to thewall button or console. Install the emergency releasetag on, or next to, the emergency releaseThe operator must reverse when the door contacts a1-1/2 inch high object on the floor at the center ofthe doorway. This is about the size of a 2" x 4" boardlaid flat.Places an invisible beam across door opening, that reversesthe door during down travel to the fully open position ifanything passes through beam.Safe-T-Reverse Contact Reversing SystemAutomatically stops and reverses a closing door within 2seconds of contact with an object.Automatic Lighting SystemTwo light bulbs up to 60 Watts max. each, are used for saferentries and exits. The lights turn on when door is activatedand automatically turn off 4 minutes after stopping in eachend position.Manual Emergency ReleaseAllows the garage door to be opened or closed manuallyfor emergencies or maintenance.Speed ControlSelf-adjusted.Force ControlSelf-adjusted.
PRE-INSTALLATION CHECKLISTWARNING:This Opener includes parts and supplies needed to install in most garages andconnect to most garage doors. There are many variations of garages and garagedoors. A few additional parts and supplies may be needed to install Opener intoyour garage and connect to your garage door. While checking items listedbelow, note any additional items you will need.If your door sticks, binds, or is out ofbalance, have it adjusted by a OverheadDoor Factory Authorized Dealer. Doorsprings, cables, pulleys, brackets and associated hardware are under extreme tensionand can cause serious injury or death.Tools used in this section: 12' Tape Measure Pencil Ladder LevelCheck following items before assembling Opener:Check Step 1: CHECK DOOR CONDITION ANDTHICKNESSCheck condition of vertical stile (Figure 2) in center of door, and its connection todoor’s top and bottom beams.A If door frame is nailed together and not a solid connection, door framemust be braced or reinforced before installing Opener.B If door is “lightweight” (made with frame and skin - not solid), door(including door frame) must be braced or reinforced beforeinstalling Opener.C A door opener reinforcement bracket may also be needed to connectgarage door to Opener's Door Bracket. This Opener is designed forinstallation on a properly braced sectional door or solidly bracedone-piece door.D Contact your Overhead Door Factory Authorized Dealer or dealer of yourgarage door for any necessary bracing and a door opener reinforcementbracket (if needed) before proceeding.E If you have a wooden door, measure door’s thickness. (1/4" x 2") LagScrews are included for installing Door Bracket onto door. If your dooris less than 2" thick, brace door or use shorter Door Bracket LagScrews (1/4" x 1-1/4" – not included)KEEP FEET CLEAR OF DOOR3' - 4'Sectional DoorCheck Step 2: CHECK GARAGE DOORALIGNMENT, OPERATION,AND BALANCEABCRaise door, check alignment and see if it moves freely (Figure 1). If door3' - 4'appears out of alignment, binds, or does not move smoothly, contact aOverhead Door Factory Authorized Dealer or dealer of your garage door forrepairs and adjustments to door mechanism.One-Piece DoorRaise door to 3' – 4' above ground and carefully let go. Door should stayFigure 1 Checking door balancestationary. Slight movement is acceptable. More than slight movementmeans door is out of balance. Contact a Overhead Door Factory AuthorizedDealer or dealer of your garagedoor for repairs and adjustmentsTorsion Springsto door mechanism.Extension SpringsHeader AreaCheck door type. MakeCentera note of whether it is aStilesectional or a one-piecedoor (Figure 2).Center StileFigure 2For Help, call 1-800-784-5028 or visit www.overheaddoor.comNote Door Type5
Check Step 3: MEASURE GARAGE DOOR HEIGHTMeasure garage door height (7'-6", 8'-0", or taller) withtape measure.A If door height is 7'-6" or less, continue with Check Step 4.B If your door height is above 7'-6", you may need a channelextension kit (Figure 3). If there is any question contact yourCustomer Service Representative at 1-800-784-5028.ChannelExtensionfor 8' doorCheck Step 4: CHECK DOOR HEADER AREAFigure 3Channel Extension KitNOTESECTIONAL DOORThe header is a heavily reinforced section of the wall justabove the top of the garage door opening.H 2 1/2"A Find vertical center line of door and header: Close door. Measure door width at top. Mark a point at center of door and on header directlyabove door. Draw a center line to connect points.B Find Header Bracket mounting height (Figure 4):(Do not attach Header Bracket). Raise door, watching top edge of door and stop doorwhen its edge reaches its highest point. Measure distance (“H”) from top edge of door to floor.– For sectional doors, add 2-1/2" to “H”. Mark a pointon center line. Bottom of Header Bracket will beinstalled here.– For one-piece doors, add 6" to “H”. Mark this point oncenter line. Bottom of Header Bracket will beinstalled here.HeaderHONE-PIECE DOORH 6"NOTE HeaderFor both types of doors:– If the ceiling in your garage is so low that there isnot at least a 3" space above the Header Bracketmounting point, contact a Overhead Door FactoryAuthorized Dealer.If a door spring is in the way, place the HeaderBracket above the spring. Do Not move the door spring.WARNING:HFigure 4Find Highest Point of TravelDoor springs are under extremely high tension and should behandled ONLY by a trained professional.C6Check wall for a stud or a solid header at your mark:(If checking a finished wall, a stud finder may be helpful). If location is above Header, a 2" x 6" board must bescrewed to studs beside your mark with at least two LagScrews and Flat Washers (not provided). Transfer your mark to new mounting board.For Help, call 1-800-784-5028 or visit www.overheaddoor.com
Check Step 5: CHECK POWER HEADMOUNTING AREACheck for 15 Amp,120 Volt grounded outletor wiring box within 5 feetof Power Head.Check ceiling or space above where Opener Power Head will bemounted (Figure 5):A Measure from garage door center line mark toward rearof garage: Approximately 11' back if garage has a 7' 6" door. Approximately 13' 6" back if garage has an 8' 0" door.NOTEMounting Straps are included to attach the Opener to mostgarage ceilings. Garage construction varies widely.Additional mounting straps or angle iron may be needed foryour installation.Door Center LineFigure 5 Check Power Head locationBFind location of ceiling joist or truss above where OpenerPower Head will be and estimate type and quantity ofmaterials needed for your installation (Figure 6).OPEN BEAM CEILING EXAMPLESMounting StrapsSupport board addedfor longer spansPerforatedAngle IronFINISHED CEILINGSLocate ceiling joists ortrusses usinga stud finderor similardevice.Attach angle iron(not included) tojoists or trussesthrough finish materialusing Lag Screws.(Angle iron not included)Figure 6 Mounting methods for open beam and finished ceilings. (Check power outlet locations.)Check Step 6: CHECK CEILING FOR GROUNDEDPOWER SOURCEACheck that there is a 15 Amp 120 Volt grounded electricaloutlet or grounded permanent wiring box (per building code)within 5' of Opener Power Head: If not, an outlet or wiring box must be installed. Contacta licensed electrician for installation. If building codes require permanent wiring, Power Headmust be partially disassembled to install appropriatewiring in place of Power Cord. See Installation Poster.NOTEPermanent wiring must be installed by a LicensedElectrician. Not all Overhead Door Factory AuthorizedDealers are Licensed Electricians. Contact someone who is aLicensed Electrician.For Help, call 1-800-784-5028 or visit www.overheaddoor.com7
Check Step 7: CHECK SAFE-T-BEAM MOUNTING BRACKET LOCATIONCheck for wood garage frame, jamb, or masonry at mounting location(6" above floor) with attachment tabs facing away from garage door(Figure 7).ASourceIf you cannot mount Safe-T-Beam Mounting Bracket towood frame: Concrete screws and concrete anchors (not included)must be used to mount Brackets on masonry withattachment tabs facing away from garage door. Safe-T-Beam Mounting Bracket Extensions may be used(not included - available from a Overhead Door FactoryAuthorized Dealer or through Accessories Order Form onpage 20).SensorSafe-T-Beam Mounting Bracket6"Check Step 8: RECOMMENDED TOOLSABTools (Figure 8):Additional tools to make installation easier: Slotted and phillips screw-driver bits Stud finder Sheet-metal cutting snipsTop ofBracket 6"abovefloorFigure 7 Mounting Safe-T-Beam ComponentsDCheck Step9: REMOVE EXISTING GARAGEDOOR LOCKSCheck that the garage door locks, rope, and T-Handles are removedfrom the garage door before starting the installation.ABefore going further, get any items and toolsneeded for your installationSafe-T-Beam Sensor Mounting Bracket Extensions (dealer)Garage door opener reinforcement bracket (dealer)Garage door frame reinforcement brackets, screws, bracingor reinforcement kits (dealer)Lag Screws (1-1/4") for a wood door less than 2" thick (store)Electrical outlet and/or wiring (supplied by alicensed electrician)Extension Kit (for 8' garage doors) (store)Sufficient angle iron or strapping for hanging Power Head(store)Two 60 Watt light bulbs(Rough service bulbs recommended)(store)GER-2 Emergency Release Kit for entry during power failure(store)Wood for header, ceiling, and/or door bracing reinforcement(if needed)Masonry fasteners for Safe-T-Beam Bracket installation,(if needed)Masonry drill bit (if needed)Extension Kit (for 8' garage doors)8ElectricDrillIf your garage does not have a separate entry door, it is highlyrecommended to install a Emergency Release Kit (GER-2).Emergency Release Kit lets you open garage door from outside ifthere is a power failure. (Please see Accessories Order Form onpage 20.)1/16"5/32"Drill Bit Drill Bit6' or 7'Step Ladder12' Tape MeasureAdjustable WrenchWireStripperHammerPliersPhillips ScrewdriverSocketWrenchSafety GlassesFlat Blade ScrewdriverPencilHack Saw1/4" 5/16" 3/8" 7/16" 1/2" 9/16"SocketsCarpenter's LevelFigure 8 Recommended ToolsFor Help, call 1-800-784-5028 or visit www.overheaddoor.com
ADJUSTMENTS AND MAINTENANCEPROGRAMMING THE OPENERBEFORE STARTINGControl ElementsThe control for programming the door openeris located at the back right corner of the powerhead.ABCDK LM NJIH G FENumerical display shows the menu stage as well as theselected value (Figure 9). Decimal Point display lights up to indicate “ready foroperation” and flashes during remote control programming.Serves as an “UP” button during the setting/adjustmentphase, and as a “START” button outside the menu.Serves as a “DOWN” button during the setting/adjustmentphase.Used to select the desired setting/adjustment menu or menustage and to store settings.Programming the control unit is menu driven.Pressing button D calls up the menu guide. Thenumbers displayed indicate the menu stage. Afterapproximately 2 seconds the display flashes andthe setting can be altered using buttons B and C.The selected setting is stored with button D, andthe program automatically jumps to the next menustage. By repeatedly pressing button D, menustages can be skipped. To quit the menu, press button D until “0” is shown again. When not in programming mode, button B can be used to activatethe unit.AaCBDFigure 9 Control elementsANOTEBefore programming allow door to engage with the carriage.Turn on the power supply. Make sure the antenna is positioned correctly. Observe the remote transmitter instructions.Settings Step 1:ABCSETTING/ADJUSTINGTHE TOP END OF TRAVELKeep button D pressed for 3 seconds (Figure 10). Number 1 will appear in the display.– Wait a short time until the 1 begins flashing.Press button B. The door will travel in the OPEN direction aslong as the button is pressed. Release button B when doorhas reached desired open position. Use B and C buttons tomake final adjustments.Once the desired OPEN end-of travel position has beenreached, press button D. The operator stores the OPEN endof-travel position and “2” appears in the display.BCFigure 10 Setting Top EndFor Help, call 1-800-784-5028 or visit www.overheaddoor.com9
Settings Step 2:ABWait a short time until “2”starts flashing. Press button C. Thedoor will travel in the CLOSE direction as long as the button ispressed. Release button C when door is within two inches offloor. Use B and C buttons to make final adjustments. Figure 11.Once the desired CLOSE end-of-travel position has beenreached, press the D button.The opener stores the CLOSEend-of-travel position. “0” is displayed.Settings Step 3:ABCSETTING/ADJUSTING THEBOTTOM END OF TRAVELABPROGRAMMING THEREMOTE CONTROLBriefly press button D. Figure 12. “3” is displayed.When the display begins to flash, press the desired button onthe remote for one second, then release the button for onesecond. Continue pressing and releasing the same buttonuntil decimal point begins to flash. Additional transmitters (up to 7) can be programmed byfollowing the same procedure.To operate the remote control. Press the remote button once.– The door will move. Press the same button again.– The door will stop. Press the same button again.– The door will move in the opposite direction. TheFigure 11 Setting bottom endABdoor will stop automatically at the fully open orfully closed position.Figure 12 Programming Start Function.Settings Step 4:APROGRAMMING MULTIBUTTON REMOTE CONTROLSProgramming.NOTEEach button on a multi-button remote is designed foruse with 1 door. You cannot program 2 buttons tooperate the same door, nor can you program 1 buttonto operate 2 doors. B10For each button.– Program as one-button transmitter above.Operation. Same as one-button.For Help, call 1-800-784-5028 or visit www.overheaddoor.com
NOTEIn case of a lost or stolen transmitter, use the followingstep to prevent unauthorized entry to your home.Settings Step 5:ABCUnplug the opener.While holding button D, plug in the opener.Re-program desired remote controls by following SettingStep 3 or 4.Settings Step 6:ABDELETING ALL THE REMOTECONTROLSREPLACING THE REMOTECONTROL BATTERYNOTE FOR NON-FLASHLIGHT MODELS Pop off the back of the remote.– Use coin, pen, screwdriver or any similar device.– Replace old Battery with new compatible coin type battery. Replace back of remote.FOR FLASHLIGHT MODELS Slide open battery cover.– Replace old Battery with new AAA battery. Replace battery cover.Each Remote Control must be programmedseparately.The Remote Controls will not cause the doorOpener to close the garage door if the Safe-TBeam System is malfunctioning.When programming the Remote Controls, theymust be at least 24" from the Antenna Wire.Each Button on a 3 Button Remote Controlis for a different Opener. You cannot use morethan one Button per Remote, per Opener.A maximum of seven Remote Controls orWireless Keypads can be stored into theReceiver at one time. If a Remote Controlbecomes lost, or if you want to delete a RemoteControl or Wireless Keypad, see “Delete RemoteControls.”WARNINGA moving garage door may cause serious injury or death. Keep people clear of opening while door is moving. Do not allow children to play with the Remote Controls.If the Safety Reverse does not work properly: Close the door and disconnect the Opener using theEmergency Release Cord. Do not use door Opener, Remote Controls, or Wireless Keypad. Refer to the door and door Opener Owner’s Manualsbefore attempting any repairs.Remote Control Operation (Figures 13A and 13B)ABCPress Button on Remote Control. Garage door will move.Press Button again. Garage door will stop: The door automatically stops at the end of the open orclose cycle.Press Button again. Garage door will reverse.315 Mhz1 Button Compact Remotew/Docking StationSome Remote Controls are equipped with a flashlight.The logo is the button which operates the light. There isa backlight under the button. When it does not light, itindicates the battery needs to be replaced.Flashlight ButtonFrequencySwitch315 MhzFrequencySwitch390 MhzDFrequencySwitch390 Mhz3 Button Compact Remotew/Docking StationFigure 13A Overhead Door Remote Controls1 ButtonRemotew/Flashlight3 ButtonRemotew/Flashlight3 ButtonLargeRemotew/FlashlightFigure 13B Overhead Door Remote ControlsFor Help, call 1-800-784-5028 or visit www.overheaddoor.com11
ABOUT DUAL FREQUENCYREMOTE TRANSMITTERSYour garage door opener (GDO) features aunique dual frequency remote control systemfor reliable service in today’s crowded airwaves.Overcrowded airwaves may intermittentlyinterfere with GDO’s remote control system.The dual frequency feature greatly reduces thepossibility of unwanted interference.The receiver in the GDO’s powerhead canreceive signals at 315 AND 390 MHz. Theremote is factory set at 315 MHz. See Figures13A and 13B for frequency selector switch.Switch your remote control frequency when: Remote does not have adequate range. Remote works inconsistently with freshbattery installed - LED feedback lights upwhen pressing button. Programming your car’s HomeLink system.To program a HomeLink device:(This GDO is HomeLink compatible.) Use a small flat screwdriver to switch thefrequency selector to 390 MHz. Follow the HomeLink instructions in yourcar owner’s manual. Reset the remote control frequency to315 MHz for everyday use.Settings Step 7:AFCC and IC CERTIFIEDThis device complies with FCC Part 15 and RSS 210of Industry Canada. In accordance with FCCRegulations, this device has no right to beprotected from interference by other legal radiotransmissions. Accordingly, it is possible thatmilitary or other civilian radio transmissionsoperating on a similar frequency could interferewith the radio transmission between the remotetransmitter and the receiver in this device. Thisequipment has been tested and found to complywith the limits for a Class B digital device,pursuant to Part 15 of the FCC Rules. These limitsare designed to provide reasonable protectionagainst harmful interference in a residentialinstallation. This equipment generates, uses and canradiate radio frequency energy and, if not installedand used in accordance with the instructions, maycause harmful interference to radiocommunications. However, there is no guaranteethat interference will not occur in a particularinstallation. If this equipment does cause harmfulinterference to radio or television reception, whichmay be determined by turning the equipment offand on, the user is encouraged to try to correct theinterference by one or more of the followingmeasures: Re-orient or relocate the receiver antenna. Increase the separation between the operatorand receiver. Connect the operator into an outlet on acircuit different from that to which the receiveris connected. Consult your local dealer.CHECKING THE FORCE LIMITTest contact reverse. Open door using Wall Control. Lay 2" x 4" board on floor in center of garage dooropening (Figure 14). Close door using Wall C
How to get warranty service: To obtain warranty service for your Overhead Door product,you must pro-vide proof of the date and place of purchase of the product. 1. Do-It-Yourself-Service. Call the Overhead Door Consumer Connection toll free at 1.800.354.3643 to speak in person to a trained Overhead Door representative for assis-SAVE THESE .