Transcription
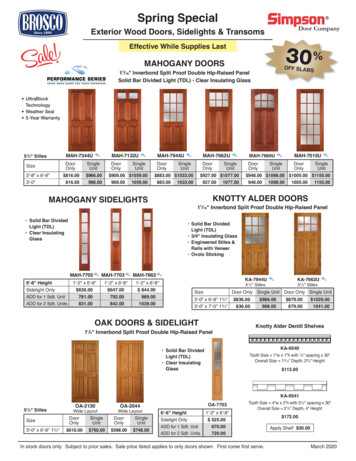
Cottage StorageShed44S E P T E M B E R 2002 THE FAMILY HANDYMANAn easy-to-openoverhead door putsall your stuff ineasy reach
Who said backyard storage has to look badto be good? Besides being easy on the eyes,this shed has lots of storage in a built-tolast and low-maintenance design. It’s got all the roomyou need for heavy-duty lawn equipment, the family’sbicycles, plus all the sporting and camping equipmentyou own. And the generous use of windows sheds plentyof light from the sides, front and through the upperdormer window.This shed is built to last.The spacious 10 x12-ft. foundation is concrete; the2x4 walls are skinned with 1/2-in. plywood and followedby durable cement siding. The windows are vinyl clad,and both doors are factory primed. And the roof is sim-StorageShedple-to-apply asphalt shingles. All this storage space iseasy to access through an 8-ft. wide overhead door thatrolls up out of the way. We chose an expensive woodoverhead door ( 1,500 installed) with lots of style, butyou can choose from a wide variety of less-expensivedoors available at any garage door supplier.Creating a great-looking project is gonna take time. Infact, this shed will take an average DIYer about twoweeks or more to build! The process, however, isstraightforward. Our easy-to-follow, step-by-stepinstructions will get you through any tough spots you’llencounter, and the clear drawings will give you confidence to tackle the hand-framed hip roof. You can alsobreak up the project into manageable steps and pick upwhere you left off at a later date. First get the framingand roof done, and then you can finish the rest at yourleisure.If you’ve built a deck before, you can tackle a job likethis. Beyond basic carpentry tools like a circular saw,level, tape measure, drill and screw gun, you’ll need concrete finishing tools (rent them from a rental center), amasonry saw blade (or diamond blade), a portable tablesaw and some roof jacks to reach the upper courses ofshingles. Two stepladders—one 8-ft. and one 10-ft.—are necessary as well.An eye-catching project like this is naturally going tocost more than a simple shed kit available from homecenters. Figure on spending about 400 for concrete andforms, 1,900 for building materials, another 800 forthe windows and service door, plus the cost of youroverhead door.A concrete floor is morework, but it'll withstandheavy useOur site sloped about 3 in. from left to right. If you havemore slope than that, you may need to do some additional excavating and grading to keep water away. It’sbest to keep the framing several inches above the finished soil grade to prevent water and insect damage.Using a sod cutter, remove the turf from the foundation site—this is a must—plus at least 6 in. around theperimeter to fasten the forms. (You can rent a manualmodel for 15 a day or a power type for 45.) Use 2x8sfor the forms and drive stakes in about every 4 ft. andnear every corner (Photo 1). Level one side first andthen level and square the other sides to it. The diagonalmeasurement across the forms should be equal if you’ve
StorageShed2x8FORMSNO. 4REBAR6-MILPLASTICFORM the 10x12-ft. slab with2x8 lumber. Taper the soilbeneath the slab from 7 in.thick at the perimeter to about 4 in.thick at the center. Reinforce theouter 12 in. of the slab with twoconcentric courses of No. 4 rebarspaced about 6 in. apart. Pour theconcrete and lift the rebar about 21/2 in. into the concrete, then screedit even with the forms.1BULLFLOAT2FINISH the slab with a bullfloat to get an even surface,then trowel the edges withan edger. Next, push the 6-in.anchor bolts into the fresh concrete.done your job right. Cut all thestakes even with the tops of theforms. We had hard-packed claysoil, so we dug about 3 in. deeperand replaced that soil with sand tohelp stabilize the slab. Note: Ifyou’ve got soil that never seems tothoroughly dry, lay 6-mil plasticover the ground up to the formsbefore you pour your slab.If you follow our foundation planyou’ll need about 2-1/4 cu. yds. ofconcrete. Tell the ready-mix company you’ll be pouring a slab for ayard shed and they’ll send theappropriate mix. Develop a planearly on to figure out how to getyour concrete to the site from thestreet. We planned to do some landscaping near the site anyway, so weallowed a small concrete truck todrive into the yard. Beware: A largeconcrete truck can leave deep rutsand damage your yard and septicsystem. To avoid having to do additional landscaping, you may need toborrow an extra wheelbarrow and astrong teenager to help you get yourconcrete into your backyard. Besure you’ve got at least two stronghelpers when the concrete arrives. Ifit looks like rain that morning,reschedule the concrete delivery.Pick a nice 75-degree day or cooler (if possible) to pour the concrete.The slab will turn out better in cooler weather, and, you won’t wearyourself out from heat exposure.Wear protective eyewear, glovesand boots. Concrete can burn withtoo much exposure. Rinse your skinwith water immediately if you getsplashed with it.Before you pour, lay No. 4 rebar(Photo 1 and Fig. A, p. 51) aroundthe perimeter of the slab to reinforce the edges. Mark your anchorbolt locations (and set them out) onthe forms so you won’t forget topush them into the wet concrete.For more on pouring and finishingconcrete see “Building a ConcretePad,” July/Aug. ‘96, p. 80, or “Poura Concrete Sidewalk,” May ‘00 p.96. Also visit our Web site atwww.familyhandyman.com. Note:If concrete work is not your idea offun, you can have a pro do the jobfor you, but expect to pay about 1,200.Wall framing isfast.and funSnap chalk lines on the slab thatcorrespond to the inside edges ofeach wall (3-1/2 in. from the outeredge of the slab). You’ll appreciatethe lines because they’ll ensureaccurate wall positioning, even ifyou have a slight belly in your slabor plates. Next, cut your sole (bottom) plates and your top platesfrom 10-ft. and 12-ft. 2x4s (usepressure-treated wood for the soleplates).Follow the steps in Photo 3 fordrilling holes in the sole plate forthe anchor bolts. Line up the topand bottom plates to mark studlocations, along with door and window header openings. Markingboth plates (sole and top plate) atthe same time will make layout mistakes less likely. Follow the dimensions in Fig. A for the wall measurements. Build the back wall first(drive a pair of 16d sinkers throughthe plates into each stud). Then tipit up and brace it (Photo 4) whileyou frame the side walls. The spacing is measured from the center ofeach wall specifically to ease rafterlayout.Cut and nail (use 16d sinker
StorageShednails) the window header pieces together separately anddrop them between the king studs (Photo 6). (Check yourwindows and doors for specific rough openings). Nailthem to the king studs and the top plate. Next, nail thetrimmer stud to the king stud and then install the sill andthe cripple studs (Photo 4) below the sill. After you’veframed the walls, tip them up into position, brace them,(Photo 5) then fasten the sole plates to the anchor bolts.Climb up your stepladder and hammer along the topplate above the stud locations. This is necessary becausethe studs can work loose from the plates while you're tipping them into position.Add angled braces to the walls (Photo 6) as you plumbthe corners. The braces must be nailed from sole plate totop plate and into the studs. The braces will keep the wallsstraight and solid while you install the rafters and nail thesheathing to the studs. Use a 4-ft. level to check the wallsfor plumb. In a perfect world, all the wall corners would beperfect. In reality, you may have to settle for "pretty close."SNAPPEDSTRINGLINE1/2”ANCHORBOLT3CUT the sole plates to length, then measure andmark the bolt locations for each of the pressuretreated wall plates. Drill 1/2-in. holes at the locations. Make sure your concrete has cured at least twodays before building on it.The tie plates bondthe tops of the wallsCut tie plates from 2x4s and nail them (16d sinkers) to MBLE each wall as shown in Fig. A. Cutyour 2x4 studs 88-1/2 in. and adjust your windowand door rough openings according to your window size. Tip up and brace each wall.FASTEN each pressure-treated sole plate to theslab with a washer and nut and then nail the corners of the walls together with 16d sinker nails.Next, tie the walls together by adding a 2x4 tie plate (Fig.A) at the top of the walls. Run the tie plates 3-1/2 in. longon the front of each side wall to overlap the large doorheader (Photo 6). Plumb and brace the inside of eachwall with a 2x4s nailed diagonally.
StorageShedKING STUDSBRACESLVL MICROLAMDOOR HEADER6RIP each of your LVL headers to 9 in. wide and make 1-1/2 x 3-1/2 in.cutouts in each top corner to accept the tie plates from the side walls.Clamp a temporary 2x4 support on one side about 9-1/2 in. down fromthe top of the tie plate, set the first header section onto the support, and carefully walk the other side up the ladder and nail it to the end stud of the sidewall. Make sure the top of the header is flush with the tie plates on the sidewalls. Next, nail the other side and repeat the process with the second LVLheader. Glue the headers together with construction adhesive and then nailthem every 16 in. with a pair of 16d sinkers. Nail the tie plates into the LVLs atthe notches.FRONTBRACE7top plate near every stud locationwith two 16d nails. Next, rip your 91/2 in. wide LVL beams (we usedMicrolam beams) to 9 in. with a circular saw. This is necessary to keepthe door's rough opening height at84 in. Notch the ends of each beamto accommodate the side wall tieplates and install the LVL doorheader as shown in Photo 6.Finally, add the steel straps weshow in Fig. A. Mark the rafter locations onto the tie plates and frontheader. Start the layout from thecenter of each wall and mark out tothe corners so each rafter will be 16in. on center (Fig. A).HEADERSUPPORTWALLBUILD the 2x4 header-support walls and fasten them to the slab withthe concrete anchors and then to the underside of each header. Checkthe front corners to make sure they’re still plumb and redo the bracesas necessary.Using full-sizepatternssimplifiesrafter cuttingTo get your rafters to all fit and sitevenly on the walls, they must beconsistent. Mark the commonrafters from a single “pattern rafter”and then use this same pattern tomark the jack rafters later.Cut the three common rafters tothe dimensions in Fig. B, p. 53. Nailthe two side common rafters to thecenter of the ridge board as shownin Photo 8 and Fig. A and carefullywalk it up a ladder with a helper tohold the rafters into position. Fastenthe rafters to the side walls and thentoe-nail the back wall rafter into theridge board.Now cut the hip rafters to thedimensions in Fig. B. Note that twoof them have a left-hand bevel cut atthe top and two have a right-handbevel. To cut these, mark the anglewith your speed square at the “10”on your hip/val gauge. Now set yourcircular saw to cut a 45-degreebevel. Follow the angle you marked
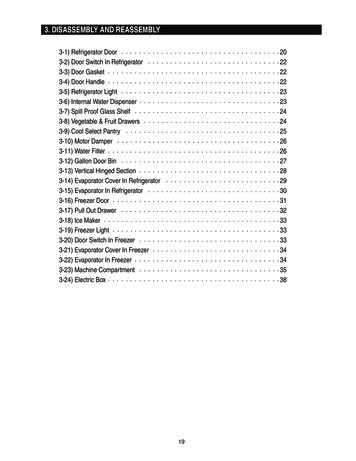
StorageShedFig.A ARTFramingTECH1 FRAMING — VERSION 3F 6/26/021/2" SHEATHINGRAFTERS TRIMMED AND INSTALLEDAFTER ROOF SHEATHINGDOUBLE 2x62x6 RAFTER2x4CROSSTIEBLOCKING1/2" PLYFILLERS40 APPROX.1246"2x2 x 21-3/4"108"30-7/16"2x43-1/2"SIMPSON A23ANGLE BRACKETDOOR/WINDOWHEADER2-5/16"2x4 TIE PLATE2-3/4"2x4 TOP PLATE3-1/2"(DOUBLED LVL)2x4 RAFTER16" O.H.1/2" SHEATHING2x4 x 27-1/2"2x4 STUDS( 88-1/2" TYP.)9"NOTCHFOR 2x4TOP PLATEANCHOR BOLT3/8"OVERHANG2x4 PRESSURETREATED PLATEGARAGE DOORHEADER2x4 x 41" (TRIMBOTTOM TO FIT)1/2"SHEATHING2x6 x 63-7/8"DORMER RIDGE2x8 RIDGE2x6 x 14" DORMERRIDGE HEADER2x4RAFTER2x4 x 26"TOP PLATE7"1/2" DIA.REBAR3-1/2"3"6"12"2x4 x 18-1/8"COLLAR TIE2x4 x 21-1/2"CORNERSTUDCONCRETESLABTYPICALWALL SECTION2x6 x 42"RAFTER TAILHEADER2x6 HIP RAFTER2x6 JACK RAFTERS2x6 COMMON RAFTER2x4 CROSS TIE1-1/2" x 6-1/2" x 14-1/2" BLOCK (TYP.)2x4 TRIMMER1/2" SHEATHINGCENTER WINDOWOPENING2x4CENTERFRAMING51-1/2"SIMPSONLSTA "
StorageShedCOMMONRAFTERS2x8RIDGEBOARD8CUT the three 2x6 common rafters (one on eachlong wall and the one on the back wall) and thecenter 2x8 ridge to the dimensions in Fig. A. Use aspeed square (see "Speed Square Know-How, p. 53) tomark the angles at a 10/12 slope. Mark the rafter locationson the tops of the tie plates, starting in the center andworking out to the sides on 16-in. centers. Have a helperhold the rafters in place on the plates and screw therafters to the tie plate using Simpson A23 angle bracesand Simpson bracket screws.HIP RAFTERHIPDUDECUT AND NAIL the 2x6 hip rafters to the sides of the center ridge andthe backside common rafter (see detail Fig. A). Each hip should intersect with the top edge of the ridge. Use 10d common nails. Next, markthe locations for the jack rafters onto the hip rafters (see text at right).9with your speed square to cut a topangle. This cut is called a cheek cut.Next, mark the bird’s-mouth angleand the plumb cut at the bottomend of the rafter. Cut the bird’smouth and the tail cuts (Fig. B) withyour saw set at 90 degrees. Drivethree 10d common nails into eachhip through the ridge and fasten thehips to the tie plates with a pair ofA23 angle brackets. Cut and nail thedormer ridge header (Figs. A andC) in place at this time to stabilizethe front hip rafters.The jack rafters that fasten to thesides of the hip rafters may lookconfusing at first, but they are simply shortened common rafters witha 45-degree bevel cut that followsthe 10/12 common mark. Thebird’s-mouth, overhang length andthe plumb cut are identical to thecommon rafter.To mark the locations where thejacks intersect the hips, hold your
StorageShedFig. B RaftersFig. C Rafter Framing Details45 BEVEL*DIMENSIONS ARE JACK RAFTER LENGTHSCOMPOUNCUT2x6 COMMON RAFTER30-13/16"* 51-11/16"* 72-1/2"* 93-5/16" *2x6 JACK RAFTERS2x6 HIP RAFTER45 BEVELS124-3/8"16"98-1/4"31COMPOUNDCUTDOUBLE2x6 "122x8 x25-1/2"RIDGESTUDS ANDRAFTERS16" O.C.STARTINGAT CENTER2x6 x 14"DORMERRIDGEHEADER2x6 RAFTERTAIL HEADER2x6 MMONRAFTER2x6COMMON RAFTER2x6 RAFTERTAIL (3 ELCOMPOUNDCUTAFTER42"45BEVELCUT TOLENGTHFOR JACKS1040APPROX.23-7/16"RAFTERTAIL (3)JACKRAFTERtape parallel to the ridge board andhook it over the center commonrafter. Keep the tape parallel to theridge (and square to the commonrafter) to ensure accurate placement. Mark each 16-in. center onthe hip as you slide the hook end ofthe tape down along the commonrafter. You’ll see that these will correspond with the marks you haveon the tie plates. To cut the lengthaccurately, measure from yourmarks on the hip and measure tothe outer edge of the marks on theRAFTER FRAMING DETAILSSpeed Square Know-howHIP RAFTERThis shed has a roof with a 10/12 slope.COMPOUNDSPEEDANGLESQUAREThis means the roof will rise 10 in. whenyou measure 12 in. horizontally.10/12 HIPYour speed square has a gauge toGAUGEhelp you accurately mark the cuts onthe rafter for a 10/12 slope. In fact, you’llABOUTnotice there are two gauges on your31 square that have the same numbers butCOMMON & JACK RAFTERSdon’t match up to similar degrees.The “10” mark on the common gaugeis close to 40 degrees, while the othergauge (marked Hip/val) when lined upon the “10” mark reads closer to 3110/12degrees. How can this be? Well, the hipCOMMONGAUGErafters of this shed start on the edge ofthe wall just like the common raftersand even meet at the same height. ButABOUT40 at closer inspection, you’ll notice thatthe hip rafter must travel considerably more distance horizontally thanthe 12 in. the common rafter must travel.In fact, the hip rafter needs to travel nearly 17 in. horizontally to rise 10in. By the way, when marking a jack rafter, use the common rafter gaugebecause the jack rafter is a just-shortened version of the common rafter.JACRAF
StorageShedGABLE RIDGEHEADERwall tie plate. Transfer these measurements to a piece of 2x6 and useyour pattern to trace the bird’smouth and rafter tail (remember,the outer edge of the tie plate is theinside corner of the bird’s-mouth).Next mark the compound cut andthe plumb cut at the overhang end.Follow this process for cutting allthe jack rafters. Nail each rafter tothe hip rafter (be careful not todeflect the hip rafter as you drivethe nail) with three 10d commonnails.GABLE RIDGEBOARDDOUBLE JACKRAFTERS42” TAIL HEADERMICROLAMDOOR HEADER10ADDITIONALRAFTER TAILSNAIL the dormer gable ridge header (cut a 45-degree bevel oneach side) to the front hip rafters as shown. Cut two double jackrafters (without the tails) and nail them in place at the locationsshown in Fig. C. These double jacks will support the dormer side walls andthe small dormer roof. Screw the lower tail header to the inside edges of thedouble jacks with A-23 angle braces. Cut the rafter tails 23-7/16" long asshown in Fig. B (bottom illustration) to fit against this support and screw thetails to the tail header from the backside with 3-in. deck screws.Dormer-buildingis meticulous,but it brings ina flood of lightIf you want to eliminate the dormer,you can frame the front roof exactly1/2” PLYWOODSHEATHINGCLEATS11SUPPORT the plywood temporarily with cleatsscrewed to rafter ends while you position andnail it to the rafter. Drive in 8d sinkers nailedevery 6-in. Mark the edge of the plywood with a string linejust short of center to the hip rafter. Set the depth of yourCUT HEREcircular saw and the angle at about 15 degrees and cutalong the line. Sheathe the walls in the same manner with1/2 in. plywood once you’ve finished the roof. Hang theplywood 3/8 in. below the bottom plate to cover the seamat the slab. Remove the braces as you finish each wall.
StorageShedTECH ART 3 FINISHING — VERSION 3F 6/26/02Fig. D Finishing1/2" x 3/4" STOPS5/4 x 3-1/2" TRIMNAILINGFLANGE3/4" x 3-1/4" FRAME5/4 x1-7/8"TRIMSASHCOLLARTIE3/4" x3-1/4"FRAME5/4 x3-1/2"TRIM5/4 x 5-1/2" TRIM5/4 x 3-1/2" TRIM4 — DORMER CORNER SECTIONNAILING FLANGEWINDOWFRAME1/2" x3/4"STOPS21-3/4" WIDEx 27-1/2" HIGHSASH FRAMERAFTERTAIL14-3/4"1/2"CHAMFER(TYP.)7 — BRACKET5/4 x3-1/2"TRIM2x TRIM TO FIT1-3/4" x4-3/4" x27-1/2"SILL3-1/4"6— SASH SECTION3/4" x5-1/4"1/4" REVEALHEADJAMB5— GARAGE DOORHEAD JAMBDOORJAMB14-1/2"102x4 x 96"TRIMMERVERTICAL STRIP OF SIDING2— CENTERWINDOW JAMB504020" x 25"SASHLVL2x4CENTERFRAMING5/4 x 1 �� HEAD/SIDEWINDOW JAMBCUT FROM 2x4sNOTCHBOTHENDS3-1/2"3x3 FLASHINGSTEP FLASHING6BRICKMOLD43 — HEAD/SIDEDOOR JAMB7ASPHALT SHINGLESBUILDING PAPERMETALDRIP CAP3512108BUILDING PAPER3/8" x 5"HARDIPLANK SIDING(4" EXPOSURE)9VINYL CLAD CASEMENT WINDOW5/4 x 2"SILLTIPPED10FRAME8— WINDOW SILLTREATED 2x4STRIPOFSIDING32" SERVICE DOORSILL SLABTAPCONFASTENERCONSTRUCTIONADHESIVE9— DOOR SILL7' x 8' OVERHEAD DOOR2x4 x 93"TRIMMER5/4 x 2-3/16"CORNERBOARD (TYP.)3/4" x 5-1/4"GARAGEDOOR JAMB5/4 x 3-3/16"CORNERBOARD (TYP.)5/4 x 3-1/2" TRIM10— SHED CORNER SECTION
StorageShedGABLE-FACERAFTER2x2 CLEAT UNDERPLYWOOD12DORMER GABLECORNER STUDNAIL a 2x2 cleat to the outer edge of the double jack rafters tosupport the roof plywood around the dormer. Once the plywoodis on the front roof, cut the rest of the framing members for thedormer and nail them in place. See Fig. A for dimensions of the framing.FLY RAFTERBRACKETNOTCH12” PLYWOODOVERHANGADD ADDITIONALRAFTER HERE13RUN the dormer plywood 12 in. beyond each front side to extendthe roof overhang. Next, screw the 2x4 fly rafter to the edge ofthe plywood. This overhang may seem flimsy now but it will getsupport from the brackets later.like the backside, but I’m sure you’llagree that the dormer is worth theextra effort.First, cut a pair of double jackrafters to support the side walls ofthe dormer. Measure 24 in. from thecenter of the header toward eachcorner. This is the location of theouter double jack on each side. Cuta pair of jacks for each side but cutthem even with the face of the frontheader so they don’t interrupt thespacing of the overhang tails.Next, cut the vertical 2x4 dormergable corners that rest directly overthe double jacks, and then cut thetop plate and nail them both to thetops of the double jack rafters.Cut the gable face rafters asshown in Fig. A. Cut the 2x6 gableridge 63 in. long and nail it to thegable header between the hip raftersand nail the rafters to the ridge.After you cut the 42-in. tail header (Photo 10) between the jacks,you can cut the three remainingrafter tails (use your old commonrafter pattern). Fasten the headerflush with the inside face of the LVLdoor header. Next, nail the raftertails to the header and screw themin place from the backside as shownin Photo 10.Before you finish framing thedormer roof, cut the roof plywoodfor the main roof and nail it inplace. The remainder of the dormerroof framing will rest on this plywood (Photo 12). Cut the dormerplywood and be sure to overhang it12 in. on the front side.Cut two pairs of rafters identicalto the gable face rafters. Nail one setover the gable-face rafters and thenscrew the next set to the end of theplywood to create the overhang.Now cut the 1/2-in. plywoodsheathing for the dormer sides andfront and secure it with 8d sinkers.
StorageShedSheathethe walls,then removethe braces15-LB. ROOFINGFELTASPHALTSHINGLES150-LB.ROOFER14CUT AND NAIL prefinished metal roof edging around the perime-ter of the main roof and the gable roof. Staple 15-lb. roofing feltto the plywood roof deck. Start shingling with the first course ofshingles upside down even with the metal drip edge. You must nail this rowand the next seven rows into the rafters only to prevent the nails from showing through on the underside of the overhang.Materials ListItemQty.FOUNDATIONItemQty.SIDING2x8 x14’ (forms)22x8 x10’ (forms)22x4 bundle of stakes2Concrete2-1/4 ydsNo. 4 rebar 12’ long8RAFTERS2x6 x 12’ spf (spruce, pine or fir)42x6 x 10’ spf202x8 x 3’ ridge (cut to fit)5-1/4” cement siding(12-ft. lengths)60TRIM (CORNERS, WINDOWSAND DOORS, GABLES)5/4x 6 x12’ Miratec8WINDOWS412’ x 4’ windows(casement or double-hung,20”x25” plastic barn sashfor gable window—see Buyer’s Guide)2x4 x 8’ spf (or precut)5531x4 x10’ gable windowframe material12x4 x 12’ treated2x6 x 14’ spf (headers)21-3/4” x 9-1/2” x 10’LVL beams22x4 x 10’ (plates)22x4 x 12’ (plates and braces)9WALLS, BEAMS, AND PLATESWALL AND ROOF SHEATHING1/2-in. CDX plywood20BRACKETS AND GABLEDORMER RAFTERS2x4 x 8’ spf6DOORS32” pre-hung wood exterior door1(order 2 in. shorter)8’ x 7’ wood overhead door11x6 x 8’ door jamb material3pine shims2 pkgs.HARDWARE16d sinker nails10 lbs.8d sinker nails5 lbs.10d common nails10 lbs.7d galv. common nails5 lbs.ROOFING10d galv. casing nails5 lbs.4-1/2 squares of shinglesA23 Simpson steel angles382Simpson Strong-Drive screws4 pkgs.Metal roof drip edge6Simpson 18-in. steel straps101” roofing nails10 lbs.Door lockset and deadbolt11/2” staples1 box3” deck screws1 lb.Rolls of 15 lb. feltYour plywood sheathing shouldhang below your sole plate about3/8 in. to give a good seal aroundthe foundation. To ensure thisaround the whole perimeter, measure the distance from the bottomof the rafter to the bottom of thesole plate along each wall. Add 3/8in. to this measurement and cutyour plywood to this length. Startwith a sheet of plywood in the middle of each wall and work your wayout to the corners. Nail the plywood sheathing every 6 in. to thestuds and plates. Be sure to nail the18-in. steel straps (Fig. A) to theheader and the support wallsbeneath. The extra support fromthese straps helps strengthen thesenarrow header support walls andkeep them from racking in highwinds. When sheathing the frontwall, start at the corners with a full4-ft. wide piece and then cut out thedoor opening. Nail the plywoodevery 4 in. along the support wallsand into the header.When you’ve got all the wallsheathing installed, remove thebraces.Order yourwindowsand doorsin advanceSeveral weeks before the projectstarted, I ordered double-hungwindows for each side of the shed.The windows were delayed, but tokeep the project moving, we substituted casement windows that we
LDING FELTUNDER WINDOWS15STAPLE 15-lb. roofing felt to the walls and install your windowsand your prehung door. Order your door 2 in. shorter than standard to clear the brace hardware of the overhead front door. If youorder a standard-size service door, relocate it toward the back of the shed toavoid this step.purchased right off the shelf. Thesestock windows fit the rough openings with only one simple modification. We added a stud to the centerof each opening. The substitutewindows did not have divided lightslike the double-hung windows, sowe purchased window grids to givea similar look. Our windows costnearly 200 each, so keep in mindthat you can keep the costs down bylooking for windows at an outletcenter or by installing used windows.Oops! We found out the hard waythat the service door would conflictwith the overhead door. We calculated the height of the overheaddoor and the track but forgot toinclude the large steel door brace onthe overhead door. When the doorwas in the raised position, the corner of the service door hit the brace.To fix the problem, we had to cutdown the service door to fit. Youcan order a shorter door or simplyremove the threshold and cut thedoor and jamb down 2 in.Install building felt around therough opening, then shim and nailyour doors and windows, makingsure they’re plumb and level. Also,follow your manufacturer’s suggestions.ADD BLOCK HERE1-1/2” x 6-1/2” BLOCK16RIP 2x8 pieces to about 6-1/2 in. wide (cut yours to fit) and tapthem into the spaces between the rafter tails. These blocks willkeep out the birds and bugs. Nail them to the top plate with 10dgalvanized casing nails.Rip your trimto size witha table sawInstall 15-lb. felt over the sheathingand around the windows and doors.We used 1-in. thick Miratec trim(see Buyer’s Guide, p. 66) becauseit’s tough, durable and preprimed.It’s a composite exterior fiberboardthat is weather- and crack-resistantand holds paint very well. Rip apiece 2 in. wide for a windowsill
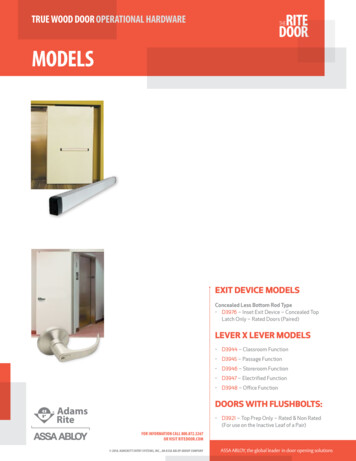
StorageShed3-1/2”DOOR TRIMSILL2-3/16” CORNERTRIM PIECE3-3/16”CORNERTRIM PIECE17CUT corner and window trim from 5/4 composite trim or cedar(see Fig. D). We used Miratec because it’s durable, comespreprimed and has nice square edges. The 1-in. thickness is deepenough to cover the edges of the siding. Rip the 5-1/2 in. wide trim boards foreach lower corner to 3-3/16 in. and use the remaining 2-3/16 in. piece for theother side of the corner.below each pair of windows. Cut thehead and side trim pieces for thewindows and nail them in placewith 10d galvanized casing nails.Rip the corner pieces from widerstock and install them as shown inPhoto 17. Nail on the thinner piecefor the corner first, making sure it’sflush with the sheathing. Next, nailthe wider piece and sand the sharpedges to complete the corners.Make your garage door jambsfrom 1x6 pine. Rip the pine to 5-1/4in. and nail it around the door’srough opening (Fig. D, detail 5).Nail the jambs to the 2x4 framing.Next, cut 2x4s and nail them flatagainst the framing and tight to thedoor jambs. This extra bit of framing around the door supports thegarage door track hardware. To finish the opening, rip 3-1/2-in. trimpieces and nail them to the sheathing and the jambs, leaving a 1/4 in.reveal along the jambs.Fiber cementsiding andbracketscompletethe detailsANGLEDSILLNAILHERE3-1/2”TRIM1-7/8” TRIMAPPLIEDAROUND BRICKMOLDINGSTORY POLEDIAMONDMASONRYBLADE18CEMENTSIDINGMARK the locations of your siding courses with a story pole toensure accuracy and to save you the trouble of leveling eachpiece of siding. We used cement siding called Hardiplank. It cutsnicely with a diamond blade in your circular saw. If you have an old sawyou’re not attached to, use it—the abrasive dust from this stuff is hard on sawbearings.To seal off the area between therafters, rip and nail blocks betweenthem as shown in Photo 16. Next,make a story pole (Photo18) out ofsome scrap wood and draw linesexactly 4 in. apart. Use this scrap formarking the corner boards and thewindow trim to ensure uniformcourses around the shed. To use thestory pole, just align the bottomedge of it with the bottom of thecorner board trim, tack it next tothe trim and transfer the marks.To get the bottom course of siding to bevel, rip a 5/16-in. piece of
StorageShed19PLACE the siding to your marks and nail it though the sheath-ing into your wall studs with 7d galvanized box nails. Poundthe nails flush. Cement siding is nailed within the top 1 in. ofeach course (except for 10-in. or wider widths) so the next piece will hidethe nails of the previous course. If a stud is not available within 6 in. of thepiece, nail the end to your 1/2-in. plywood sheathing.GABLEOVERHANGBRACKET3” DECKSCREWSBARN-SASHWINDOW205-1/2” WIDECORNER TRIMMARK the location of the gable-overhang brackets so they fittightly into the notches of the fly rafters. Screw the bracketsinto the corner trim and the fly rafters with 3-in. deck screws.
StorageShedwood from a 3/4-in. thick boardfor each side. Nail these piecesabout 1/4 in. from the bottom tobevel the first course of siding.Cut the siding (Photo 18) so youleave a gap of about 1/8 in. at thecorner boards to allow for expansion and contraction.When you get to the top courseof the siding, you’ll have to rip itto width. You'll also need toinstall a backer piece similar tothe piece at the bottom to prevent the top piece from having apronounced lean along the topedge. Notch this top piece slightly to fit around the rafters.Prime all bare spots (the sidingcomes preprimed from the factory) and then caulk any gaps alongthe trim with a urethane caulk.Finish the job with two coats ofdurable satin latex exterior paint.You can purchase and hangyour own overhea
ple-to-apply asphalt shingles. All this storage space is easy to access through an 8-ft. wide overhead door that rolls up out of the way. We chose an expensive wood overhead door ( 1,500 installed) with lots of style, but you can choose from a wide variety of less-expensive door