Transcription
Manual and Recipe BookTM1
Table of ContentsImportant Safeguards.5Component Overview.6Component Overview – Diagram.9Operating Instructions. 10Cleaning Instructions. 11Mixer Recipes. 11Blender Recipes. 16Troubleshooting. 18Warranty. 18Notes. 19 2009 Blendtec All Rights Reserved.
Important Information and Safeguardsway, return the unit to a Blendtec service agentimmediately for examination, repair, electrical ormechanical adjustment, or possible replacement.PLEASE READ ALL INSTRUCTIONS CAREFULLYBEFORE USING YOUR Mix n Blend II 6. NEVER PUT NON-FOOD ITEMS INTO BLENDERJAR OR MIXING BOWLMetal utensils, rocks, and glass are dangerous ifplaced in jar or bowl. Damage caused by suchforeign objects will void the warranty. Keep handsand utensils out of the blender jar or mixing bowlwhile in use to reduce the risk of severe injury topersons or damage to the machine. Utensils mayonly be used when the machine is not running.1. SAFETY CERTIFICATIONThis machine is certified by ETL (Report No.3018204-4, 3018204-2 & 3018204-3).It also complies with UL standard 982 4th ed.11-29-2001, and to CSA standard C22.2 No. 195-m1987, Nov. 1990, R 1994.2. CERTIFICATIONThe Mix n Blend II and its accessories arecertified by NSF International (NSF) underBlendtec in the NSF Official Listing.7. NEVER OPERATE THE BLENDER WITHOUTTHE LID IN PLACE8. NEVER OPERATE THE BLENDER USINGATTACHMENTS NOT SOLD BY BLENDTECThe use of any unauthorized attachments maycause fire, electric shock, and/or injury and willvoid the warranty.3. AVOID CONTACT WITH MOVING PARTS Keep fingers, hands, hair, and clothing away fromall moving parts. Keep all utensils away from the drive socket,blender jar blades, and whisks during operation.Metal utensils may cause damage. NEVER put hands into the blender jar or addsubstances by hand when the blender jar is on themotor base. NEVER touch the blade with your fingers whetherit is on or off the motor base. NEVER place jar into drive socket if blender motoris operating. DO NOT rock the blender jar during operation.9. CONTAINER MUST BE PROPERLY IN PLACEWHILE APPLIANCE IS OPERATING10. BLADES ARE SHARP! HANDLE CAREFULLY!11. WHEN BLENDING HOT LIQUIDS, THE VENTEDLID WILL ALLOW PRESSURE RELIEF. BECAREFUL NOT TO COME IN CONTACT WITHANY STEAM COMING FROM THE CLEARCENTER LID.4. KEEP THE MACHINE AWAY FROM AND OUTOF ANY WATER OR LIQUIDTo protect against the risk of electrical shock donot put the Mix n Blend II power unit in wateror other liquid. Do not use the machine outdoorswhere it is subject to precipitation.12. POWER CORD PRECAUTIONS NEVER operate with a damaged cord or plug. Ifthe electrical cord is damaged it must be replacedby the manufacturer or authorized service agentto avoid a hazard. DO NOT permit the cord to hang over the edge ofthe work surface. NEVER use an extension cord with the machine. UNPLUG the machine when not in use or while5. NEVER OPERATE THE MACHINE IF ITAPPEARS DAMAGEDIf the machine malfunctions call your serviceagent first. If it is dropped or damaged in any5
cleaning. Remove beaters from mixer beforewashing.SAVE THIS INSTRUCTIONMANUAL FOR FUTURE REFERENCE13. NEVER ATTEMPT TO REPAIR THE POWERUNIT. NEVER REMOVE THE MOTOR COVER. THEMOTOR DOES NOT CONTAIN SELF-ADJUSTABLEOR SERVICEABLE PARTS. A QUALIFIEDSERVICE AGENT MUST MAKE ALL SERVICEADJUSTMENTS. REMOVING THE COVER ORATTEMPTING TO SERVICE THE UNIT WILL VOIDTHE WARRANTY.Component Overview1. POWER UNITThis is the main part of the mixer that includesthe electrical controls, the motor assembly,drive gears, and the control panel. Each unit hasbeen factory tested to ensure that all internalcomponents are in proper working order. Thecover must not be removed. There are noadjustments that can be made and no serviceableparts within the power unit. All service must beperformed by the Blendtec factory or authorizedservice representatives. Removing the cover mayresult in damage to the machine and will void thewarranty.14. TURN THE POWER SWITCH OFF WHEN NOTIN USEThe power switch (ON/OFF switch) is located atthe front right corner, at the bottom edge of themachine.15. AVOID TOUCHING THE BLENDER DRIVESOCKET AFTER EXTENSIVE USEThe blender drive socket may become hot afternumerous cycles.2. POWER SWITCHThe power switch is located on the lower rightcorner of the machine (below the control panel).Power can be immediately turned off using thisswitch.16. CLOSE SUPERVISION IS NECESSARY WHENTHIS APPLIANCE IS USED BY OR NEARCHILDREN OR PERSONS WITH REDUCEDCAPABILITIES. Further, children and personswith reduced capabilities should not play with theappliance at any time.3. LOW SPEED DRIVEBecause of the great variety of options on theMix n Blend II , two drives are required. The lowSpeed drive is located on the lower left section ofthe machine and operates the mixing attachmentsinside the mixing bowl.17. THE Mix n Blend II IS INTENDED FOR HOMEUSE ONLY! ANY USE OF THE MACHINEFOR COMMERCIAL PURPOSES VOIDS ALLWARRANTIES.4. HIGH SPEED DRIVEThe high speed drive is located on the upper rightside of the mixer and is used to drive the blender.18. ALL REMOVABLE PARTS ARE DISHWASHERSAFE ON TOP RACK ONLY. DISHWASHERTEMPERATURE SHOULD NOT EXCEED 220 FAHRENHEIT.5. CONTROL PANELThe control panel is used to control all functionsof the Mix n Blend II . The chart below gives abrief overview of the button functions:These precautions are intended to help preventpersonal injury and/or damage to the machine.6
BUTTONFUNCTIONJarAccesses the Blender MenuBowlAccesses the Mixer MenuAuto-KneadStarts Auto-Knead cycleSpeedManually adjust speed settingTimeManually adjust length ofcycleUp/Down ArrowsScrolls through cycle menus,adjusts speed and timesettingsPulsePulses at maximum speedwhile button is pressedStart/StopStarts and stops cycles and/ormanual operations7. BOWLThe bowl is also used in all mixing operations.Rinsing your bowl with a vinegar or baking sodasolution will remove oils from the surface. Avoidusing sharp metal utensils or scouring padsas they could scratch or damage your bowl.To attach the bowl to the power unit, turn itcounterclockwise. To release the bowl, turn itclockwise.8. BOWL LIDThe bowl lid should be placed on the mixerwhen kneading large batches of dough. The lidhelps keep the dough mass down so that properkneading will occur. The lid opening can beused for adding ingredients or final amounts offlour to a dough mixture. Using the lid wheneveroperating the mixer will avoid spills or overflowof ingredients. To attach the lid to the bowl, turnit counterclockwise. To release the lid, turn itclockwise.More on the functionality of the control panel canbe found in the Operating Instructions.6. DRIVE SHAFTThe drive shaft is used in all mixing operations.The shaft fits into the low speed drive. To protectthe motor and gear assemblies, the drive shaft hasbeen designed to be the weakest link as poweris transferred from the motor to the dough hookor whisk assembly. This built-in, fail-safe designwill prevent serious gear or motor damage fromoccurring in the event that rotation of the doughhook or whisks becomes excessively difficult.Always adjust all non Mix n Blend II breadrecipes by using at least 15% less flour. Mostrecipes call for “excess” flour to accommodatekneading by hand.9. KNEADING ARMThe kneading arm provides a stationary barrierwhich pulls and folds the dough as the doughhook turns past the kneading arm. The kneadingarm is only used in conjunction with the doughhook.10. DOUGH HOOKThe dough hook is made of surgical stainless steelfor long life without tarnishing. DO NOT PLACETHE DOUGH HOOK ON THE DRIVE SHAFTUNLESS THE BOWL IS IN PLACE.The drive shaft is designed to break so as toprotect the motor and gear assembly if too muchflour is added. Foreign objects, such as spoons,measuring cups, etc., placed or dropped into thebowl can also break the drive shaft. The driveshaft is not included in the warranty.11. MEDIUM WHISK ASSEMBLYMedium whisks are single wire whisks used forthicker batters, heavier frosting, and cookie dough.If the dough cannot be stirred with a spoon, or ifit contains ingredients such as nuts or chocolatechips, then the dough hook and kneading armshould be used.7
french whisks are used for meringue, light frosting,whipped cream, pourable batters, and mashedpotatoes (potatoes must be thoroughly cooked).12. FRENCH WHISK ASSEMBLYFrench whisks are used for meringues, whippingcream, mashing potatoes, light frosting, andpourable batters. DO NOT USE WITH STIFFBATTERS OR COOKIE DOUGH.NOTE: Using the french whisks for cookieswill cause the whisk gear to fail and will voidthe warranty on that attachment.13. ACCESSORY RELEASE BUTTONAttachments can be released from the mixer bydepressing the release button found under thefront left corner.Medium whisks are used for denser dough, suchas cookies. Medium whisks are designed with asingle loop that lets dough through more easily.14. BLENDER JARThe blender jar has a total capacity of nearly twoquarts and has markings for cups and ounces. Theblade is made from high quality stainless steel.The dough hook is used for heavy doughs and isalways used in conjunction with the kneading arm.To assemble, place kneading arm over center ofmixing bowl with the arm in the 9 o’clock position.Place dough hook on top and turn in a clockwisedirection until it engages with drive shaft. Makesure kneading arm is NOT directly under the lidopening.15. BLENDER JAR LIDThe lid for the blender jar must be in place anytime the blender is in operation. The blender lidcan be easily removed by grasping one of thecorners and lifting up to release it from the jar.When blending hot liquids, the vented lid will allowpressure relief. Be careful not to come in contactwith any steam coming from the clear center lid.4. Plug unit into outlet and turn on power switch.Mixer AssemblyFor smooth operation and successful foodpreparation, please read and become familiar withthese instructions.1. Insert the drive shaft into the mixer base.2. Place the bowl over the drive shaft and turn thebowl counterclockwise.3. Add the appropriate accessory to the top of thedrive shaft following these precautions:8
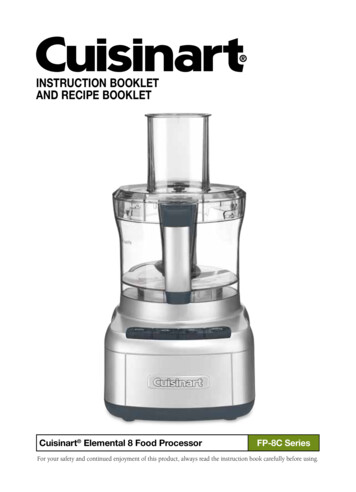
Component Overview - Diagram1281571114610451391329
Operating InstructionsAs you begin to use your Mix n Blend II , you willquickly learn that its power and double whisk actionwill make quick work out of any mixing job. Do notover-mix your batter. Begin on Speed 3 to blendingredients in the order specified by your favoriterecipe. Increase speed as needed.One of the unique features of Mix n Blend II is itscomputer controlled “cycles” allowing food and drinkto be prepared automatically. The following blenderand mixer cycles are preprogrammed into Mix n BlendII :MANUAL OPERATIONSWhen you first turn on the machine, the default modeis manual operation. CAUTION: Keep hands clearof mixer and blender base. Pressing the UP key atthis time will start the machine at Speed 1 and will runfor 5 minutes. Manual mode can be accessed at anytime by pressing the SPEED or TIME buttons.By pressing either the SPEED and/or TIME buttonswhile the machine is in operation, the speed and timecan be adjusted by pressing the Up or Down arrows. Ifthe mixer is inactive, the speed and time can also beadjusted in the same manner. (Press the START/STOPbutton to start with these settings.)NOTE: The speed can only be adjusted while thearrows are flashing around “Speed X”. The time canonly be adjusted while the arrows are flashing aroundthe time.MIXER OPERATION - AUTOMATICCYCLE NAMECYCLE TIMEBreadSee “Auto Knead” function belowWhip1 minute 30 secondsCake2 minutes 30 secondsCYCLE NAMECYCLE TIMERegularCookie50 secondsDouble Cookie1 minute 20 secondsTo access the Mixer cycles, press the Bowl button.Again use the Up/Down buttons to scroll through thecycles in the Mixer Menu. Press START/STOP to startthe cycle.AUTO KNEAD FUNCTIONThis feature is unique to Blendtec. First, press theBowl button. The first mixer cycle to appear is theBread cycle. After placing the first set of ingredientsinto the mixing bowl, begin the Bread cycle bypressing the START/STOP button. The Mix n Blend II begins the initial mixing of flour, yeast, water, etc.Add the remaining flour until the dough clings to thedough hooks and pulls away from the sides of thebowl. This initial mixing period should take between 3and 4 minutes.IMPORTANT! Stop machine when dough pullsaway from sides of bowl. Do not knead past thispoint. Due to the varying moisture content of theflour, the exact amount of flour needed will vary withevery batch of bread made. For excellent, consistentbread, keep the initial m
Blendtec in the NSF Official Listing. 3. AVOID CONTACT WITH MOVING PARTS Keep fingers, hands, hair, and clothing away from all moving parts. Keep all utensils away from the drive socket, blender jar blades, and whisks during operation. Metal utensils may cause damage. NEVER put hands into the blender jar or add