Transcription
HAL LEONARDDRUMSET METHOD 1BY KENNAN WYLIE WITH GREGG BISSONETTEINCLUDES AUDIO & VIDEO!CONTENTSINTRODUCTION .2LESSON 9: MORE GROOVES AND FILLS .38PARTS OF THE DRUMSET .3LESSON 10: MUSICAL FORM .40CARE OF THE DRUMS .7LESSON 11: 16TH NOTES.42GRIPS AND STROKES .8LESSON 12: NEW RHYTHMS .46LESSON 1: GETTING STARTED .12LESSON 13: 16TH-NOTE FILLS.48LESSON 2: MUSIC READING BASICS.15LESSON 14: TRIPLETS .50LESSON 3: COORDINATION .18LESSON 15: JAZZ DRUMMING .53LESSON 4: 8TH NOTES .22LESSON 16: THE SHUFFLE .55LESSON 5: PLAYING THE TOMS .25LESSON 17: NEW METERS .58LESSON 6: TIES AND RESTS.29ENCORE #1.60LESSON 7: NEW STROKES .32ENCORE #2 .61LESSON 8: DRUM FILLS.35GLOSSARY.62To access audio, video, and extra content visit:www.halleonard.com/mylibraryISBN 978-1-4950-8332-7Copyright 2017 by HAL LEONARD LLCInternational Copyright Secured All Rights ReservedNo part of this publication may be reproduced in any form or by any means without the prior written permission of the Publisher.In Australia Contact:Hal Leonard Australia Pty. Ltd.4 Lentara CourtCheltenham, Victoria, 3192 AustraliaEmail: ausadmin@halleonard.com.auVisit Hal Leonard Online atwww.halleonard.com
INTRODUCTIONThis book is designed to help the beginning drummer develop hand and foot technique, read music, play basic rock beatsand fills, develop coordination and independence, play basic jazz patterns, and much more. Basic drumming exercises areincluded, as well as audio demonstration and play-along tracks, plus video lessons.ABOUT THE AUDIO AND VIDEOTo access the audio and video files that accompany this book, simply visit www.halleonard.com/mylibrary and enter thecode found on page 1. From here you can download or stream all of the audio and video files.Each main exercise and song in this book includes two audio tracks:1. A demonstration track that includes the notated drum part so you can hear how the example issupposed to sound.2. A play-along track of the same example without the drums, so you can practice it along with thebacking instruments.The audio tracks for each exercise continue on a loop for approximately three minutes so you have plenty of time tolisten or play along. When there are multiple lines within one exercise, the band will continue playing through them withoutany breaks.Video lessons are also included, featuring drum master Gregg Bissonette! Gregg will demonstrate introductory concepts,song examples, and techniques throughout the book.Examples including audio and/or video are marked with icons throughout:ABOUT THE DOWNLOADABLE PDFIn addition to the audio and video, you also have access to even more content: a downloadable PDF containing further drumexercises for study and practice. You can download the PDF using the same access code and website mentioned above.HOW TO PRACTICE1. Go Slowly: Learn new beats and stickings at a slow tempo.2. Use a Metronome: Always use a metronome to reinforce good time-keeping.3. Be Repetitive: Each line should be repeated up to 10 times, at a minimum, to develop muscle memory.4. Stay Relaxed: Avoid tension in the grip, the feet, and the body.5. Record Yourself: Record yourself playing and self-evaluate what you hear.2Hw
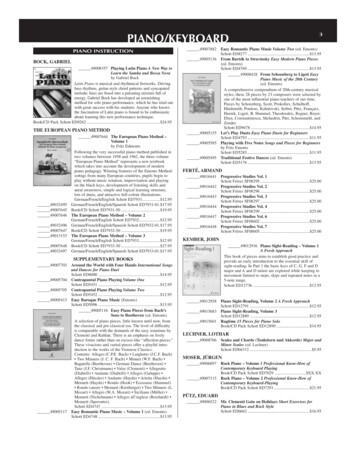
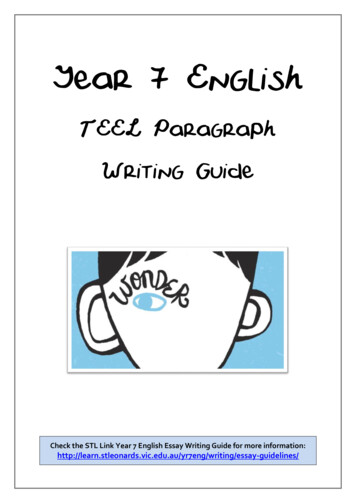
SETTING UP YOUR DRUMSETThe drumset is a very personalized instrument to arrange. What works for one drummer may not exactly work for the nextdrummer. The bigger the drumset does not mean the better the drummer. The most important thing to remember is to usethe right equipment for the style of music you are playing. However, there are some common approaches that all drummersshare when arranging their drumset.Throne (Stool)Proper positioning of the drum throne can have a great effecton the drummer’s balance, as well as foot technique. Both theheight and distance from the drums can impact the drummer’s performance. Some players sit with their legs almostparallel to the floor while others keep their legs slightly aboveparallel to the floor with the heels just below the knees. Yourfeet should feel comfortable on the pedals. The drummershould experiment until maximum relaxation and efficiencyis achieved. Avoid using chairs or stools that do not adjust.Snare DrumThe snare drum should be positioned in a way that does not interferewith the proper alignment of the forearms and hands. Matched gripplayers (see “Grips and Strokes” on page 8) usually keep the snaredrum flat, while traditional grip players might use a slight downwardtilt. The snare drum should stay a few inches above knee level.Bass Drum/Hi-HatAfter the snare drum is set up between your legs, thebass drum and hi-hat pedals can be placed on thefloor. The bass drum should be positioned just below,or in front of, your knee. The hi-hat pedal should bewithin easy reach of your hi-hat playing foot (typicallythe left foot). Once a relaxed position has been setwith the feet over the pedals, you can now slide thebass drum in to fit your setup. Some drummers maychoose to start with the foot pedals and bass drumfirst, adding the snare after. The primary goal is to setthings up consistently for a relaxed playing position.4
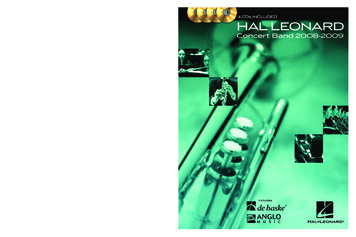
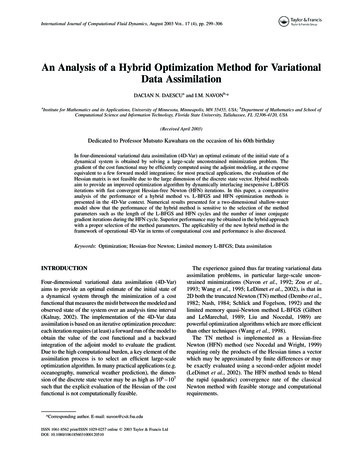
GRIPS AND STROKESMATCHED GRIPOf the two main grips, matched grip is the more basic. The right and left hand should look and move identically. Place the stick in between the thumb and index finger, about four to five inches from the butt end of thestick. The pivot point between the index finger and the thumb is referred to as the fulcrum (left photo below).Another option is to have the fulcrum between the middle finger and thumb (right photo below) for more of aloose feel. This very important part of the grip is responsible for control. It needs to be quite secure. Try marking this point with a piece of tape or a felt pen. Keep the thumbs on the side of the stick. Keep the tip of the index fingers curved slightly around the stick and not pointed. This will help control. Keep the back fingers resting gently on the stick. Avoid hanging them in the air. Also avoid grasping the stick tootightly with the fingers. The stick will not be able to move freely when it needs to (especially when rebounding). Where you grip as well as how you grip the stick can affect the tone production. Squeezing the stick can“choke” the sound. On the other hand, gripping too loosely can cause control problems.8
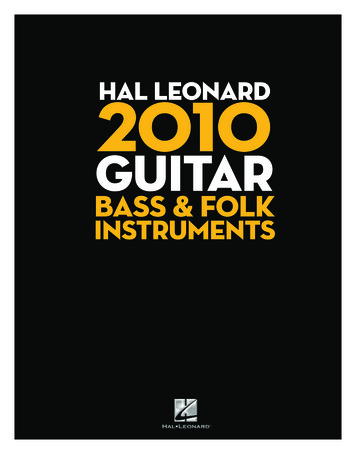
BASS DRUM TECHNIQUEThe bass drum is commonly referred to as the kick drum. It is struck with a bass drum pedal that is played with the foot.The bass drum beater is usually made of hard felt or wood. The spring tension should be set so the beater does not contactthe head when the foot is resting on the pedal. The tighter the tension, the faster and stronger the rebound will be from thepedal. Heel down and heel up are the two basic methods for playing the kick:Heel DownThis technique is usually for more low-end volume. The heel is downwith the foot flat on the pedal. The foot returns immediately to the“up” position.Heel UpThis technique is used for more high-end volume and can give morepower. Simply lift the heel up and use just the ball of the foot to pressthe pedal. The foot returns immediately to the “up” position. This isuseful for playing multiple strokes on the bass drum.Open ToneAn open tone is created when the beater is allowed to rebound off thebass drumhead. This produces more of a resonant bass drum sound.Closed ToneA closed tone is created when the beater sticks (or is “buried”) intothe bass drumhead. This produces more of a punchy and dry bassdrum sound.Open and closed tone sounds are utilized by most drummers from time to time. The tuning of your drum and style of musicyou are playing may also help determine what type of sound is needed.13
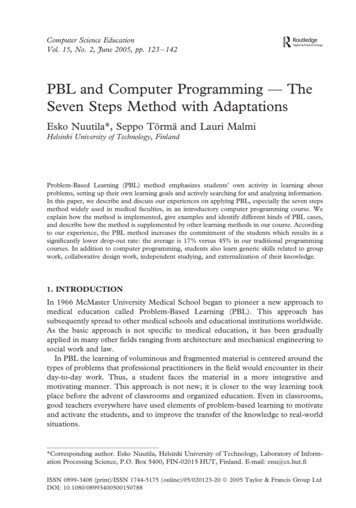
LESSON 2: MUSIC READING BASICSQUICK TIP –Counting aloud is one of the best ways for a drummer to learn how tointernalize tempo and rhythm. If you can’t say it, you can’t play it!First, let’s look at some basic musical terms:Staff/4321Percussion ClefStaff – Made up of 5 lines and 4 spaces, counted from the bottom to the top54321Percussion Clef – Denotes music of indefinite pitchBar Lines – Divide the staff into measuresMeasures (or bars) – The space between bar linesDouble Bar Lines – Mark the end of a sectionDoubleBar LineBar LineMeasureí Measure îRepeat Signs – Repeat everything in between the dotsFor drumset playing, each line and each space on the staff represents a different drum or cymbal. Using the staff below,see if you can find the different parts of the ntedTomLowœOpenHi-HatClosedHi-Hat ¿FloorTomœBassDrumœRideCymbalBell3Hi-Hatwith Foot¿15
This book is designed to help the beginning drummer develop hand and foot technique, read music, play basic rock beats and fills, develop coordination and independence, play basic jazz patterns, and much more. Basic drumming exercises are included, as well as audio demonstration and play-along tracks, plus video lessons. ABOUT THE AUDIO AND VIDEO To access the audio and video files that .