Transcription
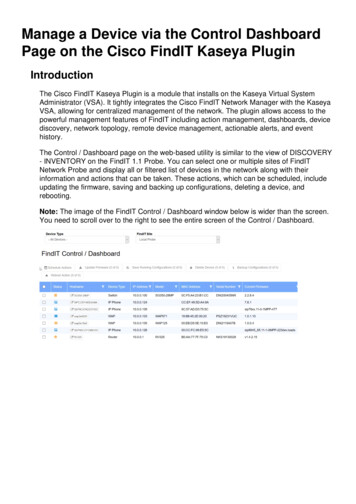
Manage a Device via the Control DashboardPage on the Cisco FindIT Kaseya PluginIntroductionThe Cisco FindIT Kaseya Plugin is a module that installs on the Kaseya Virtual SystemAdministrator (VSA). It tightly integrates the Cisco FindIT Network Manager with the KaseyaVSA, allowing for centralized management of the network. The plugin allows access to thepowerful management features of FindIT including action management, dashboards, devicediscovery, network topology, remote device management, actionable alerts, and eventhistory.The Control / Dashboard page on the web-based utility is similar to the view of DISCOVERY- INVENTORY on the FindIT 1.1 Probe. You can select one or multiple sites of FindITNetwork Probe and display all or filtered list of devices in the network along with theirinformation and actions that can be taken. These actions, which can be scheduled, includeupdating the firmware, saving and backing up configurations, deleting a device, andrebooting.Note: The image of the FindIT Control / Dashboard window below is wider than the screen.You need to scroll over to the right to see the entire screen of the Control / Dashboard.
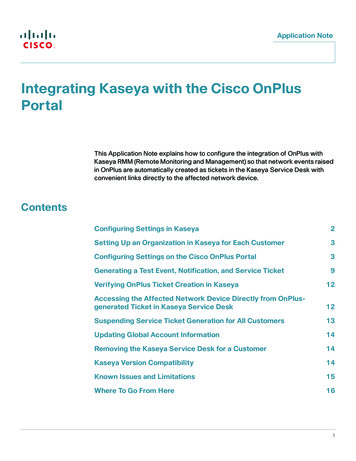
In this scenario, the web-based utility of a specific device on the network needs to beaccessed as well as the probe site where the device is associated.ObjectiveThis article aims to show you how to manage a device via the Control / Dashboard page onthe Cisco FindIT Kaseya Plugin.Applicable Devices Cisco FindIT Network ManagerCisco FindIT Network ProbeSoftware Version 1.1Manage a Device via the Control / Dashboard PageStep 1. Launch a web browser and enter the IP address of your Kaseya VSA server on theaddress bar and then click Enter.Note: In this example, the IP address used is 10.10.0.1Step 2. Enter your Kaseya account login credentials in the Username and Password fieldsprovided, and then click SIGN IN.
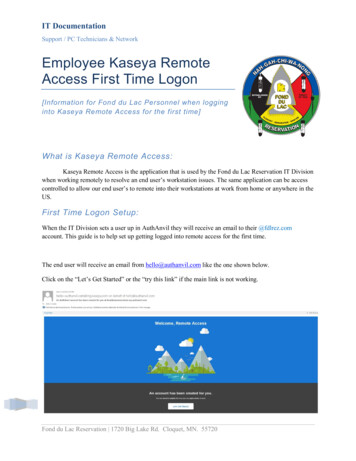
Note: In this example, kaseya is used as the Username.Step 3. Choose Cisco Main Control / Dashboard on the navigation pane.
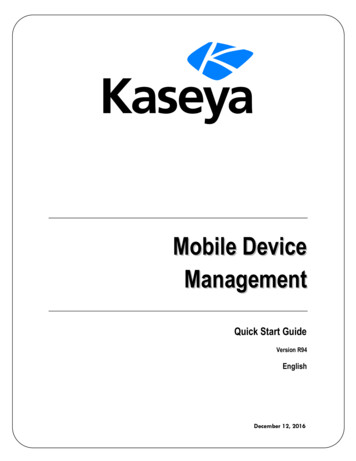
Step 4. Click on the device type dropdown menu to filter the list of devices to the type ofdevice you want to manage.Note: In this example, Switch is chosen. This will filter the table view and only show all theswitch devices in the network. In this table, all the information about the switch will bedisplayed such as its current status in the network, hostname, device type, IP address, exact
model number, MAC address, Serial number, current firmware version, available firmwareversion if there is any, the FindIT network site where it belongs, and the actions that can betaken for the specific device.Step 5. (Optional) Click on the FindIT site drop-down menu to filter devices in a specificFindIT site.Note: In this example, the FindIT site named Local Probe is chosen.Step 6. Check the check box before the device that you selected. You will then be able to doactions for the selected device such as accessing its web-based utility or the FindIT Probesite it belongs to. You can also update the firmware, save and back up configurations,delete, or reboot the device.Note: In this example, SG350-28MP is checked.Step 7. Click on the Hostname of the switch you have chosen to access its web-based utility.You will then be redirected to the login page of the web-based utility of the switch.
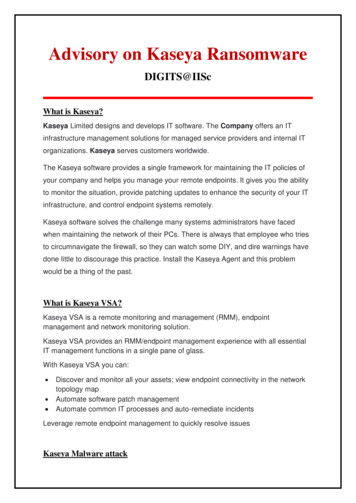
Step 8. To access the probe that is managing the switch, go back to the Kaseya UI and clickon the probe under Network.Note: In this example, the device is under Local Probe.You will then be taken to the web-based utility of the probe itself.You now have successfully managed a device on the network by accessing its web-based
utility and FindIT Probe site via the Control / Dashboard page.
Step 8. To access the probe that is managing the switch, go back to the Kaseya UI and click on the probe under Network. Note: In this example, the device is under Local Probe. You will then be taken to the web-based utility of the probe itself. You now have successfully managed a device on the network by accessing its web-based