Transcription
Application NoteIntegrating Kaseya with the Cisco OnPlusPortalThis Application Note explains how to configure the integration of OnPlus withKaseya RMM (Remote Monitoring and Management) so that network events raisedin OnPlus are automatically created as tickets in the Kaseya Service Desk withconvenient links directly to the affected network device.ContentsConfiguring Settings in Kaseya2Setting Up an Organization in Kaseya for Each Customer3Configuring Settings on the Cisco OnPlus Portal3Generating a Test Event, Notification, and Service Ticket9Verifying OnPlus Ticket Creation in Kaseya12Accessing the Affected Network Device Directly from OnPlusgenerated Ticket in Kaseya Service Desk12Suspending Service Ticket Generation for All Customers13Updating Global Account Information14Removing the Kaseya Service Desk for a Customer14Kaseya Version Compatibility14Known Issues and Limitations15Where To Go From Here161
Application NoteConfiguring Settings in KaseyaFollow the procedures in this section to configure settings within Kaseya to enableintegration with the Cisco OnPlus portal for service ticketing: Setting up Kaseya for Users Accessing Kaseya Installed on the CiscoOnPlus Server, page 2 Setting up Kaseya for Users with Kaseya Installed on a Local Server,page 3Setting up Kaseya for Users Accessing Kaseya Installed onthe Cisco OnPlus ServerTo enable the Kaseya Service Desk using Cisco OnPlus with Kaseya installed onthe OnPlus server, follow these steps:STEP 1 Log on to Kaseya.STEP 2 From the Kaseya Essentials page, click the down arrow on the green bar on the leftside of the screen.STEP 3 Click Kaseya Portal.STEP 4 From the Kaseya Portal, select Support and click My Tickets.STEP 5 Click the (plus sign) at the top left side of the page.STEP 6 On the New Ticket window, enter the following information: Summary - Enable API Description - Please enable web API for integration with Cisco OnPlusSTEP 7 Click Save.Kaseya will send an email containing a New Ticket notification when the request toenable the API is received. Another email notification will be sent when the API hasbeen enabled.NOTE Kaseya will set up a default Service Desk that is namedCustomer SD Basic. All tickets will appear in this service desk. You can configureadditional service desks by accessing Service Desk Desk Configuration.2Integrating Kaseya with the Cisco OnPlus Portal
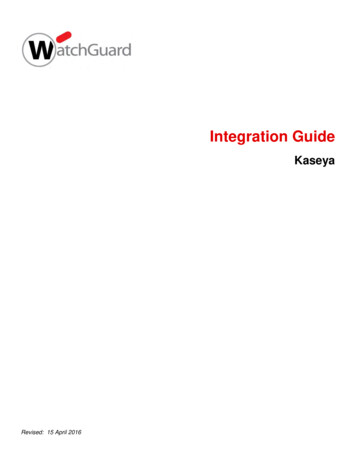
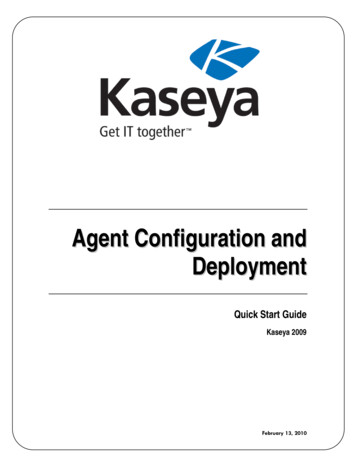
Application NoteSetting up Kaseya for Users with Kaseya Installed on a LocalServerSTEP 1 Log on to Kaseya.STEP 2 From the Kaseya Essentials page, click the down arrow on the green bar on the leftside of the screen.STEP 3 Click System.STEP 4 Check the Enable VSA API Web Service checkbox.Setting Up an Organization in Kaseya for Each CustomerTo be able to create Kaseya ticket requests automatically from the OnPlus Portal,you must set up an Organization ID and Organization Name in Kaseya for each ofyour customers on the Cisco OnPlus Portal for which you want to enable thisfeature.NOTE For customers that installed Kaseya prior to release 7.3, tickets will continue to begenerated and displayed as they were before release 7.3 with no data in theOrganization Name and Organization ID fields. It is, however, stronglyrecommended that you set up an Organization ID and Organization Name for eachof your customers to take advantage of the organizational, lookup, display, andmanagement benefits offered with Kaseya Service Desk.For customers installing Kaseya for the first time, setting up Organizationinformation for each of your customers is mandatory. Refer to the Kaseyadocumentation for more information about this setting.To create an organization in Kaseya, go to System Orgs/Groups/Depts/Staff Manage and click New. To find existing organizations, refer to the list providedon the Manage page.Record the Organization ID for each customer, since you can enter it into theOrganization ID field on the portal or you can use the Lookup feature on the CiscoOnPlus Portal.A sample Kaseya screen, showing the location of the Organization ID field, isshown below.Integrating Kaseya with the Cisco OnPlus Portal3
Application NoteConfiguring Settings on the Cisco OnPlus PortalFollow the procedures in this section to configure settings on the Cisco OnPlusPortal to enable integration with Kaseya for service ticketing: Creating a Delivery Contact for Kaseya Ticketing, page 4 Adding and Configuring the Kaseya Service Desk App on the Portal,page 5 Creating Delivery Rules for Kaseya Service Desk App, page 8Creating a Delivery Contact for Kaseya TicketingBefore you add the Kaseya Service Desk, you must create a global deliverycontact to use specifically for Kaseya ticketing. Although you can use an existing contact, we recommend that you create acontact to use specifically for Kaseya ticketing.The Kaseya contact is a global contact that is used for all of your customersthat have the Kaseya Service Desk installed.4Integrating Kaseya with the Cisco OnPlus Portal
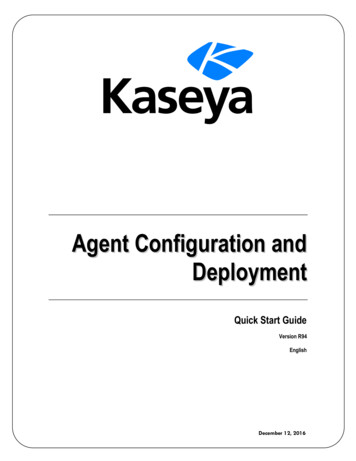
Application Note You should always create the global contact before you add the applicationand create notification delivery rules that use the contact. To create a new global delivery contact, navigate to the Partner AccountOverview page and choose Notification Delivery Contacts. Completethe requited field and click Save.IMPORTANT When creating a delivery contact for Kaseya, make sure thatthe Customer field in the Add Delivery Contact dialog is set to None to makeit a global contact.Adding and Configuring the Kaseya Service Desk App on thePortalTo add and configure Kaseya integration for a customer, follow these steps:STEP 1 For a Customer Account, from the Dashboard page on the portal, choose Apps.For a Partner Account, from the Overview page on the portal, choose a customerfor which you want to configure the Kaseya Service Desk, and choose Apps.STEP 2 Select All, locate Kaseya Service Desk, and click FREE.Integrating Kaseya with the Cisco OnPlus Portal5
Application NoteThe Add App dialog window appears.STEP 3 In the Global Account Information section, enter the following information:6Integrating Kaseya with the Cisco OnPlus Portal
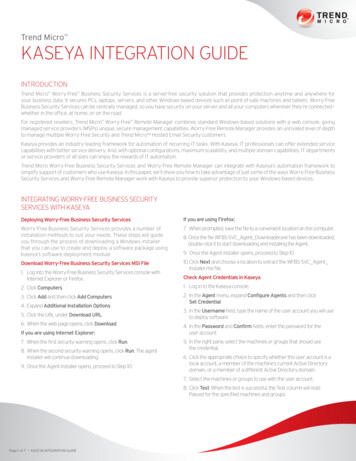
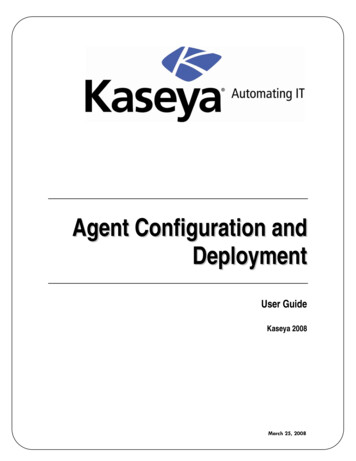
Application NoteNOTE If you have added the Kaseya Service Desk previously, check the MakeChanges checkbox to make the fields editable. Site URL: Kaseya Site URL (for example, test.kaseya.com). This URL isprovided by Kaseya. Username, Password: Kaseya username and password.These are the credentials you use when logging in to your Kaseya site. In the Associate with a Contact area, choose a contact to associate with theKaseya Service Desk on the portal.Once you have set the Global Account Information for one customer, it isused for all customers that have the Kaseya Service Desk enabled.STEP 4 In the Organization ID field, enter the Kaseya Organization ID that you configuredin Kaseya (System Orgs/Groups/Depts/Staff Manage) as shown below orclick Lookup to obtain the list of Organization Names. When an Organization Nameis selected, the associated Organization ID will display.STEP 5 Click Add.Integrating Kaseya with the Cisco OnPlus Portal7
Application NoteIf the application is added successfully, Kaseya appears on the list of Installedapplications.The Kaseya user credentials are linked to the contact you specified in the AddApp dialog. A Kaseya delivery method is added to the contact’s information so thatyou can enable or disable service ticket generation. When you first associate thecontact and add the application, it is enabled.Creating Delivery Rules for Kaseya Service Desk AppTo begin creating Kaseya Service Tickets remotely, you must create a notificationdelivery rule. The notification delivery rule lets you select specific OnPlus events,choose the severity level of OnPlus events that will generate a Kaseya serviceticket, and choose the configured Kaseya contact as the target for the deliveryrule.Make sure that you have set up device monitors so that events are generated forthe type of conditions that you want to use to create service tickets. By default,only the Cisco OnPlus Network Agent is monitored. For example, you may want tomonitor and create tickets for Device Offline events or events of a specific severitylevel.Follow these steps when creating notification rules for creating Kaseya servicetickets.STEP 1 Log in to the Cisco OnPlus Portal, and choose Notifications Delivery Rules.STEP 2 Click the Add Delivery Rule button.STEP 3 Choose a customer from the drop-down list.STEP 4 You can choose a severity level or specify the type of event that will trigger thecreation of a Kaseya service ticket.8Integrating Kaseya with the Cisco OnPlus Portal
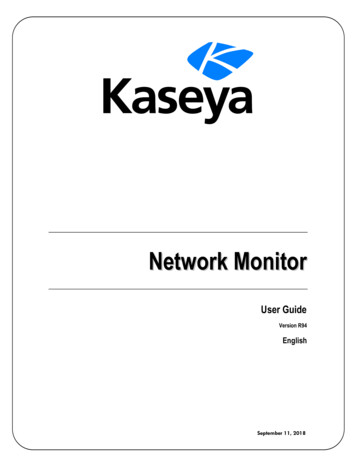
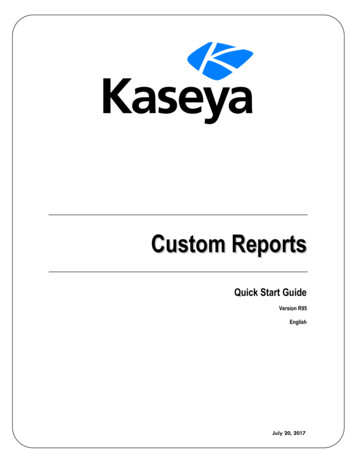
Application NoteSTEP 5 In the Contact field, choose the contract that is associated with the KaseyaService Desk. If you need to look up the Contact that is used for Kaseya, you canopen the Kaseya configuration details from the Apps page on the portal.STEP 6 Once you choose the Contact, select the Kaseya user from the Method drop-down menu. The Kaseya user is identified by the format “ username (Kaseya)” inthe list.The following example shows the Kaseya user being selected as the Methodwhen creating a delivery rule.If none of the Methods in the list display this information, it means that you selecteda contact that is not associated with the Kaseya user.STEP 7 Click Save.Generating a Test Event, Notification, and Service TicketFollow these steps to: Create an example delivery rule. Associate that rule with your Kaseya delivery contact and method Use the Test Monitor feature to generate an event that matches the criteriafor event notifications specified in the delivery rule. Verify that the event notification was sent to Kaseya.STEP 1 Log on to the Cisco OnPlus portal and choose Notifications Delivery Rules.STEP 2 Click the Add Delivery Rule button.STEP 3 For a Partner Account, from the Customer drop-down menu, choose All from theDrop-down list.Note: There is no customer drop-down list for a Customer Account.STEP 4 For the Severity level, choose Warning.Integrating Kaseya with the Cisco OnPlus Portal9
Application NoteSTEP 5 For the Contact, choose the Kaseya delivery contact.STEP 6 For the Method, choose the delivery method you defined for the Kaseya deliverycontact.STEP 7 Click Save.STEP 8 From the Overview menu, click on one of your Activated Online customers with theKaseya Service Desk installed.STEP 9 In the Topology view, locate the customer’s OnPlus Network Agent, and open theDevice Information window.STEP 10 In the Device Information window for the OnPlus Network Agent, click the Monitorstab.STEP 11 Click the Test Monitor icon to the right of the WAN Network performance monitor.STEP 12 Enable the Generate an event option.10Integrating Kaseya with the Cisco OnPlus Portal
Application NoteSTEP 13 Click Run. The test event will generate a notification because a Warning event isgenerated by the test (the default severity level of the WAN Network Monitorevent is Warning).STEP 14 After a few minutes, then go back to the Overview page and choose Notifications Delivery Rules.STEP 15 Locate the delivery rule you created for the Kaseya test. Check the Notifications Sent column to see if the count increased asexpected. Click on the number in the Notifications Sent column to view event details. Verify that the test event appears in the event list. Since it was justgenerated, it should be near the top of the list. If it is, then the notification wassent to Kaseya.Integrating Kaseya with the Cisco OnPlus Portal11
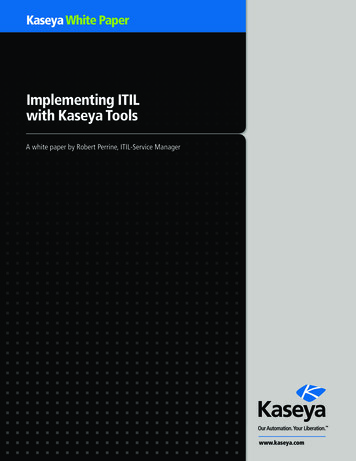
Application NoteVerifying OnPlus Ticket Creation in KaseyaIf the delivery rule and Kaseya information are configured correctly for thecustomer, when the event occurs and the ticket is successfully created, it appearson Kaseya under Service Desk.To verify that tickets are correctly associated with Organizations, go to ServiceDesk Operations Tickets. The Organization information is displayed in theOrganization column.To locate tickets that are listed by organization, go to Service Desk Operations Organization Tickets. Select the organization ID from the list at the top of thepage. Make sure you choose one that has associated tickets. The ticketsassociated with the ID you have selected will display on the lower portion of thepage, as shown in the illustrations below.Accessing the Affected Network Device Directly fromOnPlus-generated Ticket in Kaseya Service DeskWhen the OnPlus generated ticket is opened in Kaseya Service Desk, the user canview more information about the OnPlus network event. Information such as timeof the event, event message, hostname of the affected device, and more. The MACaddress shown in the ticket information provides a link to the affected device onthe Cisco OnPlus Portal. Double click the MAC Address, and if not logged in to theOnPlus portal, you will be prompted to log in to view the OnPlus Device Window.12Integrating Kaseya with the Cisco OnPlus Portal
Application NoteThe OnPlus Device Window provides the user with the ability to view informationabout the device, remotely connect to the device, update firmware, backup andrestore configurations, view and set monitors, view network events history andmore.Suspending Service Ticket Generation for All CustomersTo temporarily suspend generation of Kaseya service tickets through the portal forall customers, follow these steps:STEP 1 Log in to the Cisco OnPlus Portal, choose Notifications Delivery Contacts.STEP 2 Select the contact associated with Kaseya notification delivery.STEP 3 Click the Enable button associated with the Kaseya contact to toggle the settingto Disable.Since the Kaseya contact is a global contact for all customers with the applicationinstalled, this suspends Kaseya ticketing for all customers with the application.Integrating Kaseya with the Cisco OnPlus Portal13
Application NoteUpdating Global Account InformationTo update Kaseya Global Account Information, follow these steps:STEP 1 For the Customer Account, from the Dashboard page, choose Apps.For the Partner Account, from the Overview page, select a customer that has theKaseya Service Desk enabled and choose Apps.STEP 2 In the Installed application list, locate Kaseya Service Desk and click Edit.STEP 3 From the Update App page, click the Make Changes checkbox.STEP 4 Make your changes.STEP 5 Click Update to apply the changes.For Partner Accounts the changes are applied to all customers with the KaseyaService Desk installed.Removing the Kaseya Service Desk for a CustomerTo remove Kaseya Service Desk for a specific customer, follow these steps:STEP 1 For a Customer Account, from the Dashboard page, choose Apps.For a Partner Account, from the Partner Account Overview page, select thecustomer and choose Apps.STEP 2 In the Installed application list, locate the Kaseya Service Desk and click Remove.STEP 3 Click OK to confirm.Kaseya Version CompatibilityThe Cisco OnPlus Portal uses Version 6.2 of the Kaseya API.Kaseya recommends the following browsers:14Integrating Kaseya with the Cisco OnPlus Portal
Application Note Windows - Chrome 8 and later Mac OS X - Safari 4 and laterKaseya supports the following browsers: Windows - Internet Explorer 8 and 9, Firefox 3.x and later, Chrome 8 and later Mac OS X - Safari 4 and later, Firefox 3.x and later, Chrome 8 and laterKaseya does not support ChromePlus.Known Issues and LimitationsThe following known issue applies to Kaseya integration with the Cisco OnPlusPortal: Using Kaseya Service Desk with the Firefox browser may produceunexpected results. For example, when exiting the Service Desk by clickingLogoff, the application may branch to another Kaseya application.Integrating Kaseya with the Cisco OnPlus Portal15
Application NoteWhere To Go From HereCisco provides a wide range of resources to help customers obtain the fullbenefits of the Cisco OnPlus Portal.SupportCisco Small Business sco Small Business Support andResourceswww.cisco.com/go/smallbizhelpPhone Support Contactswww.cisco.com/go/sbscCisco Small Business ationCisco ON100 Network Agentwww.cisco.com/go/onplus-docsCisco OnPlus Portalwww.cisco.com/go/onplus-docsCisco Small BusinessCisco Partner Central for SmallBusiness (Partner Login Required)www.cisco.com/web/partners/sell/smbCisco Small Business Homewww.cisco.com/smbCisco and the Cisco logo are trademarks or registered trademarks of Cisco and/or its affiliates in the U.S. and other countries. To view a listof Cisco trademarks, go to this URL: www.cisco.com/go/trademarks. Third-party trademarks mentioned are the property of theirrespective owners. The use of the word partner does not imply a partnership relationship between Cisco and any other company. (1110R) 2012 Cisco Systems, Inc. All rights reserved.78-20797-0316Integrating Kaseya with the Cisco OnPlus Portal
Integrating Kaseya with the Cisco OnPlus Portal 3 Application Note Setting up Kaseya for Users with Kaseya Installed on a Local Server STEP 1 Log on to Kaseya. STEP 2 From the Kaseya Essentials page, click the down arrow on the green bar on the left side of the screen.