Transcription
Trend Micro KASEYA INTEGRATION GUIDEINTRODUCTIONTrend Micro Worry-Free Business Security Services is a server-free security solution that provides protection anytime and anywhere foryour business data. It secures PCs, laptops, servers, and other Windows-based devices such as point-of-sale machines and tablets. Worry-FreeBusiness Security Services can be centrally managed, so you have security on your server and all your computers wherever they’re connected—whether in the office, at home, or on the road.For registered resellers, Trend Micro Worry-Free Remote Manager combines standard Windows-based solutions with a web console, givingmanaged service providers (MSPs) unique, secure management capabilities. Worry-Free Remote Manager provides an unrivaled level of depthto manage multiple Worry-Free Security and Trend Micro Hosted Email Security customers.Kaseya provides an industry-leading framework for automation of recurring IT tasks. With Kaseya, IT professionals can offer extended servicecapabilities with better service delivery. And, with optional configurations, maximum scalability, and multiple domain capabilities, IT departmentsor service providers of all sizes can enjoy the rewards of IT automation.Trend Micro Worry-Free Business Security Services and Worry-Free Remote Manager can integrate with Kaseya’s automation framework tosimplify support of customers who use Kaseya. In this paper, we’ll show you how to take advantage of just some of the ways Worry-Free BusinessSecurity Services and Worry-Free Remote Manager work with Kaseya to provide superior protection to your Windows-based devices.INTEGRATING WORRY-FREE BUSINESS SECURITYSERVICES WITH KASEYADeploying Worry-Free Business Security ServicesIf you are using Firefox:Worry-Free Business Security Services provides a number ofinstallation methods to suit your needs. These steps will guideyou through the process of downloading a Windows installerthat you can use to create and deploy a software package usingKaseya’s software deployment module.7. When prompted, save the file to a convenient location on the computer.Download Worry-Free Business Security Services MSI File10. Click Next and choose a location to extract the WFBS-SVC AgentInstaller.msi file.1. Log into the Worry-Free Business Security Services console withInternet Explorer or Firefox.8. Once the file WFBS-SVC Agent Downloader.exe has been downloaded,double-click it to start downloading and installing the Agent.9. Once the Agent installer opens, proceed to Step 10.Check Agent Credentials in Kaseya2. Click Computers.1. Log in to the Kaseya console.3. Click Add and then click Add Computers.2. In the Agent menu, expand Configure Agents and then clickSet Credential.4. Expand Additional Installation Options.5. Click the URL under Download URL.6. When the web page opens, click Download.If you are using Internet Explorer:7. When the first security warning opens, click Run.8. When the second security warning opens, click Run. The agentinstaller will continue downloading.9. Once the Agent installer opens, proceed to Step 10.3. In the Username field, type the name of the user account you will useto deploy software.4. In the Password and Confirm fields, enter the password for theuser account.5. In the right pane, select the machines or groups that should usethe credential.6. Click the appropriate choice to specify whether this user account is alocal account, a member of the machine’s current Active Directorydomain, or a member of a different Active Directory domain.7. Select the machines or groups to use with the user account.8. Click Test. When the test is successful, the Test column will readPassed for the specified machines and groups.Page 1 of 7 KASEYA INTEGRATION GUIDE
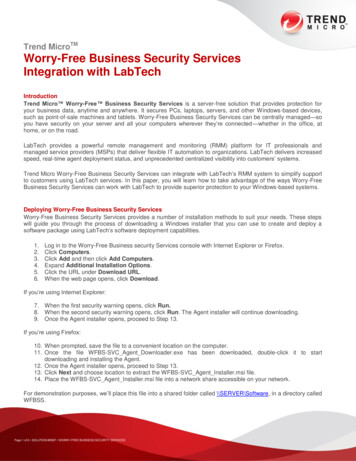
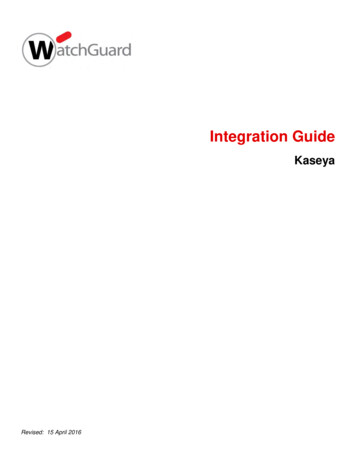
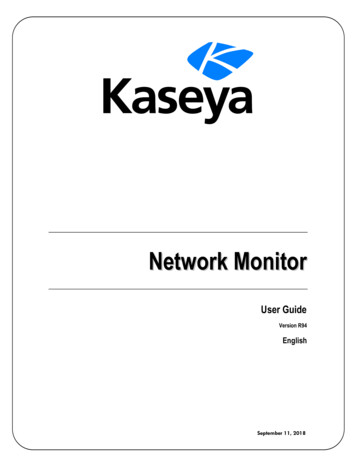
Create Worry-Free Business Security Services software packagein KaseyaMonitoring Worry-Free Business Security ServicesMonitor Services1. In the Software Deployment menu, expand Configure and thenclick Catalog.You can use Kaseya to monitor the status of Worry-Free BusinessSecurity Services and create alarms using Kaseya’s monitor sets. Beforecreating monitor sets, the set of Windows services created by WorryFree Business Security Services must be made available to Kaseya usingone of the following methods.2. In the right pane, click New and then click Windows Installer.3. In the Installer Settings tab, in the Name field, type Trend MicroWorry-Free Business Security Services.4. In the Version field, type the version number you wish to use. This isthe version number Kaseya uses to keep track of package revisions,so this can be set to any number.5. In the Upload Installer File field, click the Browse button.6. The File Upload dialog box appears. Browse to the location where youdownloaded the Worry-Free Business Security Services MSI file.7. Click WFBS-SVC Agent Installer.msi and then click Open.Method 1: In the Monitor section, expand Edit and click Update Lists ByScan. Choose a machine that already has Trend Micro installed on it andthen click Run Now. This will add all the services on the machine, evenones not related to Trend Micro.Method 2: In the Monitor section, expand Edit and click Monitor Lists. Inthe right pane, click Services and then click Add. In the Name field, typethe name of the service. This is the name of the executable file that runsas a service. The Description field is optional. If you choose this method,use the following service names for the Trend Micro WFBSS components:8. A dialog box will appear while the MSI file is uploaded to the Kaseyaserver. When the upload is complete, click the Scan Items tab andthen click Add Scan Item.SvcGenericHost - Trend Micro Client/Server Security Agent9. In the Scan Type list, click File.TmProxy - Trend Micro Client/Server Security Agent Proxy Service10. In the Scan Item field, type %ProgramFiles(x86)%\Trend Micro\Client Server Security Agent\PccNtMon.exe.Ntrtscan - Trend Micro Client Server Security Agent RealTime Scan11. Select the Has Version Number checkbox and then click Save.Tmlisten - Trend Micro Client/Server Security Agent ListenerTMBMServer - Trend Micro Unauthorized Change Prevention ServiceOnce the services are defined, you can create a monitor set. A monitorset will create an alert if one or more of the services does not exists and/or one or more of the services is not started. You can create a monitorset for each service, or create a single monitor set that will monitor oneor more services. This example shows how to create a monitor set foreach service.1. In the Monitor section, expand Edit and click Monitor Sets.2. Click Add Folder. In the Folder Name field, type Trend Micro Monitor Set.3. Right click the Trend Micro Monitor Set folder and then click NewMonitorSet.4. In the Monitor Set Name field, type Trend Micro Agent.5. In the Monitor Set description field, type a description for the agent.6. In the Group Alarm Column list, click Security and then click Save.Repeat these steps for each of the services until you have created a totalof five monitor sets:Figure 1 - Kaseya Custom Installer SettingsOnce the installer is created, Trend Micro Worry-Free Business SecurityServices can be deployed to systems using Kaseya’s built-in tools forsoftware deployment. With Kaseya, you can test a software packagebefore moving it into production. When moving from testing toproduction, Kaseya allows you to perform scheduled or on-demandsoftware deployment, so you can tailor your deployment of Worry-FreeBusiness Security Services to your organization’s needs.Page 2 of 7 KASEYA INTEGRATION GUIDETrend Micro AgentTrend Micro ListenerTrend Micro ProxyTrend Micro RealTime ScanTrend Micro Unauth Change PreventionOnce that the monitor sets have been created, you can specify whichservice goes with which monitor set.
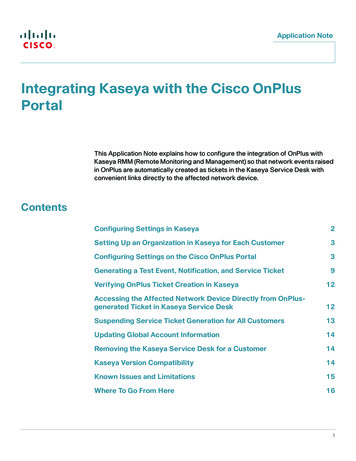
Click the Trend Micro Agent monitor set (note: you may have to clickaway to another section in the left pane, then click back to Monitor Setsto refresh the list of available monitor sets).Repeat the steps above for each of the monitor sets, until all the TrendMicro monitor sets have been assigned to computers where Worry-FreeBusiness Security Services is installed.1. Click Services Check and then click Add.2. In the Service list, click svcGenericHost.3. You can modify the Re-start attempts, Re-start interval, and Ignoreadditional alarms for fields to suit your organization’s needs.4. Click Save.Repeat the steps above until the monitor sets are assigned to thecorresponding services as shown below:Trend Micro Agent - svcGenericHostTrend Micro Listener - tmlistenTrend Micro Proxy - tmproxyTrend Micro RealTime Scan - ntrtscanTrend Micro Unauth Change Prevention – TMBMServerFigure 3 - Monitor Sets Assigned to a SystemOnce the monitor sets have been assigned, the Kaseya agent willmonitor the Worry-Free Business Security-related services on theassigned systems. If any of the services stop or are not found on asystem, Kaseya will take the actions you selected when assigning amonitor set. In the above example, Kaseya will create an alarm and sendan email to the email addresses you specified.In addition, Kaseya will attempt to re-start any stopped services on theaffected system. A successful re-start of the services will not cancelalarms or tickets, so that you can verify that the services have beenre-started.Figure 2 - Kaseya Monitor SetAssign Monitor SetsAfter creating monitor sets, you must assign monitor sets to computersor groups of computers.1. In the left pane, click Assign Monitoring.2. In the right pane, select the Create Alarm andEmail Recipients checkboxes.Review AlarmsWhenever the Kaseya agent detects that a monitored service has beenstopped, it will create an alarm if you specified that option when youassigned the monitor set.Alarms created from a monitor set will show the name of the monitorset that triggered the alarm, below the name of the machine wherethe alarm condition exists. The alarm will also show a value, which mayindicate that the service is stopped, that a service stop is pending, or thatthe service does not exist.3. Clear the Create Ticket and Run Script checkboxesif they are selected.1. In the left pane, click Status Alarm Summary.4. In the Email Recipients field, type the email addresses of recipientswho should receive notification about this monitor set.3. In the Alarm ID field, click to expand the alarm detail.5. In the monitor sets dropdown list, click Trend Micro Agent.6. In the lower right pane, select the checkboxes for the individualmachines to which the monitor set should apply.7. In the upper right pane, click Apply.8. A confirmation dialog box appears. Click OK.Page 3 of 7 KASEYA INTEGRATION GUIDE2. In the right pane, review the alarms listed.4. Once the condition that raised the alarm has been fixed, click Open tochange the alarm status to Closed.
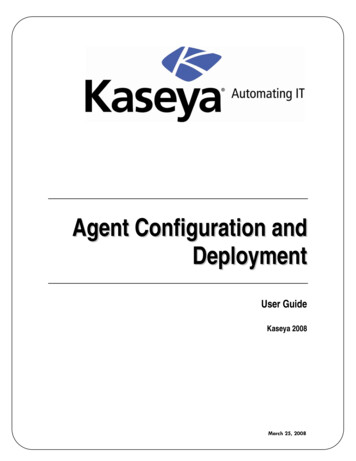
Identify Registry KeysIn addition to monitoring the services created by Worry-Free BusinessSecurity Services, you can use agent procedures in Kaseya to collectproduct information from Worry-Free Business Security Servicesregistry keys, allowing you to create up-to-date reports about the statusof Worry-Free Business Security Services component.There are several registry keys that contain product information thatadministrators may find useful. The paths to the keys differ slightly,depending on whether a system is 32-bit or 64-bit, as shown below.For 32-bit WindowsFigure 4 - Alarm Dashboard in KaseyaBecause Worry-Free Business Security Services runs as a collection ofWindows services, the Kaseya agent will automatically attempt to restart the services if they exist.Collecting Worry-Free Business Security Services InformationWhile Worry-Free Business Security Services provides a powerfuldashboard for obtaining information about clients, administratorscan also use Kaseya to gather and report on the status of Worry-FreeBusiness Security services from within the Kaseya dashboard, usingsoftware scans, agent procedures, and Kaseya’s reporting features.Check Installation Status and Create a Custom Scan ScheduleBy default, Kaseya automatically schedules weekly software scans onmachines and allows you to easily determine which machines have asoftware package installed and whether or not it is the latest version.Also, you can create custom scan schedules for individual softwarepackages deployed with Kaseya. You may want to scan daily to insurethat Worry-Free Business Security Services is installed on all machines.1. In the Software Deployment section, in the Status section, click BySoftware Title.2. In the center pane, click the package you created for deploying WorryFree Business Security Services.3. In the right pane, review the table. The third column shows the statusof the individual software package on the client, compared with thesoftware deployment package created in Kaseya, and lets you knowif Worry-Free Business Security Services should be redeployed orupdated on a machine.4. Select the checkboxes for the machines where the scheduled scanshould run.HKEY LOCAL tVersionFor 64-bit WindowsHKEY LOCAL Corp\CurrentVersionHostedAgent\Version – Product VersionSchedule Update\TimeStamp – Last Update Time, given in epoch timeMisc.\VsApiNT-Ver – Scan Engine VersionMisc.\LastInfectedDateTime – Last time a virus was foundMisc.\LastInfectedFileName – Name of file where last virus was foundMisc.\LastInfectedVirusName – Name of last virus foundMisc.\ProductName – Product NameHostedAgent\Rupdate\Version\NonCRCPtnVer – Pattern VersionCreate the Agent Procedure1. In the Agent Procedures section, in Manage Procedures, clickSchedule / Create.2. In the right pane, click Shared and then click Add Folder.3. The Add Folder dialog box appears. In the Folder Name field, typeWorry-Free Business Security and then click OK.4. Click New Procedure.5. The New Procedure dialog box appears. In the Name field, type GetTrend Micro Product Info.6. Click New IF.7. In the Condition Type list, click Windows 32 or 64 Bit Check.8. In the Condition Options list, click 64-Bit Windows.9. Click New IF.5. Click Schedule Scan and then click Latest Scan.10. In the Condition Type list, click Check 64-bit Registry Value.6. The Schedule Latest Scan dialog box appears. Create a schedule thatsuits your needs and then click Submit.11. In the Condition Options field, type HKEY LOCAL TCorp\CurrentVersion\HostedAgent\Version.7. A dialog box appears, informing you that items have been queued forscheduling. Click OK.12. In the Condition Options list, click Exists.13. Click New Step.14. In the Step Type list, click Get Variable.15. In the Select the type of the value to get from the agent list, click64-Bit Registry Value.Page 4 of 7 KASEYA INTEGRATION GUIDE
16. In the Specify the registry value name field, type HKEY linNTCorp\CurrentVersion\HostedAgent\Version.17. In the Specify a name for the variable field, type TMProductVersion.18. In the Perform Step on list, click All Windows Operating Systems.19. Click New Step.20. In the Step Type list, click Write Procedure Log Entry.21. In the Step Options field, type WFBSS Product Version #TMProductVersion#.22. In the Perform Step on list, click All Windows Operating Systems.23. In the left pane, click OS 32 or 64 Bit Check, If return value 64-BitWindows THEN.24. Repeat from step 9 for each 64-bit registry key you want to log. Instep 17, make sure to assign a unique, descriptive variable name, andin step 21, make sure to enter the appropriate description for theregistry key along with the variable name you created in step 17.25. While still in the Agent procedure, in the left pane, click OS 32 or 64Bit Check, If return value 64-Bit Windows THEN.Figure 5 - Agent Procedure Editing InterfaceSchedule Agent ProcedureOnce you have created the agent procedure to collect Worry-FreeBusiness Security Services information from the registry and writeit to the agent procedure log, you can schedule the agent procedureto run at a timed interval so that you collect regular informationabout which versions of Worry-Free Business Security Servicescomponents are installed.1. In the list of agent procedures, click Get Trend Micro Product Info.2. Click the Schedule tab.26. Click Toggle Else.3. In the lower pane, select the checkboxes for the machines or groupswhere this agent procedure should run.27. Click Else, and then click New IF.4. Click Schedule Procedure.28. In the Condition Type list, click Check Registry Value.5. The Schedule dialog box appears. Choose the schedule options thatbest fit your environment and then click Schedule.29. In the Condition Options field, type HKEY LOCAL tVersion\HostedAgent\Version.30. In the Condition Options list, click Exists.31. Click New Step.32. In the Step Type list, click Get Variable.33. In the Select the type of the value to get from the agent list, click64-Bit Registry Value.34. In the Specify the registry value name field, type HKEYLOCAL tVersion\HostedAgent\Version.35. In the Specify a name for the variable field, type TMProductVersion.36. In the Perform Step on list, click All Windows Operating Systems.37. Click New Step.38. In the Step Type list, click Write Procedure Log Entry.39. In the Step Options field, type WFBSS Product Version #TMProductVersion#.Once the agent procedure has been scheduled, the Next Exec Timefield will show the date and time the agent procedure will run next. Oncethe procedure has run at least once, the Last Time Exec and Last ExecStatus will show the results of the last run of the procedure. After theprocedure has run at least once, you can use the information gathered inthe agent procedure logs to create a report containing that information.Create a Report from Agent Procedure logsOnce the agent procedure has been created and has begun to gatherregistry key data about status of Worry-Free Business Security Servicescomponents, you can create a report based on the agent procedurelogs for automated at-a-glance information about Worry-Free BusinessSecurity Services.1. In the Info Center section, under Reporting, click Reports.2. In the center pane, click Shared, and then click New Folder.3. In the Folder Name field, type Trend Micro and then click OK.4. Click the Trend Micro folder and then click New Report.5. The New Report dialog box appears. In the left pane, click Logs.40. In the Perform Step on list, click All Windows Operating Systems.6. In the right pane, click Agent Procedure Log and then click Next.41. Repeat from step 31 for each 32-bit registry key you want to log. Instep 35, make sure to assign a unique, descriptive variable name, andin step 39, make sure to enter the appropriate description for theregistry key along with the variable name you created in step 35.7. In the Name field, type Trend Micro Product Information Report.42. Click Save and Close.10. In the Body field, type Trend Micro Product Information Report.Page 5 of 7 KASEYA INTEGRATION GUIDE8. In the Report Title field, type Trend Micro Product Information.9. In the Subject field, type Trend Micro Product Information Report.
11. Click Report Parameters.12. In the Number of days to query log field, type 1.13. In the Show entries matching the following description field, typeWFBSS*.14. Click Save.15. To view the report immediately, click Run Now.Figure 7 - Example Report16. The Run Now dialog box appears. Click Submit.Schedule a ReportWith Kaseya, you can automate report generation and delivery via email,enabling administrators to receive timely information about the status ofWorry-Free Business Security Services.1. In the center pane, click Trend Micro Product Information Report.2. Click Schedule Report.3. The Schedule Report dialog
9. Once the Agent installer opens, proceed to Step 10. k c i Cl 0. 1 Next and choose a location to extract the WFBS-SVC_Agent_ Installer.msi file. Check Agent Credentials in Kaseya 1. Log in to the Kaseya console. 2. n he I t Agent men