Transcription
Mbox User GuideVersion 9.0
Legal NoticesThis guide is copyrighted 2010 by Avid Technology, Inc.,(hereafter “Avid”), with all rights reserved. Under copyrightlaws, this guide may not be duplicated in whole or in partwithout the written consent of Avid.003, 96 I/O, 96i I/O, 192 Digital I/O, 192 I/O, 888 24 I/O,882 20 I/O, 1622 I/O, 24-Bit ADAT Bridge I/O, AudioSuite,Avid, Avid DNA, Avid Mojo, Avid Unity, Avid Unity ISIS,Avid Xpress, AVoption, Axiom, Beat Detective, Bomb Factory,Bruno, C 24, Command 8, Control 24, D-Command, D-Control,D-Fi, D-fx, D-Show, D-Verb, DAE, Digi 002, DigiBase,DigiDelivery, Digidesign, Digidesign Audio Engine, DigidesignIntelligent Noise Reduction, Digidesign TDM Bus, DigiDrive,DigiRack, DigiTest, DigiTranslator, DINR, D-Show, DV Toolkit,EditPack, Eleven, EUCON, HD Core, HD Process, Hybrid,Impact, Interplay, LoFi, M-Audio, MachineControl, Maxim,Mbox, MediaComposer, MIDI I/O, MIX, MultiShell, Nitris, OMF,OMF Interchange, PRE, ProControl, Pro Tools M-Powered,Pro Tools, Pro Tools HD, Pro Tools LE, QuickPunch, Recti-Fi,Reel Tape, Reso, Reverb One, ReVibe, RTAS, Sibelius,Smack!, SoundReplacer, Sound Designer II, Strike, Structure,SYNC HD, SYNC I/O, Synchronic, TL Aggro, TL AutoPan,TL Drum Rehab, TL Everyphase, TL Fauxlder, TL In Tune,TL MasterMeter, TL Metro, TL Space, TL Utilities, Transfuser,Trillium Lane Labs, Vari-Fi, Velvet, X-Form, and XMON aretrademarks or registered trademarks of Avid Technology, Inc.Xpand! is Registered in the U.S. Patent and Trademark Office.All other trademarks are the property of their respectiveowners.Product features, specifications, system requirements, andavailability are subject to change without notice.Guide Part Number 9329-65068-00 REV A 9/10Documentation FeedbackAt Avid, we are always looking for ways to improve ourdocumentation. If you have comments, corrections, orsuggestions regarding our documentation, email us attechpubs@avid.com.
contentsChapter 1. Welcome to Mbox . . . . . . . . . . . . . . . . . . . . . . . . . . . . . . . . . . . . . . . . . . . . . . . . . 1Mbox Features . . . . . . . . . . . . . . . . . . . . . . . . . . . . . . . . . . . . . . . . . . . . . . . . . . . . . . . . . . 1System Requirements and Compatibility . . . . . . . . . . . . . . . . . . . . . . . . . . . . . . . . . . . . . . . . 2Conventions Used in This Guide . . . . . . . . . . . . . . . . . . . . . . . . . . . . . . . . . . . . . . . . . . . . . . 2About www.avid.com . . . . . . . . . . . . . . . . . . . . . . . . . . . . . . . . . . . . . . . . . . . . . . . . . . . . . . 3Chapter 2. Mbox Hardware Overview . . . . . . . . . . . . . . . . . . . . . . . . . . . . . . . . . . . . . . . . . . 5Mbox Front Panel Features. . . . . . . . . . . . . . . . . . . . . . . . . . . . . . . . . . . . . . . . . . . . . . . . . . 5Mbox Back Panel Features. . . . . . . . . . . . . . . . . . . . . . . . . . . . . . . . . . . . . . . . . . . . . . . . . . 8Chapter 3. Installing and Connecting Mbox . . . . . . . . . . . . . . . . . . . . . . . . . . . . . . . . . . . 11Chapter 4. Making Studio Connections . . . . . . . . . . . . . . . . . . . . . . . . . . . . . . . . . . . . . . . 13Connecting Outputs . . . . . . . . . . . . . . . . . . . . . . . . . . . . . . . . . . . . . . . . . . . . . . . . . . . . . . 13Audio Inputs . . . . . . . . . . . . . . . . . . . . . . . . . . . . . . . . . . . . . . . . . . . . . . . . . . . . . . . . . . . 14Connecting a Microphone. . . . . . . . . . . . . . . . . . . . . . . . . . . . . . . . . . . . . . . . . . . . . . . . . . 15Connecting Instruments to the Mbox . . . . . . . . . . . . . . . . . . . . . . . . . . . . . . . . . . . . . . . . . . 16MIDI Connections . . . . . . . . . . . . . . . . . . . . . . . . . . . . . . . . . . . . . . . . . . . . . . . . . . . . . . . 19Chapter 5. Using the Driver Control Panel . . . . . . . . . . . . . . . . . . . . . . . . . . . . . . . . . . . . . 21Presets . . . . . . . . . . . . . . . . . . . . . . . . . . . . . . . . . . . . . . . . . . . . . . . . . . . . . . . . . . . . . . 22Layouts . . . . . . . . . . . . . . . . . . . . . . . . . . . . . . . . . . . . . . . . . . . . . . . . . . . . . . . . . . . . . . 22Additional Functions . . . . . . . . . . . . . . . . . . . . . . . . . . . . . . . . . . . . . . . . . . . . . . . . . . . . . 24Stereo Mixes. . . . . . . . . . . . . . . . . . . . . . . . . . . . . . . . . . . . . . . . . . . . . . . . . . . . . . . . . . . 28Using the Stereo Mix Section . . . . . . . . . . . . . . . . . . . . . . . . . . . . . . . . . . . . . . . . . . . . . . . 29Contentsiii
Chapter 6. Using the Multi Button (Pro Tools Only) . . . . . . . . . . . . . . . . . . . . . . . . . . . . 33Using the Multi Button . . . . . . . . . . . . . . . . . . . . . . . . . . . . . . . . . . . . . . . . . . . . . . . . . . . 33Press and Release Options . . . . . . . . . . . . . . . . . . . . . . . . . . . . . . . . . . . . . . . . . . . . . . . . 34Press and Hold Options. . . . . . . . . . . . . . . . . . . . . . . . . . . . . . . . . . . . . . . . . . . . . . . . . . . 35Hold Duration Options. . . . . . . . . . . . . . . . . . . . . . . . . . . . . . . . . . . . . . . . . . . . . . . . . . . . 35Appendix A. Using Third-Party Applications . . . . . . . . . . . . . . . . . . . . . . . . . . . . . . . . . . . 37Configuring Mbox for Third-Party Applications . . . . . . . . . . . . . . . . . . . . . . . . . . . . . . . . . . . 37Configuring the Apple Sound Preferences . . . . . . . . . . . . . . . . . . . . . . . . . . . . . . . . . . . . . . 37Appendix B. Compliance Information . . . . . . . . . . . . . . . . . . . . . . . . . . . . . . . . . . . . . . . . . 39Environmental Compliance . . . . . . . . . . . . . . . . . . . . . . . . . . . . . . . . . . . . . . . . . . . . . . . . 39EMC (Electromagnetic Compliance) . . . . . . . . . . . . . . . . . . . . . . . . . . . . . . . . . . . . . . . . . . 40Safety Compliance . . . . . . . . . . . . . . . . . . . . . . . . . . . . . . . . . . . . . . . . . . . . . . . . . . . . . . 40Index . . . . . . . . . . . . . . . . . . . . . . . . . . . . . . . . . . . . . . . . . . . . . . . . . . . . . . . . . . . . . . . . . . . . . 43ivMbox User Guide
chapter 1Welcome to MboxWelcome to the Mbox USB audio and MIDIinterface from Avid .Mbox provides your USB 2.0-equipped computer with two channels of analog audio inputand output, two channels of digital audio inputand output, MIDI In and Out ports, one headphone output with front panel level control.Mbox includes two professional-quality mic preamps and 24-bit/96 kHz analog-to-digital anddigital-to-analog converters.Mbox integrates with Pro Tools software, andis compatible with third-party audio and MIDIapplications that support the CoreAudio (Mac)or ASIO (Windows) standard. S/PDIF inputs are available independently,in addition to analog inputs 1–2 S/PDIF outputs are available independently, in addition to analog outputs 1–2 Up to a total of four channels of input, usinganalog and digital inputs simultaneously One MIDI In and one MIDI Out port, providing 16 channels of MIDI input and output Two 1/4-inch TRS analog monitor outputs 24-bit A/D and D/A converters, supportingsample rates up to 96 kHz Low Latency Monitoring (LLM) with adjustable balance between input and playback Dim and Mono buttonsMbox FeaturesMbox provides the following: Two channels of analog audio input withhigh-quality microphone preamps and switchable 48V phantom power Analog input jacks include two XLR/TRScombo-jacks and two 1/4 TS jacks, withswitchable Mic, Line, and DI levels Soft-limit feature on each input 1/4-inch (TRS) stereo headphone output withadjustable level control On-board reverb and delay effects (useful formonitoring while tracking vocals) On-board Tuner Multi-function, assignable Soft button USB 2.0 High-speed operationMbox may not function properly if connectedto a USB hub. Connect Mbox Mini to a separate, dedicated USB port. –20 dB pad available separately on each analog input channel Two channels of S/PDIF digital input and twochannels of S/PDIF digital outputChapter 1: Welcome to Mbox1
System Requirements andCompatibilityConventions Used in ThisGuideMbox can be used with a qualified Windows orMac computer running Pro Tools software 8.0.4or higher.All of our guides use the following conventionsto indicate menu choices and key commands:For Pro Tools installation instructions, seethe Pro Tools Installation Guide.Mbox can be also be used with a qualified Macor Windows computer running other Core Audio- or ASIO-compliant applications.Mbox hardware drivers must be installed beforeyou can connect and use your Mbox.For Mbox hardware drivers installation instructions, see Chapter 3, “Installing andConnecting Mbox.”A DVD drive is required to use the Drivers Installer disc (included with your Pro Tools software package).Avid can only assure compatibility and providesupport for hardware and software it has testedand approved.For complete system requirements and a list ofqualified computers, operating systems, harddrives, and third-party devices, ile SaveChoose Save from theFile menuControl NHold down the Control keyand press the N keyControl-clickHold down the Control keyand click the mouse buttonRight-clickClick with the rightmouse buttonThe names of Commands, Options, and Settingsthat appear on-screen are in a different font.The following symbols are used to highlightimportant information:User Tips are helpful hints for getting themost from your system.Important Notices include information thatcould affect your data or the performance ofyour system.Shortcuts show you useful keyboard ormouse shortcuts.Cross References point to related sections inthis guide and other Pro Tools guides.2Mbox User Guide
About www.avid.comThe Avid website (www.avid.com) is your bestonline source for information to help you getthe most out of your Pro Tools system. The following are just a few of the services and featuresavailable.Product Registration Register your purchaseonline.Support and Downloads Contact Avid CustomerSuccess (technical support); download softwareupdates and the latest online manuals; browsethe Compatibility documents for system requirements; search the online Knowledge Baseor join the worldwide Pro Tools community onthe User Conference.Training and Education Study on your own usingcourses available online or find out how you canlearn in a classroom setting at a certifiedPro Tools training center.Products and Developers Learn about Avidproducts; download demo software or learnabout our Development Partners and theirplug-ins, applications, and hardware.News and Events Get the latest news from Avidor sign up for a Pro Tools demo.Chapter 1: Welcome to Mbox3
4Mbox User Guide
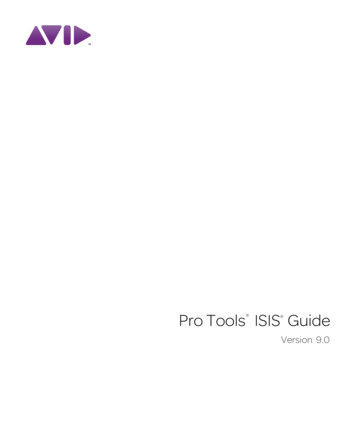
chapter 2Mbox Hardware OverviewMbox Front Panel FeaturesFigure 1 identifies controls, indicators, and input and output ports on the front panel on the Mbox.Input 1Input tLimitGain/Gain/USBMulti-20dB-20dBLEDInstrument SourceselectorInstrument oFigure 1. Mbox front panelInstrument InputsFront/Rear Source SelectorsUse these 1/4-inch TS inputs are for connectingan electric guitar, bass, or other instrument-leveldevice. The level for these inputs is controlledby the Gain Controls.These buttons select either the front panel Instrument Inputs (TS) or rear panel Mic/Line Inputs (XLR/TRS combo) for each channel. Whenthe button is set to the Out position, the frontpanel Instrument Inputs are active. When thebutton is set to the In position, the rear panelMic/Line Inputs are active.Chapter 2: Mbox Hardware Overview5
Gain Controls/–20dB PadAbout Phantom PowerThese knobs adjust the input gain levels of theMic/Line inputs. Turn the knob clockwise to increase gain, and counter-clockwise to decreasegain.Dynamic microphones (such as Shure SM57s orM-Audio Aries) do not require phantom powerto operate, but are not harmed by it. Most condenser microphones (like an M-Audio Solaris) dorequire phantom power to operate.If your input signal is too hot even with theGain knob at a low setting, pull the Gain knobout to engage a “pad” that attenuates the signalby 20 dB.Signal/Clip LEDsThese LEDs illuminate green in the presence ofaudio signal, and illuminate red if the input signal has “clipped” (overloaded) the input of theMbox. Clipping the input can result in audibledistortion.Soft-Limit ButtonsThese buttons activate the Soft-Limit function,applying a smooth, overdriven tape-type limiting to strong input signals on the Instrument,Mic, or Line inputs. 48V Switch and LED (PhantomPower)The 48V switch toggles phantom power on/offfor all mic input channels. The LED, when lit,indicates that 48V phantom power is active onthe XLR Mic inputs.Although phantom power can be usedsafely with most microphones, it is possibleto damage some ribbon microphones withit. Always turn off phantom power and waitat least ten seconds before connecting or disconnecting a ribbon microphone.When using phantom power, the Mboxmaximum current per microphone is 4 mA.If you are not sure about the phantom power requirements for your microphone, consult yourmicrophone’s documentation or contact themanufacturer.Monitor LevelThe Monitor Level knob adjusts the output levelof the Monitor Output ports.Dim Button and LEDThe Dim Button reduces by 30 dB the outputvolume from both the Monitor Outputs and theHeadphone Output. When engaged, the DimLED lights.Mono ButtonThe Mono Button sums the control room outputs to a mono signal (delivering that identicalsignal to both speakers) via the Driver ControlPanel or the Mbox. When engaged, the MonoLED lights.6Mbox User Guide
Checking Phase RelationshipsMulti ButtonThe Mono switch can also be used for a quickcheck of the phase relationship betweenSource 1 and Source 2 inputs.(Pro Tools Only)Guitar Tuner FunctionWhen the Dim Button and the Mono Button arepushed at the same time, the Guitar Tuner function is activated. The Dim and Mono LEDs flashbetween off and on to indicate tuner mode is active. When a string is played on a guitar pluggedinto an Instrument Input, the Input 1 Signal/Clip LED is illuminated red if tuning is toolow, off when tuning is too high, and greenwhen tuning is correct. The Input 2 Signal/ClipLED is illuminated red if tuning is too high, offwhen tuning is too low, and green when tuningis correct. The Tuner interface is displayed in theSoftware Control panel if the Software ControlPanel is open.The Multi Button can be assigned to execute several functions in Pro Tools, including Add Track,Start/Stop Record, Tap Tempo, Toggle MarkerLocations, and Save Session. See Chapter 5, “Using the Multi Button (Pro Tools Only).”USB LEDThe USB LED indicates that the Mbox is receiving power from its USB connection. Once theUSB light is on, audio can pass in or out of thesystem.The USB LED is a power LED, which is also indicates when the unit is powered in stand-alonemode. In this mode you can connect a USB cablebut that cable is connected to a wall outlet instead of a computer (similar to an iPod oriPhone).Front Panel Headphone OutputUse the Headphone Output to connect stereoheadphones with a 1/4-inch stereo connector.The headphone outputs mirror the signal sentto the Monitor Outputs.Headphone VolumeThe Headphone Volume knob adjusts the output level of the Headphone port. This output isindependent of the Monitor Level knob.Chapter 2: Mbox Hardware Overview7
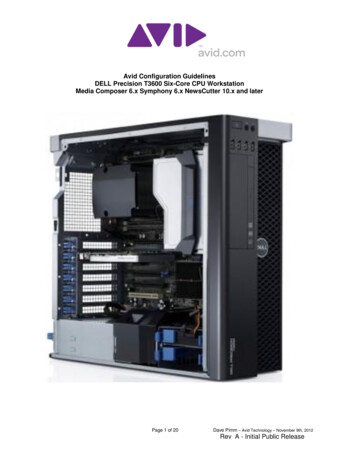
Mbox Back Panel FeaturesFigure 2 identifies each port on the back panel of the Mbox.MIDI I/OS/PDIFdigital I/OMonitoroutputsMic/LineinputsUSB portFigure 2. Mbox back panelUSB PortThis standard USB connector is used to connecta USB 2.0 port on your computer to the Mbox.One standard USB cable is included with yoursystem. (It is also used to power the unit instand-alone mode.)In use, the S/PDIF input and output channels areavailable in addition to the four channels of analog audio I/O.Mic/Line InputsEach analog source input channel providescombination XLR/TRS on the rear panel. Thesebalanced/unbalanced analog audio inputs support the following input levels: Mic (microphone) for XLR inputs Line (TRS) for line level signals on TRS or TSinputsOn the front panel, the input signal is adjustedby the Gain control for each channel and thesource (rear panel Mic/Line, or front panel Instrument) is chosen using the Source selectors.8Mbox User GuideMic/Line Input 2 is at the far left (when lookingat the back panel), and Mic/Line Input 1 is to itsright. The back panel inputs for Mic/Line Input1 and Mic/Line Input 2 are located such thatthey are directly in line with their associated input controls on the front panel. This lets you locate input jacks more easily when viewing fromthe front of the unit.Monitor OutputsThese outputs support balanced TRS, or unbalanced TS, 1/4-inch connections. To monitoryour mix, connect these outputs to a mixingboard, directly to a monitoring system such as astereo power amp, or another stereo destination.
S/PDIF Digital I/OThe S/PDIF in and out ports are unbalanced twoconductor phono (RCA) connectors that utilizea full 24-bit, two-channel digital data stream.The Sony/Philips Digital Interface Format(S/PDIF) is used in many professional and consumer CD recorders and DAT recorders. Toavoid RF interference, use 75-ohm coaxial cablefor S/PDIF transfers and keep the cable length toa maximum of 10 meters.MIDI I/OThe MIDI In and MIDI Out ports are standard5-pin MIDI ports, each providing 16 channels ofMIDI input and output.Chapter 2: Mbox Hardware Overview9
10Mbox User Guide
chapter 3Installing and Connecting MboxTo use Mbox with Pro Tools or any other CoreAudio- or ASIO-compatible applications, youmust install the Mbox hardware drivers on yourcomputer.This chapter provides instructions on installingthe drivers on Mac and Windows, and connecting the Mbox to your computer.Do not start this procedure with your Mboxconnected to your computer.Before installing the hardware drivers, referto the Read Me information included withthe drivers installer for your device.To install the drivers and connect the Mbox:1 Make sure you are logged in as an Administra-tor for the account where you want to install thedrivers.For details on Administrator privileges, seethe documentation for your computer.2 Do one of the following: Insert the Drivers Installer disc that camewith your Pro Tools software package intoyour computer.– or – Download the Mbox drivers installer foryour computer platform fromwww.avid.com. After downloading, makesure the installer is uncompressed (.dmg onMac or .ZIP on Windows).3 Do one of the following: On Mac, locate and double-clickAvid Mbox.mpkg.– or – On Windows, locate and double-clickInstall Avid Mbox.exe.4 Follow the on-screen instructions to proceedwith installation.5 When installation is complete, click Restart.Chapter 3: Installing and Connecting Mbox11
6 After the computer has restarted, connect thesmall end of the included USB cable to the USBport on Mbox and connect the other end to anyavailable USB port on your computer.If the USB LED on the front panel of theMbox does not illuminate, try unpluggingthe USB cable from the Mbox USB port, andplugging it back in. If the USB LED still doesnot illuminate, shut down the computer,disconnect Mbox and start the computer.Once the computer has fully restarted,reconnect Mbox.wthMbox may not function properly if connected to a USB hub. If you need to use ahub for other USB peripherals, connect thehub to a separate USB port; Mbox must beconnected to a dedicated port on the computer in order to function properly.You can now use your Mbox with Pro Tools, orwith any other CoreAudio- or ASIO-compatibleapplication.For Pro Tools installation instructions, seethe Pro Tools Installation Guide.12Mbox User Guide
chapter 4Making Studio ConnectionsThis chapter provides step-by-step instructionsfor connecting mics, instruments, mixers,headphones, speakers, and other devices toMbox .Connecting HeadphonesYou can use headphones equipped with a 1/4inch stereo jack to monitor your audio.The Headphone Output mirrors Monitor Output channels 1–2.Connecting OutputsTo connect headphones:To hear audio from Mbox, you need to connectheadphones or an external sound system (suchas powered monitors or a home stereo) to Mbox.1 Connect headphones with a 1/4-inch stereoconnector (or adapter) to the Headphone jack.2 Adjust the volume using the Headphone Vol-Headphone levelume knob on the front panel.The headphone outputs mirror the signal sentto the Monitor Outputs.1/4-inchHeadphone jackHeadphone jack on front of MboxChapter 4: Making Studio Connections13
Connecting a Sound SystemThe Monitor Outputs on the back of the Mboxsupport 1/4-inch plugs. These connections canbe balanced TRS (Tip-Ring-Sleeve) connectors,or unbalanced TS (Tip-Sleeve) connectors suchas those on instrument cables.To listen to your to audio, connect these outputsto any amplification system: powered speakers,a home stereo system, or an audio mixer.Line Out LeftAudio InputsMbox provides two channels of analog inputs,and supports microphones, guitars, keyboards,and other types of instruments and devices.Mbox has two audio input sections, labeled Input 1 and Input 2. For stereo inputs, use Input 1for the left input, and Input 2 for the right input.The two input sections are located so that thehardware input jacks line up directly behindtheir corresponding input controls on the frontpanel. This makes it easier to locate channel input connections from the front.Input 1Input 2Line Out RightStereo output from the Mbox (back panel)To connect a sound system: For stereo monitoring, connect Monitor Outputs 1 and 2 to the inputs of your main left andright speakers.Inputs on front panel of MboxInput 2 and Input 1To connect to a stereo system: When connecting to a stereo system, connectthe left channel of the stereo (often the whiteplug) to Monitor Output 1, and the right channel of the stereo (often the red plug) toMonitor Output 2.Home stereo systems often use RCA connectors. You can use an adaptor or a special cable to convert from the 1/4-inch TRS (TipRing-Sleeve) connectors used by Mbox to theRCA connectors on your home stereo.14Mbox User GuideInputs on rear panel of MboxFor information about connecting specific audio sources, see “Connecting a Microphone” onpage 15, and “Connecting Instruments to theMbox” on page 16.
Each Input section has three analog input jacks(the Mic and Line are on a single, combo jack):Connecting a MicrophoneMic For XLR microphone cables.Mic Cables and ConnectorsLine (TRS or TS) For 1/4-inch Tip-Ring-Sleeve orTip-Sleeve cables from keyboards, mixers, andother line-level sources.Use a microphone with an XLR connector toconnect the microphone to the Mbox.DI For 1/4-inch Tip-Sleeve cables from guitar,bass, or similar sources.DI (instrument)DI (instrument)Front panel analog input connectorsMic/LineThe Mbox can only supply power through a microphone cable with an XLR connector. If youare not sure about the phantom power requirements for your microphone, refer to your microphone’s documentation or contact the manufacturer.Mic/LineXLR connectorPhantom PowerSome microphones require power to operate.This power, called phantom power, is supplied either by a battery in the microphone, or by a micpreamp in a mixer or audio interface (such asMbox) that can supply power through the microphone cable.Rear panel analog input connectorsMost condenser microphones (such as anM-Audio Solaris) require phantom power to operate. Dynamic microphones (such as a ShureSM57 or an M-Audio Aries) do not require phantom power to operate, but are not harmed by it.Although phantom power can be usedsafely with most microphones, it is possibleto damage some ribbon microphones withit. Always turn off phantom power and waitat least ten seconds before connecting a ribbon microphone.Chapter 4: Making Studio Connections15
Using a Mic with an XLR Connector4 On the front of the Mbox, carefully turn theTo use a microphone that has an XLR connector:Gain control to the right to increase the inputlevel of your microphone signal.1 Plug your microphone cable into one of theMic/Line inputs on the back of Mbox.Input 2Mic inputGainInput 1Mic inputGain knob for Input 15 If the incoming signal is too loud, pull theXLR connector plugged into Input 1Gain knob out to engage the –20 dB pad.2 Set the Source to Rear (“in” position) by press-ing the Source selector on the front of Mbox.Connecting Instruments tothe MboxMbox provides two input types (DI and Line) forinstruments.DI Input Use the DI (“Direct Inject”) input forelectric guitars or electric basses.Source selectorInput 1 Source selector3 If your microphone requires phantom power,make sure the microphone is connected, thenpress the Phantom Power switch (labeled 48V)on the front of the Mbox. This switch sends 48Vto both mic inputs. The 48V LED on the front ofthe Mbox lights when phantom power is beingsupplied.Phantom Power switchPhantom Power switch16Mbox User GuideLine Input Use the Line input for line-level devices, including electronic audio sources such asmixers, samplers, keyboards, and synthesizers.
Connecting Electric Guitar or BassConnecting Keyboards and MixersTo use a guitar with Mbox:To use a keyboard or mixer with Mbox:1 On the front of the Mbox, plug your guitar ca-1 Plug your keyboard, mixer, or other audioble into one of the Instrument inputs.source into either the Input 1 or Input 2 Line(TRS) inputs on your Mbox. If your source is stereo (such as a stereo keyboard or the stereo output from a mixer), connect the left channel(often the white plug) to Input 1, and rightchannel (often the red plug) to Input 2.Input 2Input 1(right channel) left channel)Input 1 instrument inputConnecting a guitar to the 1/4-inch connector2 On the front of the Mbox, set the source toFront by setting the input channel Source selector to the Out position (orange band is visible).Input 1 Gain(level) controlMbox connections for line-level stereo input source2 Set the Source to Rear (“in” position) by press-ing the Source selector on the front of Mbox.Input 1 Gain(level) controlInput 2 Gain(level) controlSource selectorSource selector and Gain control for Input 13 On the front of the Mbox, carefully turn theGain control to the right to increase the inputlevel of your guitar.Source selectorSource selectorSource selector and Gain control for Inputs 1 and 23 Set your instrument’s volume to its optimallevel. For example, the optimal level for mostkeyboards is between 80% and 100% of maximum volume.4 On the front of the Mbox, carefully turn theGain control to the right to increase the inputlevel of your keyboard.Chapter 4: Making Studio Connections17
Digital Input and OutputMbox provides digital inputs and outputs forS/PDIF-format digital audio. The two channelsof S/PDIF digital input can be used in combination with the two analog inputs (for a total offour simultaneous input channels). The twochannels of S/PDIF digital output can be used incombination with the two analog outputs (for atotal of four simultaneous output channels).To configure Mbox for a S/PDIF connection:1 Do one of the following: On Mac, launch System Preferences(Apple menu System Preferences), thendouble-click Avid Mbox. (You can alsoopen the Driver Control Panel from the Applications menu.)– or – On Windows, choose Start Control Panel Mbox.Connecting Digital Devices2 In the Control Panel, choose Setup.To connect a S/PDIF device to Mbox:3 Select S/PDIF from the Clock Source pop-up1 Use two 75-ohm coaxial cables with male RCAmenu.connectors on both ends (purchased separately).2 Connect the device’s S/PDIF output to Mbox’sS/PDIF input port, and the device’s S/PDIF inputto Mbox’s S/PDIF output port.Using S/PDIF InputIf you are using the S/PDIF input on Mbox witha third-party CoreAudio-or ASIO-compliant application, use the Mbox Control Panel to configure the input. If you are using Pro Tools, use theHardware Setup dialog in Pro Tools.To configure Pro Tools for a S/PDIF connection:1 Choose Setup Hardware Setup.2 Select S/PDIF from the Clock Source pop-upmenu.3 Click OK.4 On the recording track, select the appropriatestereo or mono S/PDIF source from the track Input selector.Once enabled in the Hardware Setup dialog, theS/PDIF inputs become active and passes audio toMbox.18Mbox User Guide
MIDI ConnectionsMonitoring MIDI Instruments withMboxThe two MIDI ports on Mbox are available toany MIDI application on your computer, as longas the Mbox hardware drivers are installed.If you have a MIDI instrument that has analogoutputs, you can connect it to Mbox to monitorits output.If you need additional MIDI ports you can add acompatible MIDI interface. USB MIDI interfaceswork effectively with Windows or Mac. SerialMIDI interfaces are supported on Windows systems only.Only USB MIDI interfaces are compatiblewith Pro Tools systems for Mac OS X. Modem-to-serial port adapters and serial MIDIdevices are not supported.To connect your MIDI instrument for monitoring: Connect the MIDI instrument’s audio outputsto the Line (TRS) inputs on your Mbox.Input 2Input 1To connect your MIDI device to Mbox:1 Connect a standard 5-pin MIDI cable from theMIDI Out port of your device to the MIDI Inport on the back of Mbox.Mbox connections for line-level stereo input source2 Connect another MIDI cable from theMIDI In port of your device to the MIDI Outport on the back of Mbox.MIDI InMIDI OutMIDI connections to MboxOn Mac OS X, use the Audio Midi Setup(AMS) utility to customize the names of yourMIDI devices.Chapter 4: Making Studio Connections19
20Mbox User Guide
chapter 4Using the Driver Control PanelThe Mbox Driver Control Panel lets you configure settings for your audio interface for use withPro Tools or other audio applications that support
Contents iii contents Chapter 1. Welcome to Mbox. . . . . . . . . . . . . . . . . . . . . . . . . . . . . . . . . . . . . . . . . . . . . . . . .1 Mbox Features .