Transcription
Use & CareMANUALIntegrated Refrigerator / Freezer7 SERIESVBI7360 / CVBI7360FBI7360 / CFBI7360MVBI7360 / CMVBI7360MFBI7360 / CMFBI7360
CongratulationsWe hope you will enjoy and appreciate the care and attention we have put into every detail of your new, state-of-the-art refrigerator.Your appliance is designed to offer years of reliable service. This Use and Care Guide will provide you with the information you need tobecome familiar with your refrigerator’s care and operation. For additional information and user videos, visit our website at vikingrange.comYour complete satisfaction is our ultimate goal. If you have any questions or comments about this product, contact our ConsumerSupport Center at 1-888-845-4641.We appreciate your choice of our refrigerator and hope that you will again select our products for your other major appliance needs.For more information about the complete and growing selection of our products, visit us online at vikingrange.comTable of ContentsGetting StartedWarnings 3Important Information 4Proper Disposal (of old refrigerator) 4Features 5Product ControlsSettings and Functions 6OperationRefrigerator 8Freezer 10Automatic Ice Maker 10Food Storage Guide 11Product CareCleaning and Maintenance 12Troubleshooting 15Service Information 16Warranty 172
WarningsYour safety is important to us. This use and care manual contains safety symbols and statements. Please pay specialattention to these symbols and follow any instructions given. This symbol alerts you to hazards such as fire, electrical shockor other injuries.WARNINGWARNINGTo reduce the risk of fire, electric shock, or injury when usingyour unit, follow these basic precautions:To avoid serious illness or death, do not use unit where wateris unsafe or of unknown quality without adequate disinfectionbefore or after use of filter. Read all instructions before using the unit. NEVER allow children to operate, play with, or crawl inside theunit. NEVER clean unit parts with flammable fluids. The fumes cancreate a fire hazard or explosion. ALWAYS turn the power on/off switch (located to the left ofthe center behind the access panel) to the OFF position beforeattempting to clean or service the unit.WARNINGTo avoid electrical shock which can cause severe personal injuryor death, turn power disconnect switch to OFF before cleaning.After cleaning, return power disconnect switch to ON position.FOR YOUR SAFETYWARNINGDO NOT STORE OR USE GASOLINE OR OTHER FLAMMABLEVAPORS AND LIQUIDS IN THE VICINITY OF THIS OR ANY OTHERAPPLIANCE. THE FUMES CAN CREATE A FIRE HAZARD OREXPLOSION.ELECTRICAL SHOCK HAZARDDisconnect power or turn power disconnect switch toOFF position before removing top grille. Failure to doso can result in death or electrical shock.WARNINGWARNINGELECTRICAL SHOCK HAZARDBURN HAZARD Plug into a grounded 3-prong outlet. If a 2-prong wall receptacle is encountered,contact a qualified electrician. DO NOT remove ground prong. Unit must be grounded at all times. DO NOT use an adapter. DO NOT use an extension cord. Failure to follow these instructions can result indeath, fire, or electrical shock.-DO NOT touch condenser coils near defrost pan.Doing so can result in burns.CAUTION and between the doors and cabinetsare necessarily small. Be careful closingdoors when children are in the area. Keep fingers out of the “pinch point”areas. Clearances between the doorsand between the doors and cabinetsare necessarily small. Be careful closingdoors when children are in the area. Keep fingers out of the “pinch point”areas. Clearances between the doorsand between the doors and cabinetsare necessarily small. Be careful closingdoors when children are in the area.CAUTIONCAUTIONKeep fingers out of the “pinch point”areas. Clearances between the doorsand between the doors and cabinetsare necessarily small. Be careful closingdoors when children are in the area.CAUTION Keep fingers out of the “pinch point”areas. Clearances between the doorsand between the doors and cabinets3
Getting StartedImportant Safety Instructions Install and level your refrigerator on a floor that will hold its weight,plus food weight (approximately 1200 pounds [540kg]) and in anarea suitable for its size and use. DO NOT install a refrigeration unit near a heat source, nor in a location where the surrounding temperature will fall below 60 F (16 C). DO NOT allow your refrigerator to be exposed to the weather or outdoor elements. Connect your refrigerator only to the appropriate kind of electrical outlet, with the correct power supply and grounding. (Refer to theElectrical Requirements section of the Installation Instructions.) Use the refrigerator only for the uses described in this manual. Properly maintain the refrigerator. Be sure the refrigerator is not used by anyone unable to operate it properly.Proper Disposal (of old refrigerator)IMPORTANT:Now that you have a new refrigerator, it is extremely important that you dispose of your old appliance in a way that minimizes thepossibility that children will find it. There have been many cases in years past of children crawling inside junked and abandonedrefrigerators and becoming trapped or suffocated.Contact your municipal waste disposal authority to find out the best and safest way to dispose of your old refrigerator.WARNINGRISK OF CHILD ENTRAPMENTBefore You Throw Away Your Old Refrigerator or Freezer: Take off the doors. Leave the shelves in place so that children may not easily climbinside.4
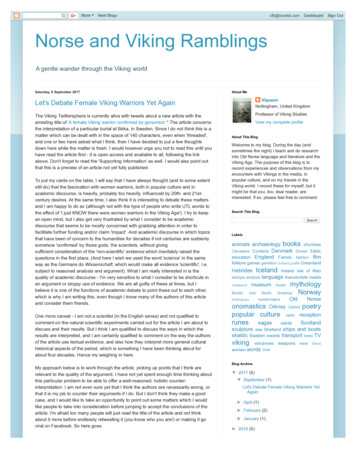
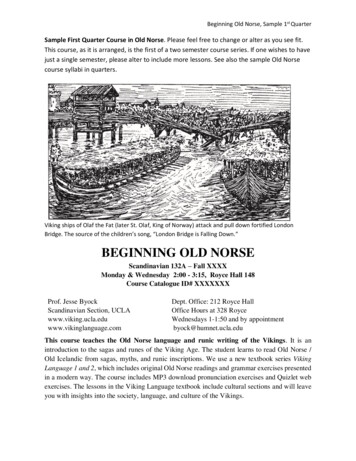
Getting 21314151615Control PanelTheater ramp-on LED LightingBluezone Fresh Preservation Technology* (Rear Inside Wall)Door Bins (3)Internal Water dispenserSpillproof Shelves with Nano Technology (3)Crisper DrawerRemovable Upper Freezer DrawerUpper Freezer Drawer Dividers (Non-Adjustable)Ice BinRemovable Lower Freezer DrawerLower Freezer Drawer Dividers (Adjustable)Water FilterAccess panelKickplateDoor Stop*Bluezone is a registered trademark of Primaira, LLC5
Settings and FunctionsIn order for your new refrigerator to work properly, it is important that youunderstand its various features, controls, and how to use them.access panelPower On/Off SwitchYour unit is shipped with the power switch on. When first plugged in, the display willflash. Push any button to initiate display.Product ControlsThe power on/off switch is located to the left of the center behind the access panel. Itis used to turn the power off when cleaning or servicing the refrigerator.To turn power off, remove the access panel. Press the power on/off switch to the offposition.BTo turn power on, press power on/off switch to the on position. Replace accesspanel.IMPORTANT: Be sure the power on/off switch is in the on position after cleaning orservicing.(Select Models only) Viking Range, LLC Connect App enables connectivity from a mobile phone to monitortemperatures, settings, and allows for various alerts to be sent to the phone. If the NIC Enabled is set to on, the iconwill illuminate blue. If not enabled, the icon will remain white.Enabling the lock feature will prevent the use of any other keypad operation. When the lock is enabled, the lockkeypad will illuminate blue. The enabled status of the lock is not retained after power loss. To disable the lockfeature press the lock keypad again. When the lock is disabled, the icon will illuminate white.Max refrigerator mode adjusts the refrigerator temperature to the coldest setting for four hours, at the end of which therefrigerator’s temperature automatically returns to its previous setting. To activate the max refrigerator mode, simplypress the “MAX REF” button. The “MAX REF” light will glow to let you know you’ve turned on the max refrigerator mode.To deactivate the max refrigerator mode before the end of the four hour cycle, press the “MAX REF” button and the blueillumination will go out.Temperature Change Button. When you first plug your new refrigerator in, you will find that the refrigerator is factoryset at 38 F in the refrigerator and 0 F in the freezer. Wait 24 hours after plug-in for the cabinets to reach this setting.After 24 hours, you may adjust controls as desired. To change from F to C, press the “ F/ C” button, To change back,press the F/ C button again.Sabbath mode is used to disable interior lights and alarms for observance of the Sabbath. To enter Sabbath mode, pressthe ”SAB” button. Button will illuminate blue to indicate “SAB” mode is active. When your refrigerator is in Sabbathmode, interior lights, display (excluding SAB indicator, temperature, and compartment indicator), and alarms aredisabled. The “SAB” button will illuminate blue. If your refrigerator loses power while in Sabbath mode, it will return tothe Sabbath mode when power is reestablished. To exit the Sabbath mode, press the ”SAB” button.Vacation mode will optimize refrigerator energy consumption during periods of non-use. Press the “VAC” button toactivate. Press again to return refrigerator to normal operation.6
Settings and FunctionsThe ice button will turn on or turn off ice production. The default setting is on. The button will illuminate in blue. Pressto turn off ice production.The “MAX ICE” button sets ice maker to full capacity. Press “MAX ICE” button to activate. The max ice mode sets thefreezer to its lowest setting (-5o) for 48 hours and will end after function is completed.The alarm sounds and the ALARM button light blinks if either door or drawer is left open for more than three minutes.To deactivate the door open alarm, press the “ALARM” button or close the door that is open. When the alarm sounds, anumber will be illuminated in either the REF or FRZ digital display. Refer to Troubleshooting Section for explanation ofcodes.To activate / deactivate Showroom mode, simultaneously press and hold the VAC key and the ALARM keyfor 3 seconds. The showroom mode icon will illuminate blue. The icon will not be visible when deactivated.When in the Showroom Mode, all controls including regulation of temperature will be disabled except forthe interior lights. No error or fault codes will be displayed while in this mode.The “FILTER” button will illuminate when it is time to change the water filter. After replacing the filter, press buttonto reset. Filter icon will be visible only when it is time to change the filter. To replace water filter, refer to page 9. Foradditional information, visit vikingrange.comThe Bluezone technology is designed to help remove odors, reduce flavor transfer, remove airbornemold, and maintain the color, texture and taste of fruits and vegetables for longer periods oftime. When it comes time to replace the Bluezone bulb, Bluezone will appear along the bottomof the refrigerator display. To replace the bulb, refer to page 14 . For additional information, visitvikingrange.comLED LightingBoth the refrigerator and freezer compartments feature maintenance-free LED lighting. To replace, contact an authorized servicetechnician.Setting the TemperatureWhen you first plug your new refrigerator in, you will find that the refrigerator is factory set at 380F in the refrigerator and 00F in thefreezer. Wait 24 hours after plug-in for the cabinets to reach this setting. After 24 hours, you may adjust controls as desired.To adjust the refrigerator or freezer temperature, press either the REF or FRZ button. Using either the UP or DOWN toggle, set desiredtemperature.7Product ControlsMax freezer mode adjusts the freezer temperature to the coldest setting for 6 hours, at the end of which, the freezertemperature automatically returns to its previous setting. To activate the max freezer mode, press the “MAX FRZ” button.The “MAX FRZ” button will glow to let you know you have turned on the max freezer mode. To deactivate the maxfreezer mode before the end of the 6 hours cycle, simply press the “MAX FRZ” button.
RefrigeratorSpillproof Plus Shelves with Nano TechnologyThe spillproof shelves with Nano Technology contain liquids with no raised edges in order to provideextra shelf capacity.Note: Foods and beverages placed on the uppermost shelf under the air vent may freeze.Shelf AdjustmentYou can adjust the shelves to match the way you use your refrigerator. To remove the shelves, push up onthe shelf, tilt upward at the front releasing the hooks from the shelf support, then pull the shelf straight out.To replace shelves, guide the rear hooks of the shelf into the slots in the shelf supports. Then, tilt the shelf upat the front until the hooks drop into the slots, and lower the front of shelf to level position.Non-Adjustable ShelfOne non-adjustable glass shelf is located above the crisper drawer.OperationCAUTIONCAUTIONTo avoid personal injury and property damage, confirm shelf issecure before placing items on shelf.To avoid personal injury or property damage, handle temperedglass shelves carefully. Shelves may break suddenly if nicked,scratched, or exposed to sudden temperature change.Door Bin AdjustmentYour refrigerator’s door bins hold two-liter bottles and can beplaced in any position on the refrigerator door.To remove a bin, grasp both sides, push the bin up from the sides,and pull it out. DO NOT pull the bin up by the top trim.2To replace the bin, place it over the glides in the refrigerator door,and push the door bin down to lock it into place.DO NOT pull the bin up bythe top trim821
RefrigeratorInternal Water DispenserThe water dispenser is located inside the refrigerator on the left wall. After refrigerator is installed, wait several hours for the water tochill before dispensing. To dispense, press a glass against the dispenser pad. Water will stop dispensing when glass is removed.The water filter is located on the bottom right corner behind the lower freezer drawer.To remove the water filter, push in and turn 1/4 counter clockwise, pull out.To replace the water filter, push in, turn 1/4 clockwise, releaseFor additional replacement information or to order replacement filter RWFDISP online, visit the product information tab for 7 SeriesBottom Mount Refrigerators online at www.vikingrange.com or by calling 1-888-845-4641.9OperationWater Filter
FreezerFreezer DividersRear TabThe freezer dividers separate the freezer into sections for easy food organization.Each drawer has two dividers which are removable but not interchangeable.Upper basket dividers are not adjustable. Lower basket dividers are adjustable.To remove dividers, push rear divider toward back of drawer until front tabreleases from front drawer panel. Rotate slightly and pull up. To replace, placerear tab in back of drawer, push and lower front of divider into slot on front panel12WARNINGIf the lower freezer basket dividers are removed, there is enough space for children to crawlinside. To prevent accidental child entrapment, DO NOT allow children to play inside drawer.Freezer DrawersBoth freezer drawers are removable.Pull drawer all the way out.Remove clip on both sides of drawer.Lift drawer up and out.OperationClipAutomatic Ice MakerThe ice maker is located above the upper freezer drawer on the left hand side.After the refrigerator reaches normal temperature, the ice maker fills with water andbegins operating. Under normal conditions, the ice maker will produce seven to ninebatches of ice per 24 hour period.Note: Allow 24 to 48 hours after installation before looking for ice in your ice drawer.You should discard the first three full drawers of ice produced by your refrigerator,and should also throw out the first drawer full of ice your refrigerator produces afterextended periods of non-use.During ice production, the ice maker arm raises and lowers. When the ice bin is full, theice maker arm automatically turns the ice maker off. To manually stop ice production,raise the ice maker arm. You will hear a definite click when you have the arm in the rightposition. The ice maker won’t produce any more ice until you lower the ice maker arm.OnPositionIce MakerArmOffPositionHandles upCAUTIONHandles downTo avoid damage to ice maker, observe the following: DO NOT force ice maker arm down or up past stop position. DO NOT place or store anything in ice bucket.Ice Bin RemovalTo remove the ice bin, pull top freezer drawer open. Raisehandles on both sides and pull up. When replacing the icebin, lower handles before closing drawer.10
Food Storage GuideYour refrigerator is equipped with Bluezone technology, a unique fresh preservation system that helps extend shelf life and maintainquality of the fruits and vegetables in your refrigerator. The Bluezone cleans the refrigerator air of ethylene gas, a naturally occurringripening agent that comes from fruit like apples, pears, melons, and stone fruit. Ethylene gas causes many vegetables and fruits to ripenfaster, discolor, or become bitter. This technology will also kill airborne microbes such as mold or bacteria, which will help keep all foodfresh longer. The Bluezone uses a germicidal bulb and a special catalyst to remove odors and reduce flavor transfer from strong smellingitems in your refrigerator and only works when the refrigerator is running. When the bulb needs to be replaced (approximately everytwo years), the Bluezone logo will appear in the refrigerator temperature display. Refer to page 14 for bulb replacement.Storing Fresh Food-Wrap or store food in the refrigerator in airtight and moisture-proof material. This prevents food odor and taste transfer. For datedproducts, check use-by date to ensure freshness.-To store leafy vegetables, remove store wrapping. Then tear off bruised and discolored areas. Place them in a plastic bag or plasticcontainer and store in your produce drawer.-For vegetables with skins, such as carrots and peppers, store in plastic bags or containers.-When refrigerating or freezing fruit, wash the fruit and then let it dry. Store the fruit in plastic bags. Don’t wash or hull berries until theyare ready to use. Instead, sort and keep berries in their original container in the temperature/humidity drawer, or store in a looselyclosed paper bag on the refrigerator shelf.-Store eggs without washing them. Keep eggs in their original carton .-Wipe milk cartons. For best storage, place milk on an interior shelf.-Keep opened butter in covered dish or closed compartment. When storing butter in the freezer, wrap it in freezer packaging.-When you have leftovers, cover then with plastic wrap, aluminum foil, or store the leftovers in plastic containers with tight lids.-Store meat in its original wrapping, as long as it’s airtight and moisture-proof. Rewrap meat if necessary.Note: When storing meat longer than the recommended times, freeze the meat.Recommended storage times:ChickenGround BeefSteaks/RoastsCured Meats1-2 days1-2 days3-5 days7-10 daysBaconCold CutsVariety Meats5-7 days3-5 days1-2 daysNote: Use fresh fish and shellfish the same day as purchased.The secret of successful freezing is in the packaging; the way you close and seal a package of food must not allow air or moisture in orout, or the quality of the food will deteriorate while frozen.Packaging you should not use for freezing includes: Bread wrappers Non-polyethylene plastic containers Containers without lids Wax paper or wax-coated freezer wrap Thin, semi-permeable wrapRecommended packaging: Rigid plastic containers with tight-fitting lids Straight-sided canning/freezing jars Heavy-duty aluminum foil Plastic-coated paper Non-permeable plastic wraps (made from saran film) Zip-top freezer bagsFollow package or container instructions for proper freezing methods.Freezing FoodsDO NOT expect your freezer to quick-freeze large quantities of food; DO NOT load more than two to three pounds of unfrozen foodper cubic foot within 24 hours. Leave enough space for air to circulate around packages, and be careful to leave enough room at thefront so the freezer door can close tightly.A full freezer stays cold longer than a partially filled one, and a freezer full of meat stays cold longer than a freezer full of baked goods.If food contains ice crystals, it may be safely refrozen, although the quality and flavor may be affected. If the condition of the food ispoor, or if you feel it is unsafe, dispose of it. Storage times will vary according to the quality of food, the type of packaging or wrapused (airtight and moisture-proof ), and the storage temperature, which should be 0 to 2 F (-18 to -17 C).11OperationPackaging Food for Freezing
Cleaning & MaintenanceCAUTIONWARNINGTo avoid personal injury or property damage, read and follow allcleaning product manufacturer’s directions.ELECTRICAL SHOCK HAZARDTo avoid electrical shock which can cause severepersonal injury or death, turn power disconnect switchto OFF before cleaning. After cleaning, return powerdisconnect switch to ON position.Your refrigerator is built to give you many years of dependable service. However, there are a few things you can do to help extend itslife. This section tells you how to clean your refrigerator and what to do when going on vacation, moving, or during a power outage.Interior SurfacesWash the interior surfaces of your refrigerator with four tablespoons of baking soda dissolved in one quart of warm water. Use a soft,clean cloth. Rinse these surfaces with warm water, and dry with a soft clean cloth.DO NOT use the following to clean interior surfaces: Abrasive or harsh cleaners, such as ammonia or chlorine bleach Concentrated detergents or solvents Metal scouring padsThese products can scratch, crack and discolor your refrigerator’s surfaces. Also, NEVER wash the ice bucket or shelves in thedishwasher. They must be cleaned by hand.Product CareCleaning ChartPartWhat to UseHow to CleanRemovable parts(shelves, drawers)Sponge or cloth with mild detergent Hand wash,and warm waterrinse, and drythoroughly.Front door panels stainless steelStainless steel cleanerWipe with softcloth. paintedSponge or cloth with mild detergentand warm waterHand wash,rinse, and dryDO NOT use cleaners containingthoroughly.chlorine bleach.Interior walls(allow freezer towarm up so clothwill not stick)Sponge, soft cloth or papertowel with baking soda or milddetergent and warm waterHand wash,rinse, and drythoroughly.Door liners andgasketsSponge, soft cloth or paper towelwith mild detergent and warmwater.Wash, wipe, anddry thoroughly.DO NOT use cleaning waxes,concentrated detergents, orcleaners containing chlorinebleach on gaskets.Plastic parts(covers, panels)Soft, clean sponge or soft cleancloth with mild detergent and warmwater.Wash, wipe, anddry thoroughly.DO NOT use paper towels,window sprays, or scouring pads.These can scratch and damage thefinish.Condenser*Vacuum cleaner with extendednarrow attachment* Condenser cleaning is not covered under the warranty12Remove visiblelint and dustbuild-up on coil.
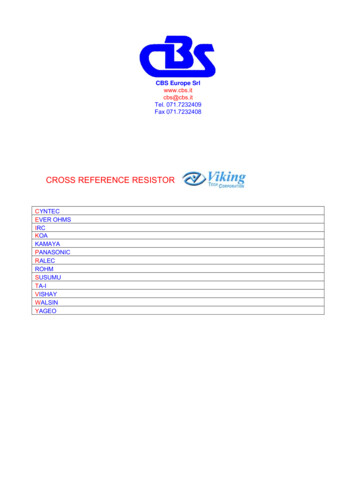
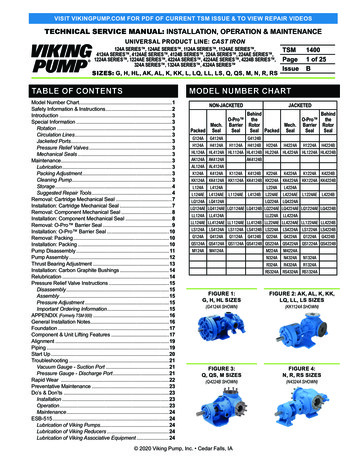
Cleaning & MaintenanceCondenser Cleaning IndicatorThe refrigerator temperature display will be blinking “CL” to indicate that it is time to clean the condenser coil.Condenser Cleaning:There is always chance of getting the condenser clogged due to dust in the air, pet hair, etc. We recommend cleaning the condenseronce every 6 months. It is always better to clean the condenser coil as soon as you perform any construction activities, or work thatproduce lots of dusts near the unit.To clean the condenser:1. Turn off the main power switch located at the top of unit behind the top access panel as shown in Settings and Functions – PowerOn/Off switch page 6.2. Remove the bottom freezer drawer by pulling allthe way out, removing the rear clips and liftingout. Details are shown in the freezer section page10.3. Remove the kick plate by loosening two screws and slide outthough the key hole4. Remove the access panel by removing 2screws as shown here and pull out with forceto unsnap the panel5. Vacuum the front surface of the condenser coil using any house holdvacuum cleaner extension. It is recommended to vacuum the coilrather than using any duster. Duster may damage the fin. Make sure toremove the dust completely out of the coil area.Glass ShelvesTo clean your refrigerator’s glass shelves, lift the shelf out by lifting thefront and releasing the hooks from the metal track. Then pull the shelfout. Be sure to allow the glass shelves to adjust to room temperaturebefore cleaning. Use a mild detergent with water to clean. Dry glassshelf thoroughly and replace shelf by inserting hooks into metal trackand lowering front.CAUTIONTo avoid personal injury or property damage, handletempered glass shelves carefully. Shelves may break suddenlyif nicked, scratched, or exposed to sudden temperaturechange.Door GasketsClean the door gaskets every three months using the same procedures used for interior surfaces. You should apply a light film ofpetroleum jelly to keep gaskets pliable.13Product Care6. Replace the access panel and kick plate.7. Turn main power switch on. Replace top access panel.8. Reset and remove the “CL” from the temperature display by simultaneously pressing the up and down arrow key for 3 seconds.
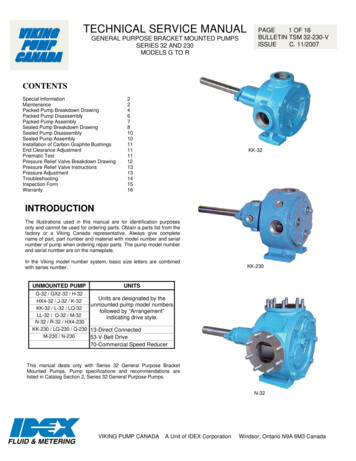
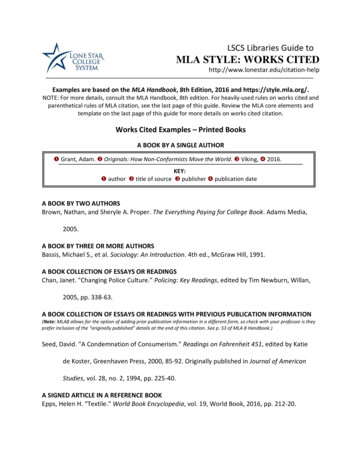
Cleaning & MaintenanceBluezone Bulb ReplacementWhen it comes time to replace the Bluezone bulb, Bluezonewill appear along the bottom of the refrigerator digital display.A bulb kit (P/N: RBZB7) will need to be purchased from VikingRange, LLC. The new bulb kit can be ordered online at www.vikingrange.com or by calling 1-888-845-4641.To remove old bulb:-Clear and remove shelf in front of the bluezone panel.-Follow the steps illustrated on the right to remove theold bulb.To install new bulb:-Remove new bulb from packaging.-Plug new bulb into socket (Note: you may need torotate the bulb in order for the pins to line up with thesocket holes.-Replace both the inner and decorative covers.To clear Bluezone alert:Once the bulb has been replaced, the Bluezone alertcan be cleared from the control panel by holding therefrigerator Selector key for 3 seconds.CoverLED2. Flip the round LED towardsyou, away from inner cover.3. Remove inner coverProduct Care1. Remove decorative cover at illuminatededge using fingertip or fingernail.Cover is held in place with magnets.4. Wedge the tab of the inner coverbetween the bulb and the socketby holding the cover straight.5. Slide bulb to the left untilcontacts fully disengage. Pullbulb forward to remove.For additional information on replacing the bulb, visit the product information tab for 7 Series Bottom Mount Refrigerators onlineat vikingrange.com14
Cleaning & MaintenanceDoor Stop AdjustmentYour refrigerator is factory set at a 90o degrees with the longer end of the door stop facing away from the door. To change to 105o doorstop, locate the door stop on top of the door hinge. Remove the two screws and door stop. Rotate the door stop 180o degrees so thatthe shorter end faces away from the door. Replace door stop and screws. For additional information on the door stop adjustment,visit the product information tab for 7 Series Bottom Mount Refrigerators online at vikingrange.comlong end of door stopDoor StopRemove screws and door stopRotate 180o degreesReplace door stop and screwsSaving EnergyVacation TipWhen you will be gone from home a short time (less than four weeks), there is no need to shut off your refrigerator. However, be sure to: Use any perishables. Freeze other items. Activate vacation mode. Turn off icemaker.If you will be away from home for a month or more, follow these guidelines: Remove all food. Turn the power disconnect switch to the off position. Clean the unit and door gaskets according to the “Cleaning and Maintenance” chart on page 12. Prop doors open with rubber or wood blocks so air can circulate inside. This will keep odor and mold from building up. Turn off icemaker and shut-off water supply to icemaker by lifting the ice maker arm. Refer to page 10.15Product CareYou can help your refrigerator use less electricity with these simple tips: Open the door as few times as possible. Think about what you need before you open the door. Get everything out at one time. Keepfood organized so you will not have to search for what you want. Close door as soon as food is removed. DO NOT overcrowd the unit so air movement is blocked. DO NOT set the unit to temperature colder than necessary.
TroubleshootingUnderstanding Sounds You May HearYour new refrigerator may make different sounds than your old one. Hard surfaces, such as the ceilings, walls, and cabinets around theunit can make these sounds seem louder. However, these sounds are normal and will soon become familiar; they indicate that yourrefrigerator is working properly.Here are some of the noises you may hear and what they are: Freezer or refrigerator fresh food fan: sounds like air rushing or whirling Sealed system (evaporator and heat exchanger) refrigerant flow: sounds like gurgles, pops or boiling water Defrost heater: sizzles, hisses or pops Condenser fan: air rushes and whirls
3 Bluezone Fresh Preservation Technology* (Rear Inside Wall) 4 Door Bins (3) 5 Internal Water dispenser 6 Spillproof Shelves with Nano Technology (3) 7 Crisper Drawer 8 Removable Upper Freezer Drawer 9 Upper Freezer Drawer Dividers (Non-Adjustable) 10 Ice Bin 11 Removable Lower Freezer Drawer 12 Lower Freezer Drawer Dividers (Adjustable)