Transcription
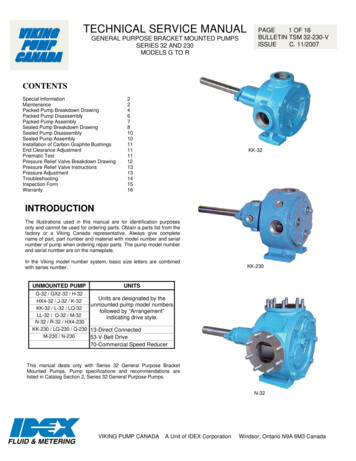
Viking Use & Care ManualViking Range Corporation111 Front StreetGreenwood, Mississippi 38930 USA(662) 455-1200For product informationcall 1-888-VIKING1 (845-4641),or visit the Viking Web site atvikingrange.comProfessional & Designer SeriesBuilt-In Electric Single and Double OvensF20362F EN(082608J)
CongratulationsYour purchase of this product attests to the importance you placeupon the quality and performance of the major appliances youuse. With minimal care, as outlined in this guide, this product isdesigned to provide you with years of dependable service. Pleasetake the few minutes necessary to learn the proper and efficientuse and care of this quality product.Some of the key features of this appliance include: A broad range of baking and broiling modes – up to 8cooking modes in all - to make even your most challengingbaking projects a success. Split baking and broiling elements – which reducespreheating time and provides greater control and more evenheating. A reversing fan which is 2 times larger than most on themarket – this allows you to cook foods more thoroughly andevenly – even when baking large quantities. Four convection modes offering greater air circulation toshorten cooking times and cook foods more evenly. Dual broiling elements producing intense radiant heat forfaster broiling and a larger coverage area. Three broiling modes including a new low-broil mode fordelicate broiling and top-browning. A new lighting system to provide more light with less glare. A profiled, hidden bake element for easier cleaning.WarningsWARNINGIf the information in this manual is not followed exactly, a fireor explosion may result causing property damage, personalinjury or death.WARNINGNEVER use this appliance as a space heater to heat or warmthe room. Doing so may result in carbon monoxide poisoningand overheating of the oven.WARNINGDo not use commercial oven cleaners inside the oven. Use ofthese cleaners can produce hazardous fumes or can damagethe porcelain finishes.WARNINGNEVER cover any slots, holes or passages in the oven bottomor cover an entire rack with materials such as aluminum foil.Doing so blocks air flow through the oven and may causecarbon monoxide poisoning. Aluminum foil linings may alsotrap heat, causing a fire hazard.WARNINGTo avoid sickness and food waste when using automatic timebaking: Six adjustable rack positions with the largest usable bakingspace available in this class. Do not use foods that will spoil while waiting for cooking tostart, such as dishes with milk or eggs, cream soups, custards,fish, pork, poultry, or foods with stuffing.Your complete satisfaction is our ultimate goal. If you have anyquestions or comments about this product, please contact thedealer from whom you purchased this product – or contact ourconsumer support center at 1-888-VIKING1. Any food that has to wait for cooking to start should be verycold or frozen before it is placed in the oven.We appreciate your choosing a Viking Range Corporationproduct and hope that you will again select our products for yourother major appliance needs. For more information about thecomplete selection of Viking products, contact your dealer or goto vikingrange.com Do not allow food to remain in the oven for more than twohours after the end of the cooking cycle. Do not use foods containing baking powder or yeast whenautomatic time baking. They will not rise properly.WARNINGTo avoid sickness and food waste, do not allow defrosted foodto remain in the oven for more than two hours.
Important Safety InstructionsGetting StartedRead before operating your oven.Important Safety Instructions 2Setting the Clock 4 Use this appliance only for its intended use as described in thismanual. Never use your appliance for warming or heating theroom. This is based on safety considerations.Product ControlsOven Control Panel 5Built-In Oven Features 7 Your unit should be installed by a qualified technician. Theappliance must be installed and electrically grounded accordingto local codes.Oven Settings & Functions 8Clocks & Timers 13Probe Function 19Cooking Tips Do not attempt to repair or replace any part of this applianceunless specifically recommended in this manual. All servicingshould be referred to a qualified technician. Warranty servicemust be performed by an authorized service agency.Cooking with Your Oven 20Conventional/Convection Cooking 21Conventional Baking Chart 23Convection Baking Chart 24Solving Baking Problems 25Roasting Instructions 26Using Meat Probe 27Conventional Roasting Chart 28 Children should not be left alone in the kitchen while the ovenis in use. CAUTION: Do not store items of interest to childrenover the unit. Children climbing to reach items could beseriously injured. GREASE - Grease is flammable and should be handledcarefully. Do not use water on grease fires. Flaming grease canbe extinguished with baking soda or, if available, multipurposedry chemical or foam type extinguisher. Let fat cool beforeattempting to handle it. Do not allow grease to collect aroundthe oven or in vents. Wipe up spillovers immediately.Convection Roasting Chart 29Broiling Instructions 30Broiling Chart 32Product CareConvection Dehydrate and Defrost 33Cleaning and Maintenance 34 Loose-fitting or hanging garments should never be worn whileusing the appliance. Do not drape towels or materials on ovendoor handles. These items could ignite and cause burns. Use only dry potholders. Moist or damp potholders on hotsurfaces may result in burns from steam. Do not let potholdertouch hot surface areas. Do not use a towel or other bulkycloth.Replacing Light 38Trouble Shooting 39Service Information 40Warranty 41 Keep area clean and free from combustible materials, gasoline,and other flammable liquids. Never use your oven as a storagespace. Combustible items (paper, plastic, etc.) may ignite andmetallic items may become hot and cause burns.2Getting StartedTable of Contents
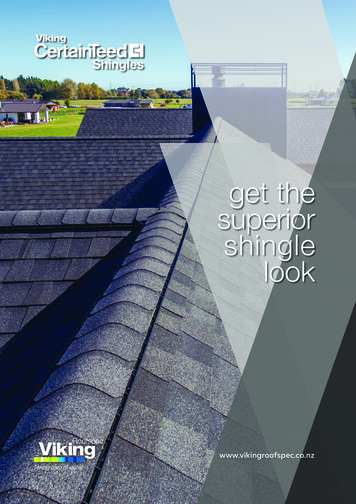
Getting StartedSetting the ClockDigital Display (Select Models) Do not heat unopened food containers; buildup of pressuremay cause the container to explode and result in injury. Always position oven racks in desired location while oven iscool. If rack must be moved while oven is hot, do not letpotholder contact hot heating element in oven. Use care when opening oven door. Let hot air or steam escapebefore removing or replacing food. Hot air or steam can causeburns to hands, face and/or eyes. Keep oven vents unobstructed. The oven vent is located at thefront of the oven and vents into the room. Do not clean door gasket. It is essential for a good tight seal.Care should be taken not to rub, damage, or move the gasket. No commercial oven cleaner or oven liner protective coatingsuch as aluminum foil should be used in or around any part ofthe oven. Improper oven liners may result in a risk of electricshock or fire. Keep oven free from grease buildup. Before self-cleaning the oven, remove broiler pan, broiler grid,oven racks, and other utensils. Do not use your oven to cleanother parts. A fan noise should be heard during the cleaningcycle. If not, call service before self-cleaning again. DO NOT TOUCH HEATING ELEMENTS OR INTERIORSURFACES OF OVEN. Heating elements may be hot eventhough they are dark in color. Interior surfaces of an ovenbecome hot enough to cause burns. During and after use, donot touch or let clothing or other flammable materials contactheating elements or interior surfaces of oven until they have hadsufficient time to cool. Other surfaces of the oven may becomehot enough to cause burns, such as the oven vent opening, thesurface near the vent opening, and the oven door window.SAVE THESE INSTRUCTIONSThe time-of-day must be set before any other program can be used. Whenyour oven is first connected to the power inyour home, the timer display will show --:--.SETTo program the time-of-day:1. Press the “CLOCK”* button once.12:00 will be displayed with the wordSET in the upper right corner.2. Turn the “SET” knob until the correcttime-of-day is displayed. AM and PMare not indicated.3. Press the “CLOCK” button again. The word SET will disappear and thecorrect time is now set into the timer.CLOCKSETMIN/SECTIMERSTARTTIMEThe time-of-day can be changed by following steps 1 through 3. It cannotbe changed while there is a Bake Hours or Start Time cycle programmedinto the timer.Analog Display (Premiere Models)Synchronizing the analog and digital clocks:NOTE: It is important to always synchronize the analog and digital clocks before setting the timeof-day.1. Press and release the “start time” button. NOTE: This is only necessary after apower outage or for the first time to set the clock.2. Press and hold the “min/sec timer” and start time buttons simultaneously.3. Turn the “Set” knob to move the hands on theanalog clock to 30 minutes ahead of thecurrent time. Release hold from “start time”and “min/sec timer” buttons.4. After several seconds, the display will blink.Press and hold the “min/sec timer” button andturn the “Set” knob to set the digital clock sothat it matches exactly with the analog clock.The clocks are now synched and you can nowset the time of day.The time-of-day must be set before any otherprogram can be used.min/sec baketimer timeSetstart probetime tempSetting the time-of-day:1. Push and hold the “min/sec timer” and “bake time” buttonssimultaneously.2. Turn the “Set” knob until correct time is displayed on the digital clock.3. Release hold from “min/sec timer” and “bake time” buttons.The analog clock’s time will automatically set to match the digital clock.*NOTE: The PROBE function is included on Premiere Models.3BAKEHOURS4Getting StartedImportant Safety Instructions
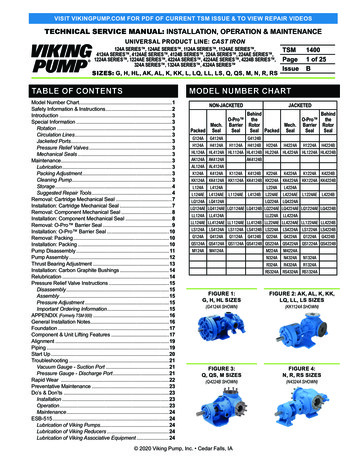
Temperature ControlEach oven has a separate temperaturecontrol dial. The controls can be set atany temperature from 200 F (93.3 C)to 550 F (287.8 C). There are separatesettings for broiling and roilcleanOven TemperatureSetstart probetime ffConvection RoastMulti-rack baking for breads, cakes,cookies (up to 6 racks of cookiesat once)TruConvecTMMulti-rack baking for heavier or frozenfoods (e.g., 4 frozen pies, pizzas, entrees,vegetables)A pyrolytic self-cleaning cycle where theoven reaches elevatedtemperatures in order to burnoff soils and depositsSelf-CleanmanualThe Premiere Designer double oven control panel is shown above.Delicate broiling such as meringueLow-BroilWhole turkeys, whole chickens, hams, etc.Medium-BroilWhite meats such as chicken or meatsgreater than 1” thick that would beover-browned in high broilThicker meats, faster than regular broil &with less smoke generationConvection roilConvection Bake500broilcleanOven TemperatureLower Ovenconv.baketru.conv.bakeOven FunctionhibroilmedbroillowbroilDark meats at 1” thickness or less where rareor medium doneness is desiredOven Function Selectormin/sec baketimer timeCleanEach oven has a separatetemperature control dial.The Electronic Timing CenterThe controls can be set at anyis used to program and controltemperature from 150 F (65.6 C)all timing functions.to 550 F (287.8 C). There areIMPORTANT–The Time-of-daymust be set before any other separate settings for broiling andself-cleaning.program can be used.Temperature ControlBakeOven(Select Models)Digital ClockElectronic Timing CenterConventional, single rack baking (breads,cakes, cookies, pastry, pies, entrees,vegetables)Upper OvenCleanSelf-CleanA pyrolytic self-cleaning cycle where theoven reaches elevatedtemperatures in order to burnoff soils and depositsThe Select Professional double oven control panel is shown above.Delicate broiling such as meringueLow-BroilConvection RoastWhole turkeys, whole chickens, hams, etc.Medium-BroilWhite meats such as chicken or meatsgreater than 1” thick that would beover-browned in high broilProduct Controls6Oven wbroilselfcleanSelf-CleanIndicator LightOff/OnIndicator LightMulti-rack baking for breads, cakes,cookies (up to 6 racks of cookiesat once)TruConvecTMMulti-rack baking for heavier or frozenfoods (e.g., 4 frozen pies, pizzas, entrees,vegetables)Convection BakeConvection BroilThicker meats, faster than regular broil &with less smoke generationHigh-BroilOven Function SelectorTESOven LightThe Electronic Timing Centeris used to program and controlall timing functions.IMPORTANT–The Time-of-daymust be set before any otherprogram can be used.Electronic Timing CenterDark meats at 1” thickness or less where rareor medium doneness is desiredNEVOConventional, single rack baking (breads,cakes, cookies, pastry, pies, ven LightIndicator.VNOCLIORBLIORBDEMNEVOTHGIL5NOITCNUF NEVOLIORBNEVO REPPUEKAB.VNOCWOLLIORBNAELCSelf-CleanIndicator LightOff/OnIndicator NAELCFLESTSAOREKABFFOAnalog ClockEKAB.VNOCCEVNOCURTNEVO REWOL003002NAELC(Premiere Models)ERUTAREPMET004FFOInteriorOven LightIndicator005LIORBNAELCNEVOProduct ControlsOven Control Panel (Professional Models)Oven Control Panel (Designer Models)
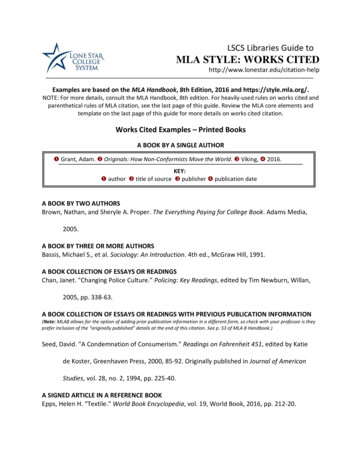
Built-In Electric Oven FeaturesOven Settings and FunctionsTemperature NV.CONV.BROILBAKETRU300BROILBROILBROILLOWER OVEN RSSETMIN/SECSTARTTIMERTIMEOVEN FUNCTIONBROILLOWER OVENROASTOVENFUNCTIONBROILUPPER ROVENCONV.CLEAN300BAKE TRUBROILBROILROASTBROIL OVEN FUNCTIONCONV.OVEN ONV.BROILSET MEDCONV.MAXIBROILHICLEANUPPER OVEN OWLIGHT BROILUPPER TIMEDMEDLOWER ERATURE400LOWER OVENTEMPERATURETruConvec Element(Behind Baffle)Oven LightOven LightOFFCLEAN200BROIL300500400Interior Oven Light ControlOven Racks(3/upper oven;3/lower oven)The upper and lower ovens have interior oven lightsthat are controlled by one switch on the controlpanel. Push the switch to turn the interior oven lightson and off.Bake ElementTwo-Element BakeOVENLIGHTFull power heat isradiated from thebake element inthe bottom of theoven cavity andsupplemental heatis radiated fromthe broil element.This function isrecommended forsingle rack baking.Many cookbookscontain recipes totwo-element bakebe cooked in theconventional manner. Conventional baking/ roasting is particularlysuitable for dishes that require a high temperature. Use this settingfor baking, roasting, and casseroles.SELFCLEANLower OvenPremiere Professional double oven is shown IBROILModel/SerialNumber Plate(behind door)Product ControlsProduct ControlsBroil ElementEach oven has a separate temperature control dialand a separate oven function selector. The controlscan be set at any temperature from 200 F (93.3 C)to 550 F (287.8 C). There are separate settings forbroiling and self-cleaning. Always be sure thecontrols are in the OFF position whenthe ovens are not in use.CONV.BROILCONV.ROAST
OFFSELFCLEANBAKEOven Settings and FunctionsOven Settings and FunctionsTruConvec The rear element onlyoperates at full power.There is no direct heatfrom the bottom or topelements. The motorizedfan in the rear of theoven circulates air in theoven cavity for evenheating. Use this settingfor foods that requiregentle cooking such asTMTruConvecpastries, souffles, yeastbreads, quick breads and cakes. Breads, cookies, and otherbaked goods come out evenly textured with golden crusts. Nospecial bakeware is required. Use this function for single rackbaking, multiple rack baking, roasting, and preparation ofcomplete meals. This setting is also recommended whenbaking large quantities of baked goods at one time.Convection vection BakeOFFBAKEThe bottom elementoperates at full power,and the top broilelement operates atsupplemental power.The heated air iscirculated by themotorized fan in therear of the ovenproviding a more evenheat distribution. Thisconvection bakeeven circulation of airequalizes the temperature throughout the oven cavity andeliminates the hot and cold spots found in conventionalovens. A major benefit of convection baking is the ability toprepare food in quantity using multiple racks – a feature notpossible in a standard oven. When roasting, cool air is quicklyreplaced, searing meats on the outside and retaining morejuices and natural flavor on the inside with less shrinkage.With this heating method, foods can be baked and roasted atthe same time with minimal taste transfer, even whendifferent dishes are involved, such as cakes, fish or meat. Thehot air system is especially economical when thawing frozenfood. Use this setting for baking and CONV.BROILCONV.ROAST9BAKEThe convection elementruns in conjuction withthe inner and outer broilelements.The reversibleconvection fan runs at ahigher speed in eachdirection.This transfer ofheat (mainly from theconvectionelement)seals moisture inside oflarge roasts. A timeconvection roastsavings is gained overexisting, single fan convection roast modes. Use this setting forwhole turkeys, whole chickens, hams, etc.TRUCONVECLOWBROILMEDBROILHIBROILConvection Broil*SELFCLEANOFFThetopelementoperates at full power.This function is exactlythe same as regularbroilingwiththeadditional benefit of aircirculationbythemotorized fan in therear of the oven. Smokeis reduced since theairflow also reducesconvection broilpeak temperatures onthe food. Use this setting for broiling thick cuts of EDBROILHIBROILCONV.BAKECONV.BROIL*This function uses a high-speed convection fan for optimumcooking performance. Some noise may be noticed from this high fanspeed. This is normal.10CONV.BAKECONV.ROASTProduct ControlsProduct ControlsCONV.BROILCONV.ROASTSELFCLEANCONV.ROAST
Oven Settings and lThis mode usesonly a fraction ofthe available powerto the inner broilelement for delicatetop-browning. Theinner broil elementis on for only part ofthe time. Use thissetting to gentlybrown meringue onracks 3 or 4 in 3-4 OILCONV.BROILlow-broilSelf-CleanoffThe pyrolytic self-cleaning cycle is designed toselfbakecleaneliminate the need for scrubbing and scouring food conv.conv.bakeroastbaked onto the oven interior. During this cycle, the conv.tru.broilconvec.oven reaches elevated temperatures in order to burnhighlowbroilbroilmedbroiloff soils and deposits. An integral smoke eliminatorreduces odors associated with the soil burn-off. A powder ashresidue is left in the bottom of the oven after completion of the selfclean cycle. When the oven has cooled, remove any ash from ovensurfaces with a damp sponge or OWBROILInner and outer broilelements pulse on andoff to produce less heatfor “slow” broiling.Allow about 4 inches(10 cm.) between thetop surface of the foodand the broil element."Slow" broiling is bestfor chicken and ham inmedium-broilorder to broil foodwithout over-browning it. Use this setting for broiling small andaverage cuts of t ControlsHeat radiates from bothbroil elements, locatedin the top of the ovencavity, at full power.The distance betweenthe foods and the broilelements determinesbroiling speed. For"fast" broiling, foodmay be as close as 2high-broilinches (5 cm) to thebroil element or on the top rack. "Fast" broiling is best formeats where "rare to medium" doneness is desired. Use thissetting for broiling small and average cuts of meat.CONV.BAKEProduct ControlsHIBROILOven Settings and ction DehydrateoffselfWith the selector set to TruConvec and cleanbakeconv.conv.the temperature control on 200 F roastbake(93.3 C), warm air is circulated by a conv.tru.broilconvec.highmotorized fan in the rear of the oven.lowbroilbroilmedbroilOver a period of time, the water isremoved from the food by evaporation. Removal of water inhibitsgrowth of microorganisms and retards the activity of enzymes. It isimportant to remember that dehydration does not improve thequality, so only fresh, top-quality foods should be T500400Convection DefrostoffselfselfWith the selector set to TruConvec and cleancleanbakeconv.conv.the temperature control off, air is conv.roastbakeroastconv.circulated by a motorized fan in the rear conv.tru.broilbroilconvec.lowof the oven. The fan accelerates naturalhighlowbroilbroilbroilmedbroildefrosting of the food without heat. Toavoid sickness and food waste, do not allow defrosted food toremain in the oven for more than two hbroil
Clocks and Timers(Digital Display)(Digital Display)Timer AlarmElectronic Timing CenterDigital DisplaySETBAKEHOURSSETMIN/SECTIMERSTARTTIMESetting the Min/Sec TimerThe Min/Sec Timer is designed for accurate timing and is ideal forbaking delicate items such as biscuits, cookies, and popovers, andfor precise broiling. The Min/Sec Timer can be used at the sametime the Bake Hours or Start Time functions are in use. It can beused for timing up to 24 hours. When setting the timer, the timedisplayed will increase in 1 minute increments. When the timercounts down to 1 minute, the timer alarm will give two short beepsand the display changes from hours:minutes to seconds only.To program the Min/Sec Timer1. Press the “MIN/SEC TIMER” button. The timer will display :00and the word TIMER will be displayed in the lower right corner.2. Turn the “SET” knob until the desired duration time is displayed.The Min/Sec Timer is now programmed. The alarm will sound at theend of the countdown. The program can be canceled anytime bysetting the remaining time to :00. To change back to the time-ofday, press the “CLOCK” button. Notice that a small clock will bedisplayed in the upper right corner to indicate that a program is inprogress. The display will return automatically to the Min/Sec Timerafter a few seconds.At the end of a Min/Sec Timer program or Bake Hours program,the alarm will consist of three beeps followed by two beeps every10 seconds until the “MIN/SEC TIMER” button is pressed.Whenever a valid function key is pressed or when a control functionstarts automatically, one beep will be sounded. When an invalidfunction key is pressed, two beeps will be sounded.Setting the Automatic Start Time Bake ProgramThe Bake Hours and Start Time modes of the timer can be used toautomatically turn the oven on and off at a preselected time. TheAutomatic Time Bake program is ideal for foods with no danger ofspoilage during the time the oven is left off.To Set The Automatic Time Bake Program:1. Set the start time:A) For Single Ovens – Program the start time by pressing the“START TIME” button and turning the “SET” knob until thedesired start time is displayed. This is the time of day you wantthe food to begin cooking.B) For Double Ovens – Press the “START TIME” button onceto set the starting time for the upper oven (UPPER OVEN willshow on the display). Press the “START TIME” button twice toset the starting time for the lower oven (LOWER OVENwill show on the display). Then program the start time byturning the “SET” knob until the desired start time isdisplayed. This is the time of day you want the food tobegin cooking.2. Set the desired baking time:Once the start time is set, the display will switch to :00 andthe words SET, COOK and TIME will appear on the right sideof the display. You will now enter the desired baking time.Turn the “SET” knob until the desired baking time is displayedin hours and minutes. Once the desired bake time is set, theword SET will disappear and the word DELAY will appear inthe display indicating that the Bake Hours program has beenset.NOTE: For Double Ovens, the word DELAY will show with eitherUPPER OVEN or LOWER OVEN depending on which oven hasbeen selected.1314Product Controls(Select Models)The Electronic Timing Center isused to program and control alltiming functions. It has fivedisplay and programming modes that are activated by the fourpush buttons and the “SET” knob. Both the Bake Hours mode andthe Min/Sec Timer mode can be used to time cooking periods.These features can even be used at the same time when both ovensare in use. However, only Bake Hours and Self-Cleaning modesshut the oven off automatically when the timed program is over.For example, you can time bake a casserole in the upper oven usingthe Bake Hours mode, while broiling in the lower oven using theMin/Sec Timer. One oven can also be cleaned while timing foodsin the other oven using the Min/Sec Timer.CLOCKProduct ControlsClocks and Timers
Clocks and Timers(Digital Display)3. Set the Oven Function selector to the desired function –BAKE, CONVECTION BAKE, OR TRUCONVEC , etc.4. Set the temperature control knob to the desired bakingtemperature.Clocks and Timers(Analog Clock)Setting the Min/Sec TimerThe Min/Sec Timer is designed for accurate timing and is ideal forbaking delicate items such as biscuits, cookies, and popovers, andfor precise broiling. The Min/Sec timer can be used at the sametime the Bake Hours or Start Time functions are in use. It can beused for timing up to 24 hours.NOTE: The display will continue to show the amount of bake timethat was programmed (this will remain until the programmed starttime is reached). You can return the display to clock mode bypressing the “CLOCK” button – Notice that a small clock will bedisplayed in the upper right corner to indicate that a program is inprogress. Switch back to the timer mode by pressing the “BAKEHOURS” button.6. When the specified time is reached, the oven will automaticallyturn on. It will bake for the programmed amount of time at theselected temperature.NOTE: At one minute from the end of the specified bake program,the oven timer will beep once. At the end of the specified bakeprogram, the oven will automatically turn off and the timer willsound a series of three beeps. This will continue until the “STARTTIME” button is pressed. The display will then return to displayingthe time.To program the Min/SecTimer1. Push and release the “min/sec timer” button.2. Rotate “Set” knob until desired duration of time is displayed.Timer starts seconds after “Set” knob stops rotating. A toneindicates the timer has started.When the timer has one minute remaining, the timer will soundtwice and begin to countdown by seconds. A tone will soundthree times indicating the time is complete and twice every tenseconds after completion until timer function is cleared.NOTE: Press any function button to clear a completed cycle orfunction.NOTE: Setting the remaining duration time to :00 will cancel theAutomatic Bake program.1516Product ControlsProduct Controls5. The automatic time bake program is now set!
Clocks and Timers(Analog Clock)Setting the Bake Hours ProgramThe Bake Hours program is used for controlled timing of baked orroasted foods. At the end of the timed cycle, the oven automaticallyturns off.Setting the Automatic Start Time Bake ProgramTo Set The Bake Hours Program1. Turn the “manual” knob to “upper timed” or “lower timed”position, depending upon the oven mode and oven being used.2. Set the Oven Function Selector to the BAKE, CONVECTIONBAKE, or TRUCONVEC position, depending upon the type ofbaking being used.3. Set the temperature control knob to the desired temperature andallow for preheating.4. Press and release the bake hours button. The timer will display:00 with the words SET and COOK in the upper right corner ofthe digital display.5. Turn the “Set” knob until the desired baking time is displayed inhours and minutes. The cook time/remaining time and the wordCOOK will be displayed.The word COOK will flash and the tone will sound three times whenthe time is completed; oven will turn off. The tone will sound twiceevery ten seconds after completion until timer function is cleared.To set the Automatic Time Bake Program1. Set the start time:A) For Single Ovens – Program the start time by pressing the“start time” button and turning the “Set” knob until the desiredstart time is displayed. This is the time of day you want the foodto begin cooking.B) For Double Ovens – Press the “start time” button once to setthe starting time for the upper oven (UPPER OVEN will show onthe display). Press the “start time” button twice to set thestarting time for the lower oven (LOWER OVEN will show on thedisplay). Then program the start time by turning the “Set” knobuntil the desired start time is displayed. This is the time of dayyou want the food to begin cooking
Viking Use & Care Manual Professional & Designer Series Built-In Electric Single and Double Ovens Viking Range Corporation 111 Front Street Greenwood, Mississippi 38930 USA (662) 455-1200 For product information call 1-888-VIKING1 (845-4641), or visit the Viking Web site at vikingrange.com