Transcription
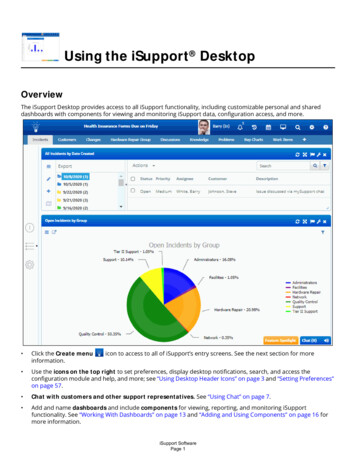
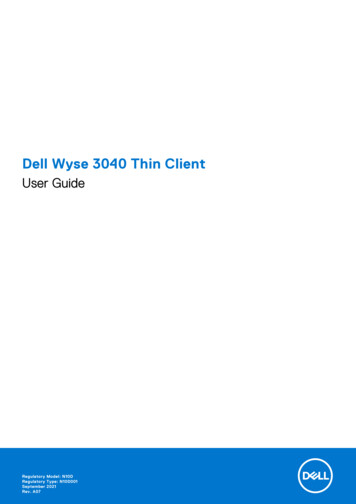
Configuring iSupport Incident FunctionalityUse iSupport’s Incident Management functionality to track issues and accomplish quick restoration of service;iSupport includes numerous features for efficiently recording and resolving incidents. An example of the Incidentscreen is shown below.Configuration OverviewBasic Configuration Set basic Incident options in Feature Basics. See “Setting Incident Basics Configuration Options” on page 4 formore information. Set up categories, which are custom values that you create for describing incidents, knowledge entries, problems,and changes. (Note that the same category set is used with all of those features.) A category combination isrequired in order to save an incident. Categories are involved in many features throughout iSupport, includingreporting, knowledge searching, displaying related work items, scripts, and more. See the online help for moreinformation.Creating Incident Records You can manually create Incident records via the Incident screen. See the online help for more information. Customers can submit an email that will create an incident via email processing. See the online help for moreinformation. Customers can submit incidents via a mySupport portal. See the online help for more information.iSupport SoftwarePage 1
If the automatic incident creation feature is enabled for chat, you can accept a mySupport customer chat request.See the online help for more information. You can use the Create Incident link in the Twitter Monitor and Facebook Monitor components on the Desktop.See “Facebook Applications” on page 106. You can schedule a single occurrence change or a recurring set of incidents to be created at a future date/time.See the online help for more information.Customizing iSupport Defaults Support includes a default Incident screen layout with a comprehensive set of fields for tracking Change data, butyou can redesign it to include fields and tabs that are specific to your company. You can create different layoutsto assign to support representative groups, customer groups, categories, incident templates, and hierarchytemplates. See “Configuring Screen Layouts” on page 33. You can create custom status labels for the Incident status levels of Open, Closed, Suspended, Scheduled, andReopened. See “Defining Custom Status Labels” on page 29. If there are fields you need that are not included in iSupport by default, you can create custom fields. See“Configuring Custom Fields” on page 19. You can include a field for entering or automatically generating a custom number. See “Defining Custom StatusLabels” on page 29. You can define custom impact and urgency values that map to priority levels. Enable impact/urgency mapping viathe Feature Basics screen. See “Defining and Mapping Impact and Urgency Values” on page 30. You can enable your customers to submit and view Incident records on mySupport portals, and you cancustomize the submission and display screen layouts. See the online help for more information. Define Work History types to create custom entries for support representatives to select to describe the workperformed on a work item. See “Configuring Work History Options” on page 6.Sending Notifications You can use Incident rules to send Desktop and email notifications when specified conditions based on Incidentrecord fields or events are met; for example, you can configure a rule to send a notification when the priority ofan Incident record is modified. See “Configuring Rules and Rule Groups for Incidents” on page 42. You can use orcopy and modify iSupport's default notifications, or you can create new custom notifications. See “Customizingand Viewing Event Notification Content” on page 58. You can include data from Incident records and designateany applicable recipients. See the online help for more information. You can send correspondence email from the Incident screen. Correspondence can include data from Incidentrecords; correspondence templates can be utilized, and an Others to Notify list can be used for keeping those notdirectly involved in the loop. See the online help for more information. You can create a headline or add a discussion post to a selected feed from the Incident screen. See the onlinehelp for more information.Interacting With Customers You can send a survey request to be completed by customers using mySupport. See the online help for moreinformation. You can enable a single selection feedback survey with a question with two response choice image links in anincident notification. See “Creating Feedback Questions” on page 9 for more information. You can enable integration With BeyondTrust (a third-party application) for remote desktop connection andchatting; contact iSupport Technical Support for more information. You can enable Citrix GoToAssist remote support access (a third-party application). See the online help for moreinformation.iSupport SoftwarePage 2
You can configure integration with Google Calendar, Google Meet, Microsoft Outlook, Zoom, and Microsoft 365Teams to display an icon in the Incident screen for initiating a meeting. See “Configuring Calendar and MeetingIntegrations” on page 99 for more information.Using Workflow Features You can route via name, skill, group, and location, all with or without load balancing, in the Incident screen.Enable routing methods via Feature Basics. See “Enabling Routing Methods” on page 10 for more information. You can use Incident rules to automatically route Incident records via round robin or load balancing. See“Configuring Rules and Rule Groups for Incidents” on page 42. You can automatically change field values on Incident records via Incident rules. See “Configuring Rules and RuleGroups for Incidents” on page 42. You can create templates to populate fields for common and reoccurring changes; see “Configuring Auto-Closeand Auto-Fill Incident Templates” on page 63. You can also create hierarchy templates for tasks that havemultiple activities; see “Configuring Incident Hierarchy Templates” on page 70. Both types of templates can beapplied manually via the Incident screen or via Incident rules. You can require an Incident record to be approved before most functions can be performed. Approval cycles areinitiated via Incident rules. See “Configuring Approval Cycles” on page 90. You can enable followup date and an acknowledgment features via Feature Basics. See “Setting Incident BasicsConfiguration Options” on page 4 for more information. You can create related incidents for an Incident record; when you close the original incident, all related incidentscan be closed automatically. See the online help for more information. You can associate new and existing Asset records. See the online help for more information. If you have the Service Desk Edition, you can associate new and existing Problem, Change, and Purchase records.You can enable associated incidents to be closed when a Problem or Change record is closed. See the online helpfor more information. You can enable a prompt in the Incident screen to automatically create a knowledge entry from a closed anincident; enable this feature via Feature Basics. See “Setting Incident Basics Configuration Options” on page 4 formore information. You can perform ad hoc scans on non-Windows SNMP-enabled devices in the Incident screen, and associatescans with an incident. See the online help for more information. You can configure webhooks to post Incident data to a web application via Incident rules. See “ConfiguringWebhooks” on page 112.Managing Incident Records You can use the Action menu in the View component on the Desktop to perform actions such as opening multipleitems. See the online help for more information. You can use Service Contract functionality to track and restrict changes associated with customers, companies,and assets. See “Setting Service Contract Feature Basics Options” on page 16. You can archive incidents for database efficiency. See the online help for more information. You can configure roles/permissions for support reps and rep groups using Incident functionality via the SupportRepresentatives screen. See the online help for more information. If you need to overwrite fields on a saved incident, see “Using the Data Override Feature for Incidents, Problems,and Changes” on page 98.iSupport SoftwarePage 3
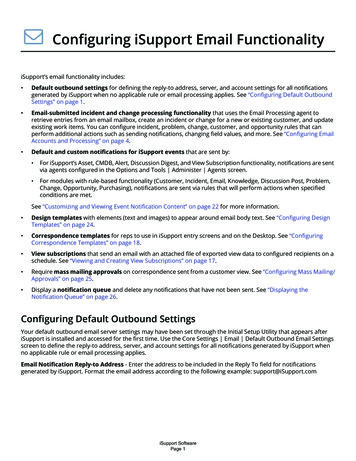
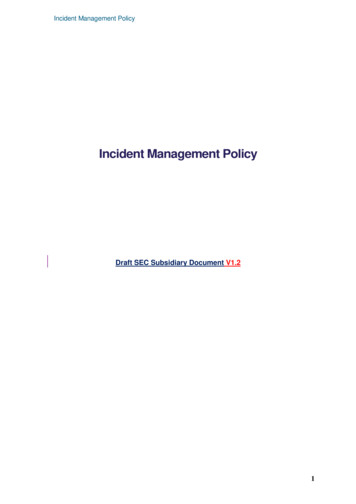
Setting Incident Basics Configuration OptionsUse the Incident Basics screen to set options for work history (see page 6), hierarchies (see page 9), feedback (seepage 9), routing (see page 10), and agents (see page 15).Completing the Basics TabUse the fields on the Basics tab to set miscellaneous configuration options.Default Incident Assignee - Select Author to assign newly-created incidents to the person who created the incident;select Other to designate a support representative to be assigned newly-created incidents. Use the Create Newicons to access the Support Representative Profile screen.and View/EditEnable Impact Urgency Mapping - Select Yes to enable prioritization to encompass urgency (based on the amountof time a resolution is needed) and impact (usually the number of users affected). Use the Impact and Urgencyand View/Editscreen to define impact and urgency values that map to priority levels; Use the Create Newicons to access the Impact and Urgency Mapping screen.In the Incident, Problem, and Change screens, the defined values will be available in the Impact and Urgency fieldsfor selection. The specified mapped priority will appear as default but all priority levels will available if permissionsare configured for the support representative to change the priority.Default Mapping - Click this link to select the Impact, Urgency, and Priority to display by default in the Impact,Urgency, and Priority fields in the Incident screen.iSupport SoftwarePage 4
Default Priority - This field appears if No is selected in the Enable Impact and Urgency Mapping field. Select thepriority (Low, Medium, High, or Emergency) to assign to newly-created incidents.Default Status - Select the status to assign to newly-created incidents. All open incident statuses will be available forand View/Editicons to access the Custom Status Labels screen.selection. Use the Create NewDefault Correspondence Template - Select the correspondence template that will apply by default when a supportrepresentative initiates a correspondence via the Incident entry screen. Correspondence templates that are activeand View/Editiconsand enabled for the Incident module will be available for this feature. Use the Create Newto access the Correspondence Template screen.Prompt for Customer Before Creating an Incident - Select Yes to display a customer selection dialog when anincident is initially created.Prompt to View Open Incidents Upon Customer Selection - Select Yes to display the following prompt if openincidents exist for a customer selected in the Incident screen: "Open incidents were found for this customer. Wouldyou like to view them now?"Prompt to Select Asset for New Incident Same Customer Action - Select Yes to, when New Incident is selected inthe Incident screen, display the assets associated with the company and customer for selection. (The Show All optionwill be included as well.)Use Short Description - Select Yes to include a Short Description field in the Incident screen.Required on Save - Select Yes to require an entry in the Short Description field before a record can be saved.Allow Approvers to Edit During Approval Cycle - Select Yes to enable support representatives designated asapprovers (or those with Approval Override) to have access to all functionality except Status in records in an approvalcycle. You can configure the Pending Incident Updated notification (or any other notification) to be sent when theEdited During Approvals event occurs.Prompt to Create Knowledge Base Entry On Incident Close - Select Yes to enable a prompt for creating aknowledge entry to display every time an incident is closed.iSupport SoftwarePage 5
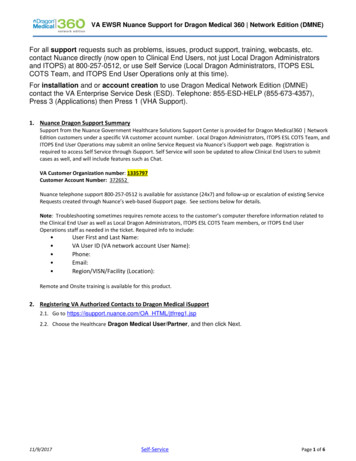
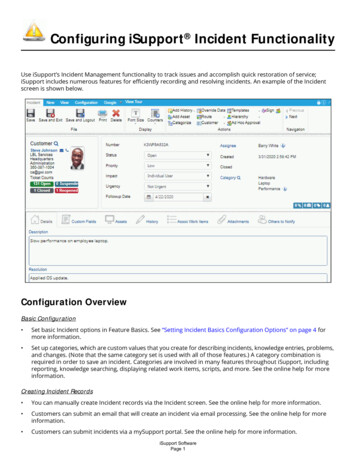
Configuring Work History OptionsUse the Work History tab to set options for the Work History and Save dialogs in the Change screen.Enable Work Type on Work History Dialogs - Select Yes to include a Work Type field in the Work History dialog inthe Incident screen.Default Work Type - If the Work Type field is enabled, select the work type to appear by default in that field. Useand View/Editicons to access the Work Types entry screen; see “Configuring Work Historythe Create NewTypes” on page 32.iSupport SoftwarePage 6
Enable Work Start and Stop Dates on Work History Dialogs - Select Yes to include Work Start and Work Stop fieldsin the Work History and Incident Save dialogs in the Incident screen.The Work Start field defaults to the date and time the support representative loaded the work item. The Work Stopfield defaults to the current time, but there will be at least a one minute gap between the Start and Stop times. Forexample, if a new incident is opened at 1:00 PM, the support representative works with the customer for 30 minutes,and then clicks the Add Work history option or saves and displays the Save dialog, the Work Start would be set to1:00 PM and the Work Stop would be set to 1:30 PM. This Time Worked field would show the 30 minutes of timeworked reflected by the gap.and clockSupport representatives can type directly in the Work Start and Work Stop fields or use the calendaricon will set the date andicons to select the date and time; the difference will populate automatically. The refreshtime to the current date and time (but the Work Stop date and time will adjust to be at least one minute past theWork Start date and time).Prompt for Work History and Time Worked on Incident Save - Select Yes to display the Save dialog every time asupport representative saves an incident.Require Time Worked in Work History for Incident - Select Yes to require an entry in the Time Worked field in theIncident Save dialog before the record can be saved in the Incident screen.Require Comment in Work History for Incident - Select Yes to require an entry in the Work History Comment fieldin the Incident Save dialog before the record can be saved in the Incident screen.iSupport SoftwarePage 7
Automatically Place Call Scripts in Work History - Select Yes to, when a call script is used, automatically includethe entire call script in the Work History field. This will also make the call script editable when it appears. Call scriptsare entered and associated with categories in the Category entry screen. If you select No in this field, the call scriptwill not be editable.Include Customer Work History Field - Select Yes to include a field on the Incident screen that includes workhistory notes for display when customers view their incidents on the mySupport portal. Depending on the optionsselected in the Include Work History Notes in Customer Work History Dialog field, the field can include the contentsof the Work History field (either with or without review by the support representative).Include Work History Notes in Customer Work History Dialog - This field appears if including the CustomerWork History field. Select: Do Not Include to prevent Work History field entries from automatically populating the Customer WorkHistory dialog in the Incident screen. Automatically Include to fill the Customer Work History field with the contents of the Work History field,without review by a support representative. (The Customer Work History dialog will not appear in the Incidentscreen.) Include With Support Rep. Review to fill the Customer Work History field with the contents of the Work Historyfield and enable the support representative to edit it before including it in the Customer Work History field.Allow Work History to be Added to Closed Incidents - Select Yes to enable support representatives to update theWork History field in incidents with a Closed status.Include Followup Date Field - Select Yes to include a Followup Date field in the Incident screen for a followupreminder email to be sent to the assignee of an incident. After completing this and the followup date configurationfields, enable the Followup agent on the Agents tab.Followup Interval Type - If including a followup date on the Incident screen, select the basis for the defaultfollowup date interval: calendar days (which include weekends) or business days (which excludes weekends).Followup Interval - If including a followup date on the Incident screen, enter the number of days (after theincident open date) to be used in the calculation of the date to display by default in the Followup field. When thefollowup date is reached, a followup reminder email will be sent to the assignee of the incident. Once the email issent, the date is recalculated based on the number of days entered in this field.Custom Text for iSupport Default Followup Notification - If including a followup date on the Details tab in theIncident screen, a reminder email will be sent to the support representative on the followup day. Enter text to beincluded as the first line in the body of the default email text. (Note that this text will not be included in anycustom notifications.) The email will also contain a document link and the caller’s name and company; thisinformation will still be included if this field is left blank. If the iSupport Default notification is used, a newsletterstyle email will be sent; if a custom notification is used, a notification will be sent for each incident.Followup Notification Mapping - Select the notification to be sent to the assignee of the incident with a currentfollowup date. You can select the default notification or a predefined custom notification; select Create NewCustom Notification to access the Custom Notifications screen to create one.Enable Incident Acknowledgment - Select Yes to display an alert bar for new assignees to acknowledge incidentsthat have been: Created or saved from the mySupport portal or email. Routed manually or automatically via a rule. Created via direct entry with an assignee different from the current support representative. Created via direct entry with either an incident or hierarchy template.When the assignee opens the incident, an alert bar will appear at the top of the screen that states: "This incident wasrouted to you. Click to acknowledge that you have received this ticket." When the support representative clicks theAcknowledge button, an entry will be recorded in the Audit History. You can use the Incident Rules screen to enable anotification to be sent when an incident is acknowledged.iSupport SoftwarePage 8
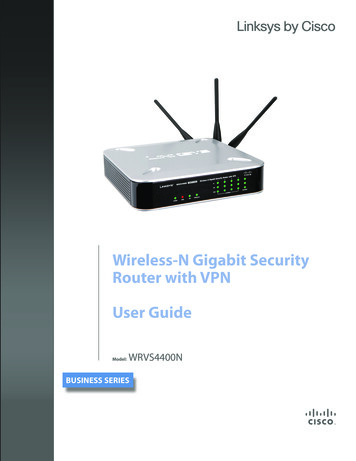
Configuring Options for Incident HierarchiesUse the Hierarchies tab to set options for incidents created by hierarchy templates.Inherit Custom Field Values on Hierarchies - Select Yes to, when custom fields are associated with a category orincident, pass the values in those fields to incidents created by hierarchy templates. See “Configuring Custom Fields”on page 19 for information on configuring custom fields; see “Configuring Incident Hierarchy Templates” on page 70for information on configuring incident hierarchy templates.Hierarchy Finished/In Progress/Future Color - Select the colors for the dot icons and portions of the graphic in theRelated Hierarchy field that represent the percentage of work that has been completed, is in progress, and is pendingdue to dependencies.Creating Feedback QuestionsThe Incident Feedback feature enables you to create one or more questions, each with two response choice imagelinks, for inclusion at the bottom of an incident notification, based on a configured rule. When a customer receivesthe email and clicks one of the responses, the feedback question and response will be included in the Feedback fieldon the incident. An example is shown below.Configured Feedback Submitted text will appear to the user on a page on the mySupport portal; if more than onemySupport portal is configured, the default mySupport portal URL will be used.Note that only one feedback response can be set per work item; if more than one feedback request is sent related toa single work item, only the last feedback entered will display in the feedback question and response fields. Audithistory will reflect all provided feedback questions and responses.In the rule that will send the notification including the feedback question, enable inclusion of the feedback and selectthe question and notification. Note that this feature is intended for HTML-type mail delivery. Feedback audit historyis included in the Configuration Audit Tracking screen.iSupport SoftwarePage 9
Enable Incident Feedback for Customers - Select Yes to enable the Incident Feedback feature. Use the Createbutton to create an incident feedback question.Enter the name, text of the question, response choices and images, and message to appear after a selection isentered.Name - Enter the name to assign to the question.Question - Enter the question text to be included in an incident notification (configured via the Rule screen).Choice One/Image - Enter the text for the first response choice and select the image to appear after the questiontext in the notification.Choice Two/Image - Enter the text for the second response choice and select the image to appear after the firstfeedback choice image in the notification.Note that the images will only be used in the outbound notification. The feedback choice text will appear as hovertext for the image in the notification and if selected will be used as the response in the Feedback field on the incident.Feedback Submitted Message - Enter the text to appear on a mySupport portal page when the user clicks on afeedback choice image on an incident notification.Enabling Routing MethodsYou can enable routing by name, skill, group, and location, all with or without load balancing. To set up routing: On the Routing tab, select the routing methods and enter skill levels and routing weights.iSupport SoftwarePage 10
If using location-based routing, set up locations in the Core Settings Support Representatives Locationsscreen. If using skill-based routing, set up categories in the Options and Tools Customize Categories screen anddesignate skills for support representatives in the Category screen or Support Representatives Skills screen. If applicable, set up notifications in the Options and Tools Automate Rules screen. Set routing availability options for support representatives via the Core Settings Support Representativesscreen.Note that routing availability can be controlled via: Scheduling and other options on the Routing Availability tab in the Support Representative Profile screen. If enabled, the Availability (In/Out) option on the Profile menu that appears after clicking a supportrepresentative’s avatar/name on the Desktop. The Rep Manager Desktop component.Use the Routing tab in the Basics screen to specify the type of routing to be used, the skill level labels, and loadbalanced routing weights. If you enable more than one routing method, the support representative can choose themethod when the work item route is initiated.All routing methods can also include load balancing, which involves weights based on incident priority.iSupport SoftwarePage 11
For group, location, or name based routing with load balancing, the available support representative for themethod with the lightest overall workload will be selected. (For example, if using group-based routing, theavailable support representative within the selected group with the lightest overall workload will be selected.) For skill-based routing with load balancing, after the categorization level is selected, a support representative isselected based on the workload of the support representatives who have the exact match of the selectedcategorization in their Support Representative record.If a support representative has worked with an incident and the incident is reassigned, he/she will be bypasseduntil all available support representatives with the skill or in the group or location (depending on the methodselected) have worked with the incident. If all support representatives have the same weight for their incidents, arandom choice is selected for the assignee.Note that rules can route incidents via load-balancing or the round robin method.Use Group Based Routing - Select Yes to enable incidents to be routed to available support representatives that areset up in groups. In the Incident screen the support representative will select a group and then an assignee from a listof all available support representatives in that group. Use the Group screen to set up groups and the SupportRepresentative screen to assign support representatives to groups. A support representative can be a member ofmore than one group.Group Based Routing Method - This field appears if using group based routing. Select: Standard - enables the support representative to select a group and then an assignee from a list of all availablesupport representatives in that group. Groups are designated for support representatives in their SupportRepresentative record. Load Balancing - allows the system to select a support representative based on current open incident statistics,including weights based on incident priority. The available support representative within the selected group withthe lightest overall workload will be selected. Round Robin - the support representative in the group who was assigned an incident on the oldest date and timeis selected.Use Location Based Routing - Select Yes to enable location based routing, which enables the support representativeto select a location and then an assignee from a list of all available support representatives in that location. Locationsare specified for support representatives in their Support Representative record or in the Location configurationscreen. You can associate support representative locations with customer groups for location-based routing oftickets submitted via the mySupport portal and email.Location Based Routing Method - This field appears if using location based routing. Select: Standard - allows the support representative to select from a list of all available support representatives listed bythe location entered in support representative profiles. Load Balancing - routes incidents based on current open incident statistics, including weights based on incidentpriority. The available support representative within the selected location with the lightest overall workload willbe selected. Round Robin - the support representative in a selected location who was assigned an incident on the oldest dateand time is selected.Use Name Based Routing - Select Yes to enable name based routing, which enables the support representative toselect an assignee from a list of all available support representatives regardless of group.Name Based Routing Method - This field appears if using name based routing. Select: Standard - allows the support representative to select from a list of all available support representatives. Load Balancing - routes incidents based on current open incident statistics, including weights based on incidentpriority. The available support representative with the lightest overall workload will be selected. Round Robin - the support representative who was assigned an incident on the oldest date and time is selected.Use Skill Based Routing - Select Yes to enable skill based routing, which uses the incident categorization to selectqualified support representatives. After a support representative classifies the incident and selects skill-basedrouting, the category levels selected for the incident will appear; the support representative will select the level ofiSupport SoftwarePage 12
categorization that exactly matches the categorization for which support representative skills should be searched.The support representative(s) that have those skills configured in their profile will appear for selection.Skill levels are associated with category combinations in the Support Representative screen.Skill Based Routing Method - This field appears if using skill based routing. Select: Standard - allows the support representative to select the level of categorization that exactly matches thecategorization for which support representative skills should be searched. Support representatives with thatcategorization in their Support Representative record would be displayed for assignment. Load Balancing - selects assignees based on the incident categorization and current open incident statistics,which include weights based on incident priority. The support representative selects the level of categorizationfor which support representative skills should be searched, and a support representative is selected based on theworkload of the support representatives who have the exact match of the selected categorization in theirSupport Representative record. Round Robin - allows the support representative to select the level of categorization for which supportrepresentative skills should be searched; support representatives who have the exact match of the selectedcategorization in their Support Representative record are considered. The support representative who wasassigned an incident on the oldest date and time is selected.Routing begins with skill based routing level one, and then advances to the next skill based level. If multiple supportrepresentatives have the same skill level, the load balanced routing weights are used.Use Location By Skill Based Routing - Select Yes to enable location by skill based routing, which routes to supportrepresentatives with matching skills at a certain support representative location. You can use location by skill basedrouting with: mySupport-submitted tickets. The location selected by the mySupport customer takes precedence, then thesupport representative location associated with the customer’s primary group, then t
directly involved in the loop. See the online help for more information. You can create a headline or add a discussion post to a selected feed from the Incident screen. See the online help for more information. Interacting With Customers You can send a survey request to be completed by customers using mySupport. See the online help for more